

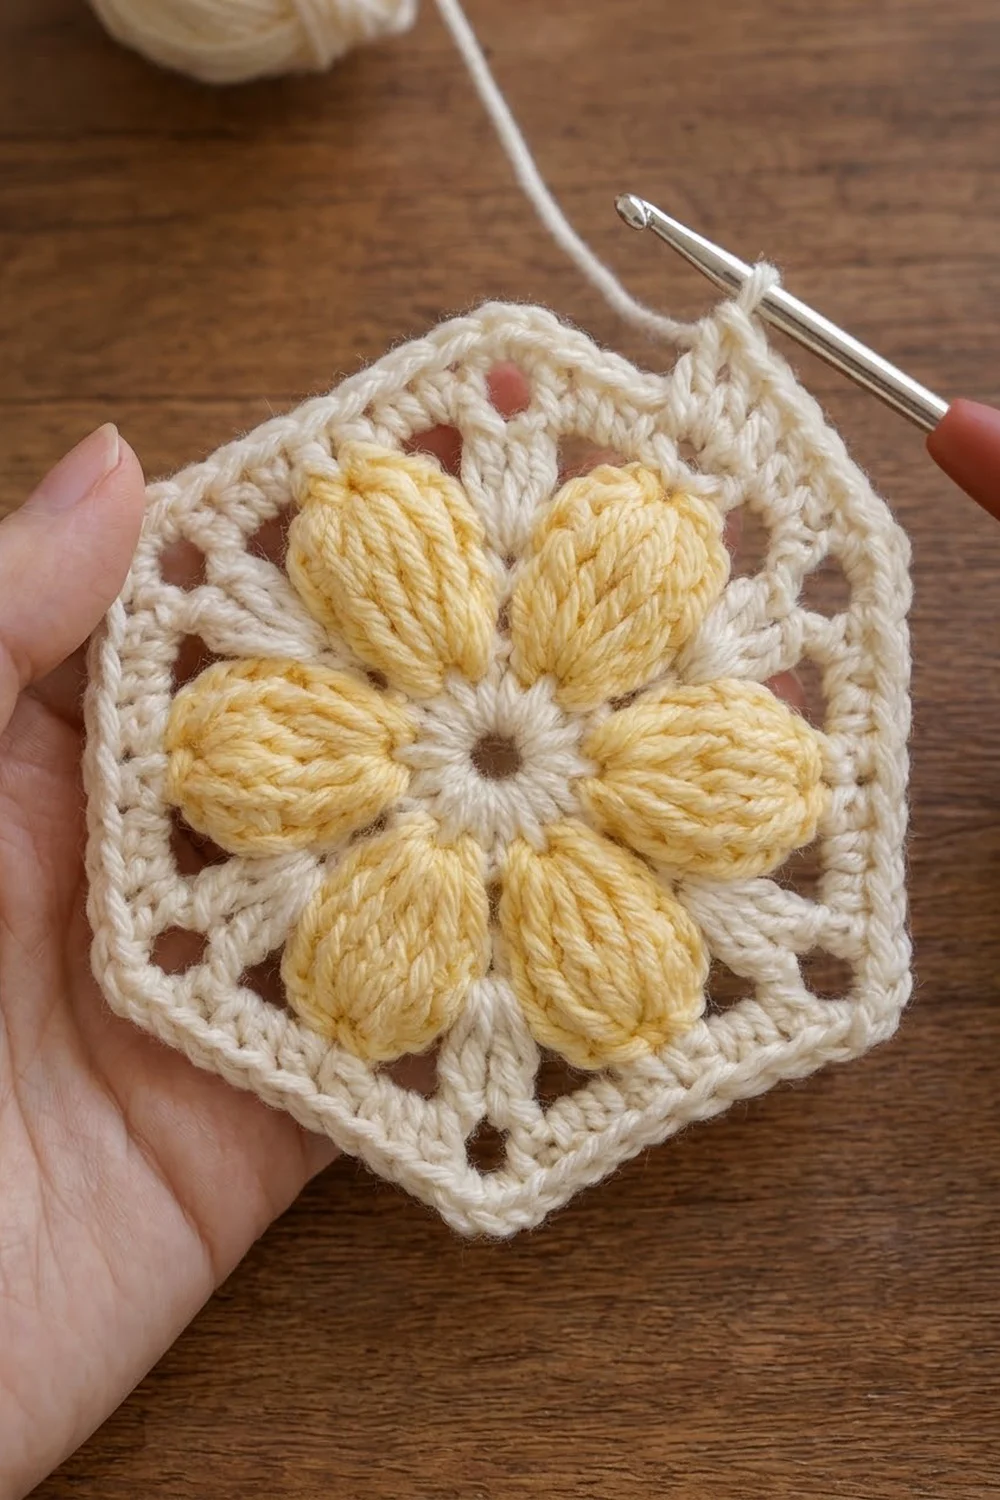
The Sunlit Puff Flower Hexagon is a single crochet motif with a six-petal flower in the middle and a crisp cream frame around it. The petals are tall, plump puff stitches that rise above the background, so the flower has real texture.
The palette is simple: butter yellow for the petals, warm cream for everything else. Small open windows sit on either side of each corner spoke and keep the motif light, while the solid outer band gives it a tidy hexagon outline.
This pattern uses US crochet terms. The finished motif measures 7 in (17.8 cm) from corner to corner and 6 in (15.2 cm) from flat side to flat side. Each side is about 3.5 in (8.9 cm) long.
Construction is worked in the round from the center out. You make a cream center ring, then six yellow two-stitch puff petals, then a cream round that sets up the hexagon frame, and finally a two-round cream border.
Finished Size and Construction
- Finished size: 7 in (17.8 cm) corner to corner; 6 in (15.2 cm) flat side to flat side
- Skill level: Easy-intermediate (the puff petals take some practice)
- Terminology: US crochet terms
- Yarn weight: DK (#3)
- Hook: 4.0 mm (G-6)
- Number of pieces: 1
- Layout: Single hexagon motif, no joining
- Piece size: 7 in (17.8 cm) corner to corner
- Size before border (after Round 3): 5.25 in (13.3 cm) corner to corner; 4.5 in (11.4 cm) flat to flat
- Border depth: 0.75 in (1.9 cm), made of Rounds 4–5
Materials
Choose a smooth, light-colored DK yarn. Cotton or a cotton blend shows the puff texture clearly and keeps the corners crisp. Avoid fuzzy or very splitty yarn: each petal pulls 12 loops through at once, and slippery, smooth plies make that much easier.
Yarn:
– Color A – Cream: 12 g / 29 m (center ring, frame, border)
– Color B – Butter Yellow: 6 g / 15 m (petals)
The quantities include a safety margin of about 20% for tails and a practice petal.
Tools:
– 4.0 mm (G-6) crochet hook
– Tapestry needle
– Scissors
– Stitch marker
– Ruler or tape measure
– Blocking mat and rustproof pins
– Spray bottle with water
Abbreviations (US Terms)
- ch – chain
- sl st – slip stitch
- sc – single crochet
- dc – double crochet
- tr – treble crochet
- st(s) – stitch(es)
- sp – space
- MR – magic ring
- yo – yarn over
- PF – two-stitch elongated puff (see below)
Special stitch – Two-stitch elongated puff (PF):
Yo, insert hook in the next st, yo and pull up a loop to 1.25 in (3.2 cm) tall. Repeat 2 more times in the same st (7 loops on hook). Then work [yo, insert hook in the following st, yo and pull up a loop to the same height] 3 times (13 loops on hook). Yo and pull through 12 loops, yo and pull through the last 2 loops. Ch 1 to lock. One PF uses 2 sts of the previous round and makes one petal. The locking ch 1 does not count as a stitch.
Gauge and Checkpoints
Gauge is not critical for a single motif, but it controls the final size. The key gauge is in the border:
Border gauge: 20 sc = 4 in (10.2 cm), or 5 sc per 1 in (2.5 cm), worked with a 4.0 mm hook.
Make the motif once as your test piece and measure at each checkpoint:
- After Round 1: center ring is 1 in (2.5 cm) across.
- After Round 2: flower is 3.5 in (8.9 cm) across, petal tip to petal tip.
- After Round 3: 5.25 in (13.3 cm) corner to corner; 4.5 in (11.4 cm) flat to flat.
- After Round 4: about 6.4 in (16.3 cm) corner to corner; 5.5 in (14.0 cm) flat to flat.
- After Round 5: 7 in (17.8 cm) corner to corner; 6 in (15.2 cm) flat to flat.
If your motif is too big: go down to a 3.75 mm hook. Also make sure your puff loops are not taller than 1.25 in (3.2 cm).
If your motif is too small: go up to a 4.5 mm hook. Pull the puff loops up evenly to the full height, since short loops shrink the flower and crowd Round 3.
Check flatness after Round 3 as well as size. If the motif ruffles or cups there, fix it before you start the border.
Center Ring (Color A – Cream)
Round 1: Make a MR. Ch 1 (does not count as a st), work 12 sc into the ring. Pull the ring closed but leave a small open hole in the middle, about the width of a pencil. Sl st to the first sc to join. (12 sc)
Fasten off Color A, leaving a 6 in (15.2 cm) tail.
Checkpoint: ring measures 1 in (2.5 cm) across.
Puff Flower Petals (Color B – Butter Yellow)
Round 2: Join Color B with a sl st in any sc. Ch 2 (does not count as a st). PF over the next 2 sc, ch 5; repeat from * 5 more times. Sl st to the top of the first PF to join. (6 PF, 6 ch-5 sps)
Each PF takes 2 sc, so 6 petals use all 12 sts of Round 1. Keep every loop the same height, because that gives the even, teardrop-shaped petals shown in the photo. The ch-5 sps run across the gaps between the petal tips and anchor the frame.
Fasten off Color B, leaving a 6 in (15.2 cm) tail.
Checkpoint: flower measures 3.5 in (8.9 cm) across, tip to tip. Gently plump each petal with your fingers so it points straight outward.
Hexagon Frame (Color A – Cream)
This round makes the corner spokes and the open windows.
Round 3: Join Color A with a sl st in any ch-5 sp. Ch 4 (counts as first tr), (tr, ch 3, 2 tr) in the same sp: this is the first corner. Ch 3, sc in the locking ch at the top of the next PF, ch 3. (2 tr, ch 3, 2 tr) in the next ch-5 sp, ch 3, sc in the top of the next PF, ch 3; repeat from * 4 more times. Sl st to the top of the beginning ch-4 to join.
Count: 24 tr, 6 sc, 6 corner ch-3 sps, 12 side ch-3 sps.
Each tr group becomes a cream spoke that lines up with a gap between petals and points to a corner. The ch-3 sps on either side of each sc are the open windows next to the spokes. The sc at each petal tip pins the flower to the center of a flat side.
Do not fasten off. Sl st in the next tr and into the corner ch-3 sp to move into place for Round 4.
Checkpoint: 5.25 in (13.3 cm) corner to corner and 4.5 in (11.4 cm) flat to flat. The piece should lie flat, with six clear corners.
Border
The border has two rounds of Color A and builds the solid cream band around the frame.
Border gauge: 5 sc per 1 in (2.5 cm).
Round 4 (dc band): Ch 3 (counts as first dc), (dc, ch 2, 2 dc) in the same corner sp. Dc in each of the next 2 tr, 3 dc in the next ch-3 sp, dc in the next sc, 3 dc in the next ch-3 sp, dc in each of the next 2 tr, (2 dc, ch 2, 2 dc) in the next corner ch-3 sp; repeat from * 4 more times. To finish the last side, dc in each of the next 2 tr, 3 dc in the next ch-3 sp, dc in the next sc, 3 dc in the next ch-3 sp, dc in each of the last 2 tr. Sl st to the top of the beginning ch-3 to join.
Count per side: 2 (corner) + 2 + 3 + 1 + 3 + 2 + 2 (corner) = 15 dc between corner ch-2 sps.
Round total: 6 sides × 15 dc = 90 dc, plus 6 corner ch-2 sps.
Each corner group places 2 dc on each of its two neighboring sides, so 6 corners × 4 dc = 24 dc. The 6 sides × 11 non-corner dc add 66 dc, and 24 + 66 = 90 dc, which matches the per-side count.
Sl st in the next dc and into the corner ch-2 sp to move to the corner.
Checkpoint: about 6.4 in (16.3 cm) corner to corner and 5.5 in (14.0 cm) flat to flat.
Round 5 (sc edge): Ch 1, (sc, ch 2, sc) in the same corner sp. Sc in each of the next 15 dc, (sc, ch 2, sc) in the next corner ch-2 sp; repeat from * 4 more times. Sc in each of the last 15 dc. Sl st to the first sc to join. (102 sc, 6 corner ch-2 sps)
Count per side: 1 (corner) + 15 + 1 (corner) = 17 sc between corner ch-2 sps.
Round total: 90 sc (one per dc) + 12 sc (2 per corner) = 102 sc.
Fasten off and weave in all ends.
Why the math works: At 5 sc per 1 in (2.5 cm), 17 sc measure 3.4 in (8.6 cm). Add the corner ch-2 turn and each side comes to about 3.5 in (8.9 cm). A regular hexagon measures twice its side length from corner to corner, so 2 × 3.5 in gives 7 in (17.8 cm). Flat to flat is 0.866 × 7 in, which is about 6 in (15.2 cm). Round 4 adds about 0.5 in (1.3 cm) of depth and Round 5 adds about 0.25 in (0.6 cm), for a 0.75 in (1.9 cm) border. That takes the 4.5 in (11.4 cm) flat-to-flat measurement before the border to the finished 6 in (15.2 cm).
Final Blocking
- Weave in all ends, keeping each color’s tails behind stitches of the same color.
- Lightly spray the motif with water until it is evenly damp but not dripping.
- Lay it face up on the blocking mat.
- Pin the six corners first so the motif measures 7 in (17.8 cm) corner to corner along all three diagonals.
- Pin the midpoint of each side so the motif measures 6 in (15.2 cm) flat to flat in all three directions.
- Use your fingers to round and lift each puff petal. Do not flatten the petals with pins or pressure.
- Leave it to dry completely before you unpin it, usually 6–12 hours.
Final Quality-Control Checklist
- Center ring has 12 sc and a small open hole.
- Six yellow petals, all the same height and evenly spaced.
- Each petal tip is anchored by one cream sc at the center of a side.
- Six cream spokes, each with an open window on either side.
- Round 4 has 15 dc per side and 90 dc in total.
- Round 5 has 17 sc per side and 102 sc in total.
- All six corners are sharp, with a visible ch-2 point.
- Motif is 7 in (17.8 cm) corner to corner and 6 in (15.2 cm) flat to flat.
- Motif lies flat, with no cupping or ruffling.
- All ends are woven in securely and invisibly.
Troubleshooting
Petals look uneven or lopsided. Pull every loop up to the same 1.25 in (3.2 cm) before working the next one. Holding the base of the puff with your thumb helps keep the loops steady.
Can’t pull through 12 loops. Use a hook with a pointed, smooth head, keep the loops slightly looser, and rock the hook gently through them a few at a time.
Motif cups after Round 3. The ch-5 sps are too tight. Work them more loosely, or try ch 6 and treat it exactly like a ch-5 sp in Round 3.
Motif ruffles after Round 3. Your tr are too loose or too tall. Go down half a hook size for Round 3 only.
Wrong count on a border side. Check that you worked exactly 3 dc in each ch-3 sp and only 1 dc in each sc and each tr.
Rounded corners. Make sure every corner gets the full ch-2, and pin the corners firmly when blocking.
Center hole is too large. Pull the magic ring tighter before weaving in the tail, then secure the tail with a backstitch.
Care
Hand wash in cool water with mild soap, press out the water in a towel, and dry flat, reshaping the corners and petals. Do not wring or tumble dry, since that flattens the puffs.

Final Notes
The measurements build on each other: the 1 in (2.5 cm) center ring supports a 3.5 in (8.9 cm) flower. Round 3 turns the flower into a 5.25 in (13.3 cm) hexagon. The 15-dc and 17-sc border sides then take it out to the finished 7 in (17.8 cm) corner to corner and 6 in (15.2 cm) flat to flat. If you hit each checkpoint, the motif will finish at the right size and lie flat, with plump petals and sharp corners.
Happy crocheting!