

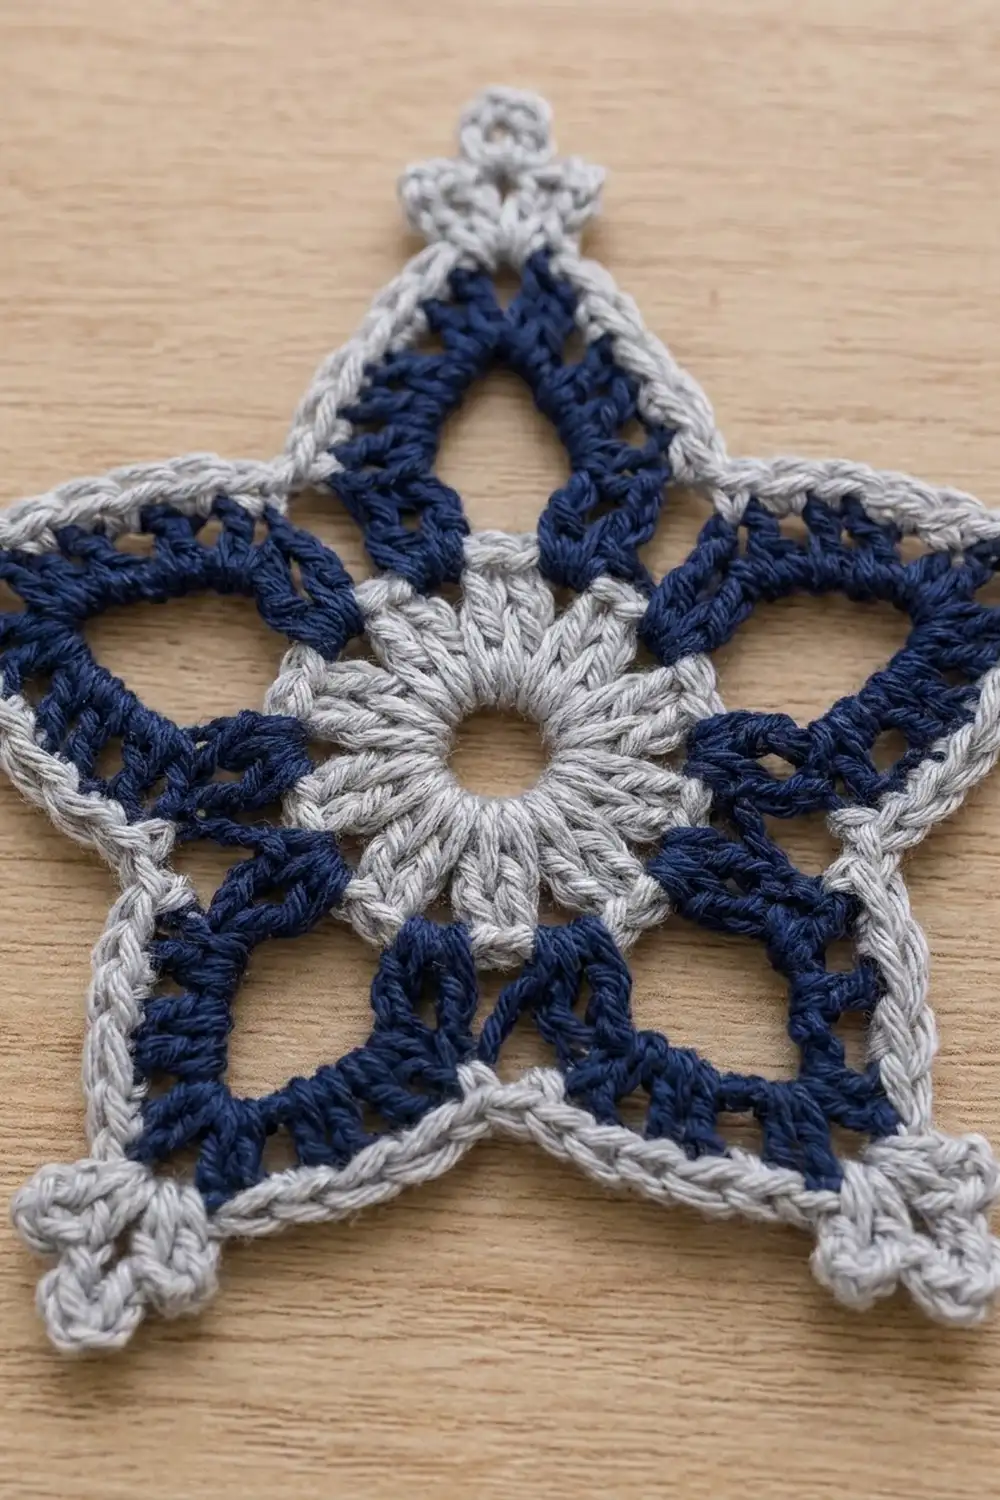
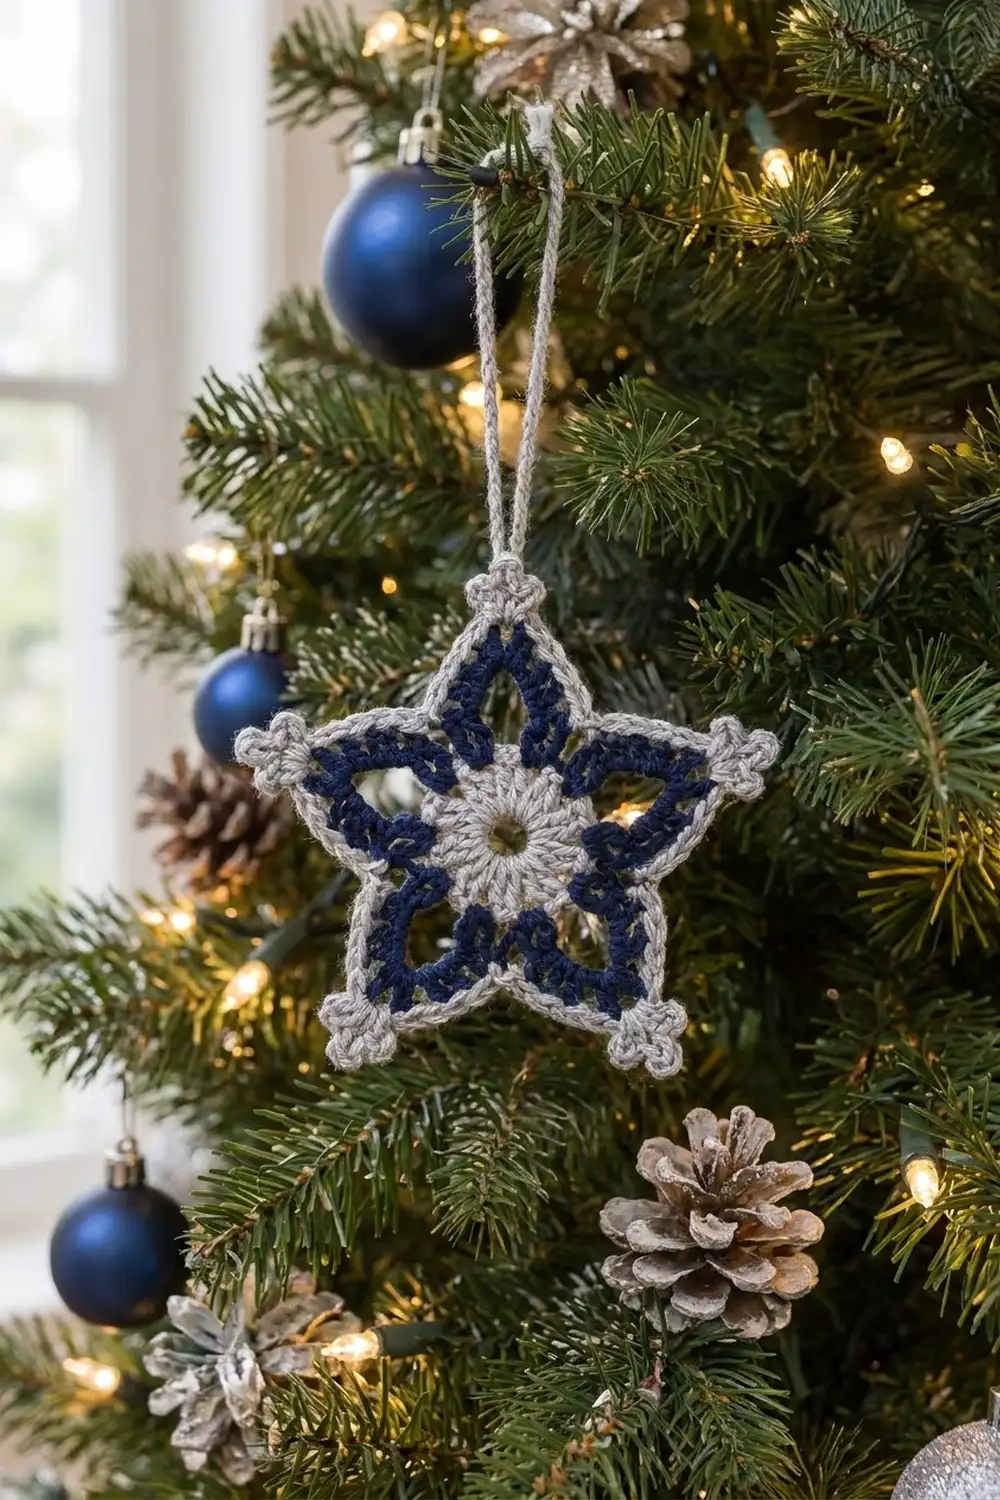
The Midnight Frost Star is a single five-pointed star motif in two colors. It has a soft gray center ring, navy arms with an open window in each one, and a crisp gray outline that ends in a small three-picot cluster at every tip. Laid flat, it looks like lace. Hung in a tree, the windows let the lights show through.
The palette is just two colors: light silver-gray and deep navy. The gray frames the star twice, once at the center ring and once around the outer edge, so the navy reads as a bold inner star. The style is classic and a little wintry. It suits holiday decor, but it isn’t tied to one season.
This pattern uses US crochet terms. The finished star measures about 4.75 in (12.1 cm) across the widest point, tip to tip, including the picots. It is one piece, worked in the round, and needs no sewing apart from weaving in ends.
You start with a gray ring of double crochet and a round of single crochet. Then you switch to navy and work five long chain loops that form the hollow arms. You fill each loop with graduated stitches to shape a pointed arm. A final gray round outlines the whole star, decreases at each inner valley, and adds the picot clusters at the tips.
Finished Size and Construction
- Finished size: 4.75 in (12.1 cm) tip to tip, including picots
- Skill level: Easy-intermediate
- Terminology: US crochet terms
- Yarn weight: Light worsted / DK (CYC 3)
- Hook: 3.5 mm (US E-4)
- Number of pieces: 1 single motif, not joined to anything
- Layout: One five-pointed star, worked in the round from the center out
- Piece size: 4.75 in (12.1 cm) tip to tip
- Size before border: 4 in (10.2 cm) tip to tip after Round 4
- Border depth: About 0.375 in (1.0 cm) at each tip, including the picot cluster
Materials
Use a smooth, tightly plied cotton or cotton blend in DK / light worsted weight. Cotton shows the stitch lines clearly and holds the points well after blocking. Acrylic works too, but it can relax over time, so block it firmly.
- Color A, light silver-gray: 8 g (about 20 m / 22 yd)
- Color B, navy blue: 7 g (about 17 m / 19 yd)
These quantities include a margin for your gauge swatch, the tails, and the optional hanging loop. One star uses very little yarn, so leftovers work fine.
Pick two colors with strong contrast. The design depends on the light outline standing out against the dark arms. Cream and red, or white and forest green, work just as well as gray and navy.
Tools:
- 3.5 mm (US E-4) crochet hook
- Tapestry needle
- Scissors
- Rustproof pins and a foam blocking mat
- Spray bottle with water, or a light spray starch
- Ruler or tape measure
Abbreviations (US Terms)
- ch – chain
- sl st – slip stitch
- sc – single crochet
- hdc – half double crochet
- dc – double crochet
- sc2tog – single crochet 2 together: (insert hook in next st, yarn over, pull up a loop) twice, yarn over, pull through all 3 loops
- sk – skip
- sp – space
- st(s) – stitch(es)
Special stitches:
- Picot: Ch 3, sl st in the 3rd ch from the hook.
- Picot cluster (tip): Picot, ch 1, picot, ch 1, picot. This makes three small bobbles side by side at each point.
Gauge and Checkpoints
Gauge isn’t critical for an ornament, but it controls the final size and how well the arms hold their shape. Work one star first and measure it at each checkpoint below before making more.
- After Round 1: The dc ring measures 1 in (2.5 cm) across.
- After Round 2: The center measures 1.25 in (3.2 cm) across.
- After Round 4: The navy star measures 4 in (10.2 cm) tip to tip.
- After Round 5: The finished star measures 4.75 in (12.1 cm) tip to tip.
If your star is too big: Go down to a 3.25 mm (US D-3) hook, or work the Round 3 chains more tightly. Loose chains are the most common cause of floppy, oversized arms.
If your star is too small or cupping: Go up to a 3.75 mm (US F-5) hook. If only the arms buckle, add 1 ch to each Round 3 loop (ch 11 instead of ch 10). Leave all other counts the same.
Measure on a flat surface without stretching. The arms will gain a little length in blocking, so a star that is slightly small before blocking is fine.
Pattern
Round 1 – Center Ring (Color A, gray)
Make a magic ring with Color A. If you don’t like magic rings, ch 4 and sl st to the first ch to form a ring instead.
Ch 3 (counts as first dc), work 14 dc into the ring. Pull the tail until the ring closes to a small, round hole about 0.375 in (1.0 cm) wide. Don’t close it completely, because the open center is part of the look. Sl st to the top of the beginning ch-3.
Stitch count: 15 dc.
Round 2 – Center Edge (Color A)
Ch 1 (does not count as a stitch). *2 sc in next st, sc in each of next 2 sts; repeat from * 4 more times. Sl st to the first sc.
Stitch count: 20 sc (15 sts worked 1-per-stitch + 5 increases).
Fasten off Color A. Check that the center measures 1.25 in (3.2 cm) and lies flat. Leave 4 in (10.2 cm) tails at every color change, and weave them in along stitches of the same color later.
Round 3 – Arm Loops (Color B, navy)
The 20 sc divide into 5 groups of 4, one group per arm.
Join Color B with a sl st in any sc. Ch 1, sc in the same st. *Ch 10, sk next 3 sc, sc in next sc; repeat from * 3 more times. Ch 10, sk last 3 sc, sl st to the first sc.
Stitch count: 5 sc and 5 ch-10 loops.
Each ch-10 loop leaves the center at one sc and comes back at the next sc 4 sts later. The 3 skipped sc stay open under the loop, and that gap becomes the window inside each arm.
Keep the chains even and slightly firm. All five loops should be the same length when you hold the piece up. If one loop is longer, its arm will be longer too.
Round 4 – Shaping the Arms (Color B)
Sl st into the first ch-10 loop. Work into each loop, not into the chains:
*In the ch-10 loop work: 2 sc, 2 hdc, 2 dc, ch 3, 2 dc, 2 hdc, 2 sc. Sl st in the next sc of Round 3 (the base between two arms); repeat from * 4 more times, ending with the last sl st in the same st as the first sl st of Round 3.
Stitch count: 60 sts (12 per arm: 4 sc, 4 hdc, 4 dc) plus 5 ch-3 tip spaces. The 5 sl sts at the valleys do not count as stitches.
The stitches get taller toward the middle of each loop, which pushes the ch-3 out into a point. The short sc at each end keep the valleys tight to the center. Each navy arm is a solid outline with an open triangular window inside it.
As you work, push the stitches along the loop so the ch-3 sits right at the loop’s midpoint. If the tip leans to one side, slide the stitches over before you close the round.
Fasten off Color B. Gently pull each tip outward and check that the star measures about 4 in (10.2 cm) tip to tip.
Round 5 – Gray Outline and Picot Tips (Color A)
Join Color A with a sl st in any ch-3 tip space.
Ch 1, in the same tip space work: sc, picot cluster, sc. *Sc in each of the next 5 sts (2 dc, 2 hdc, 1 sc). Sc2tog over the last sc of this arm and the first sc of the next arm, skipping the navy sl st between them. Sc in each of the next 5 sts (1 sc, 2 hdc, 2 dc). In the next ch-3 tip space work: sc, picot cluster, sc; repeat from * 3 more times. Sc in each of the next 5 sts, sc2tog over the valley as before, sc in each of the next 5 sts. Sl st to the first sc.
Stitch count: 65 sts (13 per arm: 2 tip sc + 10 side sc + 1 sc2tog) plus 15 picots (3 per tip).
The middle picot of each cluster should point straight out from the tip, with one picot on each side. If the cluster tilts, the ch-1 between picots is too tight. Loosen it slightly.
Fasten off, leaving a 6 in (15.2 cm) tail if you plan to add a hanging loop. Otherwise weave in all ends.
Optional Hanging Loop
Join Color A in the center picot of any tip, ch 30, and sl st back into the same picot. The chain is about 6 in (15.2 cm) long and folds to a 3 in (7.6 cm) loop. Fasten off and weave in. The star is still one piece. The loop is just a hanger.
Border
Round 5 is the border on this motif. It is a single round of sc in Color A, with decreases at the valleys and picot clusters at the tips.
Border gauge: About 5 sc per 1 in (2.5 cm) along the arm edges. Each arm side is about 1.25 in (3.2 cm) long, which fits 6 border sts per side.
Counts per side: A five-pointed star has 10 sides, two per arm. Each side of the border has:
- 1 sc in the tip space
- 5 sc down the arm
- 1 sc2tog at the valley, shared with the next side
That gives 6 full sts plus half of a shared decrease per side. Across 10 sides: 10 × 6 = 60 sc, plus 5 shared sc2tog = 65 sts, which matches the Round 5 count.
Why the math works: Every Round 4 arm has 12 sts. In Round 5, the first and last st of each arm are taken by the two sc2tog at its valleys (1 + 1). The middle 10 sts get 1 sc each (5 + 5). That accounts for all 12 sts (1 + 5 + 5 + 1 = 12) with none skipped or doubled. The 2 extra sc at each tip are worked into the ch-3 space, not into a stitch. They add fullness at the point so the picot cluster can open without pulling the arm narrow. The sc2tog at each valley removes 1 st, so the inner corners stay sharp and don’t ruffle.
Final Blocking
- Weave in all ends along same-color stitches. Weave gray tails into gray and navy tails into navy so nothing shows.
- Lightly spritz the star with water until it’s damp but not soaked. If you want ornament-stiff points, use spray starch.
- On the blocking mat, draw or imagine a circle 4.75 in (12.1 cm) across. Mark five tip points evenly around it, 72 degrees apart.
- Pin the center picot of each tip cluster to one of the marks.
- Pin each valley toward the center so the arms form straight-sided points.
- Use a pin to open the window inside each arm into a clean triangle.
- Open the center ring into a neat circle.
- Let it dry completely, at least 4 hours or overnight, before you unpin it.
Final Quality-Control Checklist
- The center ring has 15 dc and an open hole about 0.375 in (1.0 cm) wide.
- Round 2 has 20 sc and lies flat.
- There are exactly 5 navy arms, each with an open window.
- Each Round 4 arm has 12 sts and a ch-3 tip.
- The gray outline has 65 sts and 15 picots, with 3 picots at each tip.
- All 5 valleys are sharp, with no ruffles.
- The finished star measures 4.75 in (12.1 cm) tip to tip.
- All ends are woven in invisibly.
Troubleshooting
Arms are floppy or twisted: Your Round 3 chains are too loose. Redo Round 3 with tighter chains, or use a hook one size smaller just for the chains.
Star cups into a bowl: The Round 3 loops are too short for the Round 4 stitches. Add 1 ch to each loop.
Valleys ruffle: Check that you worked a sc2tog, not 2 separate sc, at every valley in Round 5.
Picots look flat: Pull each sl st snug. Pinch each picot into a ball while it’s damp during blocking.
Center hole closed up: Next time, leave the magic ring slightly open before you join Round 1. On this star, ease the ring open with a pencil while it’s damp.
Arms are uneven: Count the 3 skipped sc under every Round 3 loop. One loop placed off by a stitch makes one arm wide and the next arm narrow.
Navy shows through the gray outline: Work Round 5 through both loops of each stitch, and keep the gray yarn on top of the navy as you go.
Round 5 count is off: Count each arm separately. Each arm should have 13 sts. Find the arm that is off and redo just that section.
Care
Hand wash in cool water with mild soap. Press out the water in a towel, then re-pin the star to dry flat so the points stay sharp.
Final Notes
The measurement chain is simple. The center is 1 in (2.5 cm) after Round 1 and 1.25 in (3.2 cm) after Round 2. The navy star is 4 in (10.2 cm) after Round 4, and the gray outline brings it to 4.75 in (12.1 cm). If each checkpoint matches, the star will block out evenly. Make one, check it, then make as many as you like.
Happy crocheting!