

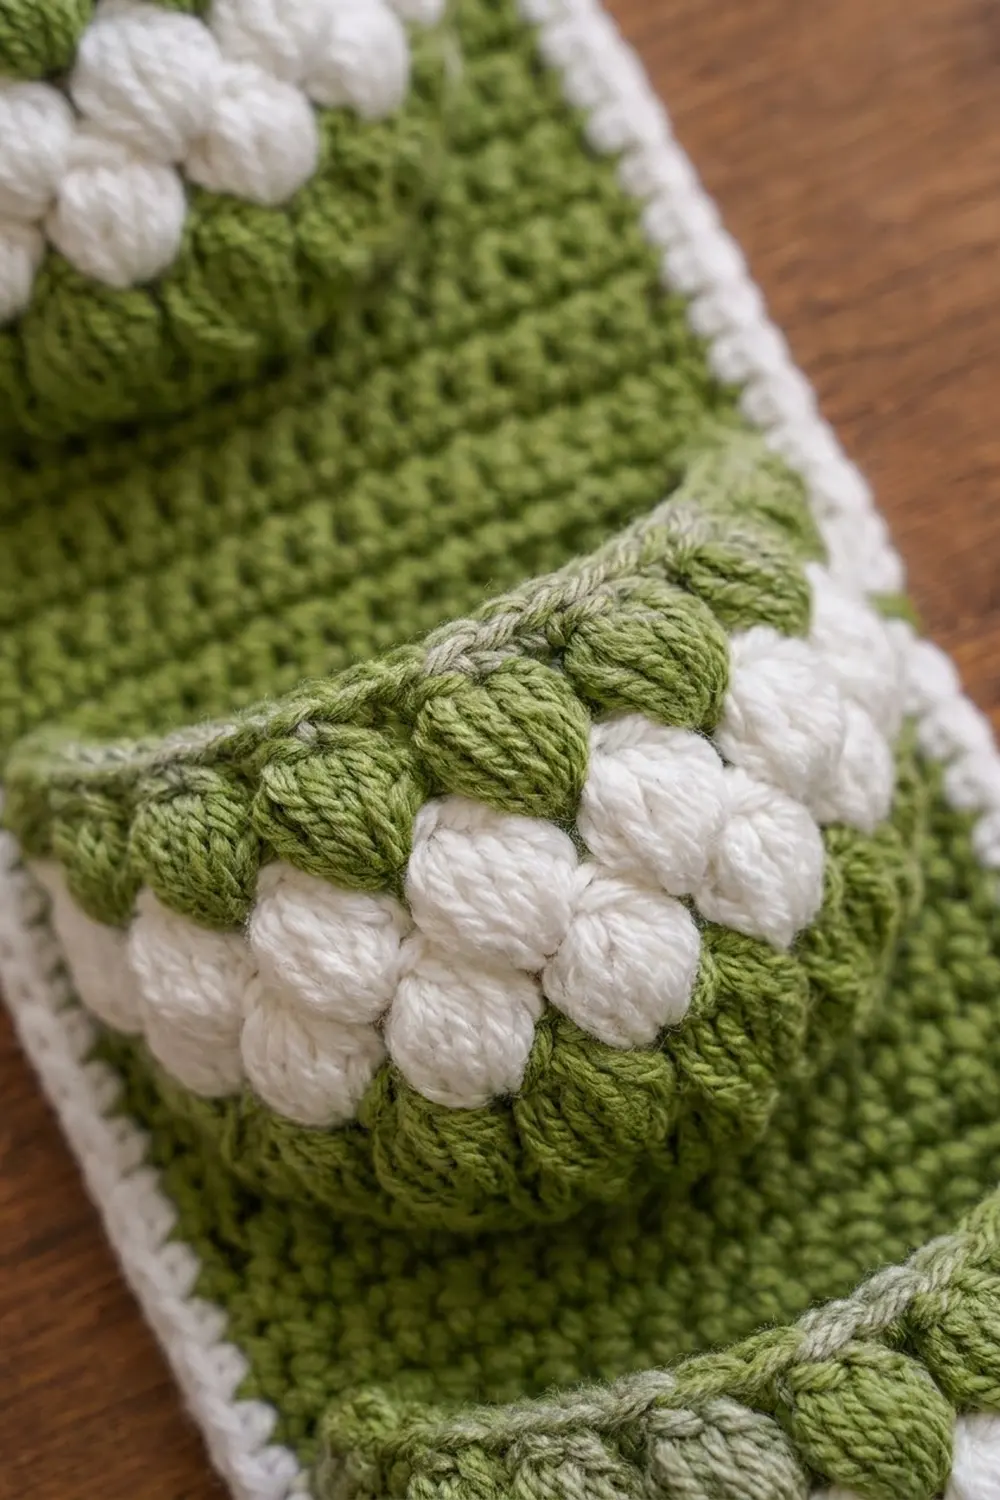
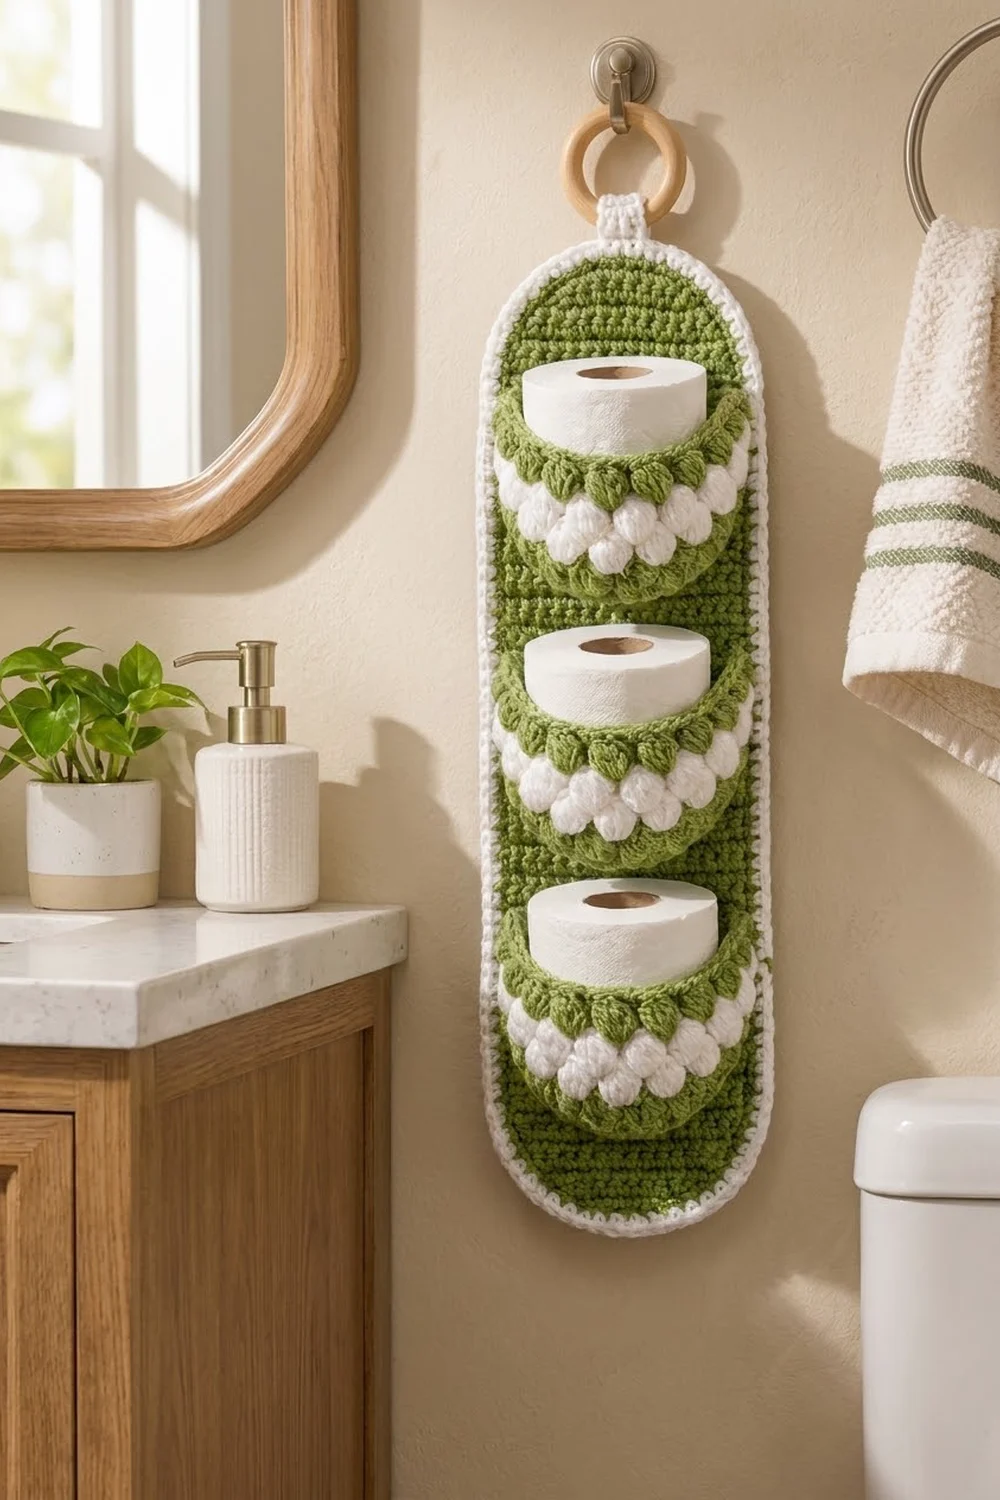
This hanging toilet paper holder pairs a long moss-green back panel with three half-moon pockets, each holding one standard roll. The pockets have bands of chunky puff stitches: two staggered rows of white puffs between a green base and a green puff top edge. A crisp white border runs all the way around the panel, and a short white tab holds a natural wooden ring for hanging.
The style is fresh and simple, and it suits a bathroom with plants, light wood and white towels. Because it uses only two colors, it’s easy to swap in shades that match your space.
All instructions use US crochet terms. The finished panel measures 6.5 in (16.5 cm) wide by 23 in (58.4 cm) long, not counting the tab and ring. From the bottom edge to the top of the ring it’s about 25 in (63.5 cm).
You crochet the back panel flat in rows of single crochet, shaping the rounded ends with increases and decreases. Next you make three pockets in rows, from a narrow green base up to a wide puff-stitch top. You sew the pockets onto the panel, work a two-round white border, and finish with the hanging tab.
Finished Size and Construction
- Finished size: 6.5 in x 23 in (16.5 cm x 58.4 cm), plus tab and ring
- Skill level: Intermediate (shaping, puff stitches, sewing)
- Terminology: US
- Yarn weight: Worsted (#4)
- Hook: 5.0 mm (US H-8)
- Number of pieces: 4 (1 back panel, 3 pockets)
- Layout: 3 pockets stacked vertically on 1 panel
- Panel size before border: 5.5 in x 22 in (14.0 cm x 55.9 cm), 22 sts x 88 rows
- Pocket size: 3.5 in (8.9 cm) wide at the base, 7 in (17.8 cm) wide at the top, 3 in (7.6 cm) tall
- Border depth: 0.5 in (1.3 cm), 2 rounds
Materials
Use a smooth worsted-weight yarn. Cotton or a cotton blend gives firm, crisp puffs and stands up to bathroom humidity. Acrylic also works, but the pockets come out softer.
- Green (main color): 80 g, about 160 m (175 yd)
- White (contrast color): 50 g, about 100 m (109 yd)
These amounts include a margin of roughly 20 percent for gauge swatching and differences in tension.
Tools:
- 5.0 mm (US H-8) crochet hook
- Wooden ring, 2 in (5.1 cm) outer diameter
- Tapestry needle
- 8 locking stitch markers
- Straight pins
- Measuring tape
- Scissors
- Blocking mat and spray bottle
Abbreviations (US Terms)
- ch: chain
- sc: single crochet
- sc2tog: single crochet 2 together
- sl st: slip stitch
- st(s): stitch(es)
- sp: space
- sk: skip
- yo: yarn over
- RS / WS: right side / wrong side
- puff: puff stitch (see below)
Puff stitch: (Yo, insert hook in the indicated st or sp, yo and pull up a loop to about 0.5 in / 1.3 cm tall) 4 times, which leaves 9 loops on the hook. Yo and pull through all 9 loops, then ch 1 to close. The closing ch belongs to the puff. Don’t count it as a stitch or work into it.
Gauge and Checkpoints
Gauge: 16 sc x 16 rows = 4 in (10.2 cm) in sc worked in rows. That’s 4 sts and 4 rows per 1 in (2.5 cm).
Puff gauge: Each (ch 1, puff) pair is 0.5 in (1.3 cm) wide. Each puff row is about 0.5 in (1.3 cm) tall.
Make one pocket first and use it as your gauge test. It’s small, and it uses both colors and every stitch in the pattern.
Checkpoints:
- Panel after Row 7: 5.5 in (14.0 cm) wide, 1.75 in (4.4 cm) tall
- Panel after Row 40: 10 in (25.4 cm) tall
- Panel after Row 88: 22 in (55.9 cm) tall
- Pocket after Row 6: 6 in (15.2 cm) wide at the top, 1.5 in (3.8 cm) tall
- Pocket after Row 9: 7 in (17.8 cm) wide at the top, 3 in (7.6 cm) tall
If your piece is too big, go down to a 4.5 mm hook. If it’s too small, go up to 5.5 mm. A standard roll is about 4.5 in (11.4 cm) across, so a pocket that comes out small won’t hold it.
Back Panel
Use green. The ch 1 at the start of each row doesn’t count as a stitch. Row 1 is the RS.
Row 1 (RS): Ch 11, sc in 2nd ch from hook and in each ch across, turn. (10 sc)
Rows 2–7 (rounded end): Ch 1, 2 sc in first st, sc in each st to last st, 2 sc in last st, turn.
- Row 2: 12 sc
- Row 3: 14 sc
- Row 4: 16 sc
- Row 5: 18 sc
- Row 6: 20 sc
- Row 7: 22 sc
Checkpoint: 5.5 in (14.0 cm) wide, 1.75 in (4.4 cm) tall.
Rows 8–82 (straight section): Ch 1, sc in each st across, turn. (22 sc per row, 75 rows)
Checkpoint: The panel is 10 in (25.4 cm) tall after Row 40 and 20.5 in (52.1 cm) tall after Row 82.
Rows 83–88 (rounded end): Ch 1, sc2tog, sc in each st to last 2 sts, sc2tog, turn.
- Row 83: 20 sc
- Row 84: 18 sc
- Row 85: 16 sc
- Row 86: 14 sc
- Row 87: 12 sc
- Row 88: 10 sc
Fasten off and weave in the ends. The panel has 88 rows, measures 5.5 in x 22 in (14.0 cm x 55.9 cm), and has matching rounded ends.
Pocket (Make 3)
Begin with green. Row 1 is the RS. The ch 1 at the start of each row doesn’t count, but each ch-1 space counts as 1 st in the totals.
Row 1 (RS): Ch 15, sc in 2nd ch from hook and in each ch across, turn. (14 sc)
Rows 2–6: Ch 1, 2 sc in first st, sc in each st to last st, 2 sc in last st, turn.
- Row 2: 16 sc
- Row 3: 18 sc
- Row 4: 20 sc
- Row 5: 22 sc
- Row 6: 24 sc
Change to white on the last yo of Row 6.
Checkpoint: 6 in (15.2 cm) across the top, 1.5 in (3.8 cm) tall.
Row 7 (RS, white puff row): Ch 1, sc in first st, ch 1, sk next st, puff in next st. Repeat from * 10 more times, then sc in last st, turn.
Count: 1 sc + 11 ch-1 sps + 11 puffs + 1 sc = 24 sts. The 11 (sk, puff) pairs use sts 2–23.
Row 8 (WS, staggered white puff row): Ch 1, 2 sc in first sc, ch 1, sk next puff, puff in next ch-1 sp. Repeat from * 10 more times, then 2 sc in last sc, turn. Change to green on the last yo.
Count: 2 sc + 11 ch-1 sps + 11 puffs + 2 sc = 26 sts. Each new puff sits between two puffs from Row 7.
Row 9 (RS, green puff top): Ch 1, 2 sc in first sc, sc in next sc, ch 1, sk next puff, puff in next ch-1 sp. Repeat from * 10 more times, then sc in next sc, 2 sc in last sc.
Count: 3 sc + 11 ch-1 sps + 11 puffs + 3 sc = 28 sts.
Fasten off, leaving a 24 in (61.0 cm) green tail for sewing. Weave in the white ends.
Checkpoint: 7 in (17.8 cm) across the top, 3.5 in (8.9 cm) across the base, 3 in (7.6 cm) tall. The flat pocket is fan-shaped. Once sewn on, its extra width at the top bows out into a cup.
Make All Pieces
- Back panel: 1, green
- Pockets: 3, each with Rows 1–6 and 9 in green and Rows 7–8 in white
Layout grid (panel rows numbered from the bottom, Row 1 = bottom):
          ( ring )
          [ tab  ]
   (  rows 83-88: rounded top  )
   |  rows 77-82: open panel   |
   |  POCKET 3: rows 64-76     |
   |  rows 49-63: open panel   |
   |  POCKET 2: rows 36-48     |
   |  rows 21-35: open panel   |
   |  POCKET 1: rows 8-20      |
   (  rows 1-7: rounded bottom )
The pockets start 28 rows (7 in / 17.8 cm) apart, which leaves room for a 4 in (10.2 cm) roll to stand in each one.
Joining
Method: Whipstitch with the green tail, catching both loops of the pocket edge and one full stitch of the panel. Sew each pocket to the RS of the panel before you add the border, while the rows are still easy to count. Pin all three pockets in place first and check the spacing.
Stitch-to-stitch placement for each pocket:
- Base: Center the 14-st foundation edge across panel sts 5–18 on the pocket’s bottom row from the grid, leaving 4 panel sts free on each side. Sew 1 pocket st to 1 panel st, for 14 stitches.
- Sides: Each side of the pocket has 9 row-ends, and they rise over 12 panel rows. Sew each of the 6 sc row-ends to 1 panel row (6 rows). Sew each of the 3 puff row-ends across 2 panel rows (6 rows). That’s 12 rows in total.
- Top corners: Set the top corners at panel st 3 and st 20, 2 sts in from each side edge. They’re 4.5 in (11.4 cm) apart, which is the width of a roll. The 7 in (17.8 cm) top edge stays unsewn and curves outward around the roll.
Tension: Sew firmly, but don’t pull. If the panel puckers, your stitches are too tight. If you see gaps, sew your stitches closer together.
Size checkpoint: After joining, the panel should still measure 5.5 in x 22 in (14.0 cm x 55.9 cm) and lie flat around the pockets.
Border
Border gauge: Each sc round adds 0.25 in (0.6 cm) on every side. The gauge is square, so 1 sc per row-end matches the length of the edge.
Round 1 (white): With RS facing, join white in the first st of Row 88 (the top end). Ch 1.
- Top end: 2 sc in first st, sc in next 8 sts, 2 sc in last st. (12 sc)
- Side A, top curve (row-ends 88–82): Work 1 sc in each row-end, but 2 sc in the row-ends of Rows 86 and 84. (9 sc)
- Side A, straight (row-ends 81–8): 1 sc in each row-end. (74 sc)
- Side A, bottom curve (row-ends 7–1): Work 1 sc in each row-end, but 2 sc in the row-ends of Rows 5 and 3. (9 sc)
- Bottom end: Working in the free loops of the foundation ch, 2 sc in first loop, sc in next 8, 2 sc in last loop. (12 sc)
- Side B: Work like Side A in reverse: bottom curve 9 sc, straight 74 sc, top curve 9 sc.
Sl st to the first sc to join. Total: 12 + 92 + 12 + 92 = 208 sts. Each long side has 9 + 74 + 9 = 92 sts.
Round 2 (white): Ch 1. Work 1 sc in each st, adding increases only on the curves:
- Each 12-st end: Sc 2, 2 sc in next, sc 6, 2 sc in next, sc 2. (14 sts)
- Each 9-st curve segment: Sc 4, 2 sc in next, sc 4. (10 sts)
- Each 74-st straight section: Sc in each st. (74 sts)
Sl st to join. Total: 14 + 10 + 74 + 10 + 14 + 10 + 74 + 10 = 216 sts. Fasten off.
Why the math works:
- Straight sides: 1 sc per row-end matches the square gauge, so the sides stay flat.
- Round 1 curves: On the stepped curves, each row-end runs on a diagonal and is about 0.1 in (0.3 cm) longer than a straight one. Over a curve that adds up to about 0.5 in (1.3 cm), and the 2 extra sc cover it.
- Round 2 curves: Each rounded end becomes a larger outer arc, and the 4 added sts supply about 1 in (2.5 cm) of extra length.
- Final size: 5.5 + 0.5 + 0.5 = 6.5 in (16.5 cm) wide, and 22 + 0.5 + 0.5 = 23 in (58.4 cm) long.
Hanging tab (white): Join white in st 6 of the 14-st top end of Round 2.
- Row 1: Ch 1, sc in sts 6–9, turn. (4 sc)
- Rows 2–8: Ch 1, sc in each st across, turn. (4 sc)
The tab is 1 in (2.5 cm) wide and 2 in (5.1 cm) long. Slip the wooden ring onto the tab and fold the tab over the ring to the back. Sew the last row firmly to the WS of the border. About 0.75 in (1.9 cm) of the tab shows above the panel.
Final Blocking
- Weave in all remaining ends on the WS.
- Lay the holder RS up on a blocking mat.
- Pin the panel to 6.5 in x 23 in (16.5 cm x 58.4 cm), keeping both rounded ends symmetrical.
- Spray until damp, but not soaked.
- Lightly fill each pocket with a rolled towel so it dries in its cup shape.
- Gently round each puff with your fingertips.
- Let it dry completely, usually 12–24 hours, then remove the pins.
Final Quality-Control Checklist
- Panel is 6.5 in x 23 in (16.5 cm x 58.4 cm)
- Both rounded ends match in shape
- Border lies flat and doesn’t ruffle or cup
- Round 1 has 208 sts and Round 2 has 216 sts
- Each pocket has 11 puffs in each of Rows 7, 8 and 9
- Pocket tops are 7 in (17.8 cm) wide
- Pockets are centered and start 7 in (17.8 cm) apart
- A standard roll sits securely in each pocket
- Tab is sewn securely and the ring hangs straight
- All ends are woven in
Troubleshooting
- Panel narrows or widens: Count all 22 sts on every straight row. The last stitch is easy to miss.
- Border ruffles: Check the extra curve sc in Round 1, or use a 4.5 mm hook for the border only.
- Border cups or pulls: Your rows are taller than your stitches are wide. Work 2 sc into every 8th row-end on the straight sides.
- Puffs look flat: Pull up every loop to the same height, and don’t skip the closing ch 1.
- Roll slips through: The pocket’s top corners are too far apart. Re-sew them 18 sts apart.
- Roll won’t fit: The pocket is too tight. Use a larger hook for the pockets.
- Holder hangs crooked: Re-center the tab on sts 6–9 of the top end.
Care
Hand wash in cool water and lay flat to dry, reshaping the pockets while they’re damp. Keep the wooden ring out of the water and wipe it clean instead.
Final Notes
Each measurement in this pattern builds on the one before it:
- The square gauge of 4 sts and 4 rows per 1 in (2.5 cm) gives a 22-st x 88-row panel of 5.5 in x 22 in (14.0 cm x 55.9 cm).
- Each pocket widens from 3.5 in (8.9 cm) at the base to 7 in (17.8 cm) at the top, and the pockets start 7 in (17.8 cm) apart.
- The 2-round border adds 0.5 in (1.3 cm) all around, for a finished size of 6.5 in x 23 in (16.5 cm x 58.4 cm).
Check each stage as you go, and the holder will hang straight and hold its rolls neatly.
Happy crocheting!