

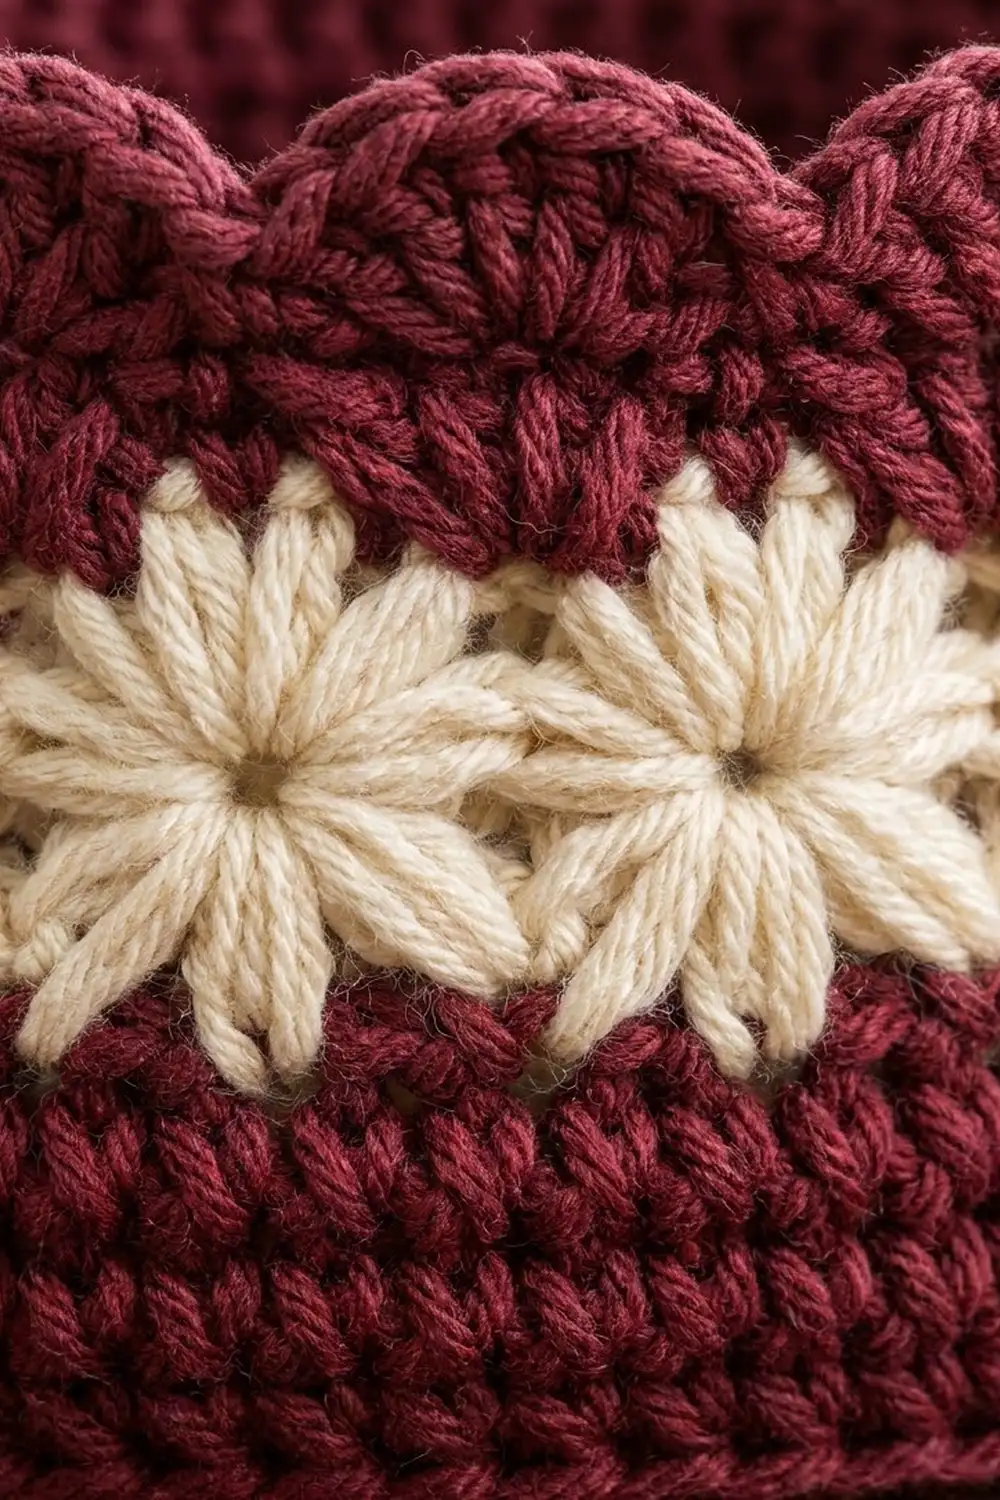
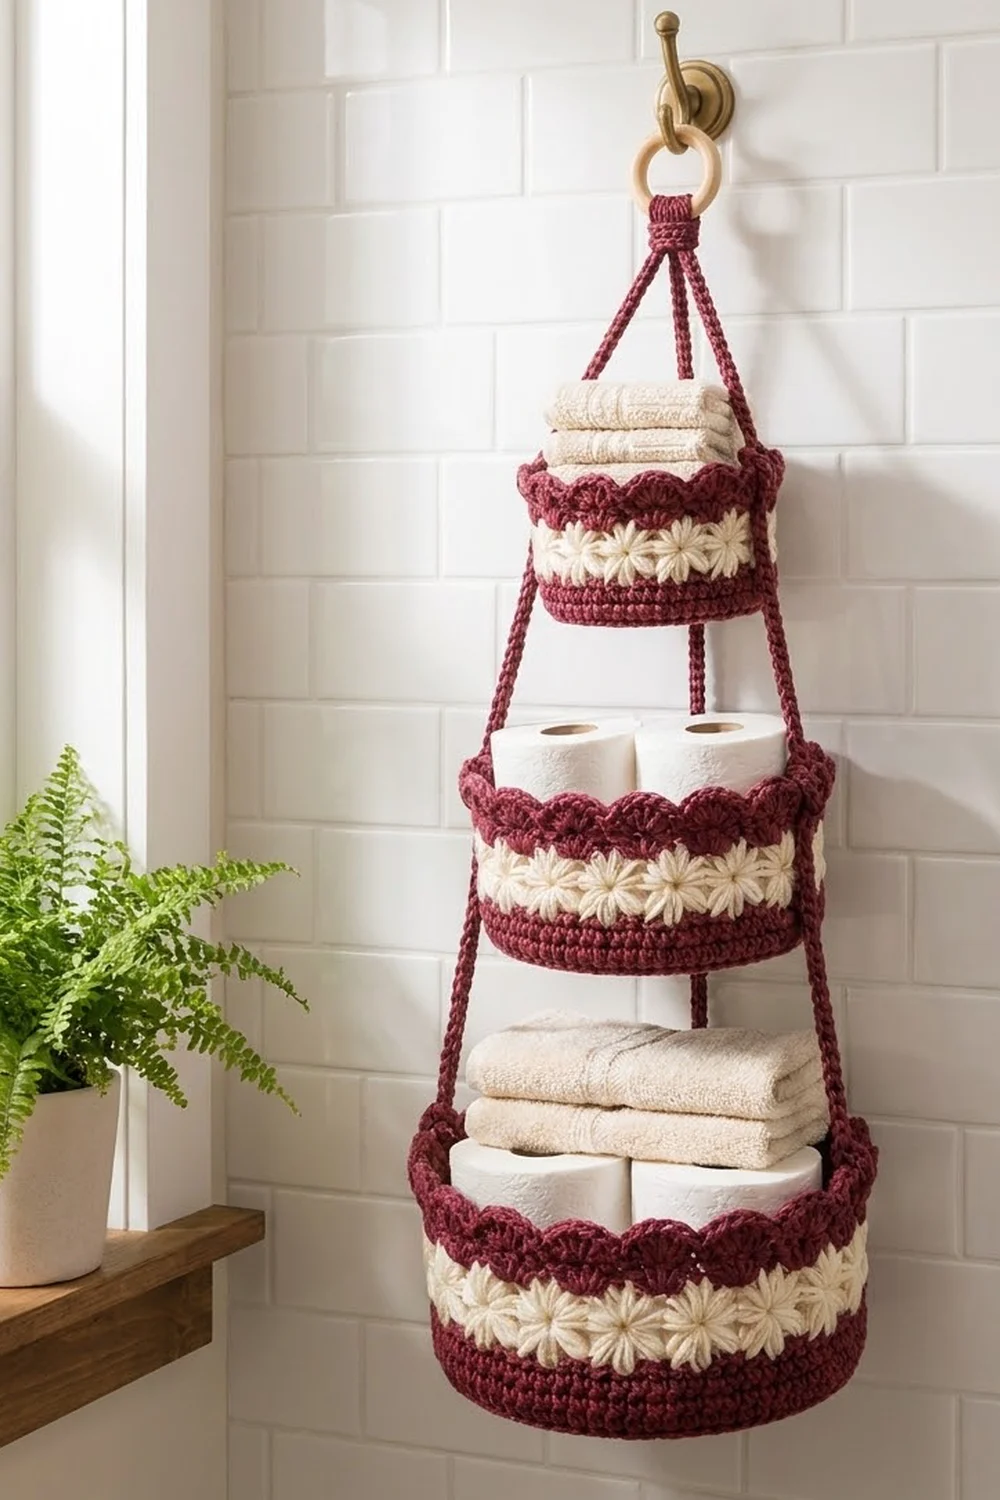
The Daisy Crown hanger is a set of three round baskets that stack vertically from one wooden ring. Each basket has a dense burgundy base, a cream band of star-stitch daisies around the wall, and a rim of rounded shell scallops that looks like a little crown.
The palette is deep burgundy with a warm cream accent. It suits a bathroom, kitchen or nursery, and the baskets are firm enough to hold towels, toilet paper rolls, fruit or small toys.
This pattern uses US crochet terms. The finished baskets measure 6.5 in (16.5 cm), 8.75 in (22.2 cm) and 11 in (27.9 cm) across, and 3.5 in (8.9 cm), 4 in (10.2 cm) and 4.5 in (11.4 cm) tall. The assembled hanger is about 30 in (76.2 cm) long from the top of the ring to the bottom of the large basket.
You work each basket from the bottom up: a flat circle, a back-loop turning round, single crochet walls, the cream daisy band, and then the scallop rim. You then make three long cords and four short links and assemble everything on the ring.
Finished Size and Construction
- Finished size: Small 6.5 in (16.5 cm) × 3.5 in (8.9 cm); Medium 8.75 in (22.2 cm) × 4 in (10.2 cm); Large 11 in (27.9 cm) × 4.5 in (11.4 cm)
- Hanging length: about 30 in (76.2 cm)
- Skill level: Intermediate
- Terminology: US
- Yarn weight: Worsted (#4) cotton
- Hook: 5.0 mm (H-8)
- Number of pieces: 3 baskets, 3 long cords, 4 short links, 1 ring
- Layout: vertical stack, small on top, large at the bottom
- Wall height before the rim: Small 2.75 in (7.0 cm); Medium 3.25 in (8.3 cm); Large 3.75 in (9.5 cm)
- Rim depth: 0.75 in (1.9 cm)
Materials
Use a firm, smooth worsted-weight cotton or cotton blend so the baskets stand up on their own. These quantities assume yarn of about 190 m per 100 g.
- Burgundy (B): 400 g, about 760 m
- Cream (C): 80 g, about 152 m
Both quantities include roughly a 15% margin for your gauge swatch and for tension differences.
Tools:
– 5.0 mm (H-8) crochet hook
– 1 wooden ring, 2 in (5.1 cm)
– Stitch markers (at least 4)
– Tapestry needle
– Scissors
– Tape measure
Abbreviations (US Terms)
- ch – chain
- sl st – slip stitch
- sc – single crochet
- hdc – half double crochet
- dc – double crochet
- BLO – back loop only
- MR – magic ring
- st(s) – stitch(es)
Star stitch (star): Each star pulls up 5 loops (6 loops on the hook in total), you yarn over and pull through all 6, then ch 1. That ch-1 is the star’s “eye.” Every star after the first covers 2 new stitches, so a round of stars always has half as many stars as there are stitches.
Gauge and Checkpoints
Gauge: 14 sc × 16 rounds = 4 in (10.2 cm), worked firmly.
Make the small basket first; it works as your test piece. Check it at each stage:
- End of the base (Round 12): 6.5 in (16.5 cm) across, lying flat
- End of the walls before the rim: 2.75 in (7.0 cm) tall
- Wall circumference: 20.5 in (52.1 cm)
If the piece is too big, go down 0.5 mm in hook size. If it is too small, go up 0.5 mm. If the base ruffles, your tension is looser on the increases, so tighten it. If the base cups before Round 12, your increases are too tight.
Basket Base (all sizes)
Use B. Work in joined rounds: sl st to the first sc, then ch 1. The ch 1 does not count as a stitch.
- Rnd 1: 6 sc in MR. (6)
- Rnd 2: 2 sc in each st. (12)
- Rnd 3: sc in next st, 2 sc in next st around. (18)
- Rnd 4: sc in next 2 sts, 2 sc in next st around. (24)
- Rnds 5 onward: sc in next (round number − 2) sts, 2 sc in next st around. Each round’s total is 6 × the round number.
For example, Round 8 is sc in next 6, 2 sc in next around, for 48 sts.
Stop here:
– Small: Rnd 12 = 72 sts, 6.5 in (16.5 cm) across
– Medium: Rnd 16 = 96 sts, 8.75 in (22.2 cm) across
– Large: Rnd 20 = 120 sts, 11 in (27.9 cm) across
Lower Walls
- W1: Ch 1, sc in BLO of each st around. This creates the turning ridge. (Small 72 / Medium 96 / Large 120)
- W2 onward: Ch 1, sc in each st around, keeping the same count.
Work the walls to this total:
– Small: 4 rounds, 1 in (2.5 cm)
– Medium: 6 rounds, 1.5 in (3.8 cm)
– Large: 8 rounds, 2 in (5.1 cm)
On the final yarn-over of the last joining sl st, change to C.
Daisy Band
C1: Ch 1, sc in each st around. (72 / 96 / 120)
C2 (star round):
1. Ch 3.
2. Star 1: Pull up a loop in the 2nd ch from the hook and the 3rd ch from the hook, then in each of the first 3 sts (6 loops on the hook). Yo, pull through all 6, ch 1.
3. Next star: Pull up a loop in the eye just made, in the side of the last loop of the previous star, in the same st as that last loop, and in each of the next 2 sts (6 loops). Yo, pull through all, ch 1.
4. Repeat the “next star” step around. Star 1 covers sts 1–3, star 2 covers sts 3–5, and so on. The last star’s final loop goes into st 1, at the base of Star 1.
5. Sl st to the top of the ch-3.
Star counts: Small 36 / Medium 48 / Large 60 stars.
C3: Ch 2 (does not count), 2 hdc in each star eye around. Sl st to the first hdc, changing to B on the last yarn-over. Count: 36 eyes × 2 = 72 (Medium 48 × 2 = 96; Large 60 × 2 = 120).
The band measures 1.25 in (3.2 cm). The hdc round pushes the star petals outward, which is what gives the daisy look.
Upper Walls
- U1–U2: Ch 1, sc in each st around. (72 / 96 / 120)
The band plus these 2 rounds add 1.75 in (4.4 cm). Checkpoint: the wall is now 2.75 in (7.0 cm) tall on the small basket, 3.25 in (8.3 cm) on the medium and 3.75 in (9.5 cm) on the large.
Mark the cord points on U2:
– Small: sts 1, 25, 49 (every 24 sts)
– Medium: sts 1, 33, 65 (every 32 sts)
– Large: sts 1, 41, 81 (every 40 sts)
Make All Pieces
Baskets: Make 1 small, 1 medium and 1 large, following the sections above. The same stitch logic gives all three sizes; only the number of base rounds and lower wall rounds changes.
Long cords (make 3, B):
1. Ch 102.
2. Sl st in the 7th ch from the hook. This forms a 6-ch loop.
3. Sl st in the back bump of each of the remaining 95 ch.
4. Fasten off, leaving a 10 in (25.4 cm) tail.
Each cord has 96 sl sts in the body, which is 32 in (81.3 cm) at 3 sl sts per in (2.5 cm), plus a loop at one end.
Short links (make 4, B):
1. Ch 6, sl st in the first ch to form loop B.
2. Ch 13. Sl st in the 7th ch from the hook to form loop A.
3. Sl st in the back bump of each of the next 6 ch.
4. Sl st in the base of loop B. Fasten off.
Each link’s body has 7 sl sts, 2.3 in (5.9 cm) long. The whole link, including both loops, is about 4.25 in (10.8 cm).
Totals by color:
– B: 3 bases, 3 sets of walls, 3 rims, 3 cords, 4 links, plus the wrap at the ring
– C: 3 daisy bands
Layout:
        [ ring + wrap ]
         /    |    \
        [  SMALL   ]   cords tacked at U2 + ridge
             |  (2 links)
      [    MEDIUM    ]
             |  (2 links)
    [       LARGE      ]  cord loops at ridge
Joining (Assembly)
Spines: Join 2 links loop-to-loop: pass loop A of one link through loop A of the other. Make 2 spines this way. Each spine is about 7.5–8 in (19.1–20.3 cm) long.
- Sew the top loop of spine 1 to the center underside of the small basket’s base.
- Sew its bottom loop to the center inside of the medium basket’s base.
- Attach spine 2 the same way between the medium base and the large base.
Cords:
1. Sew each cord’s loop to the large basket’s turning ridge, directly below one of its U2 markers.
2. Run each cord straight up the outside of the wall and tack it with 3 small stitches at the marked U2 stitch.
3. At the medium basket, line up the three markers with the three cords. Tack each cord at the turning ridge and at U2. Repeat for the small basket.
Spacing between tiers:
– Small rim to medium rim: 7.5 in (19.1 cm)
– Medium rim to large rim: 8 in (20.3 cm)
These distances match the spine lengths, so both the cords and the spines carry weight. Keep the tacking stitches snug but not tight; pulling too hard puckers the wall.
At the ring: Gather the three cord tops. Pass about 2 in (5.1 cm) of each over the ring and fold it down. Wrap tightly with B for 1.5 in (3.8 cm), then hide the end inside the wrap.
Checkpoint: Hang the piece. Each basket should sit level, and the total length should be about 30 in (76.2 cm). If one basket tilts, re-tack its cords until the three segments between tiers are equal.
Border (Scallop Rim)
Border gauge: One scallop repeat covers 6 sts, which is about 1.7 in (4.3 cm).
R1:
1. Ch 1, sc in st 1.
2. Skip 2 sts, 7 dc in next st, skip 2 sts, sc in next st.
3. Repeat from * around. End with skip 2, 7 dc in next, skip 2, then sl st to the first sc.
Scallop counts:
– Small: 72 ÷ 6 = 12 scallops; 12 × (1 sc + 7 dc) = 96 sts
– Medium: 96 ÷ 6 = 16 scallops; 16 × 8 = 128 sts
– Large: 120 ÷ 6 = 20 scallops; 20 × 8 = 160 sts
R2: Sl st loosely in each st around. Count: (96 / 128 / 160 worked 1 per stitch) + 0 added = 96 / 128 / 160. Fasten off.
Why the math works: 72, 96 and 120 all divide evenly by 6, so every basket closes on a full repeat with no partial scallop. The 7 dc fan from a single stitch and gives each scallop its round, raised shape. The sl st round firms up the edge so it doesn’t flare. The rim is 0.75 in (1.9 cm) deep.
Final Blocking
- Weave in all ends before blocking.
- Spritz each basket evenly with water until damp, not soaked.
- Stuff each basket with a towel or a container of the right size, so the walls stand straight and the base stays flat.
- Pinch each scallop into a smooth half-circle.
- Gently pull the star petals into an even daisy shape.
- Let the baskets dry fully, then hang the assembly.
- Check the measurements again: 6.5 / 8.75 / 11 in (16.5 / 22.2 / 27.9 cm) across.
Final Quality-Control Checklist
- Base counts are correct: 72 / 96 / 120 sts.
- The turning ridge runs all the way around each basket.
- Star counts are correct: 36 / 48 / 60, with even eyes.
- Scallop counts are correct: 12 / 16 / 20, with no partial repeat.
- All three cords are 32 in (81.3 cm) long and attached at evenly spaced points.
- Spines are sewn to the center of each base.
- The ring wrap is tight and the ends are hidden.
- Each basket hangs level.
Troubleshooting
- Base cups or ruffles: Re-check that the round’s count equals 6 × the round number, and adjust your tension on the increases.
- Walls flare outward: Make sure W1 was worked in the BLO, and go down a hook size for the walls.
- Stars lean or bunch: You missed the “same stitch as the previous last loop.” Each star after the first must cover exactly 2 new sts.
- Rim ends with a partial scallop: Your wall count is off. Fix it on U2 before starting the rim.
- Hanger twists: The cords are tacked unevenly. Re-mark the spacing at 24 / 32 / 40 sts.
- Baskets sag: Shorten the spines so they share the weight with the cords.
Care
Hand wash in cool water and lay flat to dry, with each basket stuffed so it keeps its shape. Do not tumble dry.
Final Notes
Here is the measurement chain:
– The gauge of 14 sc = 4 in (10.2 cm) gives bases of 6.5, 8.75 and 11 in (16.5, 22.2 and 27.9 cm).
– The walls reach 2.75, 3.25 and 3.75 in (7.0, 8.3 and 9.5 cm) before the rim.
– The 0.75 in (1.9 cm) scallop rim brings the heights to 3.5, 4 and 4.5 in (8.9, 10.2 and 11.4 cm).
– Cords of 32 in (81.3 cm) and spines of 7.5–8 in (19.1–20.3 cm) make a hanger about 30 in (76.2 cm) long.
If each checkpoint matches, the next stage will fit. Happy crocheting!