

This set brings a small holiday bakery into your kitchen. It has a cranberry-red pocket that hangs from a fridge hook and four gingerbread-girl magnets. Three cookies sit inside the pocket and peek over the rim. The fourth works on its own as a fridge magnet.
The pocket is deep cranberry red with a cream scalloped rim, a cream strap handle and a bright red bow with two green holly leaves. Each tan cookie has white icing traced just inside the edge, two white buttons, a stitched face with pink cheeks and a little red bow.
The pattern uses US crochet terms. The finished pocket is 7 in (17.8 cm) wide and 4.75 in (12.1 cm) tall, not counting the handle. Each cookie is 3.5 in (8.9 cm) wide and 4.2 in (10.7 cm) tall.
You work the pocket in rounds from an oval base and finish it with a scallop rim. Each cookie starts with a round head, then continues in rows through the arms, body and legs. One edging round finishes the cookie. The face, icing, bows and magnets go on last.
Finished Size and Construction
- Pocket: 7 in (17.8 cm) wide x 4.75 in (12.1 cm) tall. The handle loop rises about 3.5 in (8.9 cm) above the rim.
- Cookie: 3.5 in (8.9 cm) x 4.2 in (10.7 cm)
- Skill level: Advanced beginner
- Terminology: US
- Yarn weight: Worsted (#4)
- Hooks: 3.5 mm (E-4) for the cookies and small parts; 4.0 mm (G-6) for the pocket, rim and handle
- Number of pieces: 5 main pieces (1 pocket and 4 cookies) plus small appliqués. They are not joined to each other.
- Layout: 3 cookies side by side in the pocket, 1 cookie on its own
- Pocket before rim: 7 in (17.8 cm) x 4 in (10.2 cm)
- Cookie before edging: 3.1 in (7.9 cm) x 3.8 in (9.7 cm)
- Border depth: 0.75 in (1.9 cm) for the pocket rim; 0.2 in (0.5 cm) per side for the cookie edging
Materials
Use a smooth worsted-weight cotton or cotton blend. It shows the stitches clearly and keeps the cookie outlines flat.
- Tan: 30 g, about 54 m
- Cranberry red: 40 g, about 72 m
- Cream: 15 g, about 27 m
- Bright red: 10 g, about 18 m
- Green: 5 g, about 9 m
- Black: 1 g, about 2 m
- Pink: 1 g, about 2 m
Tools:
- 3.5 mm (E-4) and 4.0 mm (G-6) hooks
- Tapestry needle and stitch markers
- 4 round magnets, 0.75 in (1.9 cm) across
- Pins and a blocking mat
- 1 adhesive fridge hook
All quantities include a margin of about 20 percent.
Abbreviations (US Terms)
- ch: chain
- sl st: slip stitch
- sc: single crochet
- hdc: half double crochet
- dc: double crochet
- inc: 2 sc in the same stitch
- sc2tog: single crochet 2 together
- BLO: back loop only
- st(s): stitch(es)
- fsc: foundation single crochet
Special stitch (fsc): Insert the hook in the base chain of the last sc. Yarn over and pull up a loop. Yarn over and pull through 1 loop to make the new base chain. Yarn over and pull through 2 loops. Each fsc adds 1 stitch to the end of the row.
Gauge and Checkpoints
Make one cookie and the pocket base first to test your gauge.
- Cookie (3.5 mm hook): 18 sc and 20 rows = 4 in (10.2 cm)
- Pocket (4.0 mm hook): 16 sc and 18 rounds = 4 in (10.2 cm)
Checkpoints:
- Cookie head after Rnd 4: 1.6 in (4.1 cm) across.
- Cookie before edging: 3.1 in (7.9 cm) x 3.8 in (9.7 cm).
- Cookie after edging: 3.5 in (8.9 cm) x 4.2 in (10.7 cm).
- Pocket base after Rnd 3: about 6.25 in (15.9 cm) x 1.5 in (3.8 cm).
- Pocket after Rnd 10, pressed flat: 7 in (17.8 cm) wide.
If your piece is too big, go down one hook size. If it is too small, go up one size. The cookies should feel firm, with no gaps between stitches.
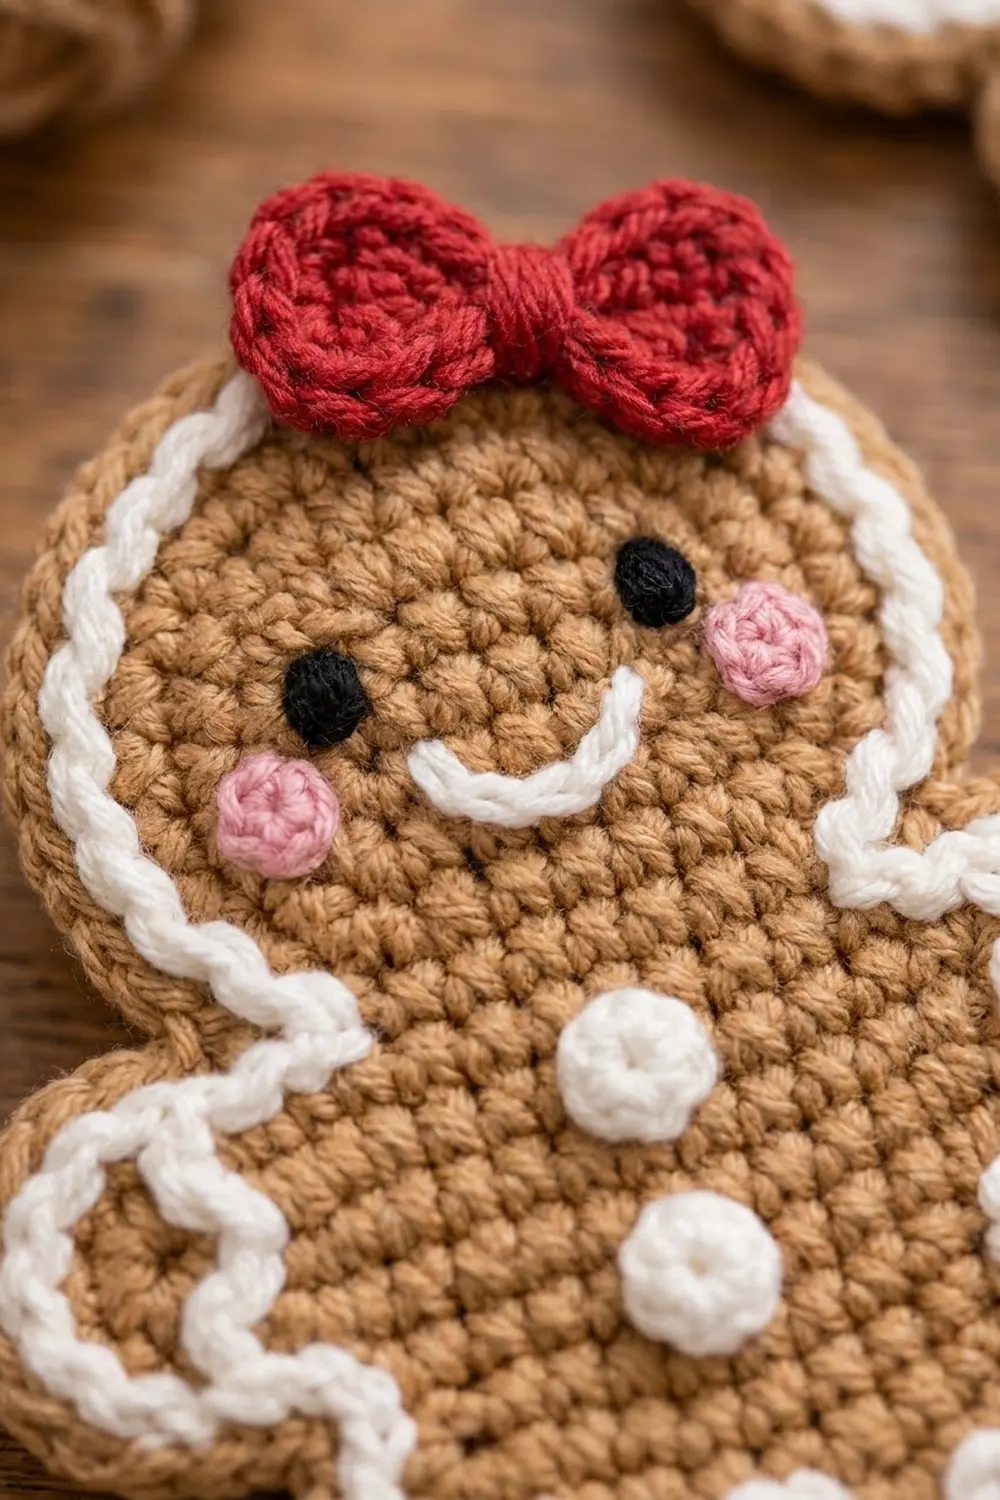
Gingerbread Cookie (Make 4)
Use tan and the 3.5 mm hook.
Head
Rnd 1: Make a magic ring and work 6 sc into it. Join with a sl st. (6)
Rnd 2: Ch 1, inc in each st around, join. (12)
Rnd 3: Ch 1, (sc in next st, inc) 6 times, join. (18)
Rnd 4: Ch 1, (sc in next 2 sts, inc) 6 times, join. (24)
Do not fasten off. The head should measure 1.6 in (4.1 cm) across.
Body
The body is worked in rows into the bottom of the head. The neck uses 6 head stitches, and the other 18 stay free.
Row 1 (neck): Ch 1, sc in each of next 6 sts, turn. (6)
Row 2: Ch 1, inc in first st, sc in next 4 sts, inc in last st, turn. (8)
Row 3 (arms): Ch 4. Sc in 2nd ch from hook and in next 2 ch (3 arm sts). Sc in each of next 8 sts. Work 3 fsc, then turn. (14)
Rows 4–5: Ch 1, sc in each st across, turn. (14)
Row 6: Do not ch. Sl st in each of first 4 sts, then ch 1. Sc in the same st as the last sl st and in the next 7 sts. Leave the last 3 sts unworked and turn. (8)
Each arm is now 3 sts wide and 3 rows tall.
Row 7: Ch 1, inc in first st, sc in next 6 sts, inc in last st, turn. (10)
Row 8: Ch 1, sc in each st across, turn. (10)
Legs
Leg 1, Row 9: Ch 1, sc in first 4 sts and turn. Leave the other 6 sts unworked. (4)
Rows 10–11: Ch 1, sc in each st, turn. (4) Fasten off.
Leg 2, Row 9: Skip the next 2 sts of Row 8 and join tan in the following st. Ch 1, sc in the same st and in the next 3 sts, turn. (4)
Rows 10–11: Ch 1, sc in each st, turn. (4) Fasten off.
Check: 4 + 2 skipped + 4 = 10, which matches Row 8. The cookie should measure 3.1 in (7.9 cm) x 3.8 in (9.7 cm).
Pocket (Make 1)
Use cranberry red and the 4.0 mm hook.
Rnd 1: Ch 22. Work 3 sc in 2nd ch from hook, sc in next 19 ch, then 3 sc in last ch. Turn the work and continue along the free loops: sc in next 19 ch. Join. (44: 3 + 19 + 3 + 19)
Rnd 2: Ch 1, (inc in each of next 3 sts, sc in next 19 sts) 2 times, join. (50)
Rnd 3: Ch 1, [(sc in next st, inc) 3 times, sc in next 19 sts] 2 times, join. (56)
The base should measure about 6.25 in (15.9 cm) x 1.5 in (3.8 cm).
Rnd 4: Ch 1, sc in BLO of each st around, join. (56) This round turns the edge up to form the wall.
Rnds 5–18: Ch 1, sc in each st around, join. (56)
Press the pocket flat. The side folds sit at the center of each rounded end, which gives 28 sts on the front and 28 on the back. The pocket should be 7 in (17.8 cm) wide and about 4 in (10.2 cm) tall. Fasten off.
Small Pieces
Cookie bow (make 4; bright red; 3.5 mm hook): Ch 7. Row 1: sc in 2nd ch from hook and in each ch across. (6) Rows 2–3: ch 1, sc 6, turn. Fasten off, leaving a 6 in (15.2 cm) tail. Wrap the tail tightly around the center 6 times. The bow should measure 1.25 in (3.2 cm) x 0.6 in (1.5 cm).
Buttons (make 8; cream; 3.5 mm hook): Work 6 sc in a magic ring, pull it closed and join. (6) Each button is 0.3 in (0.8 cm) across.
Magnet cup (make 4; tan; 3.5 mm hook): Rnd 1: 6 sc in a magic ring. (6) Rnd 2: inc in each st. (12) Rnd 3: sc in BLO of each st. (12) Leave a 12 in (30.5 cm) tail. The cup is 0.8 in (2.0 cm) across.
Pocket bow (make 1; bright red; 4.0 mm hook): Ch 41. Sl st in the back bump of the 2nd ch from hook and in each ch across. (40) The cord should be about 9 in (22.9 cm) long.
Holly leaf (make 2; green; 3.5 mm hook): Ch 8. Starting in the back bump of the 2nd ch from hook, work: sl st, sc, hdc, dc, hdc, sc, sl st. (7) Ch 2 for the tip. Along the free loops, work: sl st, sc, hdc, dc, hdc, sc, sl st. (7) Each leaf is 1.5 in (3.8 cm) long.
Handle (make 1; cream; 4.0 mm hook): Ch 41. Sc in 2nd ch from hook and in each ch across. (40) Ch 1, rotate, and sl st in each free loop. (40) The handle should be 10 in (25.4 cm) long.
Make All Pieces
- Tan: 4 cookies and 4 magnet cups
- Cranberry red: 1 pocket
- Cream: pocket rim, handle, 8 buttons and icing
- Bright red: 4 cookie bows and 1 pocket bow
- Green: 2 leaves
Front layout:
        [handle loop]
  [cookie][cookie][cookie]
  ~~~ 7 cream scallops ~~~
   [leaf] [red bow] [leaf]
  [  cranberry pocket   ]

  [cookie 4: used alone]
Joining and Assembly
The main pieces stay separate. In this step you sew the small parts onto them.
Faces: Use black to make French-knot eyes on Rnd 3, with 4 sts between them. Use pink to satin-stitch a cheek below and to the outside of each eye. Use cream to backstitch a smile across 4 sts of Rnd 2.
Details: Sew 2 buttons to the center of the body, one on Row 4 and one on Row 7. Sew the bow to the top right of the head at a slight angle.
Magnets: Put a magnet in each cup with the ridge facing out. Center the cup on the back of the cookie body. Whipstitch once through every rim stitch, and keep the stitches from showing on the front.
Pocket bow: Fold the cord into 2 loops of 1.25 in (3.2 cm) each, leaving 2 tails of 2 in (5.1 cm). Wrap the center 3 times with bright red yarn. The finished bow is 3 in (7.6 cm) x 2.25 in (5.7 cm). Sew it to the center front, 1 in (2.5 cm) below the rim. Sew one leaf on each side of the knot, angled downward.
Handle: Sew each end to the inside of the back wall. Place each end 1 in (2.5 cm) in from the side fold and 0.25 in (0.6 cm) below the rim. Stitch a small box through each end.
Sew with moderate tension: close the gaps without causing puckers. Afterward the pocket should still measure 7 in (17.8 cm) wide.
Border
Cookie Edging (tan; 3.5 mm hook)
Work 1 sc in each stitch or row end, and 3 sc in each outer corner. With the right side facing you, join tan at the top of the head.
Rnd E:
- Head: Across the 18 free sts, work sc 1, (inc, sc 3) 4 times, sc 1. (22)
- Neck: 1 sc in each row end of Rows 2–1. (2)
- Arm: Sc in the first 2 arm sts along the top and 3 sc in the 3rd. Work 1 sc in each row end of Rows 3–5. Work 3 sc in the first underside st, then sc in the next 2. (13)
- Body side: 1 sc in each row end of Rows 6–8. (3)
- Leg, outer side: 1 sc in each row end of Rows 9–11. (3)
- Foot: 3 sc in first st, sc 2, 3 sc in last st. (8)
- Leg, inner side: 1 sc in each row end of Rows 11–9. (3)
- Crotch: Sc2tog over the 2 skipped sts. (1)
- Work steps 7, 6, 5, 4, 3 and 2 in that order up the second side. (32)
Join. (87) Fasten off.
Why the math works: Each side has 2 + 13 + 3 + 3 + 8 + 3 = 32 sts. The total is 22 + 32 + 32 + 1 = 87. The head gets 4 increases so the edging lies flat around the curve, and the 3-sc corners keep the arms and feet square.
Icing: Use cream to work surface sl sts along the inner edge of Rnd E (about 87). Then work a wavy line across each wrist on Row 4, and another across the body and legs at Row 9.
Pocket Rim (cream; 4.0 mm hook)
One scallop covers 4 sts, which is 1 in (2.5 cm). Join cream at a side fold.
Rnd 19: Ch 1, sc in each st around, join. (56: 28 front + 28 back)
Rnd 20: Ch 1, (sc in next st, skip 1, 5 dc in next st, skip 1) 14 times, join. (14 scallops: 7 front + 7 back)
Why the math works: 28 ÷ 4 = 7 scallops, each 1 in (2.5 cm) wide, for 7 in (17.8 cm) across the front. Starting at a fold puts a sc on each side fold. The rim adds 0.75 in (1.9 cm), so the pocket is 4.75 in (12.1 cm) tall.
Final Blocking
- Mist each cookie and pin it flat, face up.
- Pin the arms and feet square, and shape the head into a round.
- Fill the pocket with a folded towel 7 in (17.8 cm) wide.
- Mist the scallops and pin each one open.
- Let everything dry for at least 8 hours.
- Hang the empty pocket for 1 hour so the handle settles.
Final Quality-Control Checklist
- Each cookie measures 3.5 in (8.9 cm) x 4.2 in (10.7 cm).
- Rnd E has 87 sts, and the corners are crisp.
- The icing runs evenly inside the edge.
- The magnets don’t show from the front.
- The pocket measures 7 in (17.8 cm) x 4.75 in (12.1 cm).
- Exactly 7 scallops sit across the front.
- The pocket hangs level.
Troubleshooting
- Cookie cups: Rnd E is too tight. Rework it loosely or with a 4.0 mm hook.
- Head edge ruffles: Leave out the 4 head increases.
- Scallops flare: Work 4 dc per scallop instead of 5.
- Pocket leans: Re-sew the handle ends at equal distances from the folds.
- Weak hold: Change to neodymium magnets of the same size.
Care
Spot clean the cookies with a damp cloth. Hand wash the pocket in cool water and dry it flat.
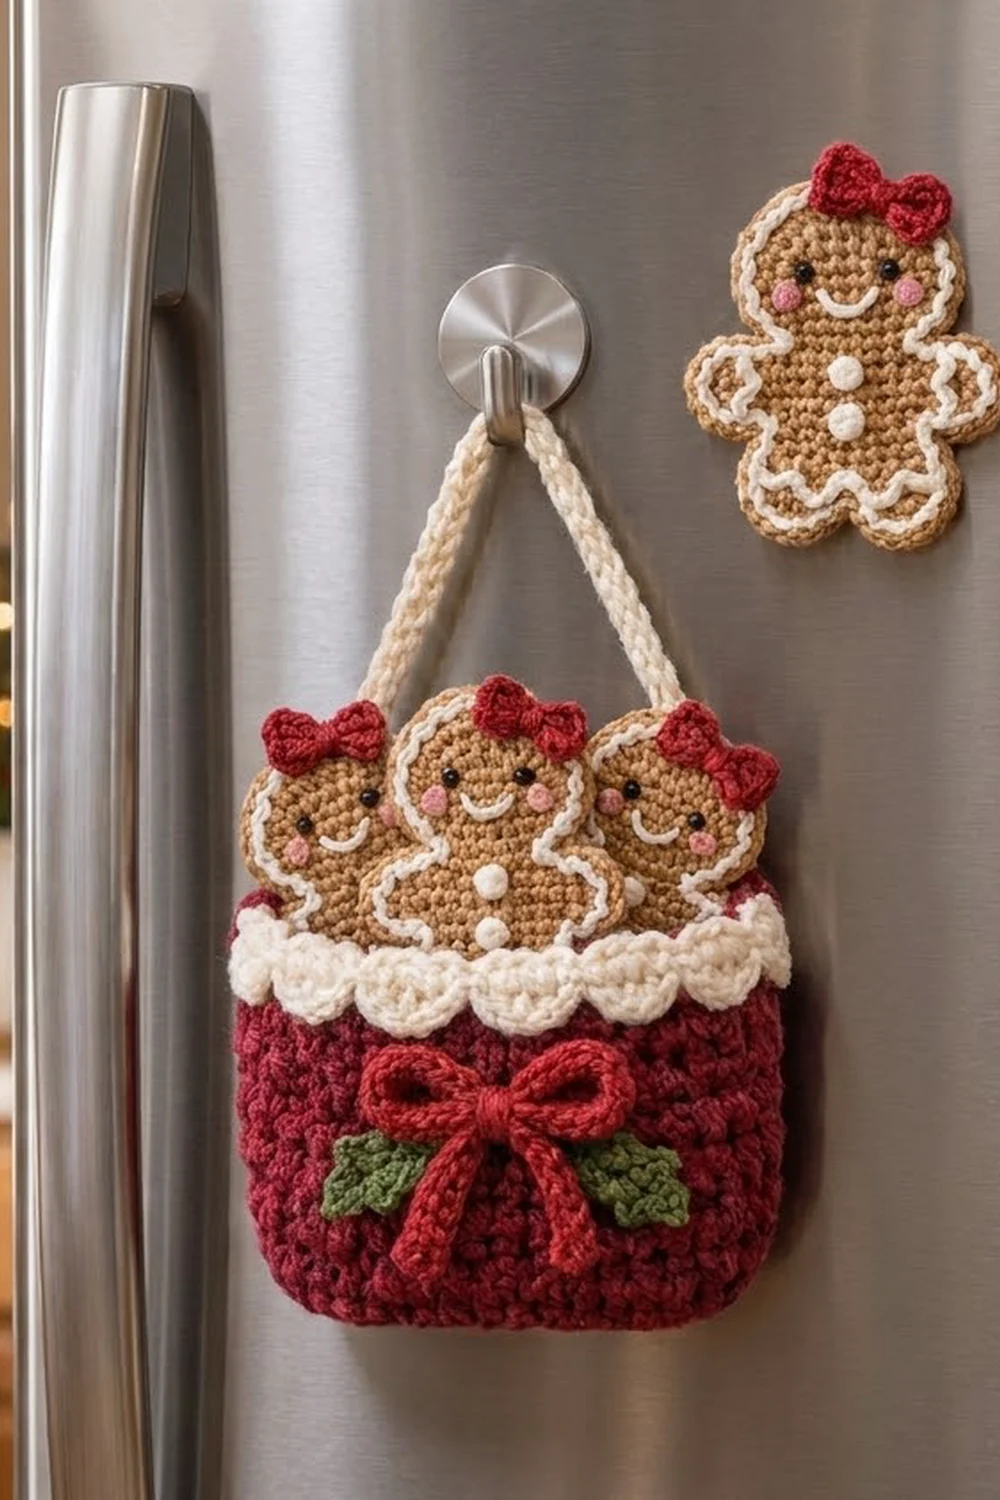
Final Notes
Here is how the measurements build up. A 1.6 in (4.1 cm) head grows into a cookie of 3.1 in x 3.8 in (7.9 cm x 9.7 cm). The 87-stitch edging brings it to 3.5 in x 4.2 in (8.9 cm x 10.7 cm). On the pocket, 56 stitches give 7 in (17.8 cm) across the front. The 14 scallops finish it at 4.75 in (12.1 cm) tall. Check each number as you go.
Happy crocheting!