

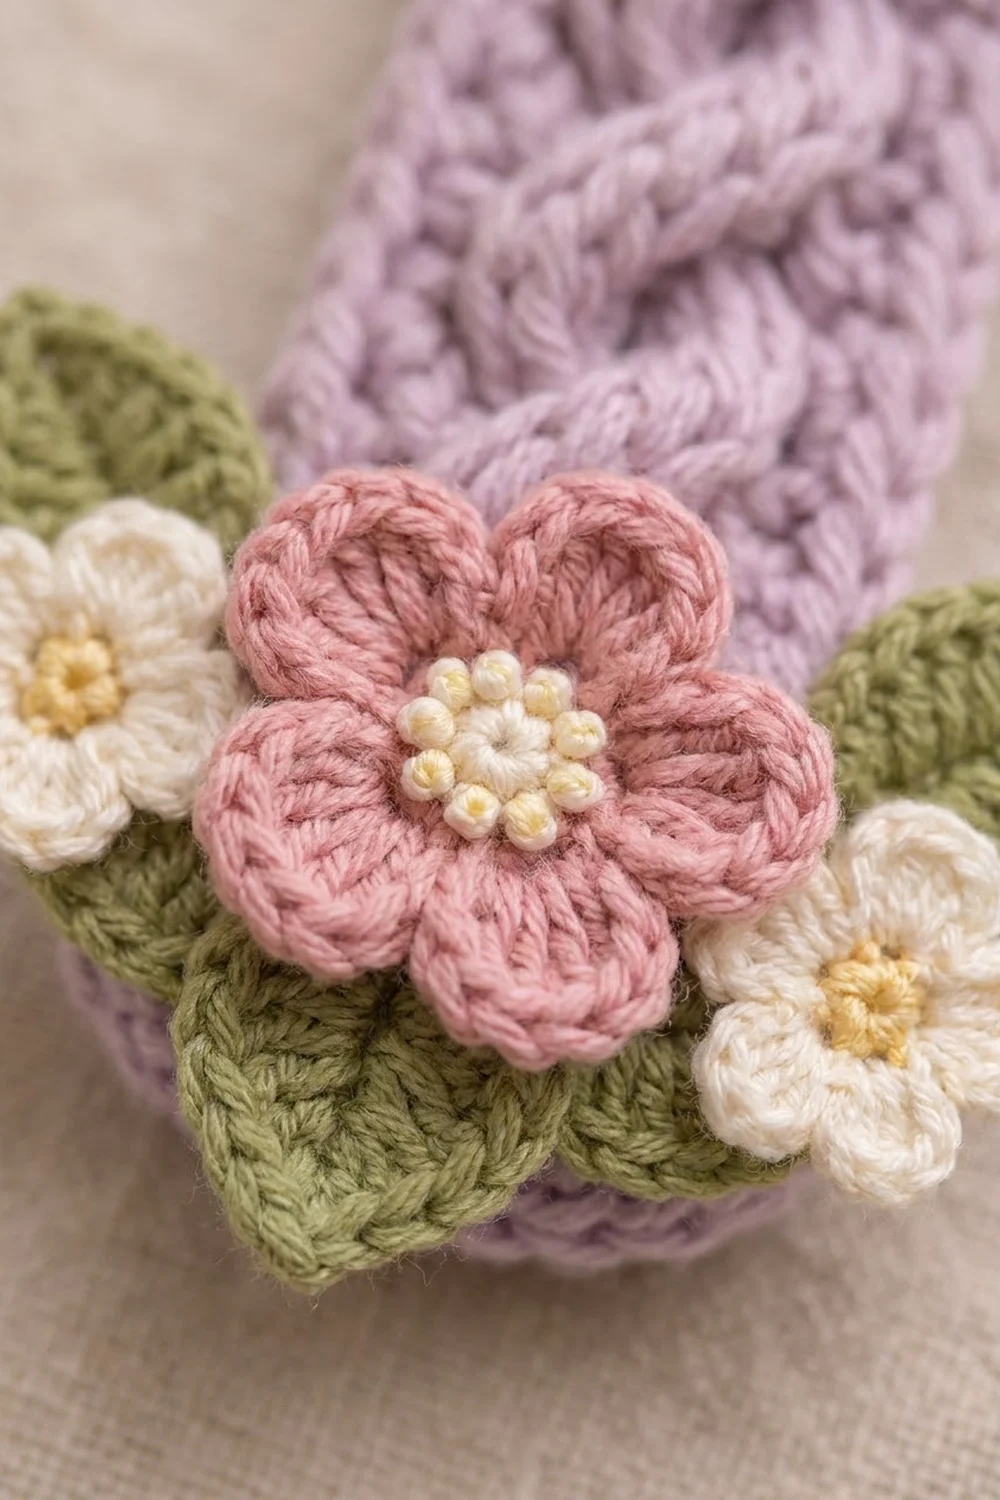
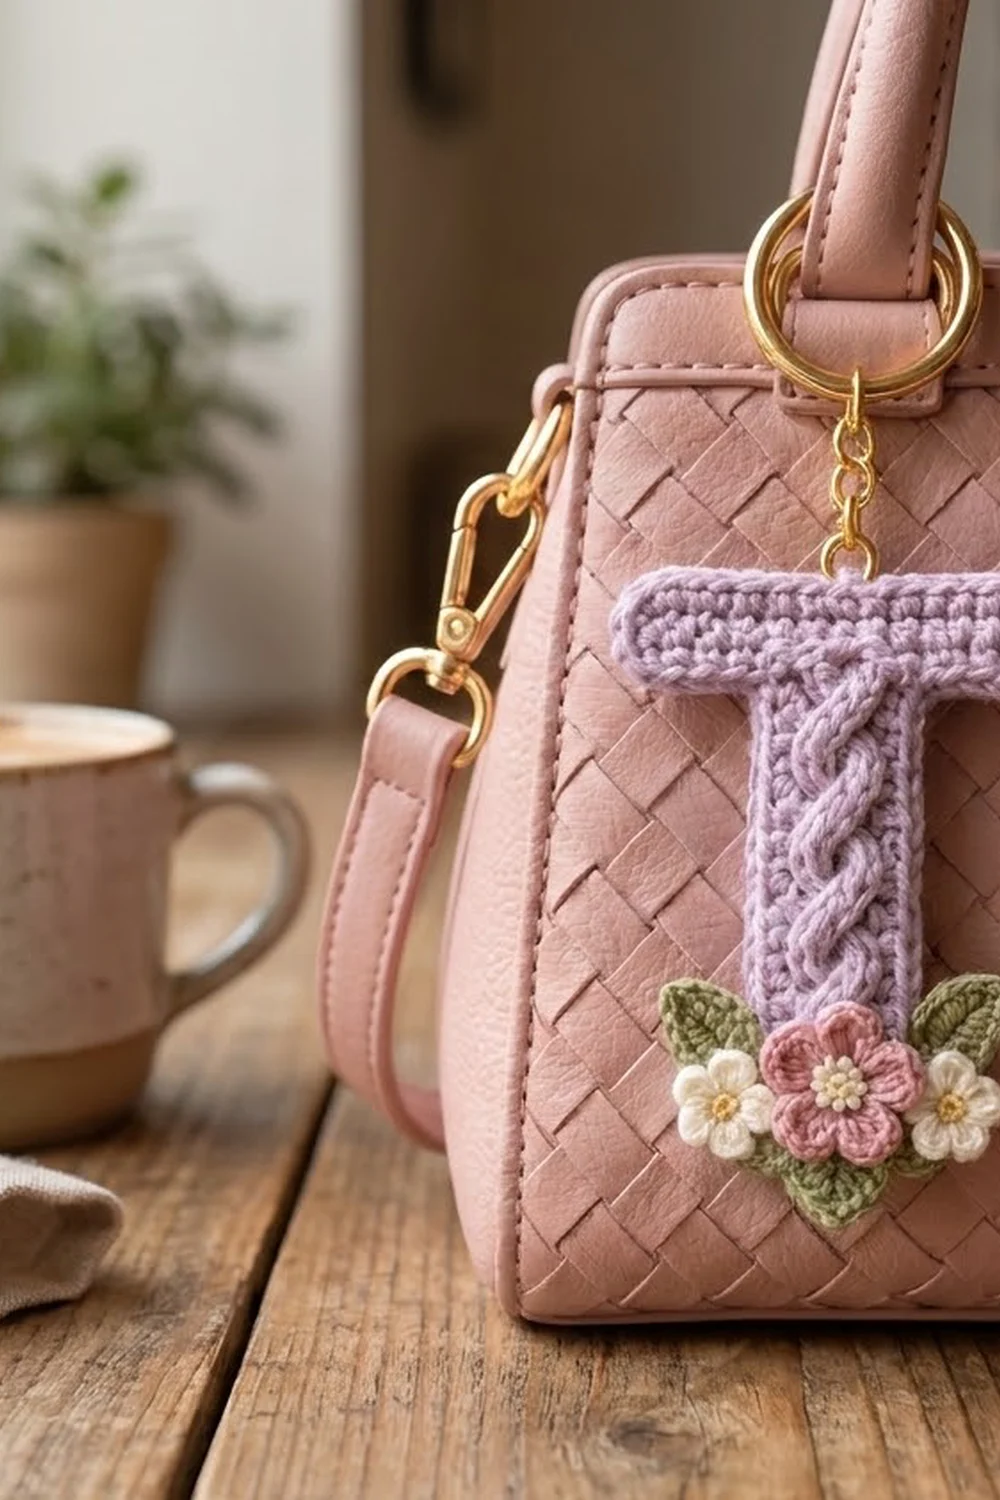
This keychain is a capital letter T in soft lavender. A raised braided cable runs up the center of the stem, and a small cluster of flowers sits at the bottom: one dusty-pink blossom, two cream blossoms and two sage-green leaves. A gold keyring and short chain finish it, so it’s ready to clip to a bag, a set of keys or a zipper pull.
The colors are pastel and gentle: lavender for the letter, pink and cream for the flowers, pale yellow for the flower centers and sage green for the leaves. Firm single crochet keeps the letter flat and sturdy, and the post-stitch braid adds texture without making the piece bulky.
This pattern uses US crochet terms. The finished letter measures 4 in (10.2 cm) wide and 4.8 in (12.2 cm) tall, not counting the hardware.
The T is worked flat in one piece. You work the stem from the bottom up with the cable in the center. Then you extend both sides into the crossbar and finish with one round of single crochet edging. The flowers and leaves are made separately and sewn onto the front.
Finished Size and Construction
- Finished size: 4 in (10.2 cm) wide × 4.8 in (12.2 cm) tall
- Skill level: Intermediate (post-stitch cables)
- Terminology: US crochet terms
- Yarn weight: DK (light worsted, #3), cotton or cotton blend
- Hook: 3.5 mm (E-4)
- Number of pieces: 1 letter, plus 5 small appliqués (1 pink flower, 2 cream flowers, 2 leaves)
- Layout: One T shape. The stem is 8 sts wide and the crossbar is 18 sts wide.
- Size before edging: 3.6 in (9.1 cm) wide × 4.4 in (11.2 cm) tall. The stem is 1.6 in (4.1 cm) wide.
- Size after edging: 4 in (10.2 cm) × 4.8 in (12.2 cm). The stem is 2 in (5.1 cm) wide.
- Edging depth: 1 round of sc, about 0.2 in (0.5 cm) on each side
Materials
Use a smooth, tightly plied DK cotton or cotton blend. Cotton shows the cable crisply and holds a flat shape. Avoid fuzzy or very splitty yarns, because post stitches are hard to read in them.
- Lavender (MC): 12 g / 30 m
- Dusty pink: 3 g / 7 m
- Cream: 3 g / 7 m
- Pale yellow: 1 g / 3 m
- Sage green: 3 g / 7 m
All quantities include a safety margin of about 20%.
Tools:
- 3.5 mm (E-4) crochet hook
- Tapestry needle
- Scissors
- Stitch markers (2)
- Gold split keyring, 1 in (2.5 cm), with a 1.2 in (3.0 cm) chain section
- 2 gold jump rings and flat-nose pliers
- Blocking board, rust-proof pins and a spray bottle
Abbreviations (US Terms)
- ch: chain
- sl st: slip stitch
- sc: single crochet
- hdc: half double crochet
- dc: double crochet
- sc2tog: single crochet 2 together
- fsc: foundation single crochet
- st(s): stitch(es)
- sk: skip
- RS / WS: right side / wrong side
- FPdc: front post double crochet. Yarn over, insert the hook from front to back to front around the post of the indicated st, then complete a dc.
- FPtr: front post treble crochet. Yarn over twice, insert the hook around the post from the front, then complete a tr.
Special stitch: fsc (foundation single crochet). Insert the hook into the indicated st, yarn over and pull up a loop. Yarn over and pull through 1 loop to make the “chain,” then yarn over and pull through 2 loops. For each following fsc, insert the hook into the “chain” of the fsc you just made.
Cable rule: On RS rows, every FP stitch wraps around a FP stitch two rows below. Always skip the sc behind each FP stitch, so every row keeps its stitch count.
Gauge and Checkpoints
Gauge: 20 sc and 20 rows = 4 in (10.2 cm) in sc. That works out to 5 sts and 5 rows per inch.
This keychain is a single small piece, so make the letter itself as your test. Stop at each checkpoint below and measure before you go on.
- After Row 6: The stem should be 1.6 in (4.1 cm) wide and 1.2 in (3.0 cm) tall. The cable may pull the width in to 1.5 in (3.8 cm), and that’s fine.
- After Row 16: The stem should be 3.2 in (8.1 cm) tall.
- After Row 22: The letter should be 3.6 in (9.1 cm) wide × 4.4 in (11.2 cm) tall.
- After the edging: The letter should be 4 in (10.2 cm) × 4.8 in (12.2 cm).
Too big? Go down to a 3.25 mm hook. Too small? Go up to a 3.75 mm hook. Change hooks early. If you’re off by more than 0.2 in (0.5 cm) at Row 6, start again rather than trying to block it out later.
The Letter T
Stem
Using lavender, ch 9.
Row 1 (WS): Sc in the 2nd ch from the hook and in each ch across. Turn. (8 sts)
Row 2 (RS, cable setup): Ch 1. Sc in the first st, FPdc around each of the next 6 sts, sc in the last st. Turn. (8 sts: 2 sc, 6 FPdc)
Row 3 (WS): Ch 1, sc in each st across. Turn. (8 sts)
Every WS row from here on is worked like Row 3.
Row 4 (RS, left cross): Ch 1, sc in the first st.
- Sk the first 2 FP sts two rows below. FPtr around the next 2 FP sts.
- Working in front of the sts you just made, FPtr around the 2 skipped FP sts.
- FPdc around the next 2 FP sts two rows below.
- Sc in the last st. Turn. (8 sts)
Row 5 and all odd rows through Row 15 (WS): Work as Row 3. (8 sts)
Row 6 (RS, right cross): Ch 1, sc in the first st.
- FPdc around the first 2 FP sts two rows below.
- Sk the next 2 FP sts and FPtr around the following 2 FP sts.
- Working behind the sts you just made, FPtr around the 2 skipped FP sts.
- Sc in the last st. Turn. (8 sts)
Rows 7–16: Keep alternating:
- Rows 8, 12 and 16 are worked as Row 4 (left cross).
- Rows 10 and 14 are worked as Row 6 (right cross).
- Rows 7, 9, 11, 13 and 15 are worked as Row 3.
You now have 8 sts on every row and 7 crossings in total. Crossing in front and then behind is what forms the braid.
At the end of Row 16, do not turn yet. Ch 6, then turn.
Crossbar
Row 17 (WS, extension row):
- Sc in the 2nd ch from the hook and in the next 4 ch (5 sts).
- Sc in each of the 8 stem sts (13 sts).
- Work 5 fsc, inserting the hook for the first fsc into the base of the last sc you made. Turn.
Row 17 total: 5 + 8 + 5 = 18 sts
Row 18 (RS, cable close): Ch 1. Sc in the first 6 sts, FPdc around each of the 6 FP sts two rows below, sc in the last 6 sts. Turn. (18 sts)
This straight row closes the braid so it fades neatly into the crossbar.
Rows 19–22: Ch 1, sc in each st across. Turn at the end of each row. (18 sts)
Fasten off after Row 22 and check your size: 3.6 in (9.1 cm) × 4.4 in (11.2 cm).
Edging
Edging gauge: Work this round at the same tension as the body, 5 sts per inch.
With the RS facing, join lavender with a sl st in the top right corner st and ch 1. Work the round as follows:
- Top: 3 sc in the corner st, sc in the next 16 sts, 3 sc in the last st. (22 sts)
- Left crossbar end: Sc once into each row end of Rows 21 to 18. (4 sts)
- Left crossbar underside: 3 sc in the corner st, sc in the next 3 sts. Then sc2tog over the last crossbar st and the Row 16 end of the stem. (7 sts)
- Left stem side: Sc once into each row end of Rows 15 to 2. (14 sts)
- Bottom: Work into the free loops of the foundation ch: 3 sc in the first loop, sc in the next 6, 3 sc in the last. (12 sts)
- Right stem side: Sc once into each row end of Rows 2 to 15. (14 sts)
- Right crossbar underside: Sc2tog over the Row 16 end and the first crossbar st. Sc in the next 3 sts, then 3 sc in the corner st. (7 sts)
- Right crossbar end: Sc once into each row end of Rows 18 to 21. (4 sts)
Join with a sl st to the first sc and fasten off.
Total: 22 + 4 + 7 + 14 + 12 + 14 + 7 + 4 = 84 sts
Why the math works:
- Every edge is used exactly once:
- The top has 18 sts (1 + 16 + 1).
- Each crossbar underside has 5 sts (1 corner + 3 sc + 1 in the sc2tog).
- The bottom has 8 foundation loops (1 + 6 + 1).
- The crossbar ends have 6 rows each. Rows 17 and 22 hold corners, which leaves 4 row ends.
- The stem sides have 16 rows each. Row 1 holds a corner and Row 16 goes into the sc2tog, which leaves 14 row ends.
- The gauge is square (5 sts and 5 rows per inch), so 1 sc per row end matches 1 sc per stitch and the sides lie flat.
- The 3-sc corners turn the 6 outer corners smoothly.
- The sc2tog at each of the 2 inner corners stops them from bunching.
Checkpoint: 4 in (10.2 cm) wide × 4.8 in (12.2 cm) tall. The stem should be 2 in (5.1 cm) wide.
Appliqués
Pink Flower (make 1)
Rnd 1: With cream, make a magic ring. Ch 1, then work 10 sc into the ring. Pull the ring closed and join with a sl st to the first sc. Fasten off. (10 sts)
Rnd 2: Join pink in any st. (Hdc, 2 dc, hdc) in the next st, sl st in the following st. Repeat from * to * 4 more times. (5 petals)
Fasten off and leave a 10 in (25.4 cm) tail. The flower measures about 1.25 in (3.2 cm) across.
With pale yellow, embroider 3 tiny French knots on the cream center.
Cream Flowers (make 2)
Rnd 1: With pale yellow, make a magic ring. Ch 1, then work 5 sc into the ring. Join and fasten off. (5 sts)
Rnd 2: Join cream in any st. Work (sc, 2 dc, sc) in each st around, then join. (5 petals, 20 sts)
Fasten off and leave a tail. Each flower measures about 0.75 in (1.9 cm) across.
Leaves (make 2)
With green, ch 7. Starting in the 2nd ch from the hook and working along the chain, number the chains 1 to 6. Chain 6 is the last one, at the far end of the chain.
- First side: Sl st in ch 1, sc in ch 2, hdc in ch 3, dc in ch 4, hdc in ch 5.
- Tip: Work (sc, ch 2, sl st in the 2nd ch from the hook, sc) all in ch 6.
- Second side: Work along the other side of the chain: hdc in ch 5, dc in ch 4, hdc in ch 3, sc in ch 2, sl st in ch 1.
Fasten off and leave a tail. Each leaf is about 1 in (2.5 cm) long. If you like, embroider a backstitch center vein in green.
Assembly
- Center the pink flower on the stem so its lowest petal sits about 0.2 in (0.5 cm) below the bottom edge.
- Tuck one leaf behind each side so the leaves fan up and outward.
- Overlap one cream flower on each lower side of the pink flower.
- Pin everything in place and check that the cluster is centered.
- Sew through the front layer of the letter only, working small stitches under the petal edges. Do the leaves first, then the pink flower, then the cream flowers.
- Weave in all the ends on the back.
Hardware
Open a jump ring and pass it through the edging between sts 11 and 12 of the 22 top-edge sts, which is the exact center. Hook on the chain, then close the ring firmly with pliers.
Final Blocking
- Lightly mist the letter until it is evenly damp, not soaked.
- Lay it RS up on the blocking board.
- Pin the 6 outer corners first, measuring 4 in (10.2 cm) across the crossbar and 4.8 in (12.2 cm) top to bottom.
- Pin each stem side straight at 2 in (5.1 cm) wide.
- Shape the crossbar corners into soft curves with your fingers.
- Don’t press the cable flat. Pat it upward so it stays raised.
- Let it dry completely, then unpin it.
Final Quality-Control Checklist
- The letter measures 4 in (10.2 cm) × 4.8 in (12.2 cm).
- The stem is 2 in (5.1 cm) wide and the same width from top to bottom.
- There are 7 cable crossings, alternating front and back.
- The edging has 84 sts, and none of the corners pucker.
- The crossbar is level and both arms are the same length.
- The flower cluster is centered, and no stitches show through on the front.
- The jump ring is closed with no gap, and the keyring hangs straight.
- All ends are woven in securely on the WS.
Troubleshooting
- The stem narrows above the cable: The FP sts are too tight. Pull each loop up to the height of the current row.
- The braid looks like a twist, not a plait: Make sure the Row 4 crosses go in front and the Row 6 crosses go behind.
- The stitch count is off: You probably forgot to skip the sc behind a FP st. Recount after every RS row.
- The edging ruffles: Your edging is too loose. Go down half a hook size for the edging only.
- The inner corners gap: Work the sc2tog tighter, or close the gap with a small stitch from the back.
- The keyring tilts: Move the jump ring to the true center stitch.
Care
Spot-clean with mild soap and cool water, then reshape and dry flat. Don’t machine wash, because the appliqués and hardware can snag.
Final Notes
Each stage has a size to check:
- Gauge: 5 sts × 5 rows per inch
- Row 6: The stem is 1.6 in (4.1 cm) wide.
- Row 16: The stem is 3.2 in (8.1 cm) tall.
- Row 22: The letter is 3.6 in × 4.4 in (9.1 cm × 11.2 cm).
- Edging: 84 sts bring it to 4 in × 4.8 in (10.2 cm × 12.2 cm).
If those numbers are right at each step, the letter will lie flat and the flowers will sit where they should.
Happy crocheting!