

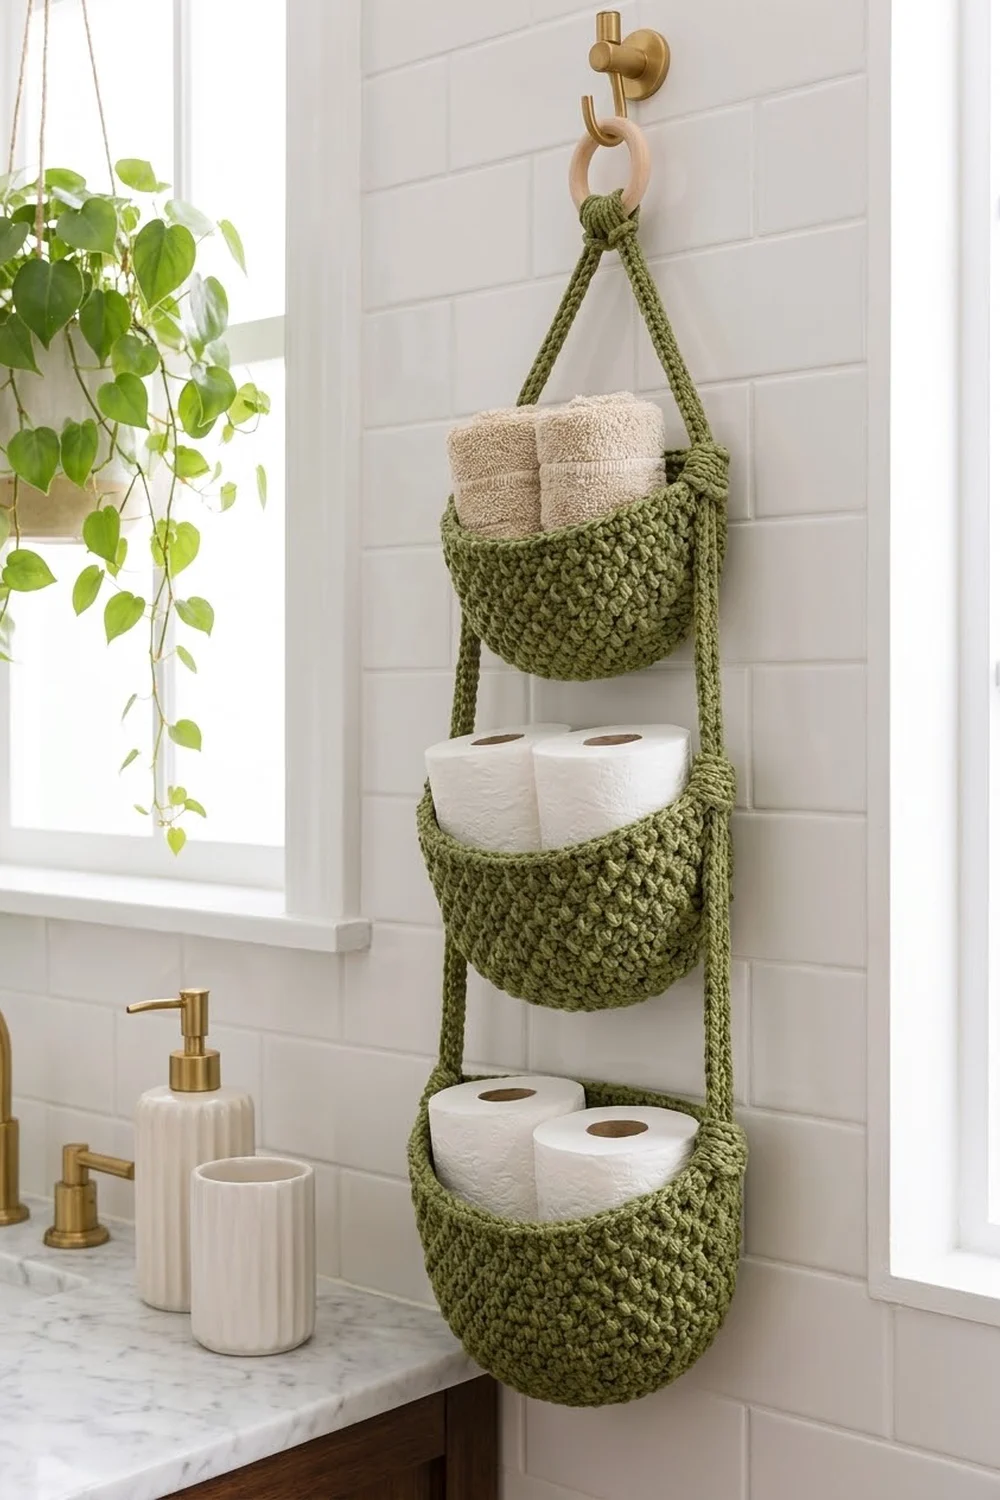
The Mossy Tiers hanger is a three-level wall organizer made of half-moon baskets. Each basket has a flat back that sits against the wall and a rounded front that holds hand towels, washcloths, or spare toilet rolls. The three baskets hang one above the other on two crocheted cords that meet at a natural wooden ring.
Everything is worked in one solid olive-moss green. The walls use griddle stitch, a simple pairing of single and double crochet that makes a dense, pebbled surface. The floors are plain single crochet, and a reverse single crochet rim gives each basket a firm, rope-like edge. All instructions use US crochet terms.
The finished hanger is about 13.3 in (33.8 cm) wide at the largest basket and 33.3 in (84.6 cm) tall from the top of the ring to the bottom of the large basket. The baskets measure 8.0 in (20.3 cm), 10.7 in (27.2 cm), and 13.3 in (33.8 cm) across the back rim.
Each basket begins as a flat half-circle floor worked in turned rows. One edging round turns the floor into a base, and the walls are then worked up in joined rounds. Two slip-stitch cords and two short ring loops finish the hanger. They are tied to the back corners of each basket.
Finished Size and Construction
- Finished size: 13.3 in (33.8 cm) wide x 33.3 in (84.6 cm) tall
- Skill level: Easy-intermediate
- Terminology: US
- Yarn weight: Bulky (#5) cotton or cotton blend
- Hook: 6 mm (US J-10)
- Number of pieces: 7 crocheted pieces (3 baskets, 2 cords, 2 ring loops), plus 1 wooden ring
- Layout: 3 baskets stacked vertically, small at top, large at bottom
- Piece size (rim width across back): small 8.0 in (20.3 cm), medium 10.7 in (27.2 cm), large 13.3 in (33.8 cm)
- Wall height before rim: small 3.5 in (8.9 cm), medium 3.9 in (9.9 cm), large 4.3 in (10.9 cm)
- Rim (border) depth: 0.5 in (1.3 cm), 2 rounds
Materials
Choose a firm, round bulky cotton or cotton blend. Cotton holds the basket shape well and does not stretch under the weight of rolls or towels. Avoid soft acrylic chenille or very fuzzy yarn, because the baskets will sag and the pebbled texture will blur.
- Olive green: 250 g, about 325 m (355 yd), based on 100 g = 130 m
All quantities include a margin of about 30% for swatching, joining, and wrapping.
Tools:
- 6 mm (US J-10) crochet hook
- 1 wooden ring, 2 in (5.1 cm) diameter
- 4 locking stitch markers
- Tapestry needle
- Scissors
- Measuring tape
- Spray bottle and a few small towels for blocking
Abbreviations (US Terms)
- ch – chain
- sl st – slip stitch
- sc – single crochet
- dc – double crochet
- rev sc – reverse single crochet
- st(s) – stitch(es)
- rnd – round
- rep – repeat
Griddle stitch (in rounds): Alternate sc and dc. On each new round, work a dc into each sc and an sc into each dc. This pairing creates the pebbled texture.
Reverse single crochet (rev sc): Working from left to right (for right-handers), insert the hook in the next st to the right, yarn over, pull up a loop, yarn over, and pull through both loops.
Back-bump slip stitch cord: Make a chain, then sl st into the back bump of each ch. This makes a round, firm cord that does not stretch.
Gauge and Checkpoints
- Floor (sc in rows): 12 sts and 13 rows = 4 in (10.2 cm)
- Walls (griddle stitch in rnds): 12 sts and 10 rnds = 4 in (10.2 cm), so each rnd is about 0.4 in (1.0 cm) tall
- Cord: 10 ch = 3 in (7.6 cm), measured after the sl st row
Make the small basket first; it is your gauge piece.
Checkpoints:
- After floor Row 6, the straight edge measures 3.7 in (9.4 cm).
- After the last floor row, the straight edge measures 7.4 in (18.8 cm) for the small basket, 9.8 in (24.9 cm) for the medium, and 12.3 in (31.2 cm) for the large.
- Before the rim, the walls measure 3.5 in (8.9 cm), 3.9 in (9.9 cm), and 4.3 in (10.9 cm) tall.
- After the rim, the back edge measures 8.0 in (20.3 cm), 10.7 in (27.2 cm), and 13.3 in (33.8 cm).
If your floor is too big, go down 0.5 mm in hook size. If it is too small, go up 0.5 mm. Do not change the stitch counts, because the cord spacing depends on the rim widths.
Basket Floor (make 1 of each size)
The floor is a half-circle worked in turned rows. Every row adds 3 increases. Ch 1 at the start of a row does not count as a stitch.
- Small: work Rows 1–12
- Medium: work Rows 1–16
- Large: work Rows 1–20
Row 1: Ch 2, 3 sc in 2nd ch from hook, turn. (3 sts)
Row 2: Ch 1, 2 sc in each st, turn. (6 sts)
Row 3: Ch 1, *sc in next st, 2 sc in next st; rep from * 2 more times, turn. (9 sts)
Row 4: Ch 1, *sc in next 2 sts, 2 sc in next st; rep from * 2 more times, turn. (12 sts)
Row 5 and onward: Ch 1, *sc in each st until 1 st remains before the next increase point, 2 sc in next st; rep from * 2 more times, turn. Each row has 1 more sc between increases than the previous row.
In general, Row k has (k − 2) sc then 1 increase, 3 times, for a total of 3k sts.
Row counts:
- Row 6: 18 sts
- Row 12: 36 sts (end of small floor)
- Row 16: 48 sts (end of medium floor)
- Row 20: 60 sts (end of large floor)
Do not fasten off. The floor should lie flat with a straight edge made of row ends and a smooth curved edge.
Basket Walls
Rnd 1 (conversion round): Ch 1, 3 sc in first st (corner), sc in each st along the curve until 1 st remains, 3 sc in last st (corner). Rotate and work along the straight edge: sc in each row end. Sl st to first sc.
The count for this round is (stitches worked 1-per-existing-stitch) + (extra stitches added):
- Small: (36 curve + 24 row ends) + 4 corner extras = 64 sts
- Medium: (48 curve + 32 row ends) + 4 corner extras = 84 sts
- Large: (60 curve + 40 row ends) + 4 corner extras = 104 sts
Split by section, the front curve has 40 / 52 / 64 sts including both 3-sc corners, and the back edge has 24 / 32 / 40 sts. Place a marker in the center st of each 3-sc corner. These are the back corners where the cords will attach. Move the markers up as you work.
Rnd 2: Ch 1, sc in first st, dc in next st, *sc in next st, dc in next st; rep from * around. Sl st to first sc. (64 / 84 / 104 sts)
Rnd 3: Ch 2 (does not count), dc in first st, sc in next st, *dc in next st, sc in next st; rep from * around. Sl st to first dc. (64 / 84 / 104 sts)
Rnd 4: Ch 1, sc in first st, dc in next st, *sc in next st, dc in next st; rep from * around. Sl st to first sc. (64 / 84 / 104 sts)
Repeat Rnds 3–4 to keep the pattern going, always working a dc into an sc and an sc into a dc.
- Small: end after Rnd 9 (1 sc rnd + 8 griddle rnds)
- Medium: end after Rnd 10 (1 sc rnd + 9 griddle rnds)
- Large: end after Rnd 11 (1 sc rnd + 10 griddle rnds)
Because there are no increases, the walls rise straight up from the floor edge. Rnd 1 has a few more stitches than the floor perimeter, so the walls flare gently outward and give the basket its soft bowl shape. Check the wall height against Checkpoint 3.
Make All Pieces
All pieces use the single olive green yarn.
- 1 small basket (64 sts per wall rnd)
- 1 medium basket (84 sts per wall rnd)
- 1 large basket (104 sts per wall rnd)
- 2 cords: ch 110, sl st in back bump of each ch (110 sts), 33 in (83.8 cm) long each. Leave a 12 in (30.5 cm) tail at the end.
- 2 ring loops: ch 20, sl st in back bump of each ch (20 sts), 6.0 in (15.2 cm) long each.
Layout (front view):
            ( O )         wooden ring
             | |          ring loops + binding wrap
            /   \
          [ SMALL ]       8.0 in rim
          |       |
        [  MEDIUM  ]      10.7 in rim
        |          |
      [    LARGE     ]    13.3 in rim
Joining
Top assembly:
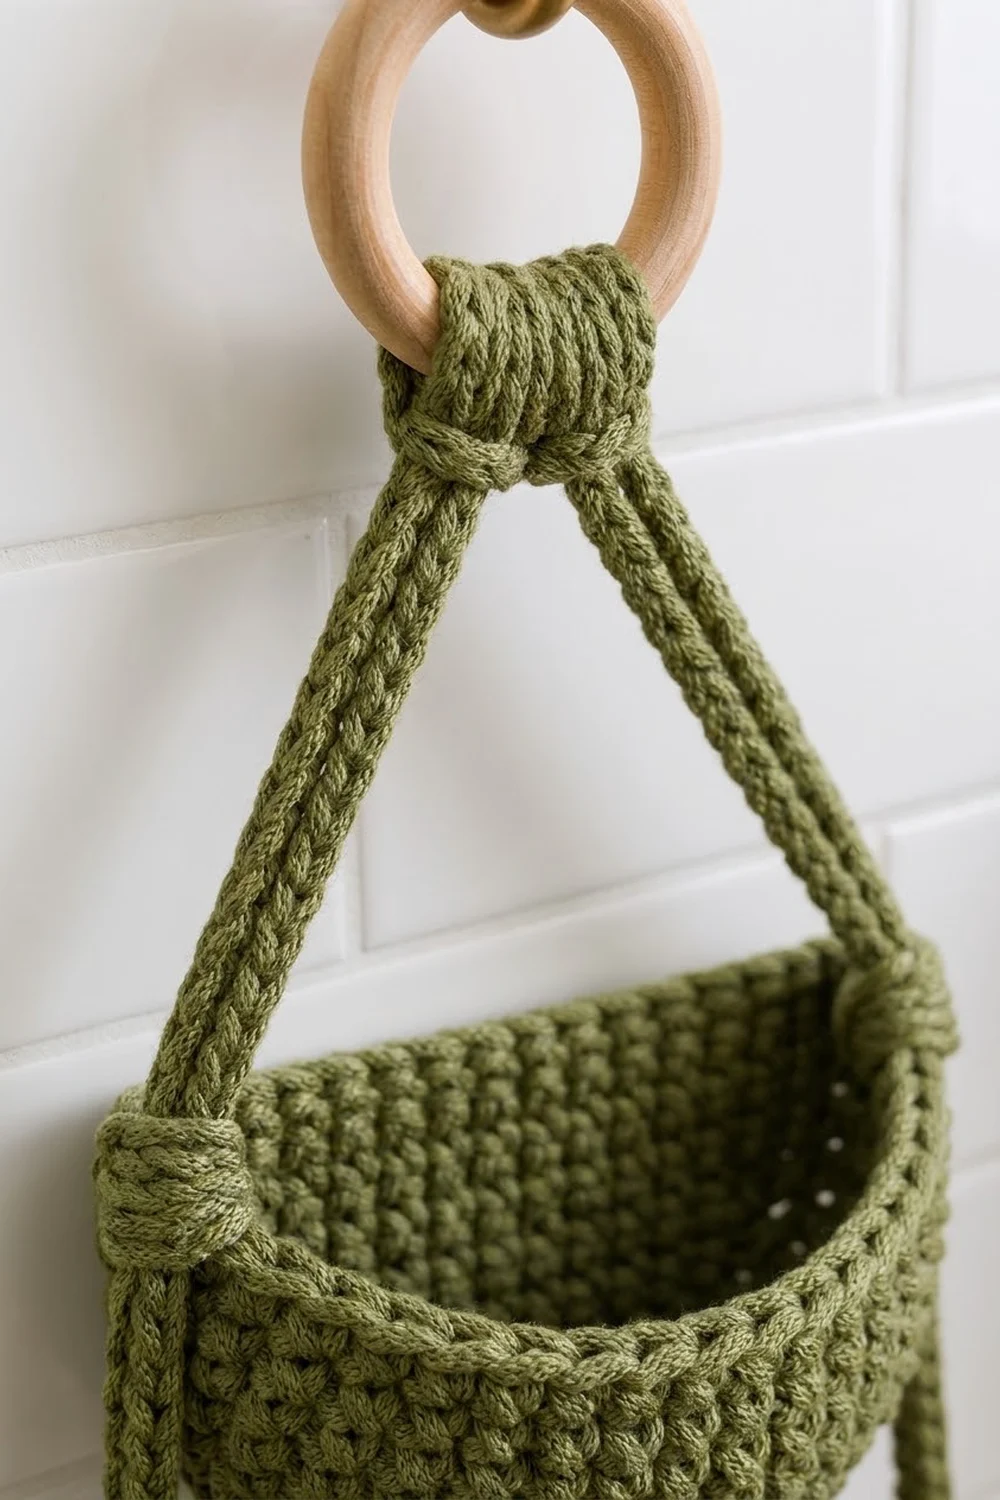
- Fold one ring loop in half over the wooden ring.
- Lay the top 1.5 in (3.8 cm) of one cord between the two loop ends.
- Sew through all three layers.
- Repeat with the second loop and cord, placing it beside the first on the ring.
- Wrap a 24 in (61.0 cm) length of yarn tightly around both bundles, just below the ring, for 1 in (2.5 cm). Thread the end under the wraps and trim.
Mark the cords: Measuring from the bottom of the binding wrap, place a marker on each cord at 9 in (22.9 cm), 18 in (45.7 cm), and 28 in (71.1 cm).
Attaching the baskets:
- Line up each cord marker with a marked back corner of the matching basket: small at 9 in, medium at 18 in, and large at 28 in.
- Sew the cord to the outside of the corner stitch, working through the rim and the top 2 wall rnds.
- Wrap yarn around the cord and the rim 8 times to make the visible corner tie. Secure on the inside.
- At the large basket, sew the remaining cord tail down the back corner of the wall.
Keep the wraps snug but not tight enough to pucker the rim. Both sides must sit at exactly the same marker, or the basket will tilt.
Size checkpoint: Hang the piece. The rims should be about 8 in (20.3 cm) apart (small to medium) and about 9 in (22.9 cm) apart (medium to large), with every rim level.
Border (Rim)
Border gauge: 12 sc = 4 in (10.2 cm). Work the rim on each basket after the walls are done and before the joining.
Rim Rnd 1: Ch 1, sc in each st around. Sl st to first sc.
- Small: 64 sts (40 front curve, 24 back)
- Medium: 84 sts (52 front curve, 32 back)
- Large: 104 sts (64 front curve, 40 back)
Rim Rnd 2: Ch 1, rev sc in each st around. Sl st to first st and fasten off. (64 / 84 / 104 sts)
Why the math works: The rim adds no stitches. At 3 sts per inch, the back edges of 24, 32, and 40 sts give 8.0 in (20.3 cm), 10.7 in (27.2 cm), and 13.3 in (33.8 cm). These are the widths the cord spacing was planned around. The rim adds 0.5 in (1.3 cm) of height, bringing the baskets to 4.0 in (10.2 cm), 4.4 in (11.2 cm), and 4.8 in (12.2 cm) tall.
Final Blocking
- Weave in all ends before blocking.
- Lightly mist each basket until it is damp, not wet.
- Pack each basket firmly with rolled towels to push out the curve.
- Press the back wall flat against a table edge so it dries straight.
- Pinch the rim corners into crisp points.
- Let everything dry completely, about 24 hours.
- Hang the cords with a weight on the bottom so they dry straight.
Final Quality-Control Checklist
- Wall rnd counts are 64, 84, and 104 sts.
- The floors lie flat with no ruffling.
- The griddle pattern stacks correctly, with dc over sc and sc over dc.
- The rev sc rim is even all the way around.
- Back rim widths are 8.0 in, 10.7 in, and 13.3 in.
- All corner ties are at matching heights on both cords.
- The rims hang level, with spacing of about 8 in and 9 in.
- The binding wrap is secure and the ring does not slip.
Troubleshooting
- Floor ruffles: Your tension is loose in later rows. Go down a hook size, or stagger the increases so they do not stack on top of each other.
- Floor cups: Your gauge is tight. Go up a hook size.
- Walls lean inward: Check that Rnd 1 has the corner extras. Without them, the count is 4 sts short.
- Pebbles look like stripes: You worked sc into sc. Rip back and follow the rule: dc into sc, sc into dc.
- Basket tilts: One corner tie is off its marker. Re-measure from the binding wrap.
- Rim waves: Work the rev sc more firmly, or use a hook 0.5 mm smaller for Rim Rnd 2.
Care
Hand wash in cool water and lay flat to dry, reshaping the baskets over towels. Do not tumble dry.
Final Notes
The measurement chain runs as follows. A floor gauge of 12 sc and 13 rows = 4 in (10.2 cm) gives half-circle floors of 7.4 in, 9.8 in, and 12.3 in (18.8, 24.9, and 31.2 cm). Wall rounds of 64, 84, and 104 sts give back rims of 8.0 in, 10.7 in, and 13.3 in (20.3, 27.2, and 33.8 cm). Cords of 33 in (83.8 cm), marked at 9 in, 18 in, and 28 in, hang everything in a 33.3 in (84.6 cm) column. Check each link in the chain and the hanger will come out level and true.
Happy crocheting!