

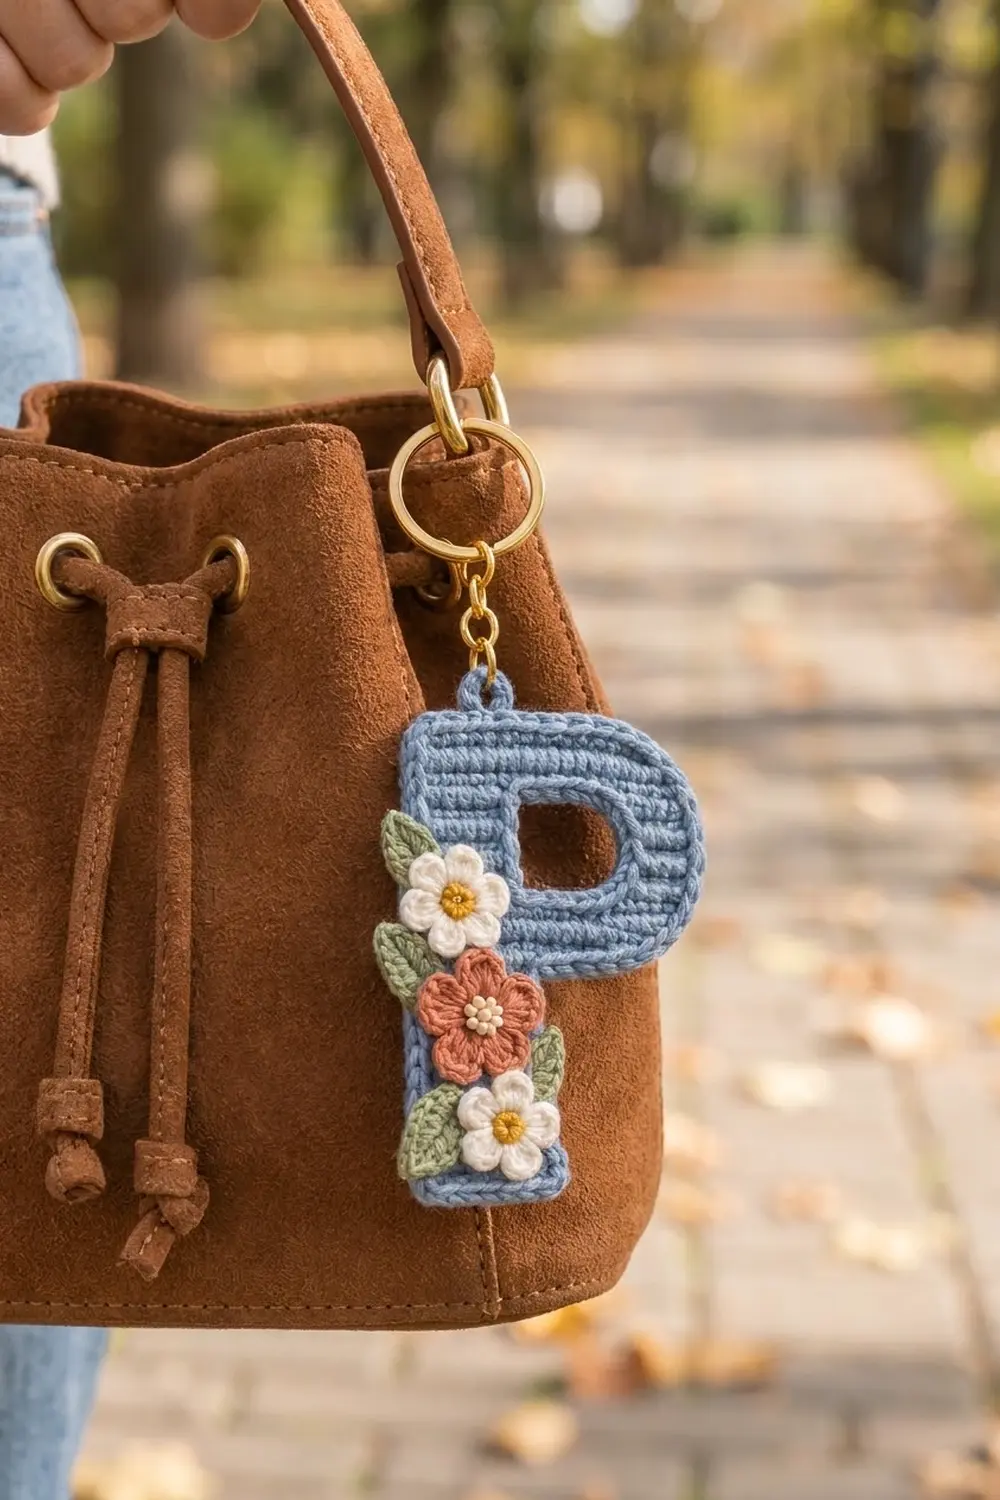
The Blue Blossom Letter P is a small, flat monogram keychain in soft dusty blue. A cluster of flowers runs down the left side of the stem. Fine horizontal ridges cover the letter, and a raised chain-look outline frames both the outside edge and the hole inside the bowl, which makes the letter look neat and polished.
The palette is calm and cottage-style: dusty blue for the letter, two cream daisies with mustard-yellow centers, one terracotta-rust flower with a cream center, and four sage-green leaves. It makes a lovely personalized gift and a nice way to use up scraps.
This pattern uses US crochet terms. The finished letter measures 2.8 in (7.1 cm) wide by 3.9 in (9.9 cm) tall. With the hanging tab it is 4.4 in (11.2 cm) tall.
You work the letter flat from the bottom up in back-loop single crochet rows. The bowl is added with a chain extension, and the hole is made by working two short columns that are then bridged with chains. A two-round border outlines the letter, a slip-stitch outline frames the hole, and the small flowers and leaves are sewn on last.
Finished Size and Construction
- Finished size: 2.8 in (7.1 cm) wide x 3.9 in (9.9 cm) tall; 4.4 in (11.2 cm) with the tab
- Skill level: Easy-Intermediate
- Terminology: US
- Yarn weight: DK (#3) cotton
- Hook: 3.25 mm (US D/3)
- Number of pieces: 1 letter, plus 3 flowers and 4 leaves sewn on as appliqués
- Layout: Single piece; the appliqués run down the left edge of the stem
- Letter size before border: 2.4 in (6.1 cm) wide x 3.5 in (8.9 cm) tall
- Border depth: 0.2 in (0.5 cm) per side
Materials
Use a smooth, mercerized DK cotton or a cotton blend. Cotton holds its shape well, shows the ridge texture clearly, and stands up to life on a bag or key ring.
- Dusty blue (main color): 12 g / 28 m
- Cream: 4 g / 9 m
- Terracotta rust: 3 g / 7 m
- Sage green: 3 g / 7 m
- Mustard yellow: 1 g / 2 m
These quantities include a small safety margin.
Tools:
– 3.25 mm (US D/3) hook
– Tapestry needle
– Sharp sewing needle (optional, for appliqués)
– 4 locking stitch markers
– Blocking board and rust-proof pins
– Spray bottle
– 1 in (2.5 cm) gold split key ring, plus 2 small jump rings and a short chain
– Small pliers
– Optional: fabric stiffener or spray starch
Abbreviations (US Terms)
- ch – chain
- sl st – slip stitch
- sc – single crochet
- hdc – half double crochet
- dc – double crochet
- BLO – back loop only
- sc2tog – single crochet 2 together
- st(s) – stitch(es)
- RS / WS – right side / wrong side
Special stitch – Surface slip stitch: Hold the yarn behind the work. Insert the hook from front to back at the marked point, pull up a loop, and draw it through the loop on your hook. This makes a flat, chain-look line.
Gauge and Checkpoints
Gauge: 10 sc x 12 rows = 2 in (5.1 cm) in BLO sc rows, unblocked.
Because this is a single small piece, the letter itself works as your gauge test. Measure at each checkpoint:
- After Row 10: stem is 1.2 in (3.0 cm) wide x 1.7 in (4.3 cm) tall
- After Row 13: 2.4 in (6.1 cm) wide x 2.2 in (5.6 cm) tall
- After Row 21: 2.4 in (6.1 cm) wide x 3.5 in (8.9 cm) tall
- After the border: 2.8 in (7.1 cm) wide x 3.9 in (9.9 cm) tall
If your work is too big, go down to a 3.0 mm hook. If it is too small, go up to a 3.5 mm hook. A difference of 0.1 in (0.3 cm) is fine and will block out.

The Letter P
Work all rows in BLO unless told otherwise. Ch 1 at the start of each row does not count as a stitch. Odd rows are worked right to left, and even rows are worked left to right.
Stem
Foundation: With blue, ch 7.
Row 1: Sc in the 2nd ch from the hook and in each ch across, turn. (6 sts)
Rows 2–10: Ch 1, sc BLO in each st across, turn. (6 sts)
Row 10 ends at the right edge. Checkpoint: 1.2 in (3.0 cm) x 1.7 in (4.3 cm).
Bowl Base
Row 11: At the end of Row 10, ch 6 (this does not count as a stitch). Sc in the 2nd ch from the hook and in the next 4 ch (5 sts), then sc BLO in each of the 6 stem sts, turn. (5 + 6 = 11 sts)
Row 12: Ch 1, sc BLO in the next 10 sts, 2 sc BLO in the last st, turn. (10 + 2 = 12 sts) The increase rounds the bottom right corner of the bowl.
Row 13: Ch 1, sc BLO in each st across. (12 sts) Do not turn yet.
Checkpoint: 2.4 in (6.1 cm) x 2.2 in (5.6 cm).
Counter (The Hole)
Left column, Rows 14–18: Turn. Ch 1, sc BLO in the first 4 sts only, turn. (4 sts) Work 4 more rows of 4 sc BLO. Fasten off.
Right column, Rows 14–18: Leave sts 5–8 of Row 13 unworked; these form the bottom of the hole. With the WS facing (the same side that faced you for the left column’s Row 14), join blue in the BLO of st 9 of Row 13. Ch 1, sc BLO in sts 9–12, turn. (4 sts) Work 4 more rows of 4 sc BLO. Row 18 ends at the right edge. Do not fasten off.
Bowl Top
Row 19: Ch 1, sc BLO in the 4 right-column sts, ch 4, sc BLO in the 4 left-column sts, turn. (4 sc + 4 ch + 4 sc = 12 sts) The ch-4 closes the top of the hole. The hole is now 4 sts wide x 5 rows tall, about 0.8 in (2.0 cm) square.
Row 20: Ch 1, sc BLO in each of the 8 sc, and sc in each of the 4 ch. (12 sts) Turn.
Row 21: Ch 1, sc2tog over the first 2 sts, sc BLO in the next 10 sts. (1 + 10 = 11 sts) Do not fasten off. The sc2tog rounds the top right corner.
Checkpoint: 2.4 in (6.1 cm) x 3.5 in (8.9 cm).
Fasten off and weave in the ends.
Border
The border is worked with the RS facing, counterclockwise around the outside edge of the letter.
Border gauge: One sc per row-end. Sc rows are a little shorter than one stitch is wide, so the border stitches settle into a flat edge rather than a ruffled one.
Round 1 – Single Crochet Outline
Join blue with a sc in the leftmost free loop of the foundation chain. Work each section in this order:
- Stem bottom: 2 more sc in the same loop, sc in the next 4 loops, 3 sc in the last loop. (10 sts)
- Stem right edge: Sc in the row-ends of Rows 2–9. (8 sts)
- Bowl bottom: Sc2tog over the row-end of Row 10 and the innermost free ch loop, sc in the next 3 ch loops, 2 sc in the outermost loop. (1 + 3 + 2 = 6 sts)
- Bowl right edge: Sc in the row-ends of Rows 12–20. (9 sts)
- Top edge: 2 sc in the sc2tog of Row 21, sc in the next 9 sts, 3 sc in the last st. (2 + 9 + 3 = 14 sts)
- Left edge: Sc in the row-ends of Rows 20 down to 2. (19 sts)
Sl st to the first sc. Total: 10 + 8 + 6 + 9 + 14 + 19 = 66 sts.
Why the math works: Each row-end gets exactly one stitch. The corner rows (Rows 1, 10, 11, and 21) are left out of the edge counts because their corner increases and the sc2tog already cover them, so nothing is counted twice. Every foundation loop and every top stitch is used once.
Round 2 – Chain-Look Edge with Hanging Tab
Ch 1. Sl st BLO in each st around, working loosely.
When you reach the 10th st of the top-edge section, sl st in it, then ch 8 and sl st into the same st to make a loop. Work 12 sc into the ch-8 loop, then sl st into the same base st again. Continue the round.
Sl st to the first st. (66 sl sts, plus the tab)
Round 2 adds about 0.03 in (0.1 cm). Round 1 adds about 0.17 in (0.4 cm). Together they make the 0.2 in (0.5 cm) border, so the size goes from 2.4 x 3.5 in (6.1 x 8.9 cm) to 2.8 x 3.9 in (7.1 x 9.9 cm). The tab adds 0.5 in (1.3 cm) of height.
Inner Outline
With the RS facing, work surface sl sts around the hole, one per edge stitch:
- Bottom of the hole: 4 sl sts (the unworked sts 5–8 of Row 13)
- Right side: 5 sl sts (the row-ends of the right column)
- Top: 4 sl sts (the base of the ch-4)
- Left side: 5 sl sts (the row-ends of the left column)
Total: 4 + 5 + 4 + 5 = 18 sl sts. Join, fasten off, and weave in the ends. The hole stays about 0.6 in (1.5 cm) wide.
Appliqués
Leave an 8 in (20.3 cm) tail on each appliqué for sewing.
Cream Flowers (Make 2)
Round 1: With yellow, make a magic ring and work 5 sc in it. Join. (5 sts) Fasten off.
Round 2: Join cream in any st. In each st, work (sl st, ch 2, 3 dc, ch 2, sl st). Join. (5 petals)
Each flower is about 0.9 in (2.3 cm) across.
Rust Flower (Make 1)
Round 1: With cream, make a magic ring and work 5 sc in it. Join. (5 sts) Fasten off.
Round 2: Join rust. Work 3 sc in each st. Join. (15 sts)
Round 3: Sl st in the next st, 5 dc in the next st, sl st in the next st; repeat from * 4 more times. Join. (5 petals)*
Optional: add 3 cream French knots in the center for a bobbled look. The flower is about 1.1 in (2.8 cm) across.
Leaves (Make 4)
With sage green, ch 6. Sc in the 2nd ch from the hook, then hdc, dc, hdc in the next 3 ch. In the last ch, work (sc, ch 2, sc). Rotate the piece and work along the other side of the chain: hdc, dc, hdc, then sl st in the last ch.
Each leaf is about 0.8 in (2.0 cm) long.
Sewing On
- Place the rust flower beside stem Rows 8–12 so it overlaps the left edge by 0.25 in (0.6 cm).
- Place one cream flower above it, at Rows 13–16, and the other below it, at Rows 3–7.
- Tuck the leaves behind the gaps between the flowers so their points show at the left and right.
- Pin everything, then whipstitch around each center and under each petal with matching yarn, sewing through the blue fabric only.
Final Blocking
- Lightly mist the letter until it is damp.
- Pin it face up to 2.8 x 3.9 in (7.1 x 9.9 cm), with pins at the corners and curves.
- Shape the bowl’s curves and the hole with your fingertips.
- Optional: spray with starch for a firmer keychain.
- Let it dry completely, at least 4 hours.
- Use the jump rings and chain to attach the split ring to the tab.
Final Quality-Control Checklist
- Letter measures 2.8 x 3.9 in (7.1 x 9.9 cm)
- Round 1 of the border has 66 sts; Round 2 has 66 sl sts
- The inner outline has 18 sl sts and the hole is clearly open
- The ridges run evenly in horizontal lines
- The flowers are secure, with no loose petals
- The tab is firm and the hardware is closed tight
- All ends are hidden
Troubleshooting
- Edge ruffles: Your border hook is too large or you added extra stitches. Recount the sections and use a smaller hook.
- Edge pulls in or puckers: Loosen your slip stitches in Round 2.
- Hole closed up: You worked sc instead of surface sl sts. Undo and redo the inner outline as slip stitches.
- Bowl leans: The two columns have different row counts. Each column needs exactly 5 rows.
- Letter is floppy: Starch it, or sew a piece of felt to the back.
Care
Hand wash in cool water, press out the water in a towel, and dry flat. Close the jump rings again if they loosen.
Final Notes
The measurement chain is: 10 sts x 12 rows = 2 in (5.1 cm), then the stem at 1.2 x 1.7 in (3.0 x 4.3 cm), then the full letter at 2.4 x 3.5 in (6.1 x 8.9 cm), then the bordered piece at 2.8 x 3.9 in (7.1 x 9.9 cm). Check each step and the finished keychain will match.
Happy crocheting!