

The Plum Blossom Letter J Keychain is a small, sturdy initial charm. It has a knit-look surface and a little bouquet of flowers tucked into the curve of the letter, and it makes a quick personalized gift.
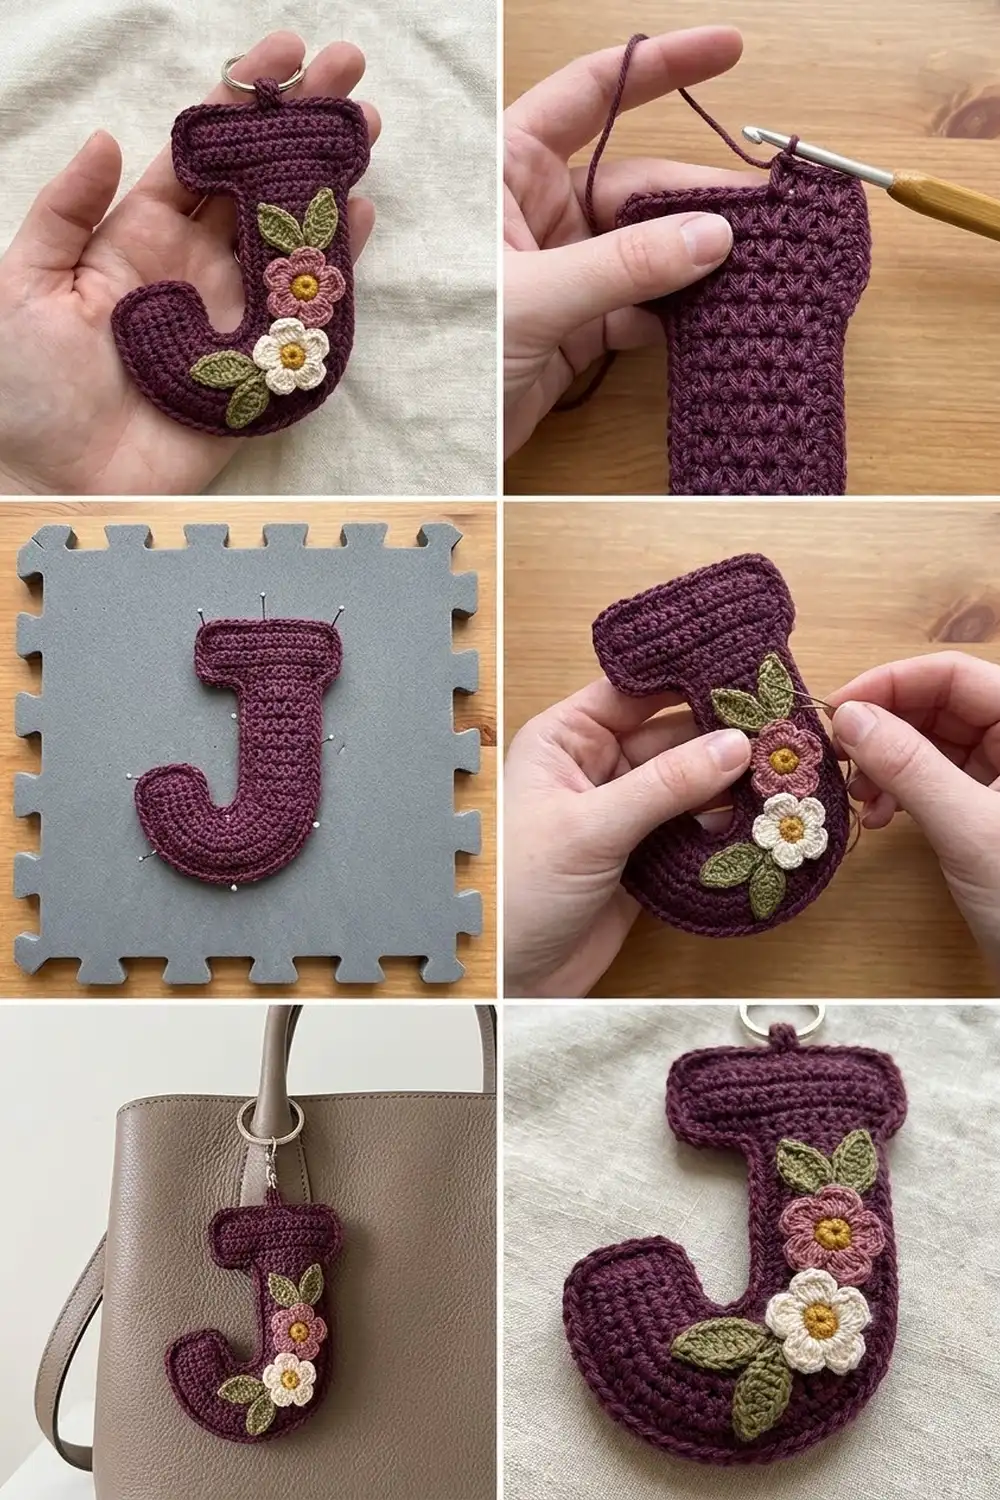
The letter is deep plum. It’s decorated with two dusty rose flowers, one cream flower, mustard-yellow centers, and three olive green leaves. Neat vertical V-columns cover the body, and a corded rolled edge frames the outline. A gold split ring hangs from the top on a short chain.
This pattern uses US crochet terms. The finished letter measures 2.5 in x 4 in (6.4 cm x 10.2 cm), not counting the hardware.
You work the letter as one flat piece in rows, from the bottom of the curve up to the top bar. A two-round border smooths the outline. Then you sew three flowers and three leaves onto the lower curve in layers.
Finished Size and Construction
- Finished size: 2.5 in x 4 in (6.4 cm x 10.2 cm)
- Skill level: Easy to intermediate
- Terminology: US crochet terms
- Yarn weight: DK (#3)
- Hook: 3.5 mm (E-4)
- Number of pieces: 1 letter piece, plus 3 flowers and 3 leaves appliquéd on top
- Layout: One flat letter J, with the flowers and leaves clustered across the lower curve
- Letter size before border: 2 in x 3.5 in (5.1 cm x 8.9 cm)
- Border depth: 0.25 in (0.6 cm) on every side, worked in 2 rounds
Materials
Choose a smooth DK yarn with crisp stitch definition. Mercerized cotton or a cotton blend shows the V-columns best and holds its shape well on a keychain.
Yarn (DK, about 2.4 m per gram):
- Plum (letter): 10 g, about 24 m
- Dusty rose (2 flowers): 2 g, about 5 m
- Cream (1 flower): 2 g, about 5 m
- Olive green (3 leaves): 2 g, about 5 m
- Mustard yellow (flower centers): 1 g, about 2 m
These quantities include a small margin for your gauge swatch and sewing tails.
Tools:
- 3.5 mm (E-4) crochet hook
- Tapestry needle
- Gold split key ring, about 1 in (2.5 cm) across
- Short gold chain (3 to 4 links) and 2 small jump rings
- Two pairs of flat-nose pliers
- Stitch markers
- Rust-proof pins and a blocking mat
- Small spray bottle
Abbreviations (US Terms)
- ch – chain
- sl st – slip stitch
- sc – single crochet
- hdc – half double crochet
- dc – double crochet
- sc2tog – single crochet 2 together: pull up a loop in each of 2 spots, then yarn over and pull through all 3 loops
- fsc – foundation single crochet
- rev sc – reverse single crochet (crab stitch), worked left to right
- st(s) – stitch(es)
- RS / WS – right side / wrong side
Special stitch – waistcoat stitch (ws): Insert the hook through the center of the stitch below, between its two front vertical legs, not under the top loops. Yarn over and pull up a loop, then yarn over and pull through both loops. On RS rows these stitches stack into vertical V-columns that look like knitting.
Increase: Work 2 stitches into the same stitch.
Pattern rhythm: Odd-numbered rows are RS rows. From Row 3 on, work every RS row in ws and every WS row in plain sc.
Gauge and Checkpoints
Gauge: 12 sts and 12 rows = 2 in (5.1 cm) in the ws/sc row pattern. That’s 6 sts and 6 rows per inch (2.5 cm).
Make a swatch first: ch 13 and work 1 row of sc (12 sts). Then alternate WS sc rows and RS ws rows until you have 12 rows, and measure it pinned flat. Waistcoat stitch is dense, so many crocheters need to go up a hook size.
Check your measurements as you go:
- After Row 6: 11 sts wide, about 1.8 in (4.6 cm); 1 in (2.5 cm) tall
- After Row 16: about 2.7 in (6.9 cm) tall; stem 1 in (2.5 cm) wide
- After Row 21: 2 in x 3.5 in (5.1 cm x 8.9 cm)
- After the border: 2.5 in x 4 in (6.4 cm x 10.2 cm)
Too big? Go down half a hook size. Too small? Go up half a hook size. If only the height is off, your WS sc rows are probably too tight or too loose.
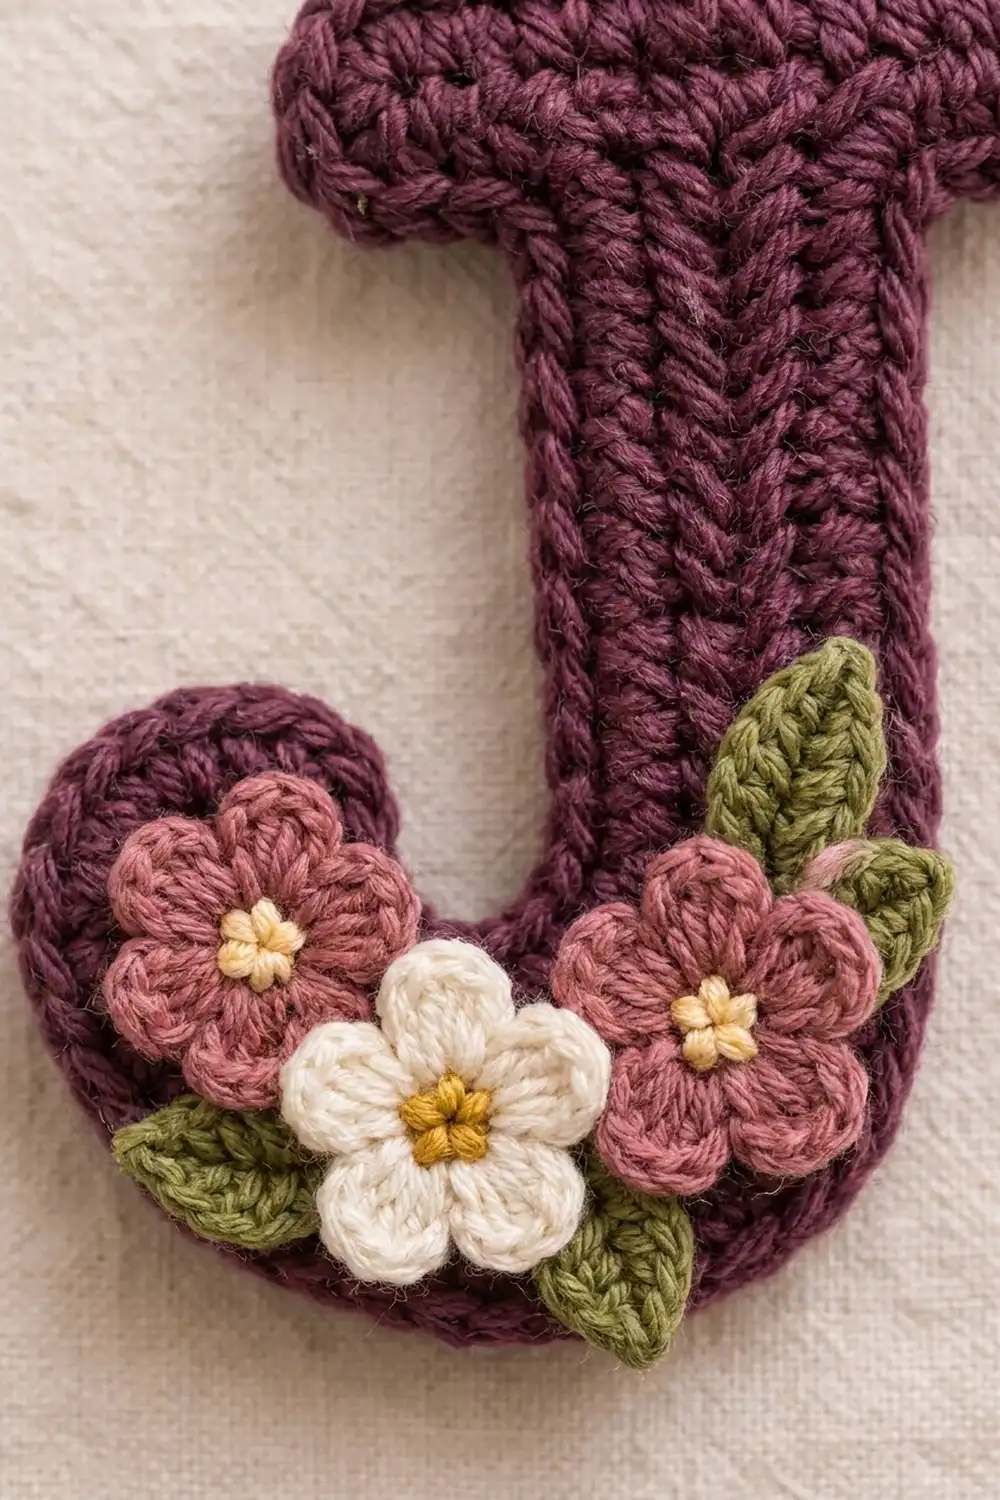
Letter J
Use plum. Columns are numbered 1 to 12 from left to right, viewed from the RS. The stem uses columns 6 to 11, the tail uses columns 1 to 3, and the top bar spans all 12 columns.
Bowl (bottom curve)
Foundation: Ch 7.
Row 1 (RS): Sc in the 2nd ch from hook and in each ch across, turn. (6 sts; columns 4–9)
Row 2 (WS): Ch 1, 2 sc in the first st, sc in the next 4 sts, 2 sc in the last st, turn. (8 sts; columns 3–10)
Row 3 (RS): Ch 1, 2 ws in the first st, ws in the next 6 sts, 2 ws in the last st, turn. (10 sts; columns 2–11)
Row 4 (WS): Ch 1, 2 sc in the first st, sc in the remaining 9 sts, turn. (11 sts; columns 1–11)
This row increases only on the left edge, so the outer edge of the stem stays straight.
Row 5 (RS): Ch 1, ws in each st across, turn. (11 sts)
Row 6 (WS): Ch 1, sc in each st across, turn. (11 sts)
Checkpoint: about 1.8 in (4.6 cm) wide and 1 in (2.5 cm) tall.
Stem
Row 7 (RS): Ch 1, ws in the first 6 sts, turn. (6 sts; columns 11–6)
Leave the other 5 sts of Row 6 unworked. Later the tail is worked into 3 of them, and the remaining 2 form the base of the opening.
Rows 8–16: Ch 1, work across the 6 sts, turn. Use sc on WS rows and ws on RS rows. (6 sts per row) Row 16 ends at column 11.
Checkpoint: about 2.7 in (6.9 cm) tall, with the stem 1 in (2.5 cm) wide.
Top Bar
At the end of Row 16, ch 2 and turn.
Row 17 (RS): Sc in the 2nd ch from hook (column 12), then ws in each of the 6 stem sts (columns 11–6). Work 5 fsc to extend the row to the left (columns 5–1), drawing the first fsc up from the base of the last ws. Turn. (1 sc + 6 ws + 5 fsc = 12 sts)
Row 18 (WS): Ch 1, sc in each st across, turn. (12 sts)
Row 19 (RS): Ch 1, ws in each st across, turn. (12 sts)
Row 20 (WS): Repeat Row 18. (12 sts)
Row 21 (RS): Repeat Row 19. (12 sts) Don’t fasten off. You are now at the top left corner (column 1).
Checkpoint: 2 in x 3.5 in (5.1 cm x 8.9 cm). The top bar is about 0.83 in (2.1 cm) tall. Put the working loop on a stitch marker.
Tail
With the RS facing, join plum in the third unworked st of Row 6, counting from the stem (column 3).
Row 7 (RS): Ch 1, ws in the same st and in the next 2 sts, turn. (3 sts; columns 3–1)
Row 8 (WS): Ch 1, sc in each st across, turn. (3 sts)
Row 9 (RS): Ch 1, ws in each st across. (3 sts) Fasten off and weave in the ends.
Columns 4 and 5 of Row 6 stay unworked as the base of the opening. The tail tip sits 1.5 in (3.8 cm) above the bottom edge.
Border
Border gauge: Work 1 sc in each st and 1 sc in each row-end. The body gauge is square (6 sts and 6 rows per inch), so 1 sc per row-end matches the edge length exactly and the border lies flat.
Put the Row 21 loop back on the hook. With the RS facing, work counterclockwise.
Rnd 1 (sc): Ch 1, don’t turn, and work around as follows.
- Top left corner: 2 sc in the top of the last ws (column 1). (2) The 3rd corner sc comes at the end of the round.
- Left end of bar: 1 sc in each row-end of Rows 20, 19, 18. (3)
- Bar underside, left: 3 sc in the bottom of the column 1 fsc, then 1 sc in the bottom of each fsc in columns 2, 3, and 4. Sc2tog over the bottom of the column 5 fsc and the row-end of Row 16. (3 + 3 + 1 = 7)
- Stem left side, opening, tail inner side: 1 sc in each row-end of Rows 15 down to 7 (9), 1 sc in each of the 2 unworked sts of Row 6 (2), and 1 sc in each row-end of tail Rows 7 and 8 (2). (13)
- Tail top: 3 sc in column 3, 1 sc in column 2, 3 sc in column 1. (7)
- Left outer side: 1 sc in each row-end of Rows 8 down to 4. (5)
- Bowl bottom: 1 sc in each row-end of Rows 3, 2, 1. Then work 2 sc in the first foundation ch, 1 sc in each of the next 4 ch, and 2 sc in the last ch. Then 1 sc in each right-side row-end of Rows 1, 2, 3. (3 + 8 + 3 = 14)
- Stem right side: 1 sc in each row-end of Rows 4 through 15 (12), then sc2tog over the row-end of Row 16 and the underside of the column 12 sc. (13)
- Right end of bar: 3 sc in the row-end of Row 17, then 1 sc in each row-end of Rows 18, 19, 20. (6)
- Top edge: 3 sc in column 12, 1 sc in each of columns 11 through 2 (10), and 1 sc in column 1 to complete the first corner. (14)
Join with a sl st to the first sc. Total: 84 sc.
Why the math works: 2 + 3 + 7 + 13 + 7 + 5 + 14 + 13 + 6 + 14 = 84. The top edge gets 16 sc: its 12 sts plus 2 extra at each corner. The two sc2tog keep the inside corners under the bar from ruffling. The shallow corners of the opening need no decrease.
Rnd 2 (rev sc): Ch 1, rev sc in each st around, and join. (84 sts) Fasten off. This round rolls into the corded rim. It needs no corner increases because rev sc eases naturally around curves.
The two rounds add 0.25 in (0.6 cm) per side, taking the letter from 2 in x 3.5 in (5.1 cm x 8.9 cm) to 2.5 in x 4 in (6.4 cm x 10.2 cm).
Flowers and Leaves
Flower (make 2 in dusty rose, 1 in cream)
Rnd 1 (mustard): Make a magic ring and ch 1. Work 5 sc in the ring, pull it closed, and sl st to the first sc. (5 sts) Fasten off.
Rnd 2 (petal color): Join in any st. In each st, work (ch 2, 2 dc, ch 2, sl st). (5 petals) Fasten off, leaving a 10 in (25.4 cm) sewing tail.
Each flower measures about 0.9 in (2.3 cm) across.
Leaf (make 3 in olive green)
Ch 6. Sc in the 2nd ch from hook, hdc in the next ch, dc in the next ch, hdc in the next ch, and 3 sc in the last ch. Working along the other side of the chain, work hdc, dc, hdc, sc, then sl st to the first sc. (11 sts plus the sl st) Fasten off, leaving a sewing tail.
Each leaf measures about 0.8 in (2.0 cm) long.
Assembly
Stack the appliqués across the lower curve in three layers:
- Leaves: Place one under the left edge of the bowl, pointing down-left. Place one beside the stem base, pointing up-right. Place one under the center, pointing down-right.
- Rose flowers: Put one on the left of the bowl, covering the base of the tail. Put the other at the lower right, on the stem base.
- Cream flower: Center it between the rose flowers so it overlaps both slightly.
Pin everything in place. Sew around each outer edge with small stitches through the plum body only, and tack between the petals so they lift slightly.
Hardware: Open a jump ring with the two pliers. Pass it through border Rnd 1 above column 8 (the center of the stem), add the chain, and close the ring. Use the second jump ring to join the chain to the split ring.
Final Blocking
- Weave in all ends except the sewing tails.
- Mist the letter until it’s damp, not wet.
- Pin it RS up at 2.5 in x 4 in (6.4 cm x 10.2 cm).
- Pin the straight stem and bar edges first, then ease the bowl into a smooth curve.
- Let it dry completely.
- Sew on the appliqués after blocking so the flowers stay raised.
Final Quality-Control Checklist
- The letter measures 2.5 in x 4 in (6.4 cm x 10.2 cm).
- The stem is 1 in (2.5 cm) wide, and the top bar is 2 in (5.1 cm) across before the border.
- Border Rnd 1 has 84 sts.
- The V-columns run straight up the stem.
- The rev sc rim is even all the way around.
- The inside corners under the bar lie flat.
- All 6 appliqués are secure, with no visible stitches.
- The jump rings are fully closed.
Troubleshooting
V-columns lean. Insert each ws through the center of the stitch below, not beside it.
Letter is too short. Your WS sc rows are tight. Relax your tension, or use a hook half a size larger for the WS rows.
Bowl looks pointed. Check the increases in Rows 2 and 3 and the 2-sc bottom corners of the border.
Border ruffles. Extra sts have crept in. Recount each segment of Rnd 1.
Border pulls in. Some row-ends were skipped. Each row-end gets exactly 1 sc.
Flowers flop. Add 2 or 3 tacking stitches near each flower center.
Care
Hand wash in cool water with mild soap, roll in a towel to remove water, and dry flat. Remove the metal ring first if you can.
Final Notes
Here is the measurement chain. A gauge of 6 sts and 6 rows per inch (2.5 cm) gives a 2 in x 3.5 in (5.1 cm x 8.9 cm) letter after Row 21. The 84-st, two-round border adds 0.25 in (0.6 cm) per side, so the letter finishes at 2.5 in x 4 in (6.4 cm x 10.2 cm). Check your swatch and the checkpoints at Rows 6, 16, and 21, and your J will come out true to size.
Happy crocheting!