

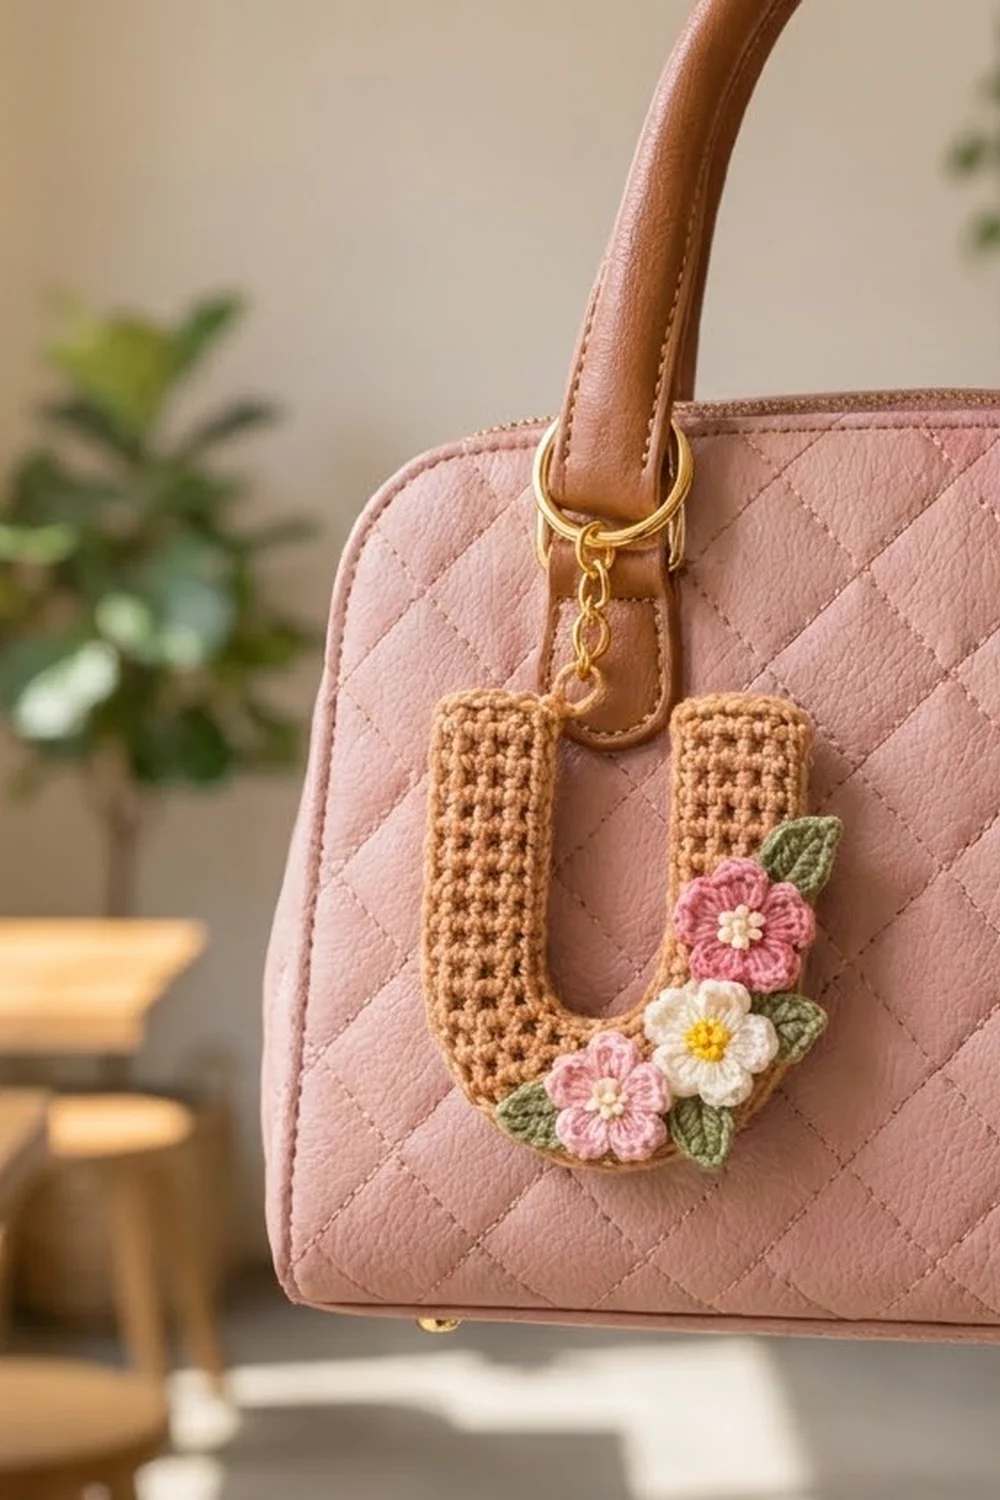
The Caramel Bloom Letter U is a small, puffy monogram keychain in warm caramel tan. A cluster of tiny flowers climbs the right arm and wraps around the bottom curve. A ridged grid texture covers the whole letter and gives it a woven, basket-like look.
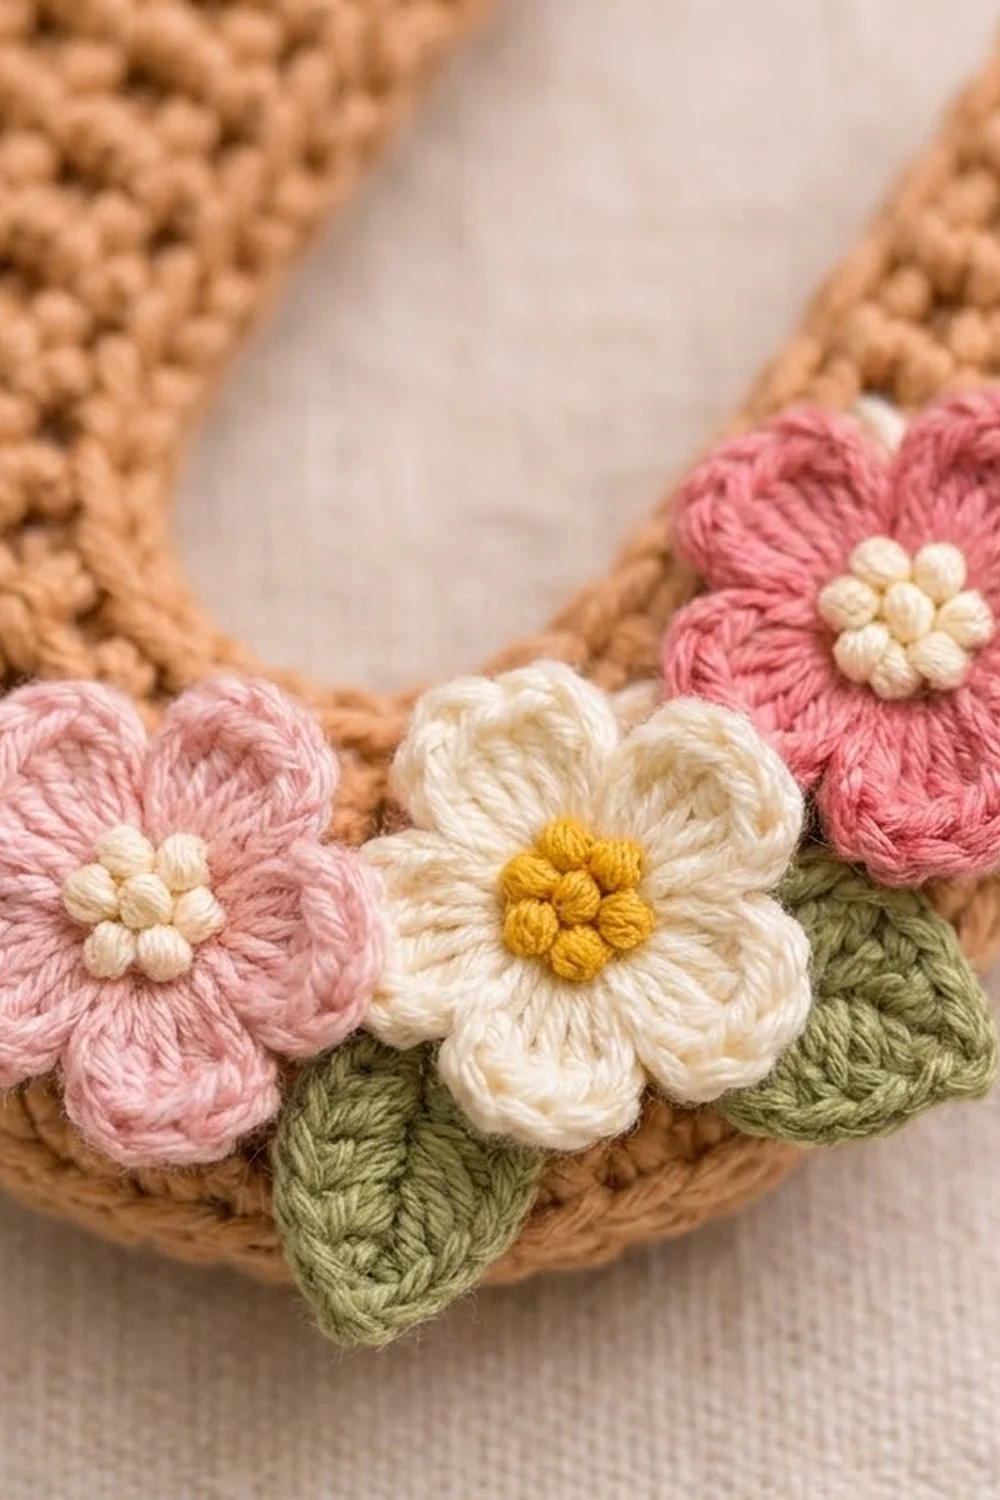
The flowers are rose pink, light pink, cream, and mustard yellow, framed by sage green leaves. The letter stays one solid color, so the appliqués carry all the contrast. The style is sweet and tidy rather than busy.
This pattern uses US crochet terms. The finished letter measures 3.25 in wide x 3.75 in tall (8.3 cm x 9.5 cm) without the hardware, and is about 0.4 in (1.0 cm) thick.
You crochet two identical flat letter panels in rows, starting at the bottom curve and splitting into two arms. Next, place the panels wrong sides together, join them with one round of single crochet that also forms the border, and stuff them lightly. Finally, sew on three flowers and four leaves and add the keyring.
Finished Size and Construction
- Finished size: 3.25 in x 3.75 in (8.3 cm x 9.5 cm), plus about 1.5 in (3.8 cm) of hardware
- Skill level: Easy to intermediate
- Terminology: US crochet terms
- Yarn weight: DK (light #3) cotton
- Hook: 2.75 mm (US C-2)
- Number of pieces: 1 finished keychain (built from 2 letter panels, 3 flowers, and 4 leaves)
- Layout: One letter U, with the flowers clustered at the lower right
- Panel size before border: 3 in x 3.5 in (7.6 cm x 8.9 cm)
- Arm width before border: 1 in (2.5 cm); gap between arms 1 in (2.5 cm)
- Border depth: 1 round of sc, about 0.125 in (0.3 cm) on every edge
Materials
Use a smooth mercerized or combed DK cotton. Cotton keeps the grid texture crisp, resists pilling on a bag, and holds the letter’s shape. Avoid fuzzy or very stretchy yarns, which blur the ridges.
- Caramel tan (main color): 15 g, about 35 m (38 yd)
- Rose pink: 3 g, about 7 m (8 yd)
- Light pink: 3 g, about 7 m (8 yd)
- Cream: 3 g, about 7 m (8 yd)
- Mustard yellow: 1 g, about 2 m (2 yd)
- Sage green: 3 g, about 7 m (8 yd)
These amounts include extra for checking gauge and for sewing tails.
Tools:
- 2.75 mm (US C-2) crochet hook
- Tapestry needle
- 4 stitch markers
- A small amount of polyester fiberfill
- 1 in (2.5 cm) gold split keyring
- 2 gold jump rings, 6 mm
- 1 in (2.5 cm) length of small gold chain
- Flat-nose pliers
- Scissors, blocking mat, and rust-proof pins
Abbreviations (US Terms)
- ch – chain
- sl st – slip stitch
- sc – single crochet
- hdc – half double crochet
- dc – double crochet
- sc2tog – single crochet 2 together
- BLO – back loop only
- st(s) – stitch(es)
- RS / WS – right side / wrong side
Special stitch – Ridge Grid: Work every RS (odd-numbered) row in sc through both loops. Work every WS (even-numbered) row in sc through the BLO. The unused front loops from the WS rows show on the RS as horizontal ridges. Together with the stacked sc columns, they make the small square grid. Turning chains never count as stitches.
Gauge and Checkpoints
Gauge: 6 sts and 6 rows = 1 in (2.5 cm) in Ridge Grid.
Finish one whole panel before you start the second. That panel is your gauge swatch.
- After Row 1: 12 sts measure 2 in (5.1 cm).
- After Row 8: The base is 18 sts wide, which is 3 in (7.6 cm), and about 1.33 in (3.4 cm) tall.
- After Row 21: The panel is 3.5 in (8.9 cm) tall, and each arm is 1 in (2.5 cm) wide.
Too big? Change to a 2.5 mm hook. Too small? Change to a 3.0 mm hook. If only the row height is off, keep the same hook and change how high you pull up each loop. The border math depends on rows and stitches being equally dense.
Letter Panel (make 2)
With caramel tan, work in Ridge Grid throughout.
Row 1 (RS): Ch 13, sc in 2nd ch from hook and in each ch across, turn. (12 sts)
Row 2 (WS): Ch 1, 2 sc BLO in first st, sc BLO in next 10 sts, 2 sc BLO in last st, turn. (14 sts)
Row 3: Ch 1, 2 sc in first st, sc in next 12 sts, 2 sc in last st, turn. (16 sts)
Row 4: Ch 1, 2 sc BLO in first st, sc BLO in next 14 sts, 2 sc BLO in last st, turn. (18 sts)
These three increase rows shape the rounded outer bottom of the U.
Row 5: Ch 1, sc in each st across, turn. (18 sts)
Row 6: Ch 1, sc BLO in each st across, turn. (18 sts)
Rows 7–8: Repeat Rows 5–6. (18 sts) Do not fasten off.
Checkpoint: the base is 3 in (7.6 cm) wide.
First Arm
Row 9 (RS): Ch 1, sc in next 7 sts, turn. (7 sts) Leave the other 11 sts unworked.
Row 10: Ch 1, sc2tog BLO, sc BLO in next 5 sts, turn. (6 sts)
The extra stitch in Row 9 and the inner-edge decrease in Row 10 turn the inner corner into a soft curve.
Row 11: Ch 1, sc in each st across, turn. (6 sts)
Row 12: Ch 1, sc BLO in each st across, turn. (6 sts)
Rows 13–21: Repeat Rows 11–12 four more times, then work Row 11 once more. (6 sts) Fasten off.
The first arm is 13 rows tall (Rows 9–21).
Second Arm
Row 9 (RS): With the RS facing, skip the next 4 unworked sts of Row 8 after the first arm. Join caramel tan in the next st, ch 1, sc in the same st and in the next 6 sts, turn. (7 sts)
Row 10: Ch 1, sc BLO in next 5 sts, sc2tog BLO, turn. (6 sts)
Rows 11–21: Work these rows the same as the first arm. (6 sts) Fasten off.
Row 8 check: 7 (first arm) + 4 (gap) + 7 (second arm) = 18 sts.
Weave in all ends on the WS of both panels.
Flowers (make 3)
- Flower 1: rose pink petals, cream center
- Flower 2: light pink petals, cream center
- Flower 3: cream petals, mustard yellow center
Round 1: With the center color, make a magic ring, ch 1, 5 sc in ring, sl st to first sc. (5 sts) Fasten off the center color and pull the ring tight.
Round 2: Join the petal color in any sc. *(Ch 2, 2 dc, ch 2, sl st) in the same st, sl st in the next st; repeat from * 4 more times. For the last repeat, work the final sl st into the joining st. (5 petals)
Fasten off, leaving a 10 in (25.4 cm) tail for sewing. Each flower is about 0.9 in (2.3 cm) across.
On the two pink flowers, use cream to add 3 small French knots in the center for a dotted look.
Leaves (make 4)
With sage green, ch 6.
Round 1: Working in the back bumps, sc in 2nd ch from hook, hdc in next ch, dc in next ch, hdc in next ch, sc in last ch, ch 1 for the tip. Rotate and work along the other side of the chain: sc in first ch, hdc in next ch, dc in next ch, hdc in next ch, sc in last ch, sl st to first sc. (10 sts plus the tip ch)
Fasten off, leaving an 8 in (20.3 cm) tail. Each leaf is about 0.8 in (2.0 cm) long.
Joining Border Round
The border is one round of sc worked through both panels at once. It closes the letter and gives it a smooth, rolled edge.
Border gauge: 6 sc per 1 in (2.5 cm) along every edge, the same as the panel gauge.
Place the panels WS together with all edges lined up. Clip them with stitch markers at both arm tops and both bottom corners. Work every stitch through both layers.
Border Round: With the RS of the front panel facing, join caramel tan in the first st of Row 21 at the outer corner of the first arm. Ch 1, then work:
- First arm top: 3 sc in first st, sc in next 4 sts, 3 sc in last st. (10 sc)
- Inner side of first arm: 1 sc in each row-end, from Row 21 down to Row 9. (13 sc)
- Inner bottom: 1 sc in each of the 4 unworked sts of Row 8. (4 sc)
- Inner side of second arm: 1 sc in each row-end, from Row 9 up to Row 21. (13 sc)
- Second arm top: 3 sc in first st, sc in next 4 sts, 3 sc in last st. (10 sc)
- Outer side of second arm and base: 1 sc in each row-end, from Row 21 down to Row 1. (21 sc)
- Bottom: 1 sc in each of the 12 foundation chs. (12 sc)
- Stuff: Pause here and stuff lightly through the open side, pushing small tufts into the arm with the back of the hook. Aim for a soft cushion about 0.4 in (1.0 cm) thick.
- Outer side of base and first arm: 1 sc in each row-end, from Row 1 up to Row 21. (21 sc)
Sl st to first sc. Total: 104 sc.
Count check: 10 + 13 + 4 + 13 + 10 + 21 + 12 + 21 = 104.
Hanging loop: Do not fasten off. Ch 6 and sl st in the first sc of the round to make a small loop at the outer corner of the first arm. Fasten off and hide the tail inside the stuffing.
Why the math works: The panel gauge is square, with 6 sts and 6 rows per inch. That means 1 sc per row-end lies just as flat as 1 sc per stitch. The 3 sc in each arm-top corner add the extra length a 90-degree turn needs. The increase rows already shaped the outer bottom curve, so it needs no extra corner stitches.
Size checkpoint: The finished letter measures 3.25 in x 3.75 in (8.3 cm x 9.5 cm). Each arm is about 1.25 in (3.2 cm) wide, and the gap between the arms is about 0.75 in (1.9 cm).
Appliqué Assembly
Lay out all the pieces on the front panel before you sew anything:
- Rose pink flower on the outer edge of the right arm, about halfway up.
- Cream flower just below it, where the bottom curve begins.
- Light pink flower at the bottom right, slightly overlapping the cream flower.
- Leaves: one above the rose pink flower, one between the rose pink and cream flowers, one to the left of the light pink flower, and one below the cream flower.
The flowers can stick out past the border by about 0.125 in (0.3 cm). Tuck the leaf bases under the flowers and sew each leaf around its base. Sew each flower with small stitches between the petals. Catch only the front panel so the back stays clean.
Use pliers to attach the chain to the hanging loop with one jump ring and to the split keyring with the other.
Final Blocking
- Mist the letter lightly with water. Do not soak the stuffed piece.
- Lay it flat on the blocking mat, front facing up.
- Pin the outer sides so they are 3.25 in (8.3 cm) apart.
- Pin the top and bottom so the height is 3.75 in (9.5 cm).
- Ease the gap between the arms open to about 0.75 in (1.9 cm).
- Press the petals open and shape each leaf to a point.
- Let it dry completely before removing the pins.
Final Quality-Control Checklist
- Each panel has 18 sts at Row 8 and 6 sts per arm in Rows 10–21.
- Both arms are 13 rows tall above the split.
- The border has exactly 104 sc.
- The grid ridges run straight across both arms.
- The stuffing is even, and none shows through.
- The appliqués are secure, with no stitches showing on the back.
- Both jump rings are fully closed.
- The letter measures 3.25 in x 3.75 in (8.3 cm x 9.5 cm).
Troubleshooting
- Arms lean outward: Check that you worked the sc2tog in Row 10 on both arms.
- Border ruffles: Work only 1 sc per row-end.
- Arm tops pucker: Work 3 sc in each corner st.
- Grid looks faint: Make sure the WS rows are worked in the BLO.
- Letter looks lumpy: Take out some stuffing and spread the rest thinly.
- Flowers cup: Steam-block them flat before sewing them on.
- Stuffing pokes through: Use a smaller hook or a more tightly spun cotton.
Care
Spot clean with a damp cloth and mild soap, then dry flat. Do not machine wash, because that can damage the stuffing and the metal hardware.
Final Notes
Here is how the measurements build up. A gauge of 6 sts and 6 rows per inch gives a 3 in x 3.5 in (7.6 cm x 8.9 cm) panel with 1 in (2.5 cm) arms. Joining two panels with the 104-sc border brings the letter to 3.25 in x 3.75 in (8.3 cm x 9.5 cm). Three flowers and four leaves finish it. You can change the flower colors to match your bag and make a personal gift in an afternoon.
Happy crocheting!