

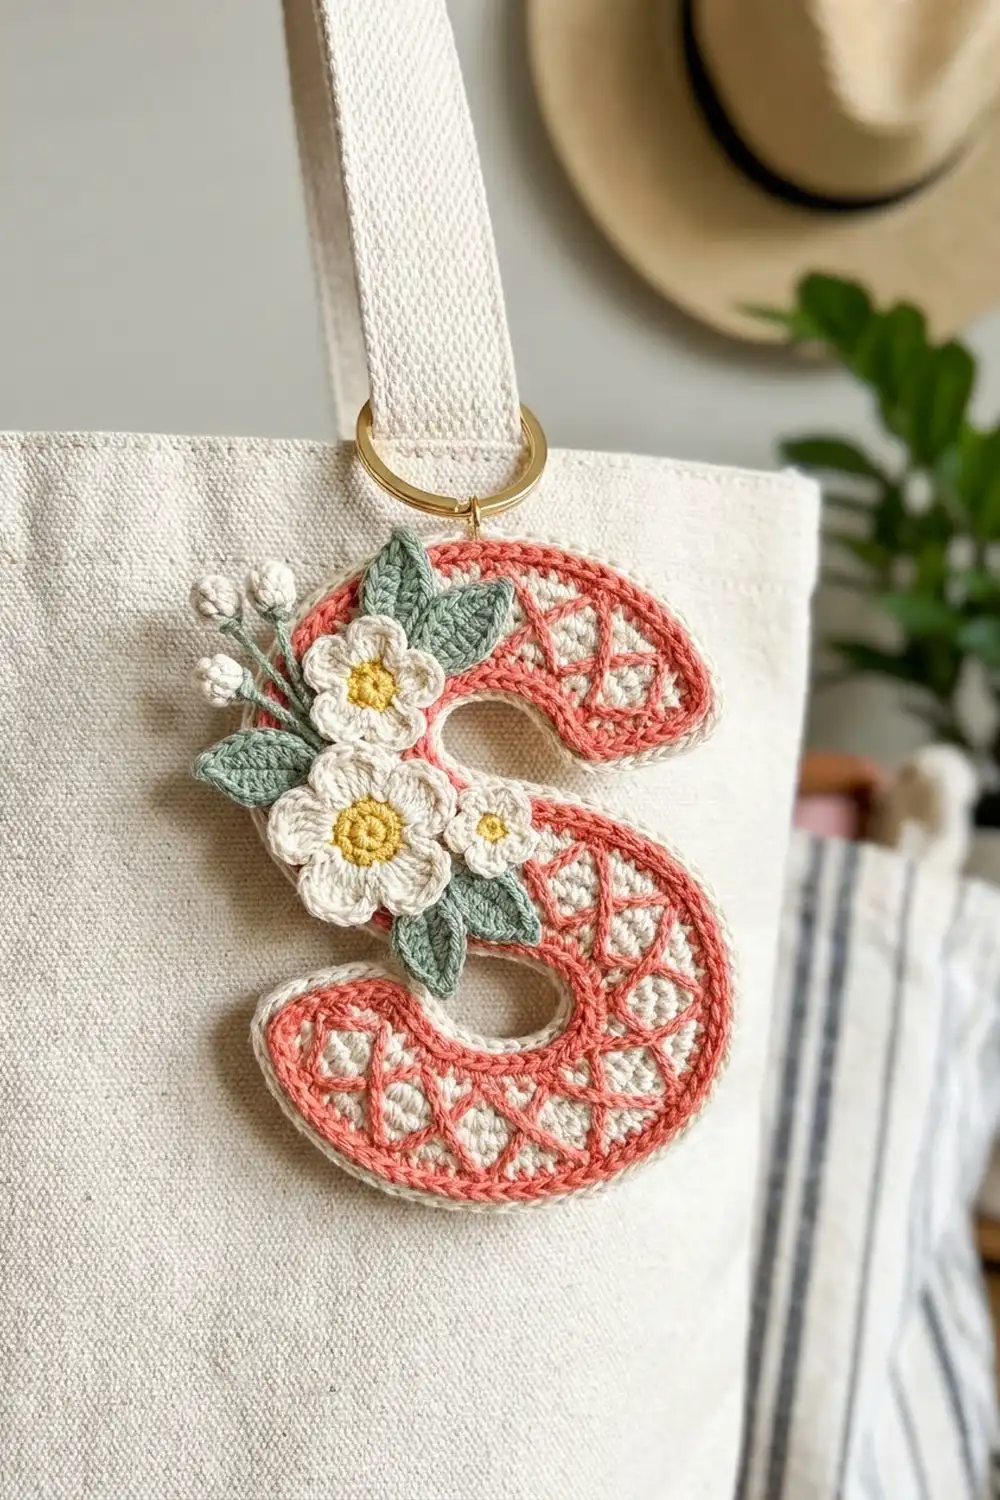
This little keychain is a bold capital S in cream cotton. A coral diamond lattice covers the front, and a raised coral outline finishes the edge. A cluster of cream five-petal flowers with sunny yellow centers, soft green leaves, and tiny cream buds spills over the left edge of the letter. A gold jump ring and split ring at the top let it hang from a bag handle, zipper pull, or key set.
The palette is cream, coral, yellow, and sage green. The style is cottage-garden sweet but tidy, with crisp edges and a flat, sturdy body that holds its shape on a bag.
The pattern uses US crochet terms. The finished letter measures 4 in (10.2 cm) tall and 3 in (7.6 cm) wide, not counting the hardware. With the rings, the total hanging length is about 5.25 in (13.3 cm).
The S is worked as one narrow strip of single crochet rows, and short-row wedges bend the strip into the two curves of the letter. Coral surface slip stitch adds the lattice, a two-round border frames the shape, and the small flowers, leaves, and buds are sewn on at the end.
Finished Size and Construction
- Finished size: 4 in (10.2 cm) tall x 3 in (7.6 cm) wide
- Skill level: Intermediate (short rows, surface slip stitch, small appliqués)
- Terminology: US crochet terms
- Yarn weight: Sport weight (#2) cotton
- Hook: 2.5 mm
- Number of pieces: 1 letter base plus 10 small appliqués (3 flowers, 4 leaves, 3 buds), sewn into one finished keychain
- Layout: A single letter S, with the appliqué cluster along the left side and the ring at the top of the upper curve
- Strip width: 5 sc, 0.83 in (2.1 cm)
- Size before border: 3.75 in (9.5 cm) tall x 2.75 in (7.0 cm) wide
- Border depth: 1/8 in (0.3 cm) on every edge
Materials
Choose a smooth, mercerized sport-weight cotton. It shows the stitches clearly, holds a crisp edge, and stands up to life on a bag. The amounts below assume about 155 m per 50 g ball.
- Cream (main): 6 g, about 19 m (letter base, Border Round 1, flowers, buds)
- Coral: 3 g, about 9 m (lattice and outline)
- Yellow: 1 g, about 3 m (flower centers)
- Green: 1 g, about 3 m (leaves and bud stems)
These amounts include a comfortable margin for gauge testing and sewing tails.
Tools:
- 2.5 mm crochet hook, plus a 2.25 mm hook for adjustments
- Tapestry needle and a sharp embroidery needle
- 2 locking stitch markers
- About 50 straight pins
- Gold split key ring, 1 in (2.5 cm)
- Gold jump ring, 6 mm, and two pairs of flat-nose pliers
- Blocking mat, spray bottle, scissors
Abbreviations (US Terms)
- ch: chain
- sl st: slip stitch
- sc: single crochet
- hdc: half double crochet
- dc: double crochet
- st(s): stitch(es)
- MR: magic ring
- rep: repeat
Surface slip stitch (surf sl st): Hold the yarn behind the work. Insert the hook from front to back through the fabric, pull up a loop, and draw it through the loop on the hook. Space the stitches about 1/8 in (0.3 cm) apart.
5-dc bobble: Five times in the same st: yarn over, insert hook, pull up a loop, yarn over, draw through 2 loops. Then yarn over and draw through all 6 loops on the hook.
Gauge and Checkpoints
Gauge: 12 sc and 14 rows = 2 in (5.1 cm) in sc rows. That works out to 6 sc and 7 rows per 1 in (2.5 cm).
Test the base first. The opening rows of the letter act as your swatch, so measure them before you start the curves.
- After Row 4: The strip is 0.83 in (2.1 cm) wide and 0.57 in (1.4 cm) long.
- After Row 34 (Curve 1): The outer edge measures 4.29 in (10.9 cm) along its curve. The inner edge measures 1.43 in (3.6 cm).
- After Row 75: The letter measures 3.75 in (9.5 cm) x 2.75 in (7.0 cm), lying flat.
- After the border: 4 in (10.2 cm) x 3 in (7.6 cm).
If your strip is wider than 0.83 in (2.1 cm), go down 0.25 mm in hook size. If it is narrower, go up 0.25 mm. Row height matters most for the curves. If 7 rows measure more than 1 in (2.5 cm), the curves will open wider than shown, so change hooks rather than removing rows.

Part 1: Letter Base (Cream)
The strip has two long edges. Edge A is the side where Row 1 ends, and Edge B is the opposite side. Clip a marker to each edge and move the markers up as you go.
Every full row has 5 sc. Short rows leave stitches unworked.
Row 1: Ch 6, sc in 2nd ch from hook and in each ch across, turn. (5 sc)
Rows 2–4: Ch 1, sc in each st across, turn. (5 sc) This is the top end of the letter. You finish at Edge B.
Curve 1 (Rows 5–34)
Edge B is the outer edge of this curve. Each wedge repeat is 6 rows.
- Row a: Ch 1, sc in each st across, turn. (5 sc, ends at Edge A)
- Row b: Ch 1, sc in each st across, turn. (5 sc, ends at Edge B)
- Row c: Ch 1, sc in next 4 sts, turn, leaving 1 st unworked. (4 sc)
- Row d: Ch 1, sc in each of the 4 sts, turn. (4 sc, ends at Edge B)
- Row e: Ch 1, sc in next 2 sts, turn, leaving 3 sts unworked. (2 sc)
- Row f: Ch 1, sc in each of the 2 sts, turn. (2 sc, ends at Edge B)
Work the wedge repeat 5 times (Rows 5–34). On each Row a, work firmly across the steps where the short rows ended so no gaps open.
In each repeat, the 2 outer stitch columns gain 6 rows, the middle 2 columns gain 4, and the inner column gains 2. Over 5 repeats, the outer edge gets 30 rows and the inner edge gets 10. That 20-row difference across a 0.83 in (2.1 cm) strip turns the strip by about 196 degrees, which forms the top bowl.
Spine (Rows 35–41)
Rows 35–41: Ch 1, sc in each st across, turn. (5 sc) That is 7 rows, or 1 in (2.5 cm). Because the number of rows is odd, you finish at Edge A.
Curve 2 (Rows 42–71)
Edge A is now the outer edge, so the strip bends the opposite way. Work the same wedge repeat 5 times, starting every short row from Edge A. Rows 42–71 end at Edge A.
Bottom End (Rows 72–75)
Rows 72–75: Ch 1, sc in each st across. Turn after Rows 72–74 only. (5 sc) Do not fasten off. Put the live loop on a marker and check the size.
Row count check: 4 + 30 + 7 + 30 + 4 = 75 rows.
Part 2: Coral Lattice
Lay the letter flat and pick the neater side as the front. If the letter reads backward, flip it over. Short-row fabric looks the same on both sides.
Pin pairs of “rungs”: one pin on Edge A and one directly opposite on Edge B. Space the pairs 3/8 in (1.0 cm) apart, measured along the center of the strip, starting 1/8 in (0.3 cm) from each end. You will have 21 rungs on each edge. Number them 1–21 from the top.
Work 4 continuous zigzag lines in surf sl st. At each pin, anchor the line in the edge stitch:
- A1 → B3 → A5 → B7, continuing to the last rung.
- B1 → A3 → B5 → A7, continuing to the last rung.
- A2 → B4 → A6 → B8, continuing to the last rung.
- B2 → A4 → B6 → A8, continuing to the last rung.
Each diagonal crosses the strip in 6–7 surf sl sts. The four lines cross to form a lattice about two diamonds wide, with cream showing inside every diamond. On the curves, the outer-edge rungs sit farther apart than the inner ones. That is correct, and it keeps the diamonds even. Weave in the coral ends on the back.
Part 3: Flowers (Make 3)
Large flower, 1 in (2.5 cm):
- Rnd 1 (yellow): MR, 10 sc in ring, join with sl st to first sc. Fasten off. (10 sc)
- Rnd 2 (cream): Join in any st. *(Hdc, 2 dc, hdc) in next st, sl st in next st; rep from * 4 more times. (5 petals, 25 sts) Fasten off.
Medium flower, 3/4 in (1.9 cm):
- Rnd 1 (yellow): MR, 5 sc in ring, join. Fasten off. (5 sc)
- Rnd 2 (cream): Join in any st. *(Sc, hdc, dc, hdc, sc) in next st; rep from * 4 more times, join. (5 petals, 25 sts)
Small flower, 1/2 in (1.3 cm):
- Rnd 1 (yellow): MR, 5 sc in ring, join. Fasten off. (5 sc)
- Rnd 2 (cream): Join in any st. *(Sc, hdc, sc) in next st; rep from * 4 more times, join. (5 petals, 15 sts)
With yellow, add 3 French knots to the centers of the large and medium flowers for a beaded texture.
Part 4: Leaves (Make 4, Green)
Ch 7. Sl st in 2nd ch from hook, sc in next ch, hdc in next ch, dc in next ch, hdc in next ch, 3 sc in last ch. Rotate and work along the opposite side of the chain: hdc in next ch, dc in next ch, hdc in next ch, sc in next ch, sl st in last ch. (13 sts) Fasten off, leaving a 6 in (15.2 cm) tail.
Each leaf is 3/4 in (1.9 cm) long. It is pointed at the sl st end and rounded at the base.
Part 5: Buds (Make 3)
With cream, ch 3, work a 5-dc bobble in 3rd ch from hook, ch 1 to close. Fasten off. (1 bobble) Each bud is 1/4 in (0.6 cm) across.
With green, join at the base of the bobble, ch 4 for the stem, and fasten off. The stem is 1/2 in (1.3 cm) long.
Part 6: Attaching Appliqués and Hardware
Do this after the border and the first stage of blocking.
- Arrange the flowers along the left side of the letter, from the upper curve down to the start of the lower curve. Put the medium flower on top, the large flower in the middle where the spine meets the top bowl, and the small flower lowest. Let each flower overlap the outline by about 1/4 in (0.6 cm).
- Tuck the leaves behind the petals, pointing out to the left. Place one at the top, one between each pair of flowers, and one below the small flower.
- Place the 3 buds above the medium flower, with the stems tucked behind it.
- Pin, then sew each piece down with small hidden stitches in matching yarn.
- Open the jump ring with two pliers. Pass it through both border rounds at the highest point of the top curve, add the split ring, and close the jump ring fully.
Border
Border gauge: Round 1 places 1 sc in each row-end along the long edges. That gives about 7 sc per 1 in (2.5 cm) of edge, which matches the row gauge.
Each short-end count below includes that end’s 2 corner groups. The long-edge counts contain no corner stitches.
Rnd 1 (cream): Continuing from Row 75, ch 1, turn.
– Across Row 75: 3 sc in first st, sc in next 3 sts, 3 sc in last st. (9 sts)
– Down Edge B: sc in each row-end of Rows 74–2. (53 sc)
– Across the opposite side of the foundation ch: 3 sc in first ch, sc in next 3 ch, 3 sc in last ch. (9 sts)
– Up Edge A: sc in each row-end of Rows 2–74. (53 sc)
Join with sl st to first sc and fasten off. (124 sts)
Rnd 2 (coral): Join with sl st in any st. Sl st loosely in each st around, then join. (124 sl sts) Fasten off.
Why the math works: Rows 2–74 make 73 rows. On each edge, 20 of those rows are short rows that never reach that edge, because they belong to the curve where that edge is on the inside. That leaves 73 − 20 = 53 row-ends per long edge. Each end adds 9 stitches, so 9 + 53 + 9 + 53 = 124.
The outer curves automatically get more stitches than the inner curves, so the border lies flat. Rnd 2 has no increases. It adds firmness and the raised coral outline without making the shape bigger. Together, the two rounds add 1/8 in (0.3 cm) on every edge, taking the letter from 3.75 in x 2.75 in (9.5 x 7.0 cm) to 4 in x 3 in (10.2 x 7.6 cm).
Final Blocking
- Weave in all ends on the back.
- Mist the letter until it is damp but not soaked.
- Lay it face up on the mat. Shape the two curves evenly and keep the strip the same width all the way along.
- Pin it to 4 in (10.2 cm) x 3 in (7.6 cm), with pins every 1/2 in (1.3 cm) along the outline.
- Let it dry completely, at least 4 hours.
- Attach the appliqués and hardware (Part 6).
- Lightly mist the flowers, press the petals flat with your fingers, and let them dry.
Final Quality-Control Checklist
- The letter measures 4 in (10.2 cm) x 3 in (7.6 cm).
- Border Rnd 1 has 124 sts, and Rnd 2 has 124 sl sts.
- The lattice diamonds look even on both curves.
- There are no gaps at the short-row steps.
- The flowers sit firmly and don’t flop when you tip the keychain.
- The jump ring is fully closed, with no gap to snag the yarn.
- No yarn ends show on the front.
Troubleshooting
- Curves too open: Your rows are too tall. Use a smaller hook or work tighter sc.
- Outer curve ruffles: Your short rows are too loose. Rework the curve more firmly.
- Holes at short-row steps: On the next full row, insert the hook into the stitch and the side of the turning ch together.
- Border waves: Your Rnd 2 slip stitches are too loose. Rework them with a 2.25 mm hook.
- Lattice puckers: Your surface slip stitches are too tight. Rework them with longer loops.
- Flowers cup: Mist them, press them flat with your fingers, and let them dry.
Care
Spot clean with cool water and mild soap, then reshape and dry flat. Keep the metal rings dry to protect the gold finish.
Final Notes
Each measurement leads to the next. A gauge of 6 sc and 7 rows per 1 in (2.5 cm) gives a 0.83 in (2.1 cm) strip. Curves with 30-row outer edges bend that strip into an S that measures 3.75 in x 2.75 in (9.5 x 7.0 cm). The 124-stitch border brings it to 4 in x 3 in (10.2 x 7.6 cm). Check your size at each stage, and your keychain will come out crisp, flat, and ready to hang.
Happy crocheting!