

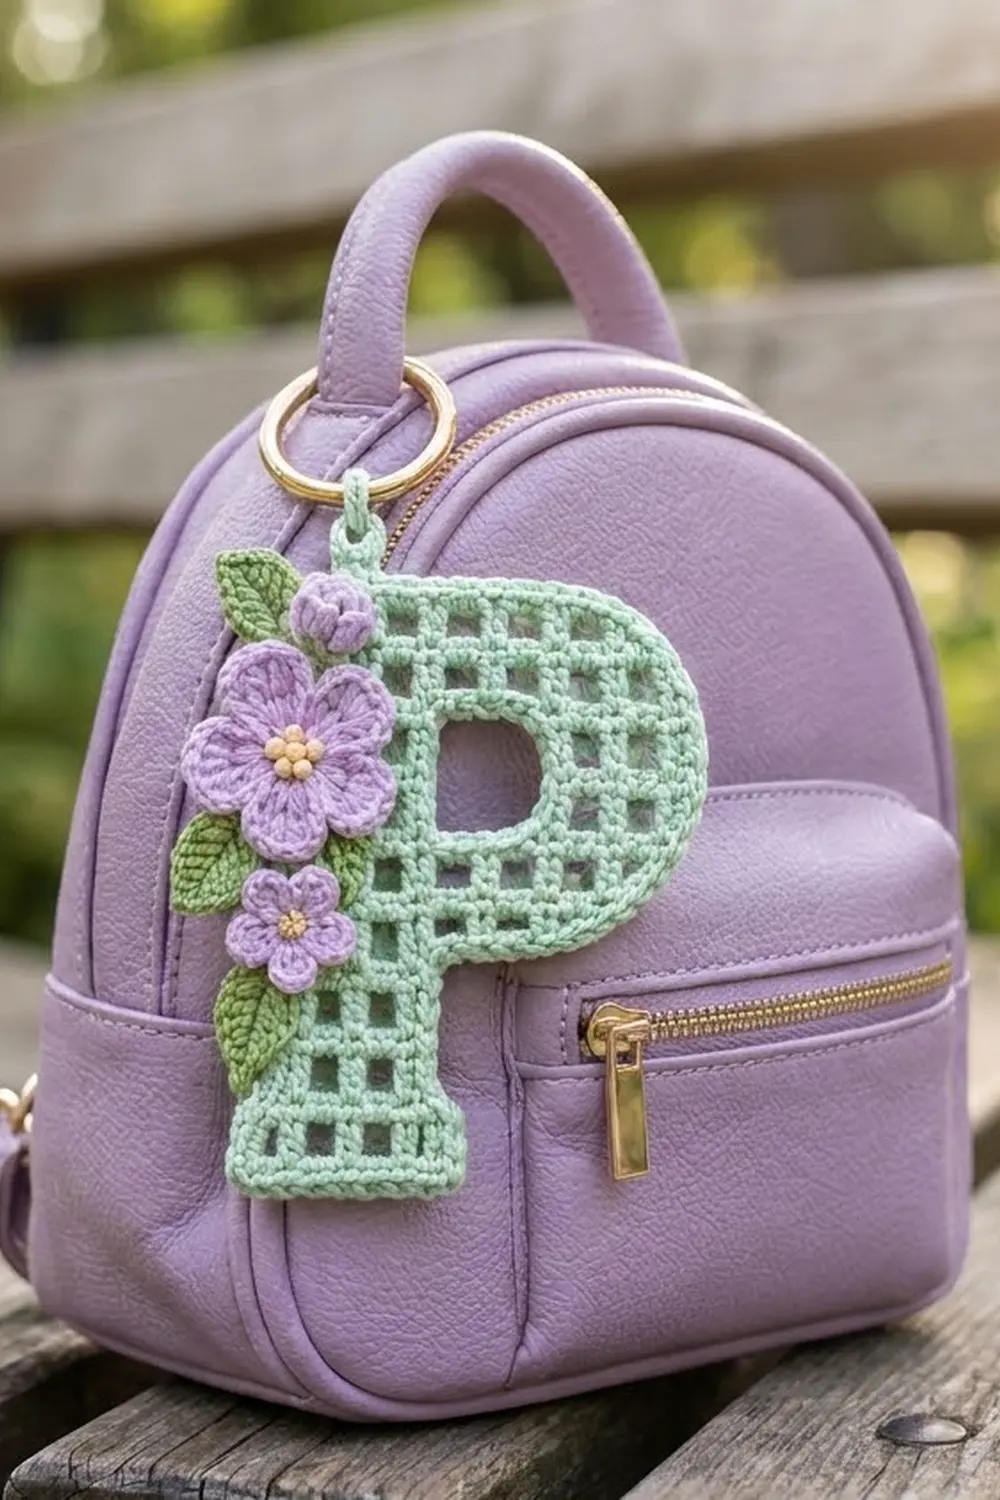
This little bag charm is a capital letter P worked in filet crochet, an open grid of small square windows. Soft mint green forms the letter, and a firm single crochet edge outlines it. A short tab at the top holds a gold metal ring, so you can clip it to a backpack, a key ring, or a zipper pull.
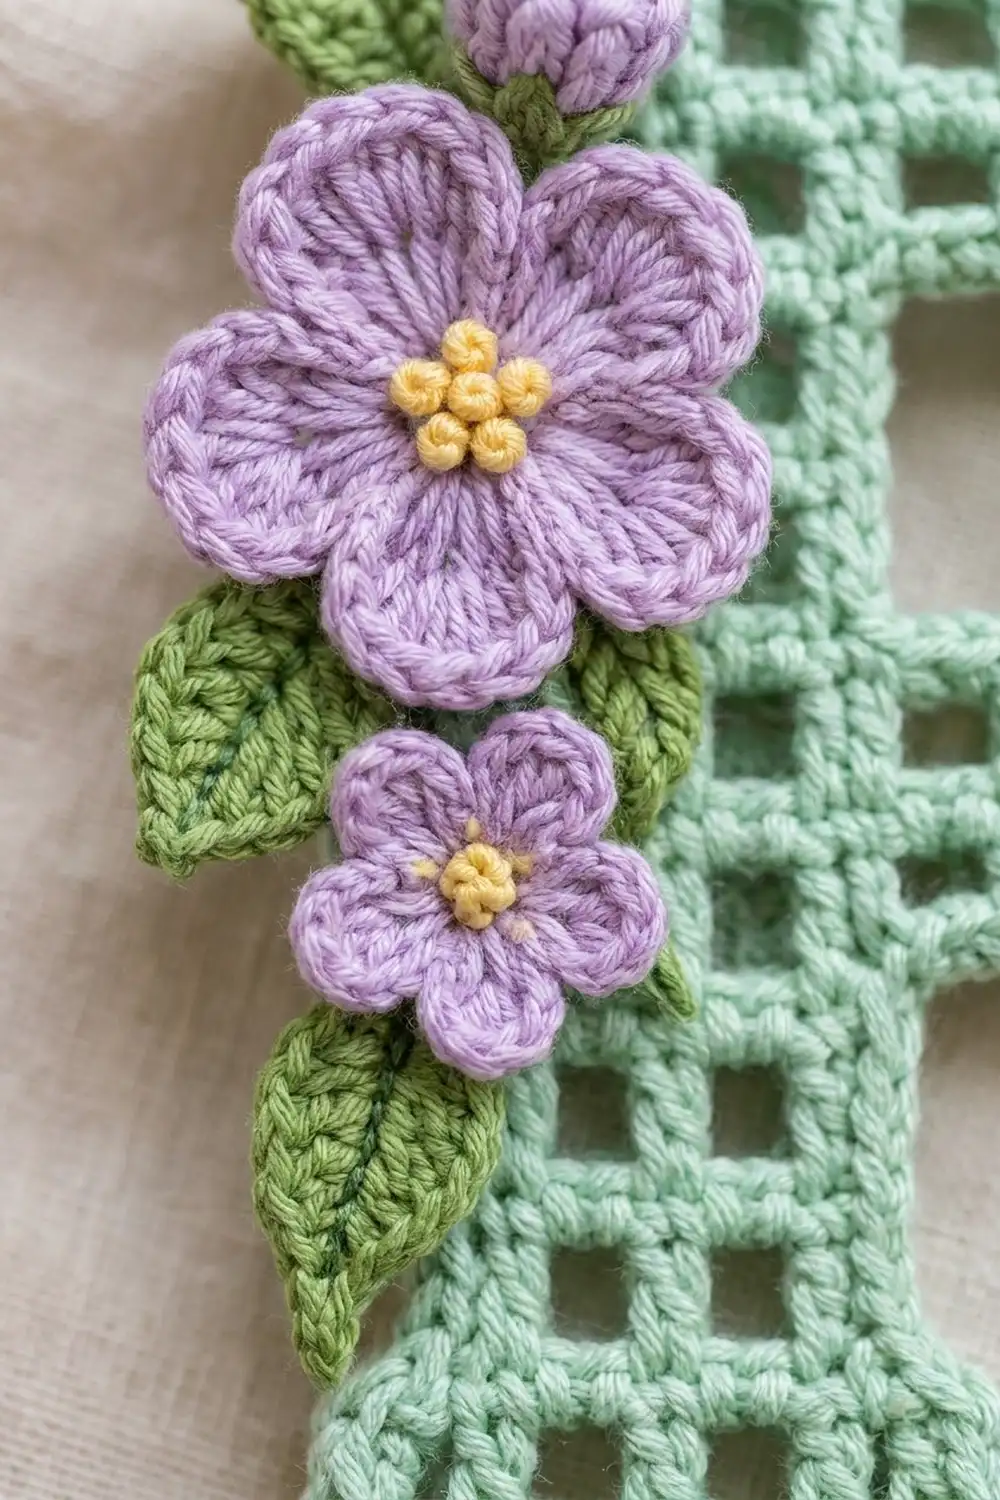
A spray of lavender flowers runs down the left edge: one large five-petal flower, one small five-petal flower and a rounded bud, set among leaf-green leaves. Yellow French knots fill both flower centers. The style is fresh and springlike, and it makes a lovely personalized gift.
The pattern uses US crochet terms. The finished letter measures 3.2 in (8.1 cm) wide by 4.8 in (12.2 cm) tall, not counting the tab and ring.
You work the letter as one flat filet piece from the bottom up. The bowl splits around the open counter, and a chain bridges across the top of it. Then you add a single crochet border, a slip stitch finishing round and a hanging tab. Last, you make seven small appliqués and sew them on.
Finished Size and Construction
- Finished size: 3.2 in (8.1 cm) wide x 4.8 in (12.2 cm) tall, not counting the tab and ring
- Skill level: Intermediate (you should be comfortable with filet mesh and simple shaping)
- Terminology: US crochet terms
- Yarn weight: Sport weight (#2) mercerized cotton
- Hook: 3.0 mm
- Number of pieces: 1 letter, plus 7 small sewn-on appliqués (2 flowers, 1 bud, 4 leaves)
- Layout: A single letter P with the bowl facing right and the flowers along the left edge
- Grid: 7 meshes wide x 11 rows tall; each mesh is 0.4 in (1.0 cm) square
- Size before border: 2.8 in (7.1 cm) x 4.4 in (11.2 cm)
- Border depth: 0.2 in (0.5 cm) on every side
Materials
Choose a smooth mercerized cotton in sport weight. Cotton gives crisp mesh squares and holds its shape on a bag. The amounts below assume a yarn of about 155 m per 50 g.
- Mint green (letter, border, tab): 8 g, about 25 m
- Lavender (flowers and bud): 4 g, about 12 m
- Leaf green (leaves): 2 g, about 6 m
- Yellow (flower centers): 1 g, about 3 m
The quantities include a margin for your gauge check and sewing tails.
Tools:
- 3.0 mm crochet hook
- Gold metal O-ring, 1 in (2.5 cm) across
- Tapestry needle
- Rustproof pins and a gridded blocking mat
- Spray bottle, plus light spray starch (optional)
- Scissors and a ruler
Abbreviations (US Terms)
- ch: chain
- sl st: slip stitch
- sc: single crochet
- hdc: half double crochet
- dc: double crochet
- sk: skip
- sp: space
- st(s): stitch(es)
Special terms:
- Mesh: one open square made of (ch 2, dc). A row of n meshes always has n + 1 posts.
- Post: a vertical dc, or the ch-3 part of a turning chain, that separates two meshes.
- Top of turning chain: the 3rd ch counted from the free end of a ch-5. In Rows 1 and 5, it’s the 3rd ch counted from the free end of the skipped chains.
- Bridge: a ch-5 that spans two mesh positions with no post in the middle. It forms the top of the counter.
- Popcorn: work 5 dc in one st. Drop the loop, insert the hook in the first dc, then pick up the dropped loop and pull it through.
Gauge and Checkpoints
Gauge: 5 meshes and 5 rows = 2 in (5.1 cm) square. One mesh = 0.4 in (1.0 cm).
Test one piece first. Work Rows 1-4 (the stem) as your swatch and measure before you continue.
- After Row 4: 1.2 in (3.0 cm) wide x 1.6 in (4.1 cm) tall
- After Row 5: 2.8 in (7.1 cm) wide across the bowl
- After Row 11: 2.8 in (7.1 cm) x 4.4 in (11.2 cm)
- After the border: 3.2 in (8.1 cm) x 4.8 in (12.2 cm)
If 5 meshes measure more than 2.1 in (5.3 cm), your work is too big: go down a hook size. If they measure less than 1.9 in (4.8 cm), go up a hook size. Meshes that are too tall usually mean loose dc. Meshes that are too wide usually mean loose ch-2 spaces.
Letter P
The grid has 7 columns, numbered 1 to 7 from left to right with the front facing you. The stem is columns 1-3, and the bowl spans columns 1-7. The counter (the hole in the bowl) is columns 4-5 in Rows 7-9. Filet looks almost the same on both sides, so you choose the front at the end: it’s the side where the bowl points right.
Stem
Row 1: With mint, ch 14. Dc in 8th ch from hook (the skipped ch count as the first post and ch-2 sp), [ch 2, sk 2 ch, dc in next ch] 2 times. (3 meshes, 4 posts)
Rows 2-4: Ch 5 (counts as dc and ch 2 here and throughout), turn, dc in next dc, ch 2, dc in next dc, ch 2, dc in top of turning ch. (3 meshes, 4 posts)
Checkpoint: 1.2 in (3.0 cm) x 1.6 in (4.1 cm).
Bowl
Row 5 (increase row): Do not turn. Ch 16. Dc in 8th ch from hook, [ch 2, sk 2 ch, dc in next ch] 2 times, ch 2, sk last 2 ch, dc in the last dc of Row 4 at the base of the chain (4 new meshes). [Ch 2, dc in next dc] 2 times, ch 2, dc in top of turning ch. (7 meshes, 8 posts)
The edge where this row began becomes the right edge of the bowl.
Row 6: Ch 5, turn, dc in next dc, [ch 2, dc in next dc] 5 times, ch 2, dc in top of turning ch. (7 meshes, 8 posts)
Counter Rows
Row 7, right column: Ch 5, turn, dc in next dc, ch 2, dc in next dc. (2 meshes: columns 7 and 6) Leave the rest of the row unworked.
Row 8, right column: Ch 5, turn, dc in next dc, ch 2, dc in top of turning ch. (2 meshes) Fasten off.
Row 7, stem: Join mint with a sl st in the top of the turning ch at the left edge of Row 6. Ch 5, dc in next dc, [ch 2, dc in next dc] 2 times. (3 meshes: columns 1-3) The last dc sits on the post between columns 3 and 4. Columns 4-5 stay empty.
Row 8, stem: Ch 5, turn, dc in next dc, ch 2, dc in next dc, ch 2, dc in 3rd ch of the joining ch-5. (3 meshes)
Row 9 (bridge row): Ch 5, turn, dc in next dc, ch 2, dc in next dc, ch 2, dc in top of turning ch (the post between columns 3 and 4). Ch 5 for the bridge. Dc in the top of the turning ch of the Row 8 right column (the post between columns 5 and 6), ch 2, dc in next dc, ch 2, dc in last dc. (5 meshes plus a bridge across 2 positions = 7 positions, 7 posts)
The counter is now one clean opening, 2 meshes wide by 3 rows tall: 0.8 in (2.0 cm) x 1.2 in (3.0 cm).
Top of Bowl
Row 10: Ch 5, turn, dc in next dc, ch 2, dc in next dc, ch 2, sk 2 ch, dc in 3rd ch of bridge, [ch 2, dc in next dc] 3 times, ch 2, dc in top of turning ch. (7 meshes, 8 posts)
Row 11: Ch 5, turn, dc in next dc, [ch 2, dc in next dc] 5 times. (6 meshes, 7 posts) Leave column 7 unworked so the top corner rounds off. Fasten off.
Checkpoint: 2.8 in (7.1 cm) x 4.4 in (11.2 cm).
Flowers, Bud and Leaves
Large flower (make 1, lavender):
- Rnd 1: Make a magic ring, ch 1, work 10 sc in the ring, then join with a sl st. (10 sc)
- Rnd 2: [Sc in next sc, ch 3, sk next sc] 5 times, join. (5 ch-3 loops)
- Rnd 3: In each ch-3 loop work (sc, hdc, 4 dc, hdc, sc), join. (5 petals, 40 sts) Fasten off, leaving a 10 in (25.4 cm) tail. The flower measures about 1.4 in (3.6 cm) across.
Small flower (make 1, lavender):
- Rnd 1: Make a magic ring, ch 1, work 10 sc in the ring, join. (10 sc)
- Rnd 2: [Sl st in next sc, (hdc, 2 dc, hdc) in next sc] 5 times, join. (5 petals) Fasten off, leaving a long tail. The flower measures about 0.9 in (2.3 cm) across.
Centers: With yellow, work 5 tight French knots in the center of the large flower and 3 in the center of the small one.
Bud (make 1, lavender): Ch 3, then work a popcorn in the 3rd ch from hook. Ch 1 and fasten off. The bud is about 0.4 in (1.0 cm) tall.
Leaf (make 4, leaf green): Ch 7. Sc in 2nd ch from hook, hdc in next ch, dc in next 2 ch, hdc in next ch, sc in last ch. Ch 1 for the tip. Working along the other side of the chain: sc, hdc, dc in next 2 ch, hdc, sc. Sl st to the first sc. (12 sts plus the tip) The chain forms the center vein. Each leaf is about 0.9 in (2.3 cm) long.
Border
Border gauge: 15 sc = 2 in (5.1 cm), or 7.5 sc per inch. That works out to exactly 3 sc per 0.4 in (1.0 cm) mesh or row. In the counts below, corner stitches are listed separately from the edge stitches.
Round 1: With the front facing, join mint with a sl st in the top of the last dc of Row 11. Ch 1, then work counterclockwise:
- Top-right corner: 2 sc.
- Top edge (6 meshes): 2 sc in each ch-2 sp and 1 sc in each of the 5 inner posts. (17 sc)
- Top-left corner: 3 sc.
- Left side (Rows 11 to 1): 3 sc around each row end. (33 sc)
- Bottom-left corner: 3 sc.
- Stem bottom (3 meshes): 2 sc in each sp and 1 sc at the base of each of the 2 inner posts. (8 sc)
- Stem bottom-right corner: 3 sc.
- Stem right side (Rows 1-4): 3 sc per row end. (12 sc)
- Inner corner: 1 sc where the Row 5 chain meets the stem.
- Bowl underside (4 meshes): 2 sc in each sp and 1 sc at the base of each of the 3 inner posts. (11 sc)
- Bowl bottom-right corner: 2 sc.
- Right side (Rows 5-10): 3 sc per row end. (18 sc)
- Top-right corner of Row 10: 2 sc.
- Top of column 7: 2 sc in the sp.
- Row 11 end: 3 sc around the last dc.
Join with a sl st to the first sc. (120 sc)
Check: 2 + 17 + 3 + 33 + 3 + 8 + 3 + 12 + 1 + 11 + 2 + 18 + 2 + 2 + 3 = 120.
Why the math works: Three sc per row or mesh matches the border gauge exactly. For example, the 33 sc on the left side lie flat along its 4.4 in (11.2 cm). A run of n meshes along a top or bottom edge gets 3n – 1 sc, and the corner group adds the rest. The square corners on the left get 3 sc each. The right-hand corners get only 2 sc, and the inner step at the top right gets none, so the bowl curves smoothly.
Round 2: Work a loose sl st in each sc around. (120 sl st) Fasten off.
Counter round: Join mint at the bottom-left corner of the counter, then ch 1. Working counterclockwise:
- Bottom: 2 sc in the column 4 sp, 1 sc in the post, 2 sc in the column 5 sp. (5 sc)
- Right side: 2 sc around each of the 3 row ends. (6 sc)
- Top: 5 sc around the bridge. (5 sc)
- Left side: 2 sc around each of the 3 row ends. (6 sc)
Join. (22 sc) The inside edge needs only 2 sc per row to stay flat. The opening now measures about 0.4 in (1.0 cm) x 0.8 in (2.0 cm).
Hanging tab: Start from the top-left corner group and count along the sl sts of the top edge. Join mint in the 3rd sl st.
- Row 1: Ch 1, sc in the same st and the next 3 sts. (4 sc)
- Rows 2-10: Ch 1, turn, sc in each sc. (4 sc)
The tab measures 0.5 in (1.3 cm) x 1.6 in (4.1 cm). Thread it through the O-ring, fold it to the back and whipstitch the last row behind the top edge. About 0.6 in (1.5 cm) of loop shows above the letter.
Attaching the Appliqués
Lay the letter front side up and arrange every piece before you sew anything:
- Bud: over columns 1-2 at Row 11, just above the border.
- Leaf 1: left of the bud, tip pointing up and out.
- Large flower: over columns 1-2 at Rows 7-9, extending 0.3 in (0.8 cm) past the left edge.
- Leaf 2: under the lower right of the large flower, tip pointing toward the counter.
- Leaf 3: between the two flowers, tip pointing out to the left.
- Small flower: over columns 1-2 at Rows 4-5.
- Leaf 4: below the small flower at Rows 2-3, tip pointing down and out.
Sew the leaves first, then the flowers. Use each piece’s own tail and catch only the mesh posts so the stitches stay hidden.
Final Blocking
- Weave in all ends along the dc posts on the back.
- Mist the piece until it is damp.
- Pin it to the mat at 3.2 in (8.1 cm) x 4.8 in (12.2 cm).
- Pin the square corners sharply, and ease the bowl into a curve.
- Pin the counter open to 0.4 in (1.0 cm) x 0.8 in (2.0 cm).
- Lift the petals so they keep their shape. If you want a stiffer letter, starch the letter only.
- Let it dry completely before you unpin it.
Final Quality-Control Checklist
- 3 meshes across the stem, 7 across the bowl, 11 rows tall
- Every mesh is open and square
- The counter has no chain bar across its middle
- Border Round 1 has 120 sc, and the counter round has 22 sc
- The left corners are square and the right side is curved
- The tab sits over columns 1-2 and holds the ring securely
- All 7 appliqués are attached firmly
- The letter measures 3.2 in (8.1 cm) x 4.8 in (12.2 cm)
Troubleshooting
- Meshes slant: Work each dc into the post below, not into the space.
- Bowl pulls in at Row 5: Your extension chain is too tight. Rework it more loosely.
- Bridge sags: Chain firmly, and make exactly 5 ch.
- Border ruffles: Work 2 sc per row end on the right side.
- Border cups: Add 1 sc to each square corner.
- Letter reads backward: Turn it over. Filet works on either side.
Care
Hand wash in cool water with mild soap, roll it in a towel to remove water and dry flat. Reshape the curve of the bowl while it is damp.
Final Notes
The measurements build on each other. Each mesh is 0.4 in (1.0 cm). The stem swatch is 1.2 in (3.0 cm) x 1.6 in (4.1 cm), and the finished grid is 2.8 in (7.1 cm) x 4.4 in (11.2 cm). The 0.2 in (0.5 cm) border, worked at 3 sc per mesh, brings the letter to 3.2 in (8.1 cm) x 4.8 in (12.2 cm). Check your size at each stage and your charm will come out right.
Happy crocheting!