

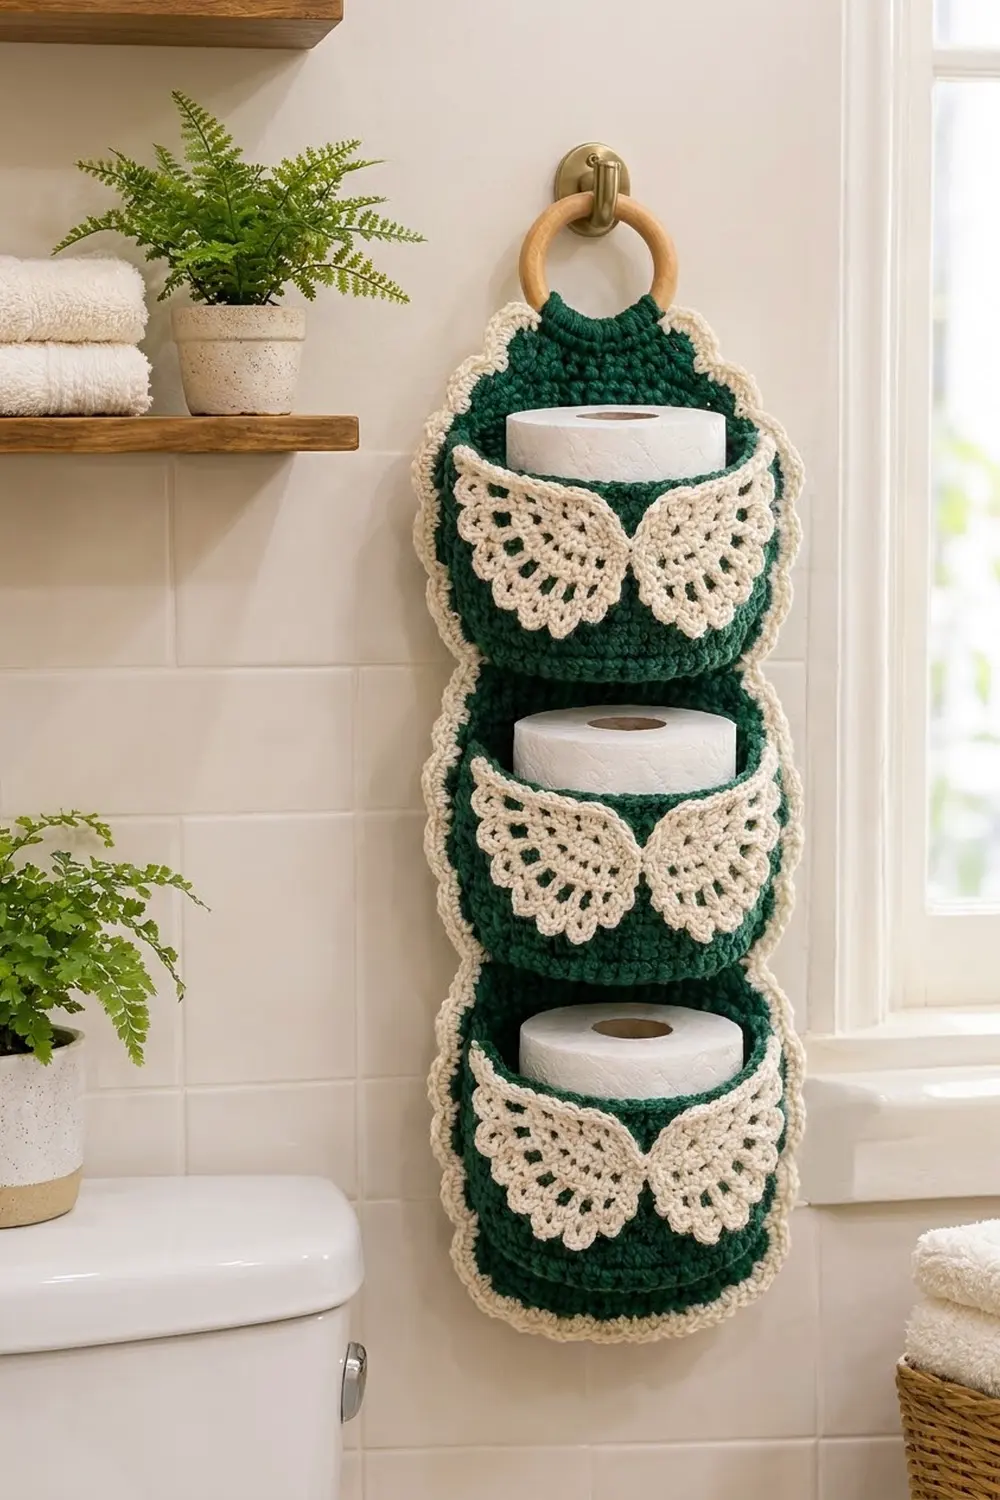
This hanging holder stores three spare rolls in deep forest green, with cream angel wings on each pocket. A scalloped cream edging runs around the whole outline, and a wooden ring at the top lets it hang from a towel bar, hook or door knob.
The style is cosy and festive without being loud. Two colours do all the work: dense green single crochet for structure and cream for the lacy details. It suits a holiday bathroom but works all year.
The pattern uses US crochet terms. The finished holder is 7 3/4 in (19.7 cm) wide and 21 in (53.3 cm) long, not counting the ring.
How it is built: you make three flat green circles and sew them into a column. Then you add a tapered hanging tab at the top and work a two-row border around the outline. Separately, you make three round pockets and six cream wings. The wings are sewn onto the pockets, and the pockets are sewn onto the panel.
Finished Size and Construction
- Finished size: 7 3/4 in (19.7 cm) wide × 21 in (53.3 cm) long, without the ring
- Skill level: Intermediate
- Terminology: US
- Yarn weight: Worsted (#4)
- Hook: 4.5 mm (US 7)
- Number of pieces: 12 crocheted pieces (3 back circles, 3 pockets, 6 wings) plus 1 wooden ring
- Layout: 1 column of 3 circles
- Piece size: back circle 6 1/4 in (15.9 cm) across; pocket 5 1/4 in (13.3 cm) across × 3 1/4 in (8.3 cm) tall; wing 2 1/4 in (5.7 cm) from centre to feather tip
- Size before border: 6 1/4 in (15.9 cm) wide × 18 1/2 in (47.0 cm) long (lobes only)
- Border depth: 3/4 in (1.9 cm)
Materials
Use a smooth worsted-weight cotton or cotton blend. Cotton holds the pocket shape well and keeps the stitches crisp. Acrylic also works but is softer, so the pockets may sag a little more.
- Forest green (MC): about 220 g / 400 m
- Cream (CC): about 70 g / 130 m
Both quantities include a margin of roughly 20 percent for swatching and differences in tension.
Tools:
– 4.5 mm (US 7) crochet hook
– Wooden ring, 3 in (7.6 cm) across
– Tapestry needle
– 12 or more locking stitch markers
– Rust-proof pins and a blocking mat
– Measuring tape
Abbreviations (US Terms)
- ch – chain
- sl st – slip stitch
- sc – single crochet
- dc – double crochet
- sc2tog – single crochet 2 together
- inc – 2 sc in the same stitch
- BLO – back loop only
- sp – space
- tch – turning chain
- st(s) – stitch(es)
Special stitches:
– Wing shell: 7 dc in the same ch-2 sp.
– Border shell: 5 dc in the same st.
Joined rounds: In every round, ch 1, work the stitches, then sl st to the first sc. The ch 1 does not count as a stitch.
Gauge and Checkpoints
Gauge: 16 sc × 18 rows = 4 in (10.2 cm) in single crochet.
Make one back circle before anything else and measure it flat:
- After Round 6 (36 sts): 2 7/8 in (7.3 cm) across
- After Round 10 (60 sts): 4 3/4 in (12.1 cm) across
- After Round 13 (78 sts): 6 1/4 in (15.9 cm) across
The pocket base follows the same rounds and should measure 5 1/4 in (13.3 cm) after Round 11.
If it is too big: go down to a 4 mm hook. A pocket that is too loose lets the roll tilt forward.
If it is too small: go up to a 5 mm hook. The pocket has to fit a standard 4 1/2 in (11.4 cm) roll.
If the circle cups, your tension is tightening as you go, so relax your grip. If it ripples, change hook size rather than leaving out increases.
Back Circles (make 3, MC)
Work in joined rounds and do not turn. To keep the circle round instead of hexagonal, stagger the increases: on even-numbered rounds, start the repeat with half the plain stitches, then the inc, then finish with the rest.
Round 1: Make a magic ring, 6 sc in the ring. (6)
Round 2: Inc in each st. (12)
Round 3: [Sc 1, inc] 6 times. (18)
Round 4: [Sc 2, inc] 6 times. (24)
Round 5: [Sc 3, inc] 6 times. (30)
Round 6: [Sc 4, inc] 6 times. (36)
Round 7: [Sc 5, inc] 6 times. (42)
Round 8: [Sc 6, inc] 6 times. (48)
Round 9: [Sc 7, inc] 6 times. (54)
Round 10: [Sc 8, inc] 6 times. (60)
Round 11: [Sc 9, inc] 6 times. (66)
Round 12: [Sc 10, inc] 6 times. (72)
Round 13: [Sc 11, inc] 6 times. (78)
Fasten off and weave in the ends. Each circle is 6 1/4 in (15.9 cm) across with 78 sts around the edge.
Pockets (make 3)
Rounds 1–11: With MC, work as for Back Circle Rounds 1–11. (66)
Check that the base measures 5 1/4 in (13.3 cm) across.
Round 12 (turning round): Sc in the BLO of each st. (66)
The unused front loops form a ridge that makes a crisp bottom edge.
Rounds 13–25: Sc in each st. (66 in each round)
Fasten off MC.
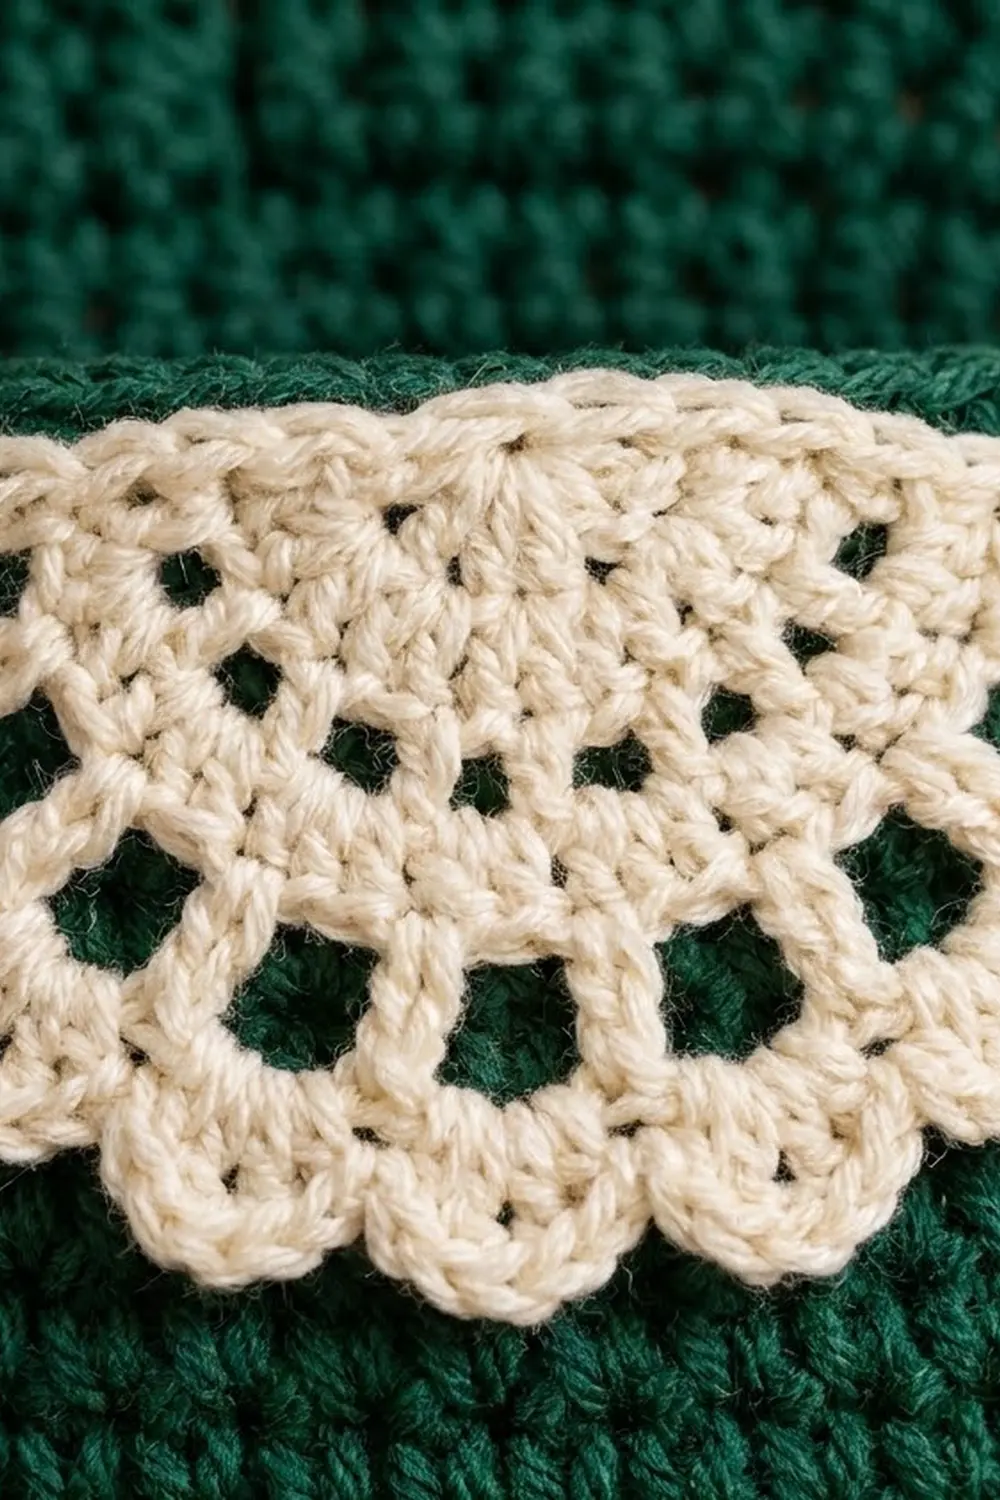
Round 26 (rim): Join CC in any st. Sc in each st. (66) Close with an invisible join.
Put a marker in the st directly above the beginning-of-round seam. This is the back centre of the pocket.
The pocket is 5 1/4 in (13.3 cm) across and 3 1/4 in (8.3 cm) tall. A standard roll should drop in easily and stand about 3/4 in (1.9 cm) above the rim.
Angel Wings (make 6, CC)
All six wings are made the same way. For each pair, you flip one wing over so the two mirror each other. Turn at the end of every row.
Row 1: Ch 4 and sl st to the first ch to form a ring. Ch 3 (counts as dc), 7 dc in the ring. (8 dc)
This makes a half-circle fan.
Row 2: Ch 3 (counts as dc), dc in the same st, 2 dc in each dc across, ending in the top of the tch. (16 dc)
Checkpoint: the fan is about 1 in (2.5 cm) from ring to edge.
Row 3: Ch 5 (counts as dc + ch 2), skip the next 2 dc, [dc in the next dc, ch 2, skip the next 2 dc] 4 times, dc in the top of the tch. (6 dc, 5 ch-2 sps)
Row 4 (feathers): Ch 1, sc in the first dc, [wing shell in the next ch-2 sp, sc in the next dc] 5 times, working the last sc in the 3rd ch of the tch. (5 shells, 6 sc)
Row 5 (top edge): Ch 1. Rotate the wing and work 8 sc evenly down the row-end edge toward the ring, 2 sc in each row end. (8 sc)
This gives the wing its solid shoulder line.
Fasten off, leaving a 12 in (30.5 cm) tail for sewing. Each wing measures 2 1/4 in (5.7 cm) from ring to feather tip.
Make All Pieces
Before assembly, check that you have:
- MC: 3 back circles and 3 pockets (Rounds 1–25)
- CC: 3 pocket rims (Round 26) and 6 wings
Layout from top to bottom:
      [ring]
      [ tab ]
   ( Circle A )  <- Pocket 1 + wing pair
   ( Circle B )  <- Pocket 2 + wing pair
   ( Circle C )  <- Pocket 3 + wing pair
Joining
Circles into a column
Lay the three circles in a vertical line. On each circle, use markers to mark these stitches:
- Circle C (bottom): 8 sts at the top centre.
- Circle B (middle): 8 sts at the bottom centre and 8 sts at the top centre.
- Circle A (top): 8 sts at the bottom centre, and 16 sts at the top centre for the tab.
Hold Circles C and B right sides together, with the 8 marked sts of each lined up. Whipstitch through both loops, joining stitch to stitch: 8 sts to 8 sts, with no stitches skipped or doubled. Repeat for B and A.
Keep the seam tension even with the fabric. A tight seam pulls the circles out of round, and a loose one leaves a gap at the waist. Open the seams flat.
Size checkpoint: the column is 6 1/4 in (15.9 cm) wide × 18 1/2 in (47.0 cm) long.
Hanging tab
With the right side facing, join MC in the first of the 16 marked sts at the top of Circle A.
Row 1: Ch 1, sc in each of the 16 sts. (16)
Row 2: Ch 1, sc2tog, sc 12, sc2tog. (14)
Row 3: Ch 1, sc in each st. (14)
Row 4: Ch 1, sc2tog, sc 10, sc2tog. (12)
Row 5: Ch 1, sc in each st. (12)
Row 6: Ch 1, sc2tog, sc 8, sc2tog. (10)
Row 7: Ch 1, sc in each st. (10)
Row 8: Ch 1, sc2tog, sc 6, sc2tog. (8)
Rows 9–20: Ch 1, sc in each st. (8 in each row)
Rows 1–8 form the tapered dome, about 1 3/4 in (4.4 cm) tall. Rows 9–20 form a strap about 2 3/4 in (7.0 cm) long. Leave a long tail; the ring is attached after blocking.
Border
Border gauge: same as the main fabric. Row 1 should measure 1/4 in (0.6 cm) deep and Row 2 about 1/2 in (1.3 cm) deep.
The border is worked in rows, with the right side facing for both rows. It runs from the left base of the tab, around the outline, to the right base of the tab.
Free edge stitches available:
– Circle A: 78 − 16 (tab) − 8 (seam) = 54, which is 27 on each side
– Circle B: 78 − 16 = 62, which is 31 on each side
– Circle C: 78 − 8 = 70, one continuous arc around the bottom
At each waist, go straight from the last free st of one circle to the first free st of the next. Nothing is added or skipped at the seams.
Row 1 (MC): Join MC in the first free st to the left of the tab. Ch 1.
– A-left (27 sts): sc 13, inc, sc 13. (28)
– B-left (31 sts): sc 10, inc, sc 9, inc, sc 10. (33)
– C (70 sts): [sc 11, inc] 5 times, sc 10. (75)
– B-right (31 sts): sc 10, inc, sc 9, inc, sc 10. (33)
– A-right (27 sts): sc 13, inc, sc 13. (28)
Total: 186 sts worked into, plus 11 incs, for 197 sts. Fasten off.
Row 2 (CC): With the right side facing, join CC in the first st of Row 1. Ch 1, sc in the same st, [skip 1, border shell in the next st, skip 1, sc in the next st] 49 times. (49 shells, 50 sc) Fasten off.
Why the math works: The circle rounds grow by 6 sts per 78, which is 1 inc per 13 sts. Row 1 uses the same rate (1 inc about every 11–13 sts) along the curved edges, so the border lies flat. The total of 197 is 1 + (4 × 49), which is exactly what the 4-stitch shell repeat needs, so the row ends with a full sc at both ends of the tab.
Checkpoint: 7 3/4 in (19.7 cm) wide; 19 1/4 in (48.9 cm) from the bottom of the border to the base of the tab.
Assembly of Pockets and Wings
Wings to pockets: On each pocket, lay two wings across the front, opposite the back-centre marker. Flip one wing so both solid top edges are on top. Place the rings side by side at the centre front, 1/2 in (1.3 cm) below the cream rim, with the top edges angled up toward the outer tips.
Using the CC tails, sew around each ring, along each 8-sc top edge, and tack down the tip of each feather. The pair spans about 4 1/2 in (11.4 cm).
Pockets to panel: Centre each pocket on its circle, with the base ridge 1 in (2.5 cm) above the circle’s bottom edge (measured before the border). With MC:
- Whipstitch the 7 rim sts centred on the back-centre marker to the panel.
- Whipstitch the 7 matching front loops of the Round 12 ridge to the panel.
- Sew two vertical lines through the wall to connect the ends of those two seams.
This makes an attachment strip 1 3/4 in (4.4 cm) wide that holds each pocket upright as a round cup.
Final Blocking
- Lightly mist the panel, or steam it from 1 in (2.5 cm) above without touching the yarn.
- Pin the panel to 7 3/4 in (19.7 cm) wide and 19 1/4 in (48.9 cm) long, plus the tab.
- Pin each cream shell open into an even scallop.
- Put a roll in each pocket so it dries round.
- Pin the feather tips of each wing so they spread evenly.
- Leave it until completely dry, at least 12 hours.
- Fold the strap over the ring and sew Row 20 to the back of Row 8.
Final Quality-Control Checklist
- Each circle has 78 sts and measures 6 1/4 in (15.9 cm).
- Each pocket has 66 sts in every round and measures 5 1/4 in (13.3 cm) across.
- Each wing has 5 feathers and an 8-sc top edge.
- Each waist seam joins 8 sts to 8 sts.
- Border Row 1 has 197 sts and Row 2 has 49 shells.
- All three wing pairs mirror each other and sit at the same height.
- The ring hangs straight and the panel does not twist.
- All ends are woven in on the wrong side.
Troubleshooting
- Circle cups: check your increases, then go up a hook size.
- Circle ruffles: you have extra stitches. Recount and go down a hook size.
- Pocket leans forward: make the attachment strip wider, to 9 sts.
- Border flares: check that Row 1 has 11 increases, not more.
- Shells crowd at the waists: re-block and pin the waist inward.
- Wings curl: steam them flat before sewing them on.
- Tab stretches: add a sc row along the back of the strap.
Care
Hand wash in cool water, press out the water in a towel and dry flat. Take the holder off the ring before washing.
Final Notes
The measurements build on each other. A 4 in (10.2 cm) gauge gives a 6 1/4 in (15.9 cm) circle. Three circles make an 18 1/2 in (47.0 cm) column. The 3/4 in (1.9 cm) border brings it to 7 3/4 in (19.7 cm) wide, and the tab brings the total length to 21 in (53.3 cm).
If every checkpoint matches, the pockets, wings and scallops will fall into place. Happy crocheting!