

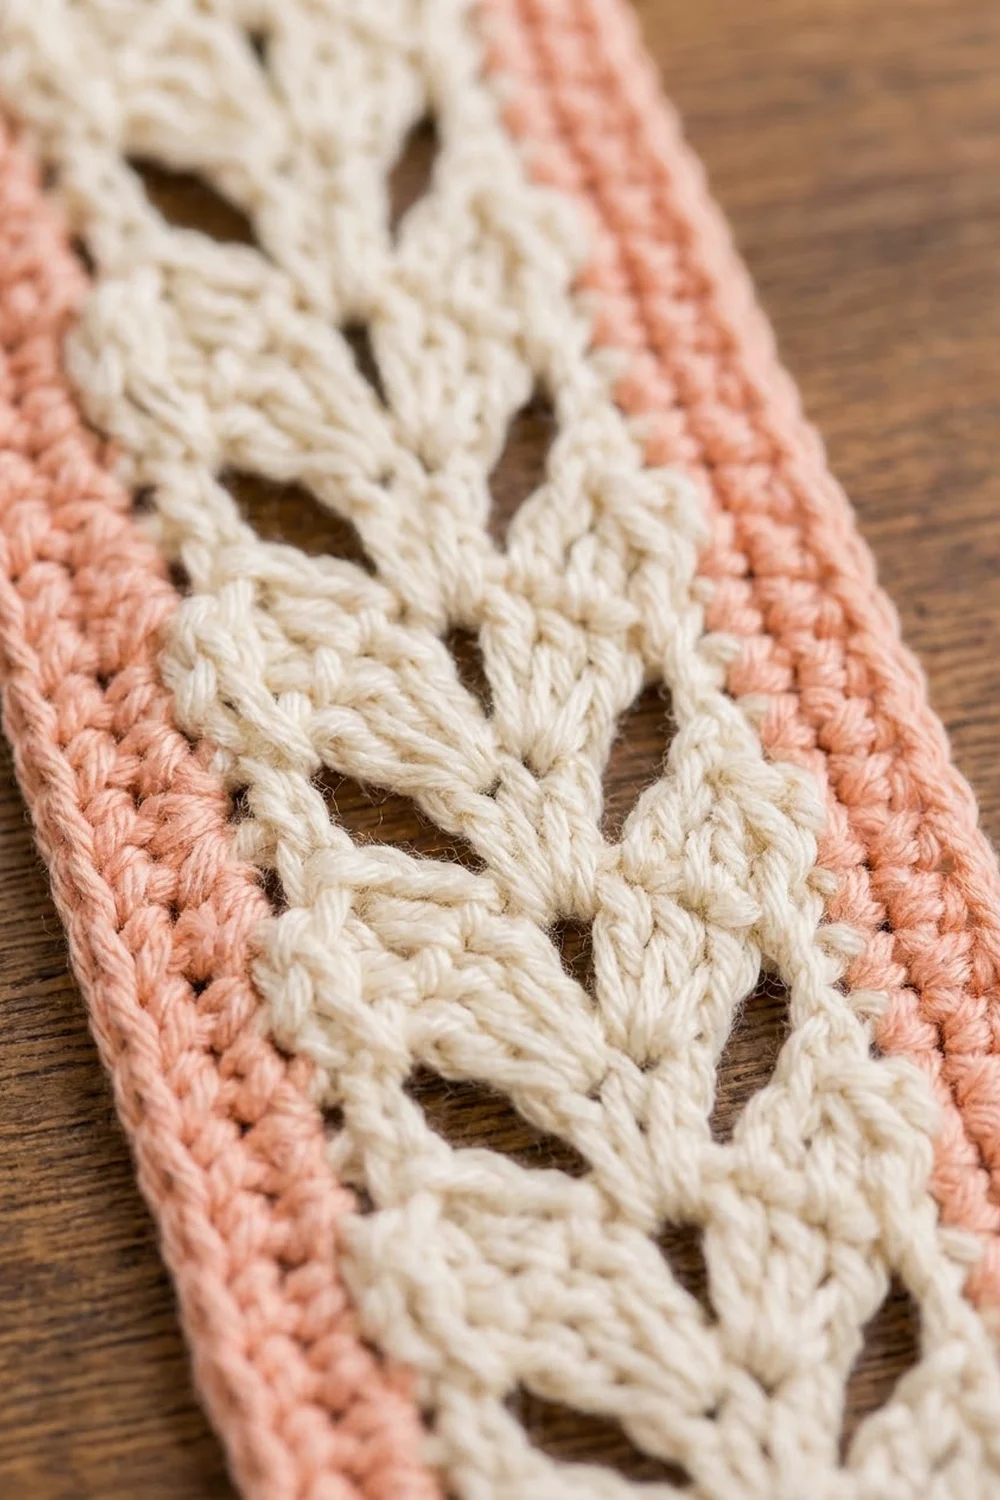
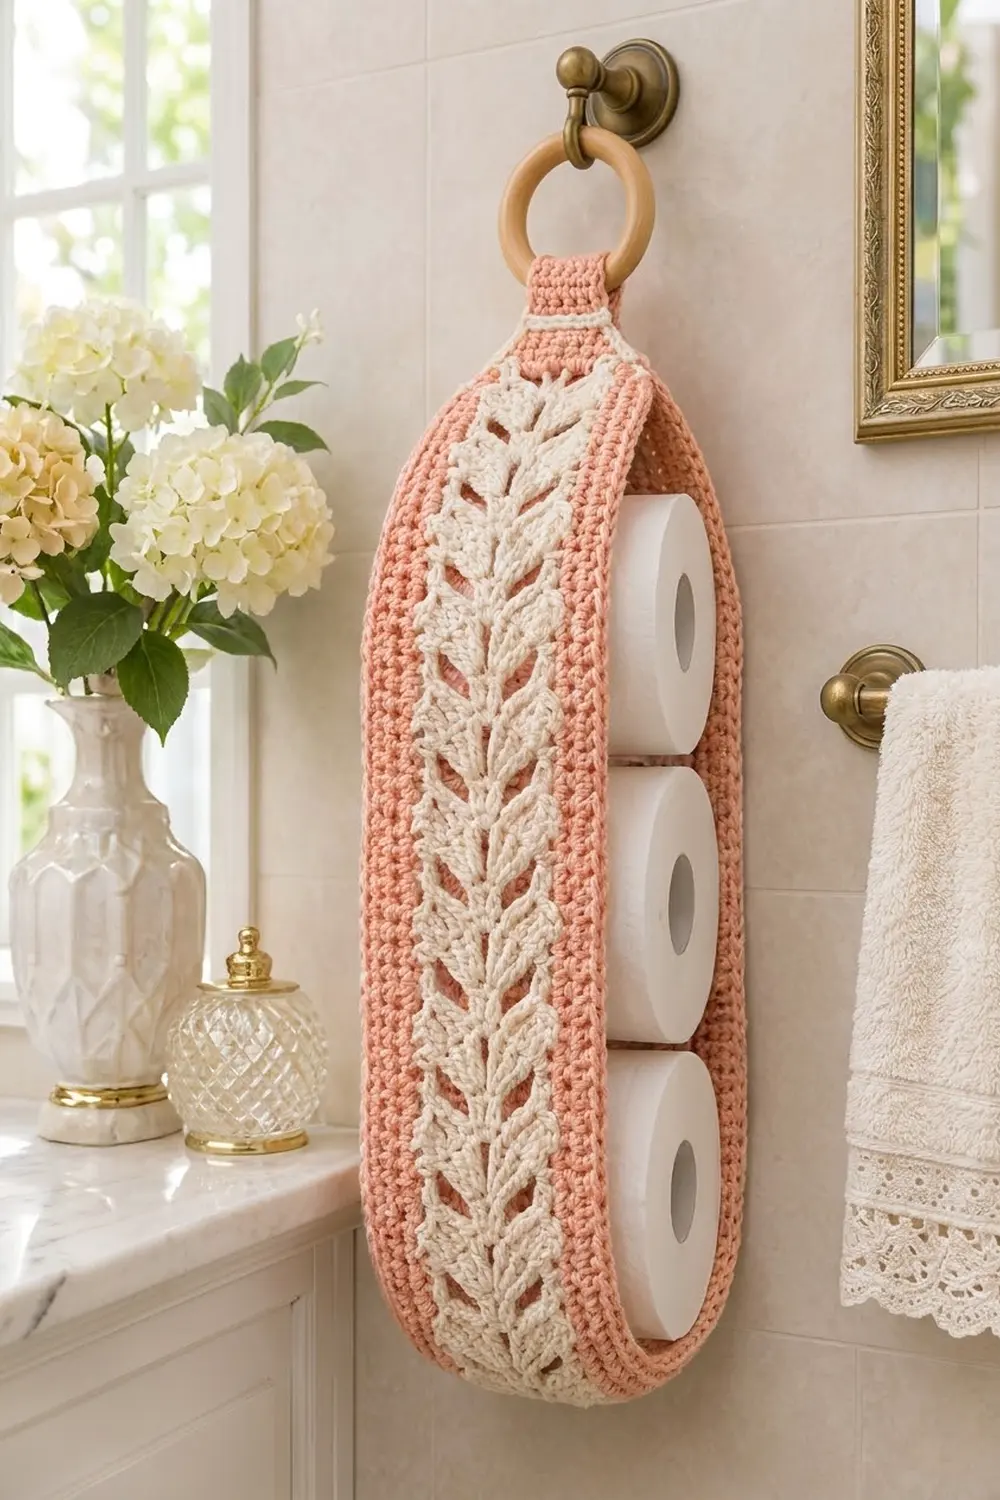
This hanging toilet paper holder keeps three spare rolls tidy and in view. A shallow oval basket in soft peach forms the back and side walls. A front band runs across it from top to bottom: a cream fern-lace strip framed by two narrow peach strips. A short pointed tab loops through a wooden ring, so the holder hangs from a hook or towel knob.
The look is warm and simple. Peach single crochet makes a firm, smooth fabric. The cream lace adds a column of stacked V-shaped leaves with small eyelets on each side. The open sides of the basket show off the rolls and make it easy to grab one.
The pattern uses US crochet terms. The finished body is about 4.9 in (12.4 cm) wide, 14.4 in (36.6 cm) tall, and about 5.5 in (14.0 cm) deep when filled. The total hanging height, including the tab and ring, is about 18 in (45.7 cm).
Construction is straightforward. First you work the oval back in spiral rounds and continue the side-wall rounds straight up from it. Next you make the lace strip and the two peach strips flat, sew them into one band, and add a two-round border. Last, you sew the band ends to the top and bottom of the rim and attach the tab and ring.
Finished Size and Construction
- Finished body size: about 4.9 in (12.4 cm) wide x 14.4 in (36.6 cm) tall x 5.5 in (14.0 cm) deep
- Skill level: Easy to intermediate
- Terminology: US crochet terms
- Yarn weight: Worsted (#4) cotton
- Hook: 4.0 mm (G-6)
- Number of pieces: 5 crocheted pieces (back basket, lace strip, 2 peach strips, hanging tab) plus 1 wooden ring
- Layout: front band = peach strip | lace strip | peach strip, sewn side by side
- Piece sizes: lace strip 2.25 x 16 in (5.7 x 40.6 cm); each peach strip 1 x 16 in (2.5 x 40.6 cm)
- Band size before border: 4.25 x 16 in (10.8 x 40.6 cm)
- Border depth: 2 rounds, about 0.45 in (1.1 cm) per edge
- Band size after border: about 5.1 x 16.9 in (13.0 x 42.9 cm)
Materials
Choose a smooth, mercerized or combed cotton in worsted weight. Cotton keeps its shape and makes a firm basket that won’t stretch under the weight of the rolls. Avoid fuzzy or very soft acrylics, which can sag.
- Peach (main color): 170 g, about 289 m
- Cream (contrast color): 50 g, about 85 m
These amounts assume about 170 m per 100 g. They include a margin of roughly 10 percent, which covers a gauge swatch and a little extra.
Tools:
– 4.0 mm (G-6) crochet hook
– 1 wooden ring, 2 in (5.1 cm) inner diameter
– Tapestry needle
– 6 or more stitch markers
– Rust-proof pins
– Measuring tape
– Spray bottle and blocking mat
Abbreviations (US Terms)
- ch – chain
- sc – single crochet
- dc – double crochet
- sl st – slip stitch
- sc2tog – single crochet 2 together
- BLO – back loop only
- st(s) – stitch(es)
- sp – space
- RS / WS – right side / wrong side
Special stitch – 2-dc cluster (cl): Yarn over, insert hook in the stitch, pull up a loop, yarn over and pull through 2 loops. Repeat once in the same stitch. Yarn over and pull through all 3 loops on the hook.
Gauge and Checkpoints
Gauge: 16 sc and 18 rows = 4 in (10.2 cm) in peach.
Lace gauge: 6 lace rows (3 repeats) = 2 in (5.1 cm). One dc row is as tall as 2 sc rows, so each 2-row repeat equals 3 sc rows.
Test one piece first. Make a peach strip before anything else. After 18 rows it should measure 1 x 4 in (2.5 x 10.2 cm). If it does, your gauge is right for the whole project.
Checkpoints:
– Back, Rnd 1: about 10 in (25.4 cm) long
– Back, Rnd 11: about 4.9 x 14.4 in (12.4 x 36.6 cm), lying flat
– Rim, after Rnd 20: 2 in (5.1 cm) tall
– Each strip: 16 in (40.6 cm) long
– Joined band: 4.25 x 16 in (10.8 x 40.6 cm)
– Bordered band: about 5.1 x 16.9 in (13.0 x 42.9 cm)
If your piece is too big, go down one hook size. If it’s too small, go up one hook size. Make a new test strip and check again before you continue.
Back Basket (Peach)
Work in continuous spiral rounds. Don’t join or turn. Move the marker up to the first stitch of each round.
Ch 41.
Rnd 1: 3 sc in 2nd ch from hook (end A), sc in next 38 ch, 3 sc in last ch (end B), rotate and work along the underside of the chain, sc in next 38 ch. (82 sts: 3 per end, 38 per side)
Every round now begins at end A. Place a marker in the first stitch.
Rnd 2: [2 sc in next st] 3 times, sc in next 38 sts, [2 sc in next st] 3 times, sc in next 38 sts. (88 sts)
Rnd 3: [sc in next st, 2 sc in next st] 3 times, sc in next 38 sts, [sc in next st, 2 sc in next st] 3 times, sc in next 38 sts. (94 sts)
Rnds 4–11: Work as Rnd 3, adding 1 more plain sc before each increase in each new round. Rnd 4 uses [sc in next 2 sts, 2 sc in next st] at each end, Rnd 5 uses [sc in next 3 sts, 2 sc in next st], and so on through Rnd 11, which uses [sc in next 9 sts, 2 sc in next st]. Each round adds 6 sts.
Stitch counts: Rnd 4: 100. Rnd 5: 106. Rnd 6: 112. Rnd 7: 118. Rnd 8: 124. Rnd 9: 130. Rnd 10: 136. Rnd 11: 142.
At Rnd 11, each end has 33 sts and each side has 38 sts (33 + 38 + 33 + 38 = 142). The oval measures about 4.9 x 14.4 in (12.4 x 36.6 cm).
Rim
Rnd 12: Sc in BLO of each st around. (142 sts) This makes a clean fold line, so the wall stands up.
Rnds 13–20: Sc in each st around. (142 sts)
Sl st in next st and fasten off. The rim is 9 rounds, or 2 in (5.1 cm) tall.
Lace Strip (Cream)
Work in rows. The leaf rows are RS rows.
Ch 11.
Row 1 (RS): Dc in 4th ch from hook (the skipped 3 ch count as 1 dc), skip next 2 ch, (cl, ch 2, cl) in next ch, skip next 2 ch, dc in last 2 ch. Turn. (2 dc on each side + 1 V)
Row 2 (WS): Ch 1, sc in first 2 dc, sc in next cl, 3 sc in ch-2 sp, sc in next cl, sc in next dc, sc in top of turning ch. Turn. (9 sc)
Row 3: Ch 3 (counts as dc), dc in next st, skip next 2 sts, (cl, ch 2, cl) in next st (the middle of the 3 sc), skip next 2 sts, dc in last 2 sts. Turn.
Row 4: Repeat Row 2. (9 sc)
Rows 5–48: Repeat Rows 3–4 twenty-two more times.
You now have 24 leaf rows and 24 sc rows. Fasten off. The strip measures 2.25 x 16 in (5.7 x 40.6 cm). The stacked V-shells form the fern column, and the skipped stitches leave eyelets on both sides of each leaf.
Peach Side Strips (Make 2)
Ch 5.
Row 1: Sc in 2nd ch from hook and in each ch across. Turn. (4 sc)
Rows 2–72: Ch 1, sc in each st across. Turn. (4 sc)
Fasten off, leaving a 30 in (76.2 cm) tail for sewing. Each strip measures 1 x 16 in (2.5 x 40.6 cm).
Hanging Tab (Peach)
Ch 7.
Row 1: Sc in 2nd ch from hook and in each ch across. Turn. (6 sc)
Rows 2–16: Ch 1, sc in each st across. Turn. (6 sc)
Row 17: Ch 1, sc2tog, sc in next 2 sts, sc2tog. Turn. (4 sts)
Row 18: Ch 1, sc in each st across. Turn. (4 sts)
Row 19: Ch 1, sc2tog twice. Turn. (2 sts)
Row 20: Ch 1, sc2tog. (1 st) Fasten off.
Edging (cream): Join cream at Row 1. Loosely sl st in each of the 6 foundation ch, then work 1 sl st in each row end up one side and down the other (20 + 20). (46 sl sts) Fasten off. The tab measures 1.5 x 4.4 in (3.8 x 11.2 cm).
Make All Pieces
Before you assemble, check that you have:
- Peach: 1 back basket, 2 side strips, 1 hanging tab
- Cream: 1 lace strip
- Hardware: 1 wooden ring
Band layout (front view):
| Peach   | Cream lace | Peach   |
| 4 sts   | 9 sts      | 4 sts   |
| 72 rows | 48 rows    | 72 rows |
|         | (= 72 sc-  |         |
|         | row units) |         |
Joining
Join the strips by whipstitching through the outer loops on the WS, using a peach tail.
Stitch-to-stitch logic: Each lace repeat (1 leaf row + 1 sc row) is 3 sc rows tall, the same as 3 peach rows. Along each seam, work 2 whipstitches into each lace leaf-row end and 1 into each lace sc-row end, with each whipstitch matched to one peach row end. That gives 24 x 2 + 24 x 1 = 72 stitches, one per peach row.
Pin the strips at the top, bottom, and every 4 in (10.2 cm) before sewing, so the seams stay aligned.
Tension: Pull each stitch snug but not tight. The seam should lie flat without puckering. If it gathers, loosen your tension and resew that section.
Checkpoint: The joined band measures 4.25 x 16 in (10.8 x 40.6 cm), which is 4 + 9 + 4 = 17 sts wide. The seams add no extra stitches.
Border
Border gauge: On the short ends, work 1 sc per stitch (4 sts per inch). On the long sides, work 1 sc per peach row end (4.5 rows per inch). Both match the fabric underneath, so the edge lies flat.
Rnd 1 (peach): With RS facing, join at the top right corner. Sc in each of 17 sts across the short end (4 + 9 + 4), ch 1 (corner), sc in each of 72 row ends down the long side, ch 1, sc in each of 17 sts across the bottom end, ch 1, sc in each of 72 row ends up the other side, ch 1. Join with sl st to first sc.
Count: (17 + 72 + 17 + 72 = 178 sc, worked 1 per existing st or row end) + 4 ch-1 corner sps.
Rnd 2 (peach): Ch 1, sc in each sc around, working 3 sc in each ch-1 corner sp. Join.
Count: (178 sc worked 1 per existing sc) + (4 corners x 3 sc = 12 added) = 190 sts. Each short end has 3 + 17 + 3 = 23 sts including both corner groups. Each long side has 72 sts between the corner groups.
Why the math works: The band’s short end is the sum of its three pieces, 4 + 9 + 4 = 17 sts, with no seam stitches added. The long side follows one peach strip at 72 rows, and the lace strip matches it at 72 sc-row units. Each border round adds one sc row height, about 0.22 in (0.6 cm), to every edge. The bordered band is about 5.1 x 16.9 in (13.0 x 42.9 cm).
Attaching the Band and Tab
- On the rim, find the 33 sts of each end curve. Skip the first 5 and mark the next 23 sts. That leaves 5 unmarked sts on the other side.
- Whipstitch one short end of the band (23 sts) to the 23 marked sts at the top of the rim, stitch for stitch. Repeat at the bottom end. The band arches forward and forms the front of the holder.
- Thread the tab through the ring. Whipstitch the Row 1 edge to the outside of the rim, just behind the top band seam. Fold the pointed end down over the front of the band, then tack down its point and sides.
Final Blocking
- Lightly mist the band and the open sides of the basket.
- Fill the basket with a rolled towel so it holds a rounded shape.
- Pin the band so its long edges are straight and the lace leaves are centered.
- Gently open the lace eyelets with your fingers.
- Let it dry completely, at least 24 hours.
- Remove the towel and test-fit 3 rolls.
Final Quality-Control Checklist
- Back basket Rnd 11 has 142 sts.
- Rim is 2 in (5.1 cm) tall and stands upright.
- Lace strip has 24 complete leaves.
- Both peach strips have exactly 72 rows.
- Band is 17 sts wide before the border.
- Border Rnd 2 has 190 sts.
- Band ends are centered on the rim, with 5 free sts on each side.
- Tab is secure and the ring is centered.
- All ends are woven in at least 2 in (5.1 cm).
Troubleshooting
Oval ripples: Increases may be stacking. Check for 33 end sts at Rnd 11, or go down a hook size for Rnds 6–11.
Oval cups: You may have skipped some increases. Count every round.
Lace strip shorter than the peach strips: Your dc rows may be too short. Pull up taller loops, or add 1 repeat to the lace strip and 3 rows to each peach strip.
Band edges wave: You may have worked extra sc on the long sides. Rework with exactly 72 sc per side.
Holder tips forward: Sew the tab lower on the back, or add one more rim round.
Care
Hand wash in cool water with mild soap. Lay flat to dry, reshaping it over a rolled towel, and don’t tumble dry.
Final Notes
Every measurement builds on the one before it. A gauge of 16 sc and 18 rows to 4 in (10.2 cm) gives a 4.9 x 14.4 in (12.4 x 36.6 cm) oval and a 2 in (5.1 cm) rim. It also gives three 16 in (40.6 cm) strips that join into a 4.25 in (10.8 cm) band, which grows to about 5.1 x 16.9 in (13.0 x 42.9 cm) with the border. Check each number as you go, and the band will fit the rim the first time.
Happy crocheting!