

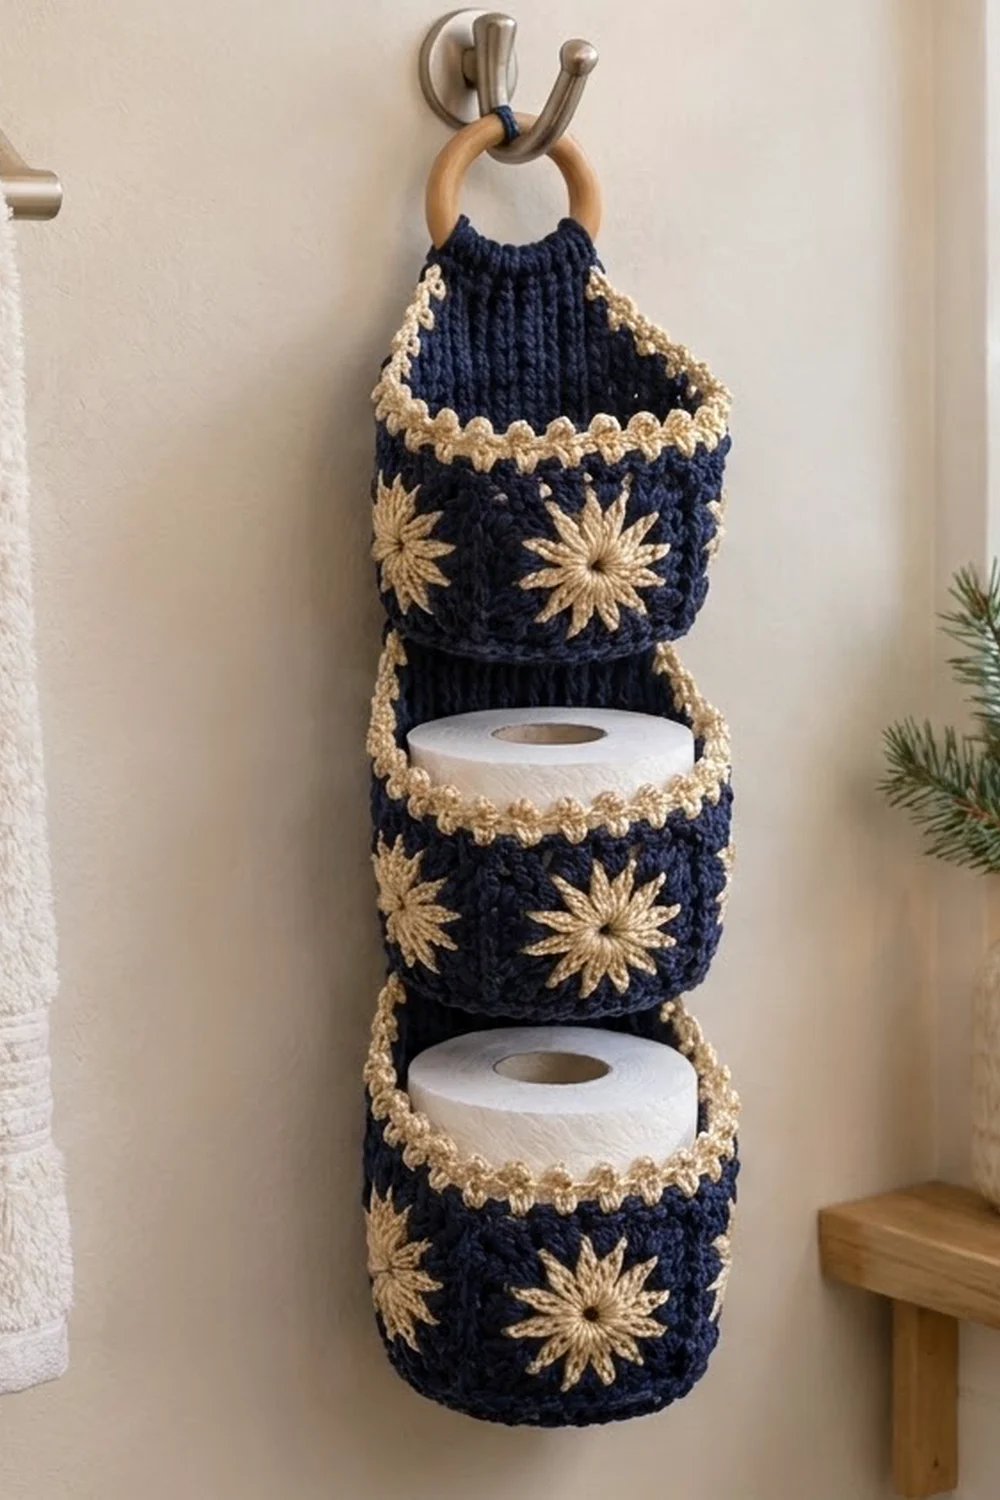
The Midnight Star Holder is a hanging toilet paper holder with three stacked pockets on a ribbed navy back panel. Each pocket wall is a ring of five small square motifs, and each square has a cream star with twelve puffy petals. Cream picot rims finish the pocket tops, and the panel hangs from a wooden ring.
Deep navy and warm cream look calm and cozy in a bathroom. The style is classic granny motif with a bit of texture: raised seam ridges, a ribbed panel and beaded-looking picot edges.
This pattern uses US crochet terms. The finished holder is about 5 in (12.7 cm) wide and about 18 in (45.7 cm) long from the bottom border to the top of the ring. Each pocket is about 5.2 in (13.2 cm) across and 4 in (10.2 cm) tall.
Construction is simple. You make 15 star squares, join them into three rings of five, and add a round base to each ring. Then you crochet the ribbed back panel sideways, add the tapered tab, work the cream edgings and sew the pockets onto the panel.
Finished Size and Construction
- Finished size: about 5 in x 18 in (12.7 cm x 45.7 cm), including border, tab and ring
- Skill level: Intermediate (clusters, joining in the round, basic assembly)
- Terminology: US crochet terms
- Yarn weight: worsted / aran (#4), cotton or cotton blend
- Hook: 5 mm (H-8)
- Number of pieces: 15 star squares, 3 round bases, 1 back panel with tab
- Layout: 3 pockets stacked vertically; each pocket = a ring of 5 squares + 1 base
- Square size: 3.25 in x 3.25 in (8.3 cm x 8.3 cm)
- Back panel before border: 4 in x 16 in (10.2 cm x 40.6 cm)
- Border depth: 0.5 in (1.3 cm) on panel sides and bottom; pocket rims 0.5 in (1.3 cm) tall
Materials
Choose a smooth, firm cotton or cotton blend. Cotton holds its shape well, so the pockets stay upright around the rolls. Avoid very soft acrylic, which can let the pockets sag.
- Navy (MC): 200 g, about 380 m (415 yd)
- Cream (CC): 110 g, about 210 m (230 yd)
- 5 mm (H-8) crochet hook
- 1 wooden ring, 2 in (5.1 cm) inside diameter
- Tapestry needle
- Stitch markers
- Scissors
- Measuring tape
- Blocking mat and pins
Quantities include a margin of about 15 percent for gauge swatches and small differences in tension.
Abbreviations (US Terms)
- ch – chain
- sl st – slip stitch
- sc – single crochet
- sc2tog – single crochet 2 together
- dc – double crochet
- tr – treble crochet
- BLO – back loop only
- sp(s) – space(s)
- MR – magic ring
- st(s) – stitch(es)
Special stitches
- Beginning cluster (beg-cl): Ch 4, yo twice, insert hook in st, pull up a loop, [yo, pull through 2 loops] twice; repeat from * to * once more in the same st, yo and pull through all 3 loops on hook.
- 3-tr cluster (cl): Yo twice, insert hook in st, pull up a loop, [yo, pull through 2 loops] twice; repeat from * to * 2 more times in the same st, yo and pull through all 4 loops on hook. This forms one pointed, puffy petal.
- Picot: Ch 3, sl st in 3rd ch from hook.
Gauge and Checkpoints
Sc gauge: 15 sc and 15 rows = 4 in (10.2 cm) in sc or sc BLO.
Square gauge: One finished square = 3.25 in (8.3 cm) per side.
Make one square before anything else, and measure it after Round 2 and after Round 4.
- After Round 2: the star measures about 2.25 in (5.7 cm) across, tip to tip.
- After Round 4: the square measures 3.25 in (8.3 cm) per side, lightly blocked.
- After the base: Round 10 measures about 5.25 in (13.3 cm) across.
- After the panel: 4 in x 16 in (10.2 cm x 40.6 cm).
If your square is too big, go down to a 4.5 mm hook. If it is too small, go up to a 5.5 mm hook. Change the hook for the whole project, not just one piece, so the squares, bases and panel still match.
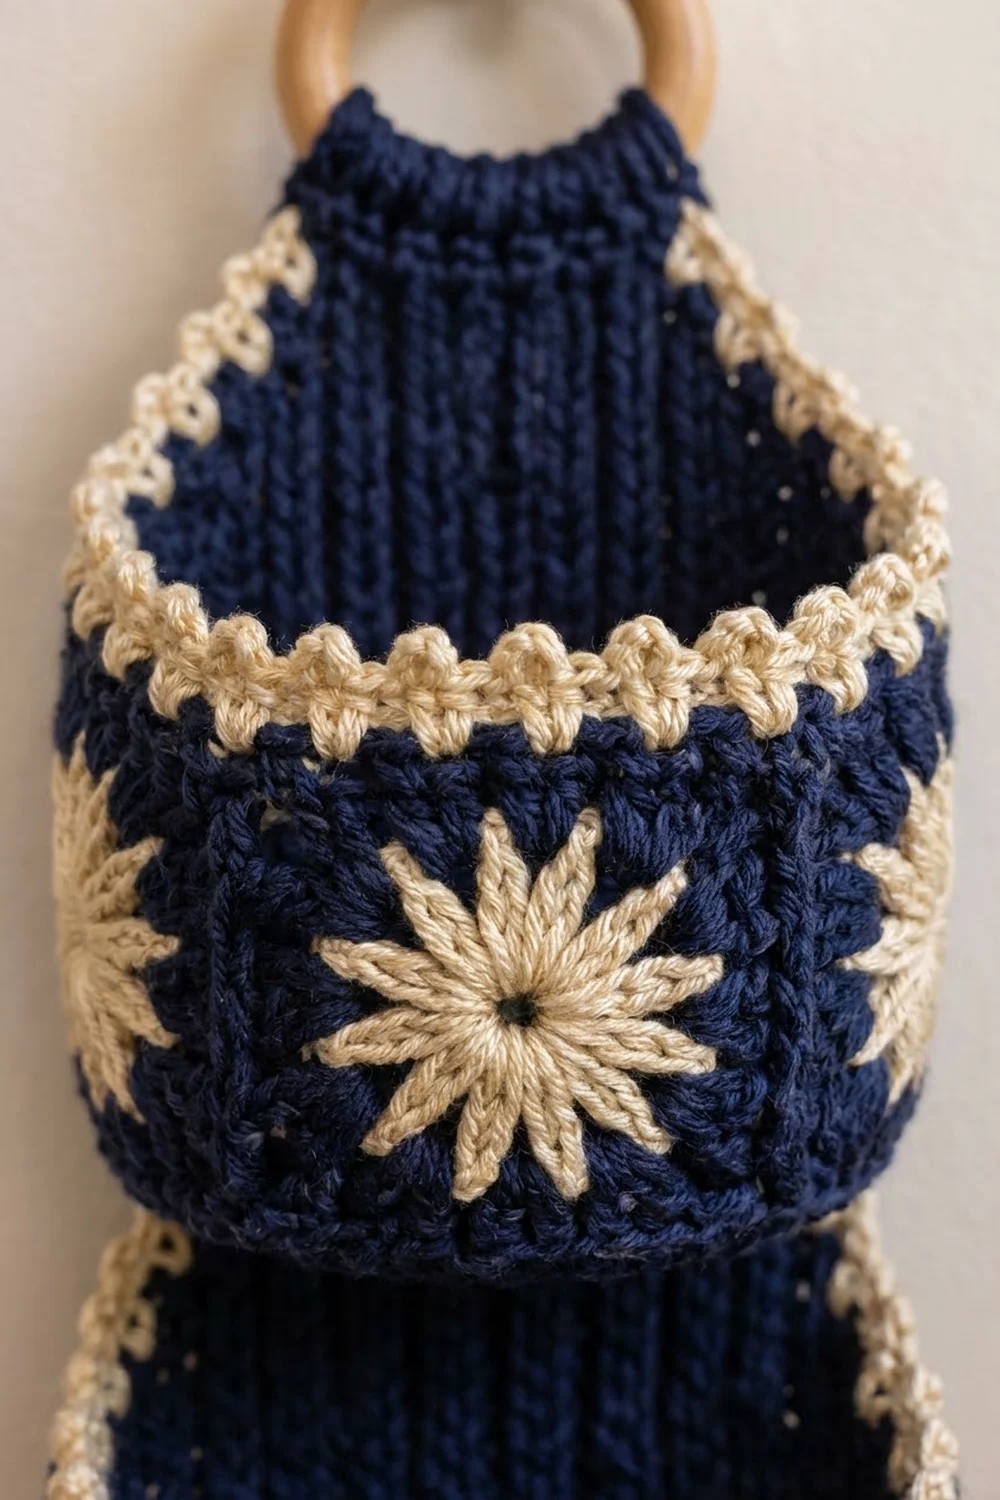
Star Square (make 15)
Round 1 (navy): MR, ch 1, 12 sc in ring, sl st to first sc to join. Pull the ring closed tightly. (12 sts) Fasten off navy.
Round 2 (cream): Join cream in any sc. Beg-cl in same st, ch 2, cl in next st, ch 2; repeat from * 10 more times. Sl st to top of beg-cl. (12 clusters, 12 ch-2 sps) Fasten off cream.
The clusters stand up from the small navy center like petals, which makes the cream star. Checkpoint: 2.25 in (5.7 cm) across.
Round 3 (navy): Join navy in any ch-2 sp. Ch 3 (counts as dc), dc, ch 2, 2 dc in same sp (corner made). 3 dc in each of next 2 ch-2 sps, (2 dc, ch 2, 2 dc) in next ch-2 sp; repeat from * 2 more times, 3 dc in each of last 2 ch-2 sps, sl st to top of ch-3.
Count: 4 corners x 4 dc = 16, plus 8 side sps x 3 dc = 24. Total 40 dc. Each side has 2 + 3 + 3 + 2 = 10 dc between corner ch-2 sps.
Round 4 (navy): Ch 1, sc in same st and each dc to the next corner, (sc, ch 2, sc) in each corner ch-2 sp, sc in each dc around, sl st to first sc.
Count: 12 sc per side (10 + 1 corner sc at each end), 48 sc total, plus 4 corner ch-2 sps. Fasten off, leaving a 12 in (30.5 cm) tail.
Checkpoint: 3.25 in (8.3 cm) per side.
Per-side definition: In this pattern, “12 sts per side” means the 12 sc between the two corner ch-2 sps, and it already includes the corner sc on each end. Corner ch-2 sps are not counted as stitches.
Round Base (make 3)
Work in continuous rounds with navy. Place a marker in the first st of each round.
- Round 1: MR, 6 sc in ring. (6)
- Round 2: 2 sc in each st. (12)
- Round 3: Sc in next st, 2 sc in next; repeat 6 times. (18)
- Round 4: Sc in next 2, 2 sc in next; repeat 6 times. (24)
- Round 5: Sc in next 3, 2 sc in next; repeat 6 times. (30)
- Round 6: Sc in next 4, 2 sc in next; repeat 6 times. (36)
- Round 7: Sc in next 5, 2 sc in next; repeat 6 times. (42)
- Round 8: Sc in next 6, 2 sc in next; repeat 6 times. (48)
- Round 9: Sc in next 7, 2 sc in next; repeat 6 times. (54)
- Round 10: Sc in next 8, 2 sc in next; repeat 6 times. (60)
Sl st to the next st and fasten off. Checkpoint: about 5.25 in (13.3 cm) across. The base must lie flat. If it ruffles, go down a hook size for the base only.
Back Panel with Tab (make 1)
The panel is worked sideways so the BLO ridges run up and down when the holder hangs.
Foundation: With navy, ch 61.
Row 1: Sc in 2nd ch from hook and each ch across. Turn. (60)
Rows 2–15: Ch 1, sc BLO in each st across. Turn. (60)
Checkpoint: 4 in x 16 in (10.2 cm x 40.6 cm). Do not fasten off yet. Turn so you are working along one short edge. This is the top.
Tab Row 1: Ch 1, work 15 sc evenly along the short edge, 1 sc in each row end. Turn. (15)
- Tab Row 2: Ch 1, sc2tog, sc in next 11, sc2tog. Turn. (13)
- Tab Row 3: Ch 1, sc2tog, sc in next 9, sc2tog. Turn. (11)
- Tab Row 4: Ch 1, sc2tog, sc in next 7, sc2tog. Turn. (9)
- Tab Row 5: Ch 1, sc2tog, sc in next 5, sc2tog. Turn. (7)
- Tab Rows 6–16: Ch 1, sc in each st across. Turn. (7)
Fasten off, leaving a 12 in (30.5 cm) tail. The taper is about 1.25 in (3.2 cm) tall, and the strip is about 3 in (7.6 cm) long.
Make All Pieces
| Piece | Quantity | Navy | Cream |
|---|---|---|---|
| Star square | 15 | Rounds 1, 3, 4 | Round 2 |
| Round base | 3 | All | – |
| Back panel with tab | 1 | All | – |
Each pocket uses 5 squares and 1 base. Seen from above, one pocket ring looks like this (A–E are squares, | is a seam):
        A (front, centered)
     E         B
       D  |  C
     (back seam: sewn to panel)
The holder stacks like this, from top to bottom:
[ wooden ring ]
[ tab ]
[ panel top margin 2.5 in ]
[ Pocket 1: A B C D E + base ]
[ gap 0.75 in ]
[ Pocket 2: A B C D E + base ]
[ gap 0.75 in ]
[ Pocket 3: A B C D E + base ]
[ panel bottom border ]
Joining
Joining the Squares into Rings
Join with navy, holding two squares wrong sides together so the seam forms a raised ridge on the right side.
- Hold square A and square B together, edges matched, with all petals pointing the same way.
- Join navy in the matching corner ch-2 sps. Sc through both corner sps.
- Work 1 sc through each pair of matching sts, 12 sc total.
- Sc through the second pair of corner sps. Fasten off.
Join B to C, C to D, D to E, and then E to A to close the ring. Each seam is 14 sc: 12 sts matched 1 to 1, plus 1 sc in each corner pair. Those corner sc belong only to the seam. They are not counted in the rim or base edges.
Keep your tension even and relaxed. A tight seam pulls the ring into a pentagon with sharp corners.
Checkpoint: The ring measures 16.25 in (41.3 cm) around, which is 5 x 3.25 in, and about 5.2 in (13.2 cm) across.
Joining the Base
Each square’s bottom edge has 12 sts. Five squares give 5 x 12 = 60 sts, which is exactly the 60 sts of Base Round 10.
- Place the base inside the bottom of the ring, wrong sides together.
- Join cream through any base st and the first st of a square’s bottom edge.
- Sc through both layers, 1 base st to 1 square st, all the way around. Skip the seam corner sps; the seam ridge fills that point. (60 sc)
- Sl st to the first sc and fasten off.
This makes the cream ridge at the bottom of each pocket. At gauge, 60 sc measure 16 in (40.6 cm). The squares ease in the extra 0.25 in (0.6 cm) without any puckers.
Border
Border gauge: 15 sc = 4 in (10.2 cm), the same as the main gauge. One sc round plus one picot round gives a depth of about 0.5 in (1.3 cm).
Pocket Rims (each pocket)
Rim Round 1 (cream): Join cream in the first st of the top edge of any square. Sc in each of the 12 sts across each square’s top edge. Do not work into the seam corners. Sl st to first sc. (5 x 12 = 60 sc)
Rim Round 2 (cream): Ch 1, sc in next 2 sts, picot; repeat from * 29 more times. Sl st to first sc. (60 sc + 30 picots)
Fasten off. Each square’s top edge holds exactly 6 picots, so the rim looks even all the way around.
Back Panel Border
Work this as an open border down one long side, across the bottom and up the other long side. Leave the tab without a border.
Border Row 1 (cream): With the right side facing, join cream at the top corner of a long side, next to the tab. Work 60 sc down the long side, 1 in each st. Ch 1 at the corner. Work 15 sc across the bottom, 1 in each row end. Ch 1 at the corner. Work 60 sc up the other long side. Turn. (135 sc + 2 corner ch-1 sps)
Border Row 2 (cream): Ch 1. Sc in next 5 sts, picot; repeat from * 11 more times (12 picots on the long side). (Sc, ch 1, sc) in corner sp. Sc in next 5 sts, picot; repeat from * 2 more times (3 picots on the bottom). (Sc, ch 1, sc) in corner sp. Sc in next 5 sts, picot; repeat from * 11 more times (12 picots). Fasten off.
Count: 60 + 2 + 15 + 2 + 60 = 139 sc, plus 27 picots and 2 corner ch-1 sps.
Why the math works: The long sides take 1 sc per panel stitch (60), and the bottom takes 1 sc per row (15). Rows and stitches have the same gauge, so both edges lie flat. Every count divides evenly by 5, so the picots are evenly spaced on all three sides. Finished panel: 5 in x 16.5 in (12.7 cm x 41.9 cm).
Attaching the Tab and Pockets
- Fold the tab strip through the wooden ring to the back. Whipstitch Tab Row 16 to the back of Tab Row 5.
- Lay the panel flat, right side up. Mark the pocket positions from the bottom edge of the panel, not counting the border: Pocket 3 starts at 0 in, Pocket 2 at 4.75 in (12.1 cm), and Pocket 1 at 9.5 in (24.1 cm).
- Turn each pocket so its C–D seam is at the back. Center that seam on the panel at the marked height.
- With navy, whipstitch the full seam ridge to the panel through the panel’s center ribs.
- Tack the rim to the panel at the C–D seam, and again 1 in (2.5 cm) to each side of it, so the pocket opening stays round.
Checkpoint: Pocket 1’s rim sits 13.5 in (34.3 cm) above the panel bottom, leaving a 2.5 in (6.4 cm) margin below the tab.
Final Blocking
- Weave in all ends before blocking, running each one through stitches of the same color.
- Lightly spray the whole holder with water until it is damp.
- Lay the panel flat and pin it to 5 in x 16.5 in (12.7 cm x 41.9 cm).
- Stuff each pocket with a toilet roll or a rolled towel about 4.5 in (11.4 cm) across, so the walls dry round and upright.
- Pin the rim picots open so each one stands as a small bead.
- Let everything dry completely before removing the pins.
Final Quality-Control Checklist
- Every square measures 3.25 in (8.3 cm) per side.
- Every star has 12 petals and a closed navy center.
- All seam ridges are on the outside.
- Each pocket ring measures 16.25 in (41.3 cm) around.
- Each base lies flat with 60 sts joined 1 to 1.
- Each rim has 60 sc and 30 picots.
- The panel border has 139 sc and 27 picots.
- Pockets are evenly spaced, with 0.75 in (1.9 cm) gaps.
- The tab is sewn securely around the ring.
Troubleshooting
- Petals look flat: Pull the clusters snug, and make sure all 3 tr are in the same st.
- Square is curving: Check that Round 3 has exactly 10 dc per side.
- Ring is too tight around the roll: Your squares are too small. Go up one hook size.
- Base cups upward: Check your increases. Round 10 must be exactly 60 sts.
- Pocket leans forward: Add more tacking stitches along the rim at the back.
- Panel edges wave: You worked more than 1 sc per st or per row end. Undo and recount.
Care
Hand wash in cool water and lay flat to dry, with rolls inside the pockets to keep their shape. Do not tumble dry.
Final Notes
The measurement chain is short and simple. Twelve sts per side give a 3.25 in (8.3 cm) square. Five squares make a 16.25 in (41.3 cm) ring with 60 edge sts, which matches the 60-st base and the 60-st rim. A 60 x 15 panel blocks to 4 in x 16 in (10.2 cm x 40.6 cm) and becomes 5 in x 16.5 in (12.7 cm x 41.9 cm) with its border. Check each link as you go, and the holder will fit together neatly.
Happy crocheting!