

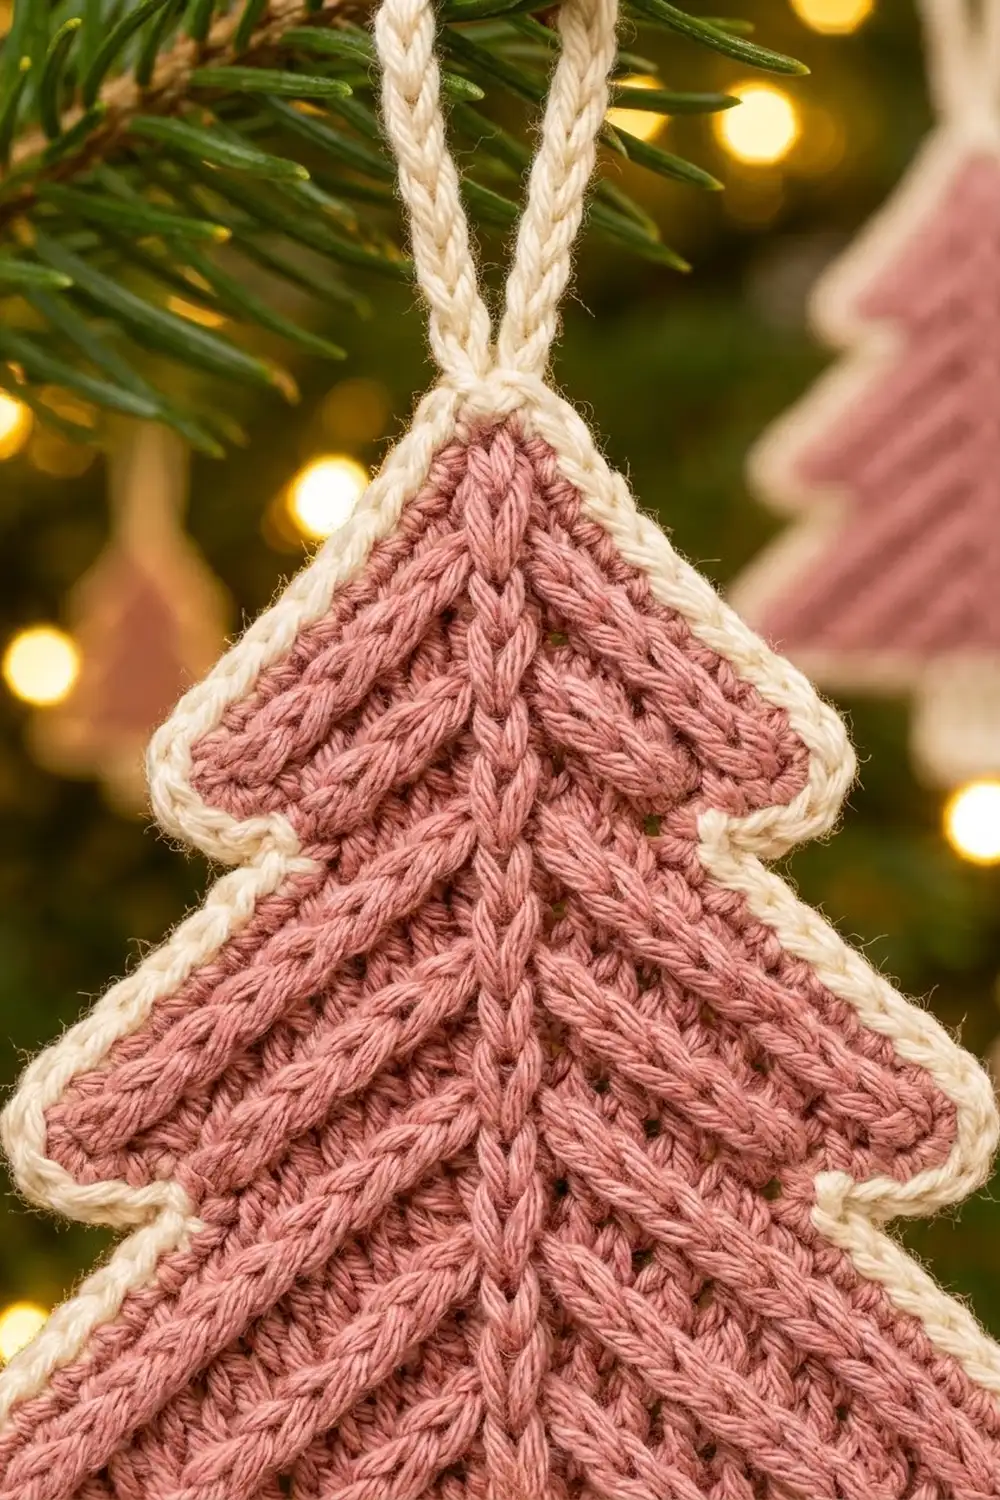
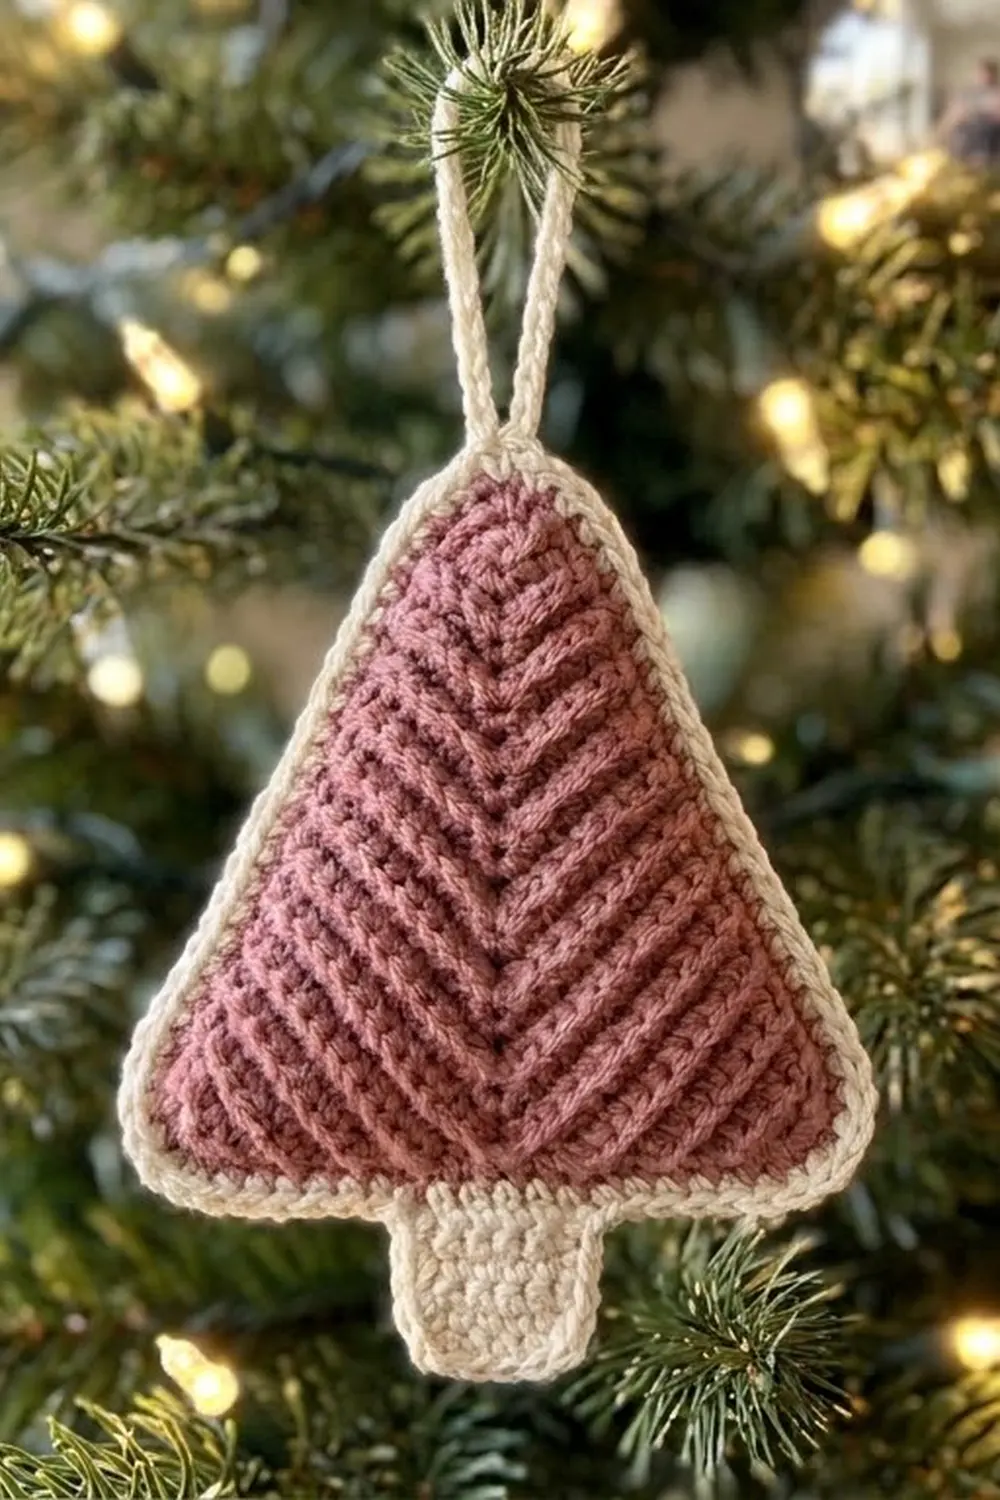
The Rosewood Fir ornament is a small, flat Christmas tree in soft dusty rose with a crisp cream outline. Its texture looks almost knitted. Fine ridges slope down and away from a raised center spine, so each tier looks like a row of drooping fir branches.
The palette is two colors: rose for the tree and cream for the trunk, the border, and the hanging loop. The look is cozy and Scandinavian, and it suits a pink-themed tree, gift toppers, or a garland of handmade ornaments.
This pattern uses US crochet terms. The finished ornament measures 3.3 in (8.4 cm) wide by 3.3 in (8.4 cm) tall, plus a loop of about 1.25 in (3.2 cm).
You make it as one piece. First you crochet the tree body from the bottom up in back-loop single crochet rows. Each row has a 3-stitch increase at the center and a decrease at each end, which creates the mitred “V” ridges. Next you work a small cream trunk into the free loops of the foundation chain. Last, one cream border round outlines the whole tree and makes the loop.
Finished Size and Construction
- Finished size: 3.3 in (8.4 cm) wide x 3.3 in (8.4 cm) tall, plus the loop
- Skill level: Advanced beginner to intermediate
- Terminology: US
- Yarn weight: Sport (#2) cotton
- Hook: 2.75 mm (C-2)
- Number of pieces: 1 (the trunk and border are worked onto the body)
- Layout: One single tree, three tiers, trunk centered below
- Piece size before border: 3.0 in (7.6 cm) wide x 3.0 in (7.6 cm) tall
- Border depth: 0.15 in (0.4 cm) on every edge
Materials
Use a smooth, tightly plied cotton or cotton blend in sport weight, roughly 3 m per gram (about 150 m per 50 g). Plied cotton shows the back-loop ridges clearly and holds a flat shape. Avoid fuzzy or brushed yarns because they blur the chevron lines.
- Color A, dusty rose: 5 g (about 15 m)
- Color B, cream: 3 g (about 9 m)
These amounts include a safety margin of about 30% over what one ornament actually uses.
Tools:
– 2.75 mm (C-2) crochet hook
– Tapestry needle
– Stitch marker
– Scissors
– Blocking mat and rustproof pins
– Spray bottle or steam iron
– Optional: fabric stiffener
Abbreviations (US Terms)
- ch: chain
- sc: single crochet
- sl st: slip stitch
- st(s): stitch(es)
- BLO: back loop only
- sc2tog: single crochet 2 together
- sc3tog: single crochet 3 together
- RS / WS: right side / wrong side
Special stitch: sc3tog in BLO. Insert the hook in the back loop of the next stitch, yarn over and pull up a loop. Repeat in the back loops of the next 2 stitches (4 loops on the hook). Yarn over and pull through all 4 loops. This turns 3 stitches into 1.
Peak increase: Work 3 sc into the back loop of the center stitch. Mark the middle sc of the 3. It becomes the center stitch of the next row.
Gauge and Checkpoints
Gauge: 7 sc and 7 rows = 1 in (2.5 cm) in BLO single crochet with a 2.75 mm hook.
The ornament is small, so tier 1 works as your gauge swatch. Crochet Rows 1–5 and then check:
- After Row 1: the foundation row of 21 sts measures 3.0 in (7.6 cm).
- After Row 5 (tier 1): the tier is 0.7 in (1.8 cm) tall at the side edges, and the top row of 13 sts is about 1.9 in (4.8 cm) across.
- After Row 10 (tier 2): the body is 1.4 in (3.6 cm) tall, and the base of tier 2 is about 2.4 in (6.1 cm) across.
- After Row 17 (body complete): the body is 2.4 in (6.1 cm) tall from the foundation to the tip.
- After the trunk: the full piece is 3.0 in (7.6 cm) tall, and the trunk is 0.7 in (1.8 cm) wide.
If Row 1 measures more than 3.1 in (7.9 cm): your stitches are too big. Go down to a 2.5 mm hook.
If Row 1 measures less than 2.9 in (7.4 cm): your stitches are too small. Go up to a 3.0 mm hook.
Rip out and restart at Row 1 if needed. All later measurements depend on this first row.
Tree Body (Color A, Rose)
How the rows work. From Row 2 on, every stitch goes into the back loop only. Most rows are decrease rows, worked like this:
Ch 1, sc3tog in BLO, sc in BLO to the marked center st, 3 sc in BLO of center st, sc in BLO to the last 3 sts, sc3tog in BLO. Turn.
Each decrease row loses 1 stitch at each edge and gains 2 at the center, so it has 2 fewer stitches than the row before. The center increases bend every row into an inverted “V”. The stacked center stitches form the raised spine.
A row starting with N stitches has (N − 7) ÷ 2 plain BLO sc on each side of the peak.
Foundation: With Color A, ch 22.
Row 1 (RS): Sc in the 2nd ch from the hook and in each ch across. Turn. (21 sts) Mark the 11th st as the center.
Tier 1
Row 2: Decrease row: sc3tog, 7 sc, 3 sc in center, 7 sc, sc3tog. (19 sts)
Row 3: Decrease row with 6 sc on each side. (17 sts)
Row 4: Decrease row with 5 sc on each side. (15 sts)
Row 5: Decrease row with 4 sc on each side. (13 sts)
Checkpoint: 0.7 in (1.8 cm) tall at the edges.
Tier 2
Row 6 (step-out row): Ch 1, 2 sc in BLO of the first st, sc in BLO of the next 5 sts, 3 sc in center, sc in BLO of the next 5 sts, 2 sc in BLO of the last st. Turn. (17 sts: 2 + 5 + 3 + 5 + 2)
This row adds 1 stitch at each edge and 2 at the center. The new edge stitches stick out past the top of tier 1 and form the visible step.
Row 7: Decrease row with 5 sc on each side. (15 sts)
Row 8: Decrease row with 4 sc on each side. (13 sts)
Row 9: Decrease row with 3 sc on each side. (11 sts)
Row 10: Decrease row with 2 sc on each side. (9 sts)
Checkpoint: the body is 1.4 in (3.6 cm) tall.
Tier 3
Row 11 (step-out row): Ch 1, 2 sc in BLO of the first st, sc in BLO of the next 3 sts, 3 sc in center, sc in BLO of the next 3 sts, 2 sc in BLO of the last st. Turn. (13 sts: 2 + 3 + 3 + 3 + 2)
Row 12: Decrease row with 3 sc on each side. (11 sts)
Row 13: Decrease row with 2 sc on each side. (9 sts)
Row 14: Decrease row with 1 sc on each side. (7 sts)
Row 15: Ch 1, sc3tog in BLO, 3 sc in center, sc3tog in BLO. Turn. (5 sts)
Row 16: Ch 1, sc2tog in BLO, sc in BLO of the center st, sc2tog in BLO. Turn. (3 sts)
Row 17: Ch 1, sc3tog in BLO. (1 st) This is the tip.
Fasten off and weave in the end. The body should now measure 3.0 in (7.6 cm) across Row 1 and 2.4 in (6.1 cm) tall.
Trunk (Color B, Cream)
Turn the body upside down so the free loops of the foundation chain face you. Count the free loops 1 through 21. The trunk uses loops 9–13, the 5 center stitches. Loop 11 sits directly under the spine.
Row 1: Join Color B with a sl st in free loop 9. Ch 1, then sc in the same loop and in loops 10–13. Turn. (5 sts)
Rows 2–4: Ch 1, sc in each st across (both loops). Turn. (5 sts)
Do not turn at the end of Row 4. Fasten off and weave in the end.
The trunk measures 0.7 in (1.8 cm) wide by 0.6 in (1.5 cm) tall. The trunk uses both loops, so it looks smooth against the ridged rose tree. The full piece is now 3.0 in (7.6 cm) tall.
Border and Hanging Loop (Color B, Cream)
Border gauge: At 7 sts and 7 rows per inch, 1 sc per row end lies exactly as flat as 1 sc per stitch. Plan on 1 sc per row end and 1 sc per stitch or free loop. Add 3 sc at outer corners and 2 sc on each step ledge.
Border Round 1: With the RS facing, join Color B with a sl st in the tip stitch (Row 17). Ch 1. Work the round in this order:
- Tip: (Sc, ch 16, sc) in the tip stitch. (2 sc + ch-16 loop)
- First side, tier 3: 1 sc in each row end of Rows 16–11. (6 sc)
- Ledge: 2 sc along the underside of the Row 11 edge stitch. (2 sc)
- Tier 2: 1 sc in each row end of Rows 10–6. (5 sc)
- Ledge: 2 sc along the underside of the Row 6 edge stitch. (2 sc)
- Tier 1: 1 sc in each row end of Rows 5–1. (5 sc)
- Bottom corner: 3 sc in free loop 1. (3 sc)
- Under tier 1: Sc in free loops 2–8. (7 sc)
- Trunk: 1 sc in each trunk row end going down (4), 3 sc in the first trunk st, sc in the next 3 sts, 3 sc in the last trunk st, 1 sc in each trunk row end going up (4). (17 sc)
- Under tier 1: Sc in free loops 14–20. (7 sc)
- Bottom corner: 3 sc in free loop 21. (3 sc)
- Second side: 5 sc in row ends of Rows 1–5, 2 sc on the Row 6 ledge, 5 sc in row ends of Rows 6–10, 2 sc on the Row 11 ledge, 6 sc in row ends of Rows 11–16. (20 sc)
Sl st in the first sc to join.
Count check: Each side from the tip to the trunk has 6 + 2 + 5 + 2 + 5 + 3 + 7 = 30 sc. The trunk has 4 + 9 + 4 = 17 sc, and the tip has 2 sc. Total: 30 + 30 + 17 + 2 = 79 sc, plus the ch-16 loop.
Loop Round: Sl st into the ch-16 space. Work 24 sc into the loop, packing them tightly. Sl st in the second tip sc. Fasten off.
Why the math works: 1 sc per row end matches the 1:1 stitch-to-row gauge, so the sloped sides stay flat. Each 3-sc corner turns the 90-degree corners at the base and trunk without cupping. Each step ledge is exactly 2 stitches wide, because the step-out row is 2 stitches wider per side than the row below it. The 2 ledge sc fill that gap exactly. The border adds 0.15 in (0.4 cm) on every edge, so 3.0 in plus 0.3 in (0.8 cm) gives the finished 3.3 in (8.4 cm) in both directions.
Final Blocking
- Weave in all ends along stitches of matching color, inside the border where you can.
- Lightly mist the ornament with water, or hold a steam iron just above it without touching.
- Lay it RS up on the blocking mat.
- Pin the two bottom corners 3.3 in (8.4 cm) apart.
- Pin the tip so the full height, not counting the loop, is 3.3 in (8.4 cm).
- Pin the four step-out points outward so each ledge stays crisp.
- Run a finger down the spine to straighten it, and check that both sides slope evenly.
- Pin the loop into a smooth teardrop shape.
- Let it dry completely. For a stiffer ornament, brush on diluted fabric stiffener and dry it pinned.
Final Quality-Control Checklist
- [ ] Row 1 had exactly 21 sts and measured 3.0 in (7.6 cm)
- [ ] Every decrease row lost exactly 2 sts
- [ ] Step-out rows had 17 sts (Row 6) and 13 sts (Row 11)
- [ ] The center spine runs straight from the foundation to the tip
- [ ] The trunk is centered under stitch 11 and is 5 sts wide
- [ ] The border round has 79 sc plus the ch-16 loop
- [ ] Each step ledge is clearly visible
- [ ] Finished size is 3.3 in x 3.3 in (8.4 cm x 8.4 cm)
- [ ] All ends are hidden and secure
Troubleshooting
The spine drifts sideways. You lost track of the center. Always mark the middle stitch of the 3-sc increase and move the marker up every row.
The tiers ruffle or cup. The center increases are too loose or the edge decreases too tight. Keep the 3 sc compact and work the sc3tog with relaxed tension.
The ridges don’t show. Check that you are working in the back loop only from Row 2 onward, including the decreases and the peak increase.
The step ledges are barely visible. Make sure you worked 2 sc in both the first and the last stitch of Rows 6 and 11.
The border ruffles. Your border is looser than the body. Skip one sc on each sloped tier side, or use a hook 0.25 mm smaller for the border.
The border pulls in. Use a hook 0.25 mm larger for the border, or check that you worked 3 sc at each bottom corner.
The loop is floppy. Pack more sc into the loop, up to 26, so it stiffens.
Care
Hand wash in cool water with mild soap, press out the water in a towel, and dry the ornament flat, pinned to shape. If you used stiffener, spot clean only.
Final Notes
The whole ornament depends on one measurement chain. A Row 1 of 21 sts at 3.0 in (7.6 cm) sets the gauge. Seventeen mitred rows build the 2.4 in (6.1 cm) body. The 4-row trunk brings the piece to 3.0 in (7.6 cm) tall. One 79-stitch border round adds 0.15 in (0.4 cm) on each side for a finished 3.3 in by 3.3 in (8.4 cm by 8.4 cm). Check your stitch counts at the end of each tier and the shape will come out right.
Happy crocheting!