

Plastic grocery bags tend to collect in kitchen drawers. This holder gives them one tidy place to live. It’s a tapered mesh tube that hangs from two hooks. You stuff bags in at the top and pull them out one at a time through a slot at the bottom.
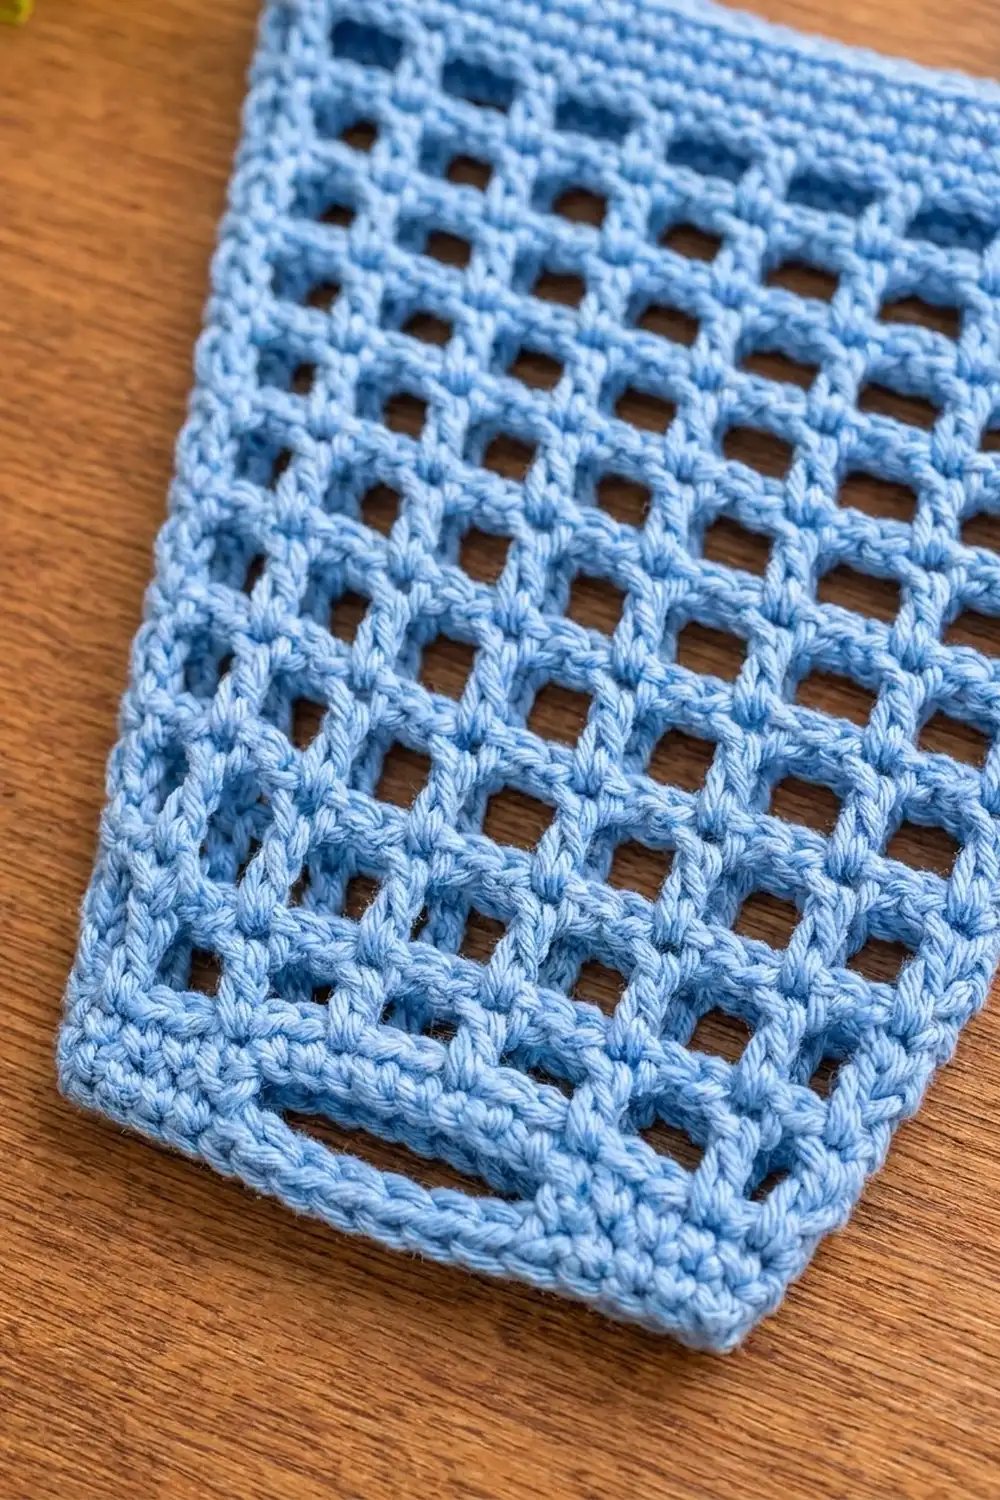
The design is worked in one soft cornflower blue. A solid single crochet band at the bottom holds the dispensing slot. An open double crochet mesh widens toward the top so you can see how full the holder is, and a solid rim band keeps the top edge firm. Two small tabs with hanging holes are sewn to the back of the rim.
This pattern uses US crochet terms. The holder measures 9 in (22.9 cm) wide at the top, 5.5 in (14.0 cm) wide at the bottom and 10.2 in (25.9 cm) tall when flat. The tabs add another 1.6 in (4.1 cm) above the rim.
You work the body bottom-up in joined rounds. It starts on both sides of a foundation chain, so the bottom edge is closed without sewing. The slot is a simple chain-over-skipped-stitches opening, like a buttonhole. The mesh adds 2 spaces on every other round, and the rim band is the finishing border. The tabs are worked flat and sewn on last.
Finished Size and Construction
- Finished size (flat): 9 in (22.9 cm) wide at the top × 10.2 in (25.9 cm) tall; 5.5 in (14.0 cm) wide at the bottom
- Height with tabs: 11.8 in (30.0 cm)
- Skill level: Easy
- Terminology: US
- Yarn weight: #4 worsted, cotton or cotton blend
- Hook: 4.0 mm (G-6)
- Number of pieces: 3 (1 body, 2 tabs)
- Layout: tabs sewn to the inside back of the rim band, 1 in (2.5 cm) in from each side fold
- Body size before border: 9 in (22.9 cm) wide × 9.1 in (23.1 cm) tall
- Border (rim band) depth: 1.1 in (2.8 cm), 5 rounds of sc
- Tab size: 1.5 in (3.8 cm) wide × 2.7 in (6.9 cm) long
Materials
Cotton or a cotton blend is the best choice here. It holds its shape under the weight of the bags, it doesn’t stretch much, and it washes well. Choose a smooth yarn so the mesh posts look crisp.
- Light cornflower blue, worsted weight: 90 g / 170 m (186 yd)
Tools:
- 4.0 mm (G-6) crochet hook
- 2 locking stitch markers
- Tapestry needle
- Scissors
- Measuring tape
- Pins and a flat blocking surface
The yarn quantity includes a margin of about 15% for your gauge swatch and small tension differences.
Abbreviations (US Terms)
- ch – chain
- sc – single crochet
- dc – double crochet
- sl st – slip stitch
- sk – skip
- sp – space
- st(s) – stitch(es)
- sc2tog – single crochet 2 together
- rnd – round
Special stitch, mesh: one dc followed by ch 1. Each mesh counts as 2 sts: 1 dc plus 1 ch-1 sp.
Mesh increase (inc): work (dc, ch 1, dc) in the same dc, then ch 1. This turns 1 mesh into 2.
Gauge and Checkpoints
- Sc gauge: 16 sc × 18 rnds = 4 in (10.2 cm)
- Mesh gauge: 8 meshes × 7 rnds = 4 in (10.2 cm)
Use the first 5 rounds of the body as your test piece. Everything that follows is built on the bottom band, so it is your real swatch.
Checkpoints (measure flat):
- After Rnd 5: 5.5 in (14.0 cm) wide, 1.1 in (2.8 cm) tall
- After Mesh Rnd 7: 7 in (17.8 cm) wide, about 5.1 in (13.0 cm) total height
- After Mesh Rnd 14: 9 in (22.9 cm) wide, about 9.1 in (23.1 cm) total height
- After the rim band: 9 in (22.9 cm) wide, 10.2 in (25.9 cm) tall
If your piece is more than 0.25 in (0.6 cm) too wide, go down half a hook size. If it is too narrow, go up half a hook size. If only the mesh height is off, check that your dc aren’t being pulled short or left loose. Even dc height keeps the taper smooth.
Body
Bottom Band
Foundation: Ch 23.
Rnd 1: Sc in the 2nd ch from hook and in each ch across (22 sc). Rotate the work. Sc in the free loop of each ch along the underside (22 sc). Join with sl st to the first sc. (44 sc)
The beginning of the round is now one side fold. Place a marker in the 23rd st (the first sc on the underside). This marks the opposite fold. Each face has 22 sts.
Rnd 2: Ch 1, sc in each st around, join. (44 sc)
Rnd 3 (slot round): Ch 1, sc in the first 6 sts, ch 10, sk the next 10 sts, sc in the remaining 28 sts, join. (34 sc + 10 ch = 44 sts)
On the front face this is 6 sc, the 10-ch slot and 6 sc, for 22 sts. The back face is 22 sc.
Rnd 4: Ch 1, sc in each sc and in each ch, join. (44 sc)
Rnd 5: Ch 1, sc in each st around, join. (44 sc)
The slot is 2.5 in (6.4 cm) wide, centered on the front face, with 2 solid rounds below and 2 above.
Mesh Section
Keep the fold marker in place. In each mesh round, the dc of every mesh goes into the dc below it, and the ch 1 goes over the ch-1 space. Join every round with sl st to the 3rd ch of the beginning ch-4.
Mesh Rnd 1 (conversion round): Ch 4 (counts as dc + ch 1), sk next st, dc in next st, ch 1, sk next st; repeat from * 20 more times, join. (22 meshes = 22 dc + 22 ch-1 sps = 44 sts)
This round is worked 1-for-1 across the 44 sc, with no stitches added. The fold marker lands on the 12th dc. Move it there.
Mesh Rnd 2 (inc): Ch 4, dc in the same st as the join, ch 1 (inc made). [Dc in next dc, ch 1] 10 times. Inc in the marked dc. [Dc in next dc, ch 1] 10 times. Join. (24 meshes = 48 sts)
Move the marker to the first dc of the second increase pair. Do this after every increase round.
Mesh Rnd 3: Ch 4, [dc in next dc, ch 1] around, join. (24 meshes = 48 sts)
Mesh Rnd 4 (inc): Work as Mesh Rnd 2, repeating each bracket 11 times. (26 meshes = 52 sts)
Mesh Rnd 5: Work as Mesh Rnd 3. (26 meshes = 52 sts)
Mesh Rnd 6 (inc): Work as Mesh Rnd 2, repeating each bracket 12 times. (28 meshes = 56 sts)
Mesh Rnd 7: Work as Mesh Rnd 3. (28 meshes = 56 sts)
Checkpoint: 14 meshes per face, 7 in (17.8 cm) wide.
Mesh Rnd 8 (inc): Work as Mesh Rnd 2, repeating each bracket 13 times. (30 meshes = 60 sts)
Mesh Rnd 9: Work as Mesh Rnd 3. (30 meshes = 60 sts)
Mesh Rnd 10 (inc): Work as Mesh Rnd 2, repeating each bracket 14 times. (32 meshes = 64 sts)
Mesh Rnd 11: Work as Mesh Rnd 3. (32 meshes = 64 sts)
Mesh Rnd 12 (inc): Work as Mesh Rnd 2, repeating each bracket 15 times. (34 meshes = 68 sts)
Mesh Rnd 13: Work as Mesh Rnd 3. (34 meshes = 68 sts)
Mesh Rnd 14 (inc): Work as Mesh Rnd 2, repeating each bracket 16 times. (36 meshes = 72 sts)
Checkpoint: 18 meshes per face, 9 in (22.9 cm) wide, about 9.1 in (23.1 cm) tall.
Each increase round adds 2 meshes, one at each side fold. Seven increase rounds take you from 22 to 36 meshes. The increases sit at the folds, so both faces stay flat and the sides slope evenly.
Tabs
Make 2.
Foundation: Ch 7.
Row 1: Sc in the 2nd ch from hook and in each ch across, turn. (6 sc)
Rows 2–8: Ch 1, sc in each st across, turn. (6 sc)
Row 9 (hole row): Ch 1, sc in the first 2 sts, ch 2, sk 2 sts, sc in the last 2 sts, turn. (4 sc + ch-2 sp)
Row 10: Ch 1, sc in 2 sts, 2 sc in the ch-2 sp, sc in 2 sts, turn. (6 sc)
Row 11: Ch 1, sc in each st across, turn. (6 sc)
Row 12: Ch 1, sc2tog, sc in the next 2 sts, sc2tog. (4 sts)
Fasten off and leave a 12 in (30.5 cm) tail for sewing. Each tab measures 1.5 in (3.8 cm) wide × 2.7 in (6.9 cm) long, with a 0.5 in (1.3 cm) hole. The decrease row rounds off the top corners.
Make All Pieces
- Body: 1, light cornflower blue
- Tabs: 2, light cornflower blue
Layout of the back rim (36 sc, fold to fold):
| 4 sc | TAB A (6 sc) | 16 sc gap | TAB B (6 sc) | 4 sc |
  fold                                               fold
4 + 6 + 16 + 6 + 4 = 36 sc, which is the full back face.
Rim Band (Border)
The rim band is the border of this piece. It uses the sc gauge: 16 sc = 4 in (10.2 cm).
Starting count: Each face has 18 meshes. At 2 sts per mesh, that’s 36 sts per face and 72 sts around. A tube has no corner stitches to add or subtract. The two side folds are ordinary stitches.
Rnd 1 (conversion round): Ch 1, sc in each dc and in each ch-1 sp around, join. (36 dc + 36 ch-1 sps = 72 sc)
That is 1 sc per existing stitch, with no extras added. Each face gets 36 sc.
Rnds 2–5: Ch 1, sc in each st around, join. (72 sc; 36 per face)
Fasten off and weave in the end.
Why the math works: 36 sc per face at 16 sc per 4 in comes to 9 in (22.9 cm). That matches the mesh width, because 18 meshes at 8 per 4 in is also 9 in. The band sits flat without ruffling or pulling in. Five rounds at 18 rnds per 4 in give the 1.1 in (2.8 cm) band depth. The full circumference is 18 in (45.7 cm).
Joining
Lay the body flat with the slot facing down toward the table. The back face is now on top.
- Count 4 sts in from one fold along the rim’s top edge. Pin Tab A over the next 6 sts, inside the holder. The tab’s foundation edge goes down toward the mesh, and 1.6 in (4.1 cm) of tab sticks up above the rim.
- Count 16 sts across for the gap. Pin Tab B over the next 6 sts, and check that 4 sts are left before the other fold.
- Whipstitch each tab’s 6 foundation loops to the first round of the rim band, 1 tab stitch to 1 band stitch.
- Whipstitch both side edges of each tab to the band. Then run a line of stitches along the top round of the band, through the tab.
Tension: Pull each stitch snug but not tight. The rim shouldn’t pucker. The tabs hold the full weight, so stitch through both loops of the band and go over the top edge twice.
Size checkpoint: Hold the tabs together and check that both stick up the same 1.6 in (4.1 cm). The total height should be 11.8 in (30.0 cm).
Final Blocking
- Weave in all remaining ends along solid sc rounds, not through the mesh.
- Wet the holder in cool water and gently squeeze it out. Don’t wring it.
- Roll it in a towel to remove extra water.
- Lay it flat with the folds at the sides and the slot centered on the front face.
- Pin to 9 in (22.9 cm) across the top, 5.5 in (14.0 cm) across the bottom and 10.2 in (25.9 cm) tall.
- Pin the mesh rounds straight and square the spaces with your fingers.
- Pin the tabs straight up and open the holes with a pencil.
- Let it dry completely before you take out the pins.
Final Quality-Control Checklist
- Bottom edge is closed with no gaps at the ends of the foundation chain
- Slot is 2.5 in (6.4 cm) wide and centered on the front face
- Mesh Rnd 14 has 36 meshes (72 sts)
- Rim band has 72 sc, 36 per face
- Both side slopes are straight and match
- Tabs sit 4 sts in from each fold with a 16-st gap between them
- Hanging holes are open and the same height
- Final size is 9 in × 10.2 in (22.9 cm × 25.9 cm)
Troubleshooting
The slot is gaping or puckered. The ch-10 was too loose or too tight. Rework Rnd 3 and make the chains match your sc width.
One side slants more than the other. An increase was worked off the fold. Check the marker position after each increase round.
The rim band flares. Your hook is too large for the band. Rework the band with a hook half a size smaller.
The rim band pulls in. Make sure you worked 1 sc into every ch-1 sp, not just into the dc.
The mesh spaces look uneven. Keep every ch 1 the same size. Count the round to make sure no meshes were skipped.
The tabs stretch. Reinforce the seam with a second pass of whipstitch and use a firmer cotton.
Care
Hand wash or machine wash on a gentle cool cycle, then reshape and dry flat. Cotton holds up well to frequent washing in the kitchen.

Final Notes
The measurements build on each other:
- 44 sc make a 5.5 in (14.0 cm) bottom band with a centered 2.5 in (6.4 cm) slot.
- 14 mesh rounds grow from 22 to 36 meshes, ending 9 in (22.9 cm) wide.
- The 72-sc rim band keeps that width and adds 1.1 in (2.8 cm), for 10.2 in (25.9 cm) total.
- Two 6-st tabs placed 4 sts from each fold finish the holder at 11.8 in (30.0 cm) tall.
If you check each stage against the checkpoints above, the holder will hang straight and dispense bags neatly.
Happy crocheting!