

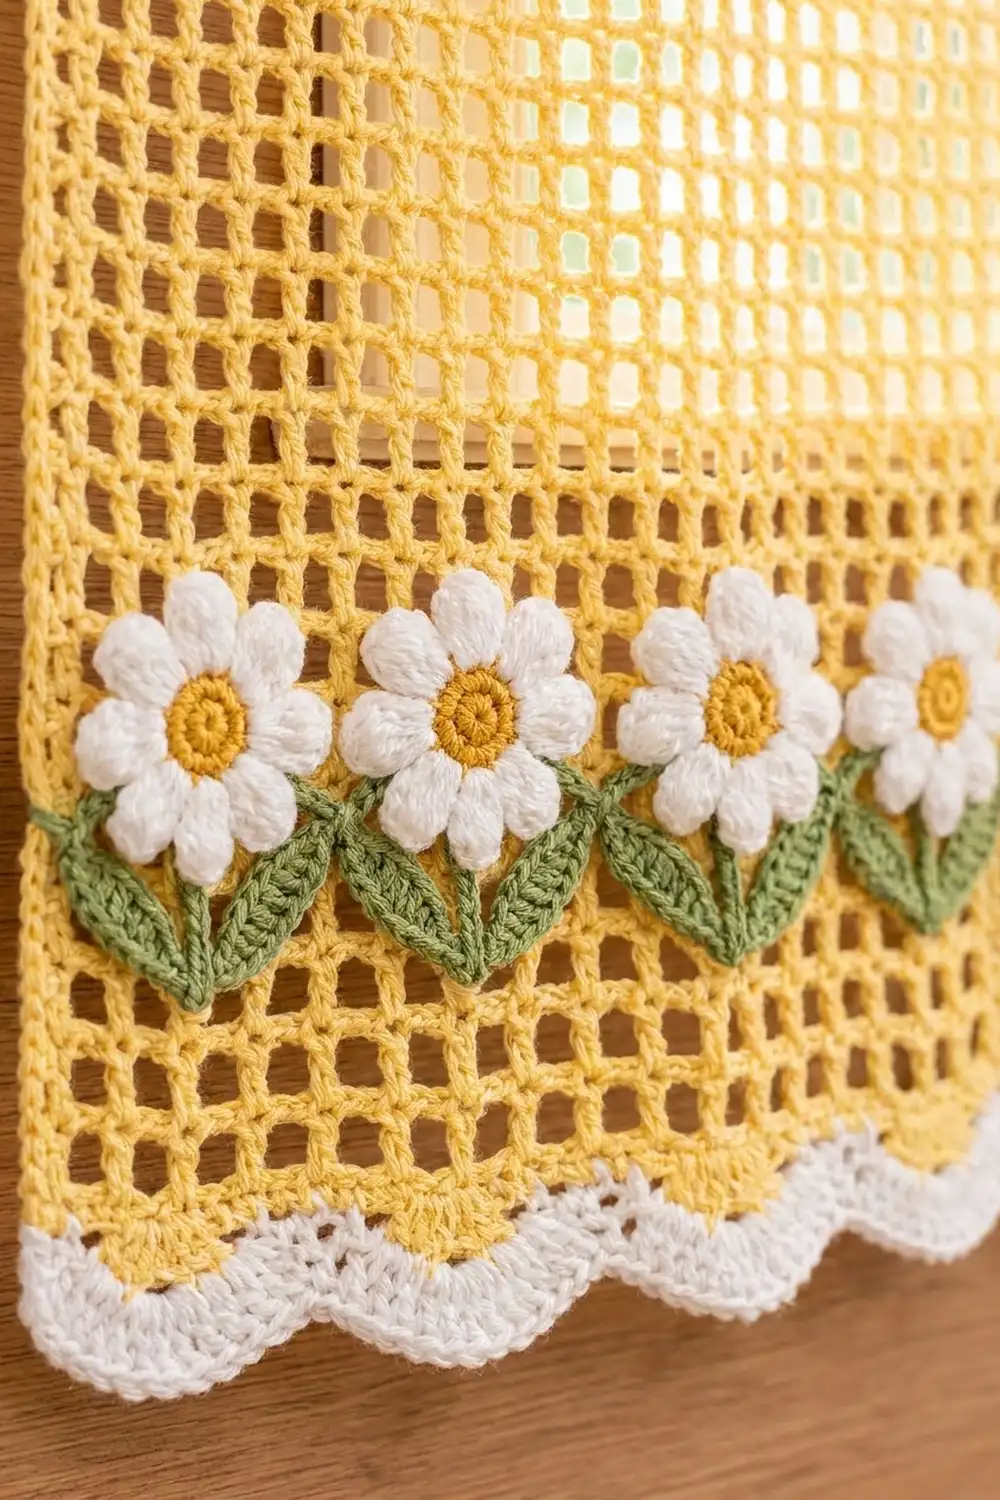
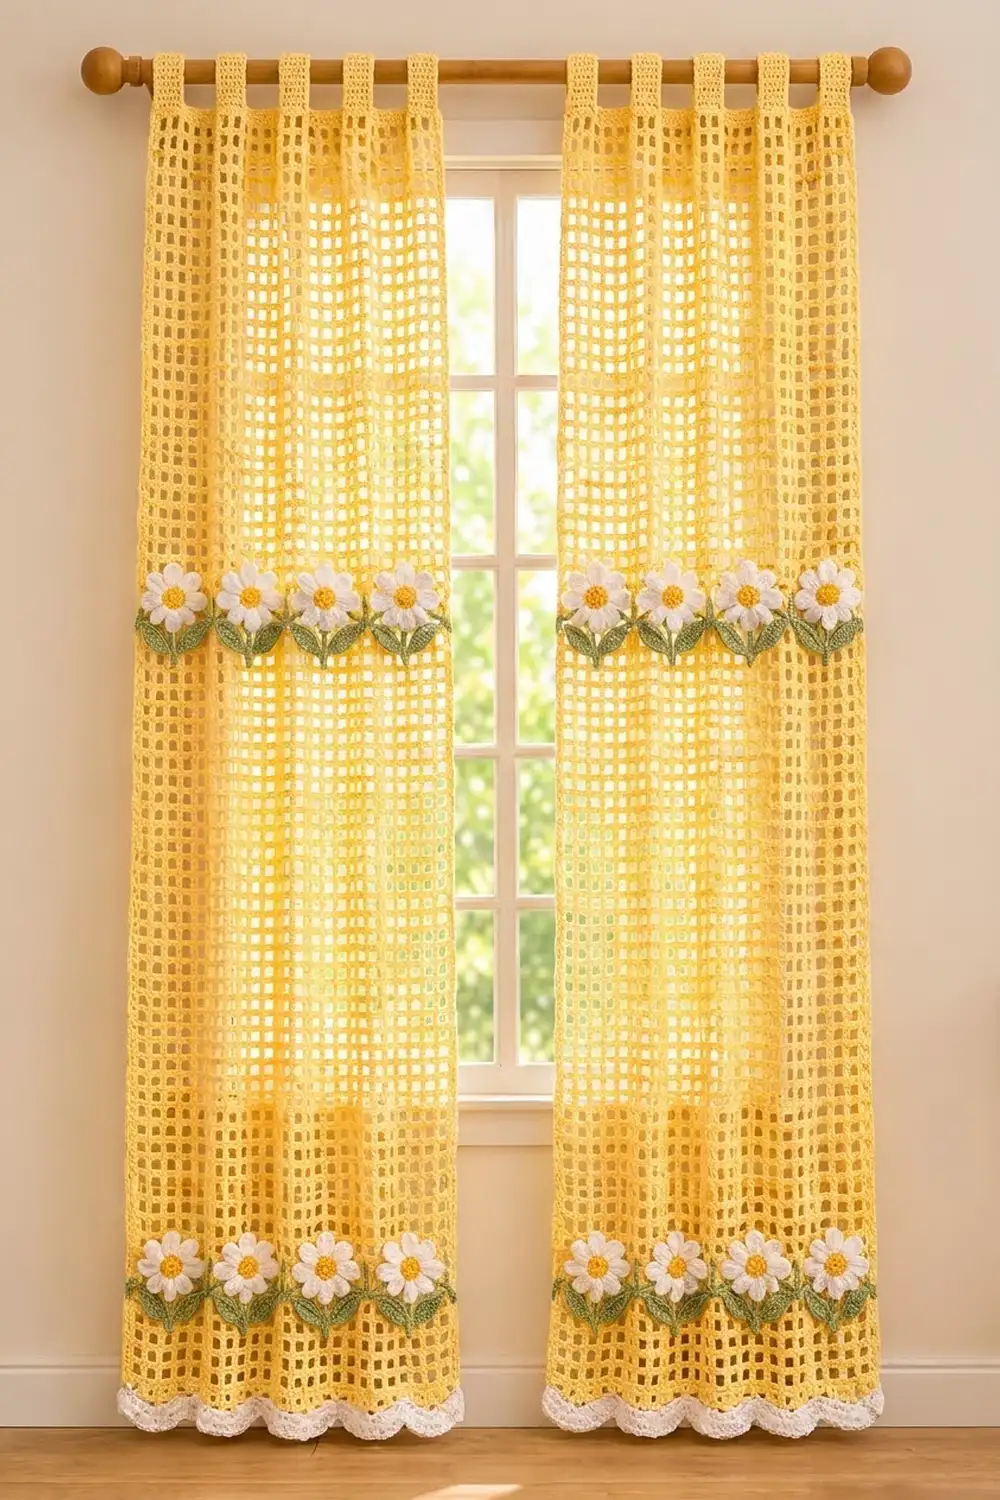
These Sunny Daisy curtain panels are made of light, airy yellow filet mesh that lets the daylight through. Each panel has two bands of white daisies with golden centers and green leaves. A scalloped white hem finishes the bottom, and five simple tabs slide onto any standard curtain rod.
The palette is butter yellow, white, golden yellow and leaf green. It looks cheerful and a little vintage, and it suits a kitchen, a sunroom or a child’s bedroom window. The pattern uses US crochet terms throughout.
Each finished panel measures 24.5 in (62.2 cm) wide and 61.5 in (156.2 cm) long from the top edge to the scallop points. That’s 64.5 in (163.8 cm) overall when you include the tabs. You make two panels.
Each panel is worked flat from the top down: a solid row, then the mesh, then a solid row. Next you add a yellow edging round and a white scallop hem, then work the tabs from the top edge. The daisies, stems and leaves are made separately and sewn on.
Finished Size and Construction
- Finished size (each panel): 24.5 in x 61.5 in (62.2 cm x 156.2 cm), plus 3 in (7.6 cm) tab loops
- Skill level: Easy-Intermediate
- Terminology: US crochet terms
- Yarn weight: Worsted (#4) cotton or cotton blend
- Hooks: I/9 (5.5 mm) for panels; H/8 (5 mm) for appliqués
- Number of pieces: 2 separate panels (not joined), plus 16 daisies, 16 stems and 32 leaves
- Layout: 2 panels hung side by side; 2 bands of 4 daisies on each panel
- Mesh per panel: 30 squares wide x 75 rows
- Size before border: 24 in x 60 in (61.0 cm x 152.4 cm)
- Border depth: 0.25 in (0.6 cm) on the top and sides; 1.25 in (3.2 cm) at the bottom, scallops included
Materials
Use a smooth, mercerized or matte cotton, or a cotton-acrylic blend. Cotton holds the square mesh crisply and doesn’t stretch much when it hangs. Avoid fuzzy yarns, because they blur the holes.
Buy all the yellow from one dye lot. A small shade difference is easy to see when the two panels hang side by side in daylight.
The amounts below are for a worsted cotton with 190 m (208 yd) per 100 g:
- Butter yellow (main): 500 g, 950 m
- White (petals and hem): 200 g, 380 m
- Golden yellow (daisy centers): 25 g, 48 m
- Leaf green (stems and leaves): 50 g, 95 m
These quantities include a margin of about 15 to 20 percent for the gauge swatch and small tension differences.
Tools:
- I/9 (5.5 mm) and H/8 (5 mm) crochet hooks
- Tapestry needle
- Stitch markers (at least 10)
- Measuring tape
- Rust-proof pins and a blocking surface large enough for one panel
- Spray bottle
- Scissors
Abbreviations (US Terms)
- ch – chain
- sl st – slip stitch
- sc – single crochet
- hdc – half double crochet
- dc – double crochet
- sp – space
- st(s) – stitch(es)
- tch – turning chain
- RS – right side
Special stitch – mesh square: a mesh square is one dc post followed by ch 2. On mesh rows, each square is “ch 2, dc in next dc.” The ch-5 at the start of a mesh row counts as 1 dc + ch 2.
Gauge and Checkpoints
Mesh gauge (I/9 hook): 5 mesh squares and 5 rows = 4 in (10.2 cm). Each square is 0.8 in (2.0 cm) wide and tall.
Border gauge: 15 sc and 16 sc rows = 4 in (10.2 cm).
Test first: Ch 21. Work Row 1 as written below: you get 19 sts, which is 6 squares. Then work 6 mesh rows and lightly steam the swatch. It should measure 4.8 in (12.2 cm) wide.
Checkpoints for each panel:
- After Row 10: 8 in (20.3 cm) long
- After Row 25: 20 in (50.8 cm)
- After Row 50: 40 in (101.6 cm)
- After Row 75: 60 in (152.4 cm), and still 24 in (61.0 cm) wide
If your swatch is too big, go down one hook size. If it’s too small, go up one hook size. If only the height is off, adjust how far you pull up your dc loops rather than the hook size. Don’t add or remove rows to fix the gauge, because that moves the daisy bands.
Panel (Make 2)
Use the I/9 (5.5 mm) hook and butter yellow.
Foundation: Ch 93.
Row 1 (solid row, WS): Dc in the 4th ch from the hook and in each ch across. Turn. (91 sts: 90 dc + tch)
This row is the top edge of the curtain. 91 sts = 1 + (3 x 30), which sets up exactly 30 squares.
Row 2 (first mesh row): Ch 5 (counts as dc + ch 2), skip next 2 sts, dc in next st. Ch 2, skip next 2 sts, dc in next st. Repeat from * across, working the last dc in the top of the tch. Turn. (30 squares; 31 dc posts)
Row 3 (mesh row): Ch 5 (counts as dc + ch 2), dc in next dc. Ch 2, dc in next dc. Repeat from * across, working the last dc in the 3rd ch of the turning ch-5. Turn. (30 squares)
Rows 4–74: Repeat Row 3. (30 squares in every row)
Make sure every dc lands on a dc post, so the holes stack in straight columns. Place a marker every 10 rows so it’s easy to compare the two panels.
Row 75 (solid row): Ch 3 (counts as dc). 2 dc in next ch-2 sp, dc in next dc. Repeat from * across, working the last dc in the 3rd ch of the turning ch-5. (91 sts: 1 + 30 x 3) Don’t fasten off.
The panel now measures 24 in x 60 in (61.0 cm x 152.4 cm).
Daisy Appliqués
Use the H/8 (5 mm) hook. The smaller hook keeps the appliqués firm, so they lie flat against the mesh.
Daisy (make 16):
- Rnd 1 (golden yellow): Magic ring, 6 sc in the ring, join with sl st to the first sc. (6 sc)
- Rnd 2: Ch 1, 2 sc in each sc around, join. Fasten off. (12 sc) The center measures 1.25 in (3.2 cm) across.
- Rnd 3 (white): Join white with sl st in any sc. Ch 7, then work back along the chain: sc in the 2nd ch from the hook, hdc in the next ch, dc in each of the next 2 ch, hdc in the next ch, sc in the last ch. Sl st in the next sc of Rnd 2. Repeat from * 11 more times, working the final sl st into the joining st. (12 petals; 6 sts per petal) Fasten off.
The petals are wide in the middle and taper at both ends, which gives them their rounded look. The finished daisy is about 4 in (10.2 cm) across.
Stem (make 16, green): Ch 9, sl st in the 2nd ch from the hook and in each ch across. (8 sl sts) The stem is 2 in (5.1 cm) long.
Leaf (make 32, green): Ch 8.
- Side 1: Sl st in the 2nd ch from the hook, sc in next ch, hdc in next ch, dc in next ch, hdc in next ch, sc in next ch, sl st in last ch. (7 sts)
- Side 2: Ch 1, rotate, and work into the free loops on the other side of the chain: sl st, sc, hdc, dc, hdc, sc, sl st. Join to the first sl st. (14 sts) Fasten off.
Each leaf is a pointed oval, 1.75 in (4.4 cm) long.
Make All Pieces
- Butter yellow: 2 panels
- Golden yellow + white: 16 daisies (8 per panel)
- Green: 16 stems and 32 leaves (8 stems and 16 leaves per panel)
Layout for one panel (RS facing, Row 1 at the top, squares counted from the right edge; D = daisy center):
Rows 1-33    plain mesh
Row 36       D sq 4 | D sq 12 | D sq 19 | D sq 27   (upper band)
Rows 38-41   stem + 2 leaves under each daisy
Rows 42-63   plain mesh
Row 66       D sq 4 | D sq 12 | D sq 19 | D sq 27   (lower band)
Rows 68-71   stem + 2 leaves under each daisy
Rows 72-75   plain mesh
Measured from the right edge, the daisy centers sit at 2.8 in (7.1 cm), 9.2 in (23.4 cm), 14.8 in (37.6 cm) and 21.2 in (53.8 cm). The layout is mirror-symmetric.
Measured from the top edge, the upper band is at 28.4 in (72.1 cm) and the lower band is at 52.4 in (133.1 cm).
Joining: Attaching the Appliqués
The two panels are never joined to each other. The only joining is sewing the appliqués onto the mesh.
- Lay the panel flat, RS up, and mark each daisy square with a stitch marker.
- Place each stem vertically, with its top end tucked 0.5 in (1.3 cm) under the lower petals of the daisy. Angle one leaf up and to the left from the bottom of the stem, and one leaf up and to the right.
- With matching yarn, whipstitch each piece to the dc posts and ch-2 bars behind it. Sew the daisy center around its outer edge into the mesh square below it, and tack each petal tip to the nearest post or bar. Tack each leaf at its tip and base, and the stem every 0.5 in (1.3 cm).
Stitch-to-stitch logic: Sew only into the yarn of the mesh, never across an open hole. That way, the holes keep their shape.
Tension: Leave each stitch snug but not tight. If the mesh puckers around a daisy, the stitches are too tight.
Size checkpoint: After sewing, the panel should still measure 24 in (61.0 cm) across both daisy bands.
Border
Use butter yellow and the I/9 hook. Check the border gauge (15 sc = 4 in or 10.2 cm) before you start. The ch-2 corner sps are not counted as stitches.
Rnd 1 (yellow, all around):
- Continue from Row 75. Ch 1, then sc in each of the 91 sts of Row 75 (bottom edge, 91 sc). Ch 2 for the corner.
- Work 3 sc in each of the 75 row ends along the side (225 sc). Ch 2.
- Work sc in the free loop of each foundation ch at the base of the Row 1 sts (top edge, 91 sc). Ch 2.
- Work 3 sc in each of the 75 row ends along the second side (225 sc). Ch 2. Join to the first sc and fasten off. (632 sc: 91 + 225 + 91 + 225)
Why the math works: 91 sc across 24 in (61.0 cm) is about 3.79 sc per inch, and 225 sc along 60 in (152.4 cm) is 3.75 sc per inch. Both match the 15-sc-per-4-in border gauge, so the edges stay flat and don’t ruffle or pull in.
Hem Row A (white): With RS facing, join white with sc in the first sc of the bottom edge. Sc in each sc across. Turn. (91 sc)
Hem Row B (white): Ch 1, sc in the first sc. Skip 4 sc, 9 dc in the next sc, skip 4 sc, sc in the next sc. Repeat from * 8 more times. Fasten off. (9 scallops; 81 dc + 10 sc = 91 sts)
Each scallop repeat uses 10 sts. 9 x 10 + 1 = 91, so the scallops end exactly at the corners. Each scallop is about 2.7 in (6.9 cm) wide.
Tabs (yellow): Count the 91 top-edge sc from right to left. You work 5 tabs of 7 sts each, separated by 4 gaps of 14 sts each (5 x 7 + 4 x 14 = 91). The tabs start on sc 1, 22, 43, 64 and 85.
For each tab:
- Row 1: Join yarn and sc in each of the 7 sc. Turn. (7 sc)
- Rows 2–24: Ch 1, sc in each sc across. Turn. (7 sc)
Each tab is 6 in (15.2 cm) long and 1.9 in (4.8 cm) wide. The gaps between tabs are 3.7 in (9.4 cm).
Fold each tab to the back and whipstitch its last row to the back of Rnd 1 and Row 1. This makes a 3 in (7.6 cm) loop that fits rods up to 1.5 in (3.8 cm) in diameter.
Final Blocking
- Weave in all ends, running them through the dc posts.
- Soak the panel in cool water for 10 minutes, then press out the water in a towel. Don’t wring it.
- Pin the panel flat to 24.5 in x 61.5 in (62.2 cm x 156.2 cm).
- Pin a few mesh columns to keep them straight, and pin each scallop point.
- Shape each daisy’s petals so they lie evenly.
- Let the panel dry completely, then repeat with the second panel.
Final Quality-Control Checklist
- Each panel has 30 squares in every row and 75 rows in total.
- Rnd 1 has 91 sc on the top and bottom edges and 225 sc on each side.
- There are 9 even scallops on each hem.
- There are 5 tabs per panel, evenly spaced and sewn securely.
- There are 8 daisies per panel, aligned in matching bands on both panels.
- Both panels are the same size: 24.5 in x 61.5 in (62.2 cm x 156.2 cm).
Troubleshooting
- The mesh slants: Your last dc went into the wrong st. Always finish in the 3rd ch of the turning ch-5.
- The holes are rectangular, not square: Adjust the dc height, or work ch 1 instead of ch 2 if the holes are too wide.
- The sides ripple: Use fewer sc per row end. The sides pull in: Use more.
- The scallops cup: Block them firmly, or use 7 dc per shell instead of 9.
- The daisies curl: Steam-block them before sewing.
- The panels differ in length: Compare the row markers and re-block the longer panel.
Care
Hand wash or machine wash cold on a gentle cycle, then lay flat or hang to dry while damp. Re-shape the daisies while the panels are still wet.
Final Notes
The measurement chain: a swatch of 5 squares = 4 in (10.2 cm). That gives 30 squares = 24 in (61.0 cm) and 75 rows = 60 in (152.4 cm). The border brings each panel to 24.5 in x 61.5 in (62.2 cm x 156.2 cm), plus 3 in (7.6 cm) tabs. If you check each link in that chain, both panels will match and hang straight.
Happy crocheting!