

The Peach Lattice Trio is a three-tier hanging organizer. Three small oval baskets are stitched onto one long, tapered mesh panel that hangs from a wooden ring. Each basket holds one standard toilet roll upright, so the organizer fits well on the back of a bathroom door.
The whole piece uses one soft peach worsted-weight cotton. Each basket has a solid single crochet base and a short solid wall. Above the wall is an open lattice of chain loops. The top edge has six rounded fan scallops and a slip-stitch rim. The panel is a diamond net that narrows toward the top, where a solid band wraps around the ring.
This pattern uses US crochet terms. Each finished basket is about 6.25 in x 4.5 in (15.9 cm x 11.4 cm) at the base and 3.5 in (8.9 cm) tall. The assembled hanger is about 26 in (66.0 cm) long from the top of the ring to the bottom edge.
You’ll work three identical baskets in joined rounds and one panel in rows from the bottom up. Fold the ring band over the wooden ring, sew on the baskets, and finish the panel with a two-row edging.
Finished Size and Construction
- Basket base: 6.25 in x 4.5 in (15.9 cm x 11.4 cm)
- Basket height: 3.5 in (8.9 cm). The top opening is about 7 in x 5 in (17.8 cm x 12.7 cm).
- Skill level: Intermediate
- Terminology: US
- Yarn weight: Worsted (#4) cotton
- Hook: 5.0 mm (US H-8)
- Number of pieces: 4 crocheted pieces (3 baskets + 1 panel), plus 1 wooden ring
- Layout: 3 baskets stacked vertically on 1 panel (1 column x 3 tiers)
- Panel size before border: 6 in (15.2 cm) wide at the bottom and about 2.5 in (6.4 cm) wide at the top, with 22 in (55.9 cm) of mesh
- Border depth: 2 rows, about 0.6 in (1.5 cm)
- Panel width after border: about 7.25 in (18.4 cm) at the bottom and 3.75 in (9.5 cm) at the top of the mesh
Materials
Choose a smooth, firm worsted-weight cotton or cotton blend. Cotton holds the basket shape and shows the lattice crossings clearly. Acrylic also works, but the baskets will be softer.
- Peach: 200 g, about 320 m (350 yd)
- Each basket uses about 45 g (72 m).
- The panel and border use about 50 g (80 m).
- 5.0 mm (US H-8) crochet hook
- 1 wooden ring, 2.5 in (6.4 cm) outer diameter
- Tapestry needle
- 6 locking stitch markers
- Rust-proof pins and a blocking mat
- Measuring tape
The quantities include a margin of about 15 g for swatching and sewing.
Abbreviations (US Terms)
- ch: chain
- sl st: slip stitch
- sc: single crochet
- dc: double crochet
- inc: 2 sc in the same stitch
- sc2tog: single crochet 2 together
- BLO: back loop only
- sk: skip
- sp: space
- st(s): stitch(es)
- rnd: round
Special stitch (Fan): Work 9 dc into the same ch-6 loop.
Gauge and Checkpoints
Solid gauge: 14 sc and 14 rnds = 4 in (10.2 cm) in sc, worked in joined rounds.
Mesh gauge: 7 ch-4 loops across = 6 in (15.2 cm), and 10 mesh rows = 6 in (15.2 cm).
Make one full basket and measure it before you start the other two. Check it at these points:
- After Rnd 4: The base is about 4 in x 2.25 in (10.2 cm x 5.7 cm).
- After Rnd 8: The base is 6.25 in x 4.5 in (15.9 cm x 11.4 cm).
- After Rnd 12: The solid wall is 1.1 in (2.8 cm) tall.
- After Rnd 14: The total height is about 2.4 in (6.1 cm).
- After Rnd 17: The total height is 3.5 in (8.9 cm).
If the base is too big, switch to a 4.5 mm hook. If it’s too small, or a toilet roll won’t fit, switch to a 5.5 mm hook.
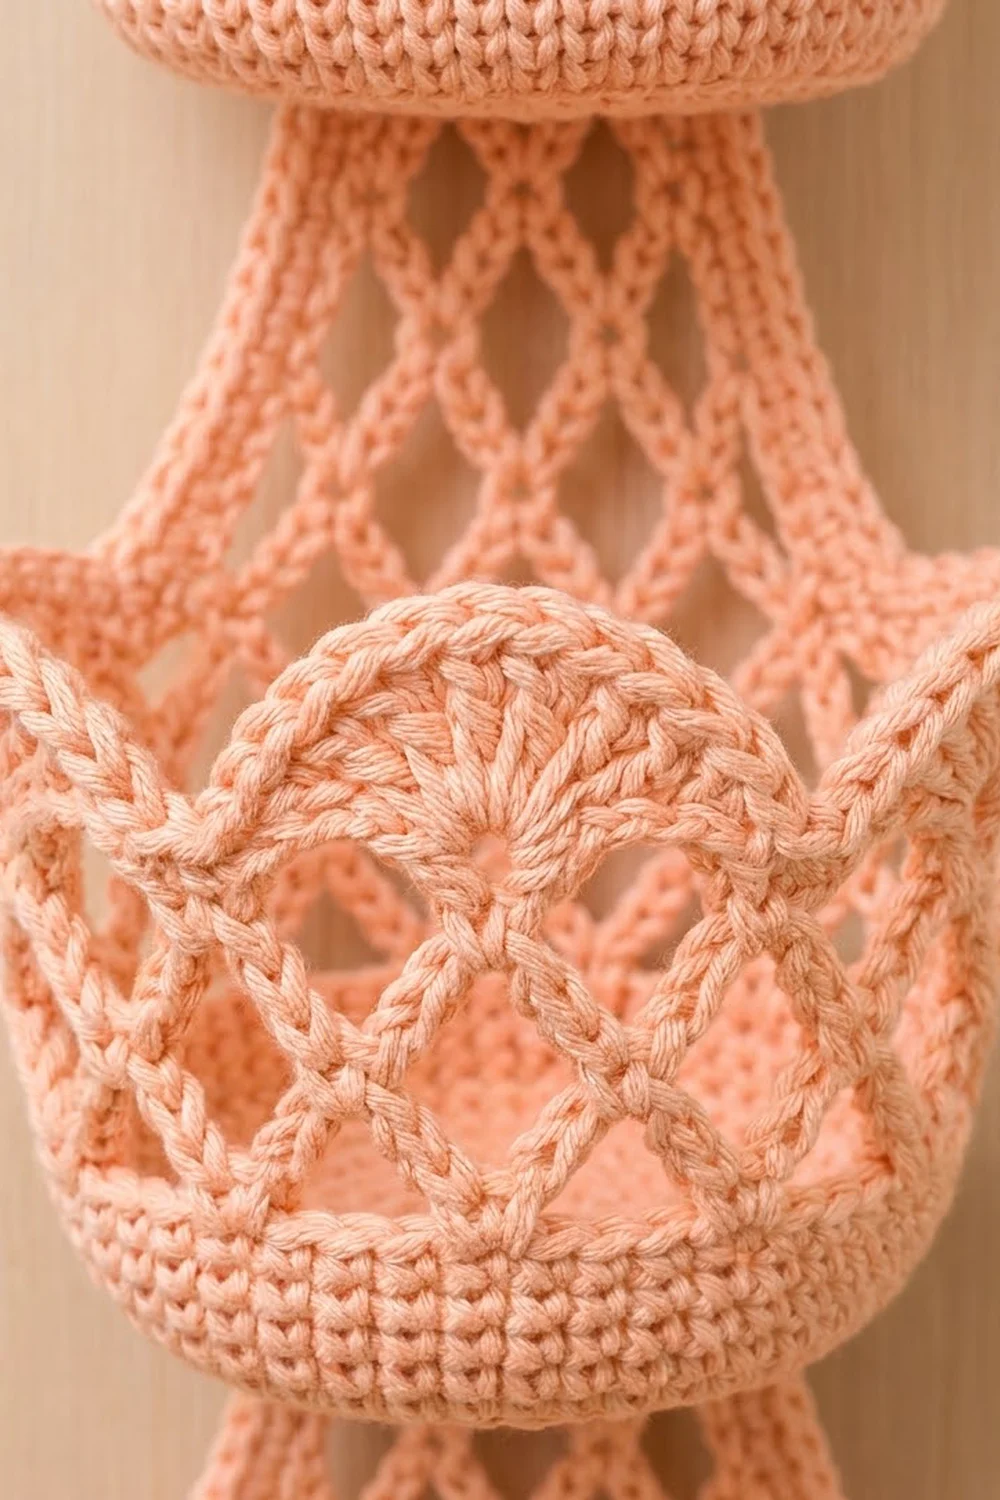
Basket (Make 3)
Work in joined rounds. Join each round with a sl st to the first sc, and don’t turn. The ch 1 at the start of a round doesn’t count as a stitch.
Base
Ch 9.
Rnd 1: Sc in 2nd ch from hook, sc in next 6 ch, 3 sc in last ch. Working along the opposite side of the foundation chain, sc in next 6 ch, 2 sc in last ch (the same ch as the first sc); join. (18 sts)
Rnd 2: Ch 1, inc in first st, sc in next 6, inc in each of next 3, sc in next 6, inc in each of next 2; join. (24 sts)
Rnd 3: Ch 1, sc in first st, inc, sc in next 6, [sc, inc] 3 times, sc in next 6, [sc, inc] twice; join. (30 sts)
Rnd 4: Ch 1, sc in next 2, inc, sc in next 6, [sc 2, inc] 3 times, sc in next 6, [sc 2, inc] twice; join. (36 sts)
Rnd 5: Ch 1, sc in next 3, inc, sc in next 6, [sc 3, inc] 3 times, sc in next 6, [sc 3, inc] twice; join. (42 sts)
Rnd 6: Ch 1, sc in next 4, inc, sc in next 6, [sc 4, inc] 3 times, sc in next 6, [sc 4, inc] twice; join. (48 sts)
Rnd 7: Ch 1, sc in next 5, inc, sc in next 6, [sc 5, inc] 3 times, sc in next 6, [sc 5, inc] twice; join. (54 sts)
Rnd 8: Ch 1, sc in next 6, inc, sc in next 6, [sc 6, inc] 3 times, sc in next 6, [sc 6, inc] twice; join. (60 sts)
The two “sc in next 6” sections are the straight sides. Mark the 6 straight sts on one side. That side becomes the back of the basket.
Wall
Rnd 9: Ch 1, sc in BLO of each st around; join. (60 sts) The unused front loops form a ridge, and the wall turns upward from there.
Rnds 10–12: Ch 1, sc in each st around; join. (60 sts)
Lattice
Rnd 13: Ch 1, sc in first st, [ch 6, sk 4, sc in next st] 11 times, ch 6, sk 4; join to first sc. (12 ch-6 loops)
Rnd 14: Sl st in each of first 3 ch, ch 1, sc in same loop, [ch 6, sc in next ch-6 loop] 11 times, ch 6; join to first sc. (12 ch-6 loops)
Each Rnd 14 loop is anchored at the center of a Rnd 13 loop. That offset creates the crossed diamond lattice.
Scalloped Top
Rnd 15: Sl st in each of first 3 ch, ch 1, sc in same loop, Fan in next loop, [sc in next loop, Fan in next loop] 5 times; join to first sc. (6 sc + 54 dc = 60 sts; 6 fans)
Rnd 16 (trim round): Ch 1, [sc in next sc, sc in next 4 dc, 2 sc in next dc, sc in next 4 dc] 6 times; join. (60 sts worked 1-per-st + 6 extra = 66 sts)
Rnd 17: Sl st loosely in each st around. (66 sl sts) Fasten off and leave a 24 in (61.0 cm) tail for sewing.
The slip-stitch rim firms each scallop into a rounded, corded edge.
Back Panel (Make 1)
Work in rows from the bottom up.
Foundation: Ch 23.
Row 1: Sc in 2nd ch from hook, [ch 4, sk 2 ch, sc in next ch] 7 times. (8 sc, 7 loops)
Row 2 (even row): Ch 5 (counts as dc + ch 2), turn, sc in first ch-4 sp, [ch 4, sc in next ch-4 sp] across, ch 2, dc in last sc. (6 full loops + 2 half loops)
Row 3 (odd row): Ch 1, turn, sc in dc, [ch 4, sc in next ch-4 sp] across, ch 4, sc in 3rd ch of turning ch-5. (7 loops)
Rows 4–14: Repeat Rows 2–3 five times, then work Row 2 once more. Row 14 ends with 6 full loops.
Row 15 (decrease row): Ch 1, turn, sk dc and ch-2 sp, sc in first ch-4 sp, [ch 4, sc in next ch-4 sp] across, ending with sc in last ch-4 sp. Don’t work into the last ch-2 sp or the turning chain. (5 loops)
The panel is now about 4.25 in (10.8 cm) wide.
Rows 16–26: Alternate even and odd rows, starting with an even row. Even rows have 4 full loops. Odd rows have 5 loops.
Row 27 (decrease row): Work as for Row 15. (3 loops)
Rows 28–37: Alternate even and odd rows, starting with an even row. Row 37 is an odd row. (3 loops)
The mesh is now 22 in (55.9 cm) long and about 2.5 in (6.4 cm) wide at the top.
Ring Band
Row 38 (conversion row): Ch 1, turn, sc in first sc, [3 sc in next loop, sc in next sc] 3 times. (4 sc worked 1-per-sc + 9 sc in loops = 13 sts)
Row 39: Ch 1, turn, sc2tog, sc in next 9, sc2tog. (11 sts)
Row 40: Ch 1, turn, sc2tog, sc in next 7, sc2tog. (9 sts)
Row 41: Ch 1, turn, sc2tog, sc in next 5, sc2tog. (7 sts)
Rows 42–47: Ch 1, turn, sc in each st across. (7 sts)
Fasten off and leave a 12 in (30.5 cm) tail. Fold Rows 42–47 over the wooden ring to the back. Whipstitch each st of Row 47 to the matching st of Row 41. The finished band is 2 in (5.1 cm) wide and gathers the top of the mesh under the ring.
Make All Pieces
All pieces use the same peach yarn.
- Baskets: Make 3, about 45 g (72 m) each.
- Panel: Make 1, about 50 g (80 m) including the border.
Here’s the layout from top to bottom, with panel row numbers:
        ( wooden ring )
        [ ring band   ]  Rows 38-47
       [ mesh          ]  Rows 30-37
     [  BASKET 3        ]  Rows 24-29
      [ mesh            ]  Rows 19-23
     [  BASKET 2        ]  Rows 13-18
      [ mesh            ]  Rows 8-12
     [  BASKET 1        ]  Rows 2-7
      [ Row 1 + border  ]
Joining
Sew each basket to the panel with its long tail and a tapestry needle. Whipstitch through both the basket and the panel’s chain loops.
- Lay the panel flat with the right side up. Place markers at Rows 2, 13, and 24. These are the base lines for the three baskets.
- Turn each basket so that one fan is centered over the marked back side.
- Base seam: Take the 6 marked straight sts plus 2 sts on each side, for 10 sts in total. Line up their Rnd 8 front-loop ridge with the marked row. Whipstitch each of the 10 sts once to the panel, spacing them evenly across the center loops.
- Wall seam: Sew the same 10 sts of Rnd 12 to the panel 1.1 in (2.8 cm) higher, with one whipstitch per st.
- Rim tack: Tack the center (the 2-sc point) of the back fan to the panel 3.5 in (8.9 cm) above the base line with 3 small stitches.
Keep the whipstitches firm but not tight. The panel should stay at its full width behind each basket. If the mesh pinches inward, take out the seam and sew it again more loosely.
Size checkpoint: There should be about 3 in (7.6 cm) of open mesh between baskets. The hanger should measure about 26 in (66.0 cm) from the top of the ring to the bottom edge.
Border
The border runs down one long side of the panel, across the bottom, and up the other side. It stops at Row 37 and doesn’t go around the ring band.
Border gauge: 14 sc = 4 in (10.2 cm), the same as the solid gauge.
Border Row 1: With the right side facing, join yarn at the top of Row 37 on the right edge. Ch 1, then work 2 sc in each row-end down the side (74 sc). Along the foundation chain, work 3 sc in the first ch (corner), sc in next 20 ch, and 3 sc in the last ch (corner). Work 2 sc in each row-end up the second side (74 sc). (74 + 26 + 74 = 174 sts)
Border Row 2: Ch 1, turn, sc in each st, working 3 sc in the center st of each bottom corner. (174 sts worked 1-per-st + 4 extra = 178 sts) Each long side now has 74 sts, each corner group has 5 sts, and the bottom has 20 sts between the corners.
Fasten off and weave in the ends.
Why the math works: Each mesh row is 0.6 in (1.5 cm) tall, and 2 sc measure about 0.57 in (1.4 cm). The edge is slightly firmer than the mesh, which keeps the panel from stretching under the weight of the rolls. Along the bottom, you work 1 sc into each of the 22 foundation chains, so the edge matches the foundation exactly. The 3-sc corners add the extra stitches needed to turn each corner flat.
Final Blocking
- Soak the finished hanger in cool water for 10 minutes. Roll it in a towel and press out the water without wringing.
- Pin the panel flat with the right side up. Pin it to 7.25 in (18.4 cm) wide at the bottom and 3.75 in (9.5 cm) wide at the top of the mesh.
- Open each mesh diamond with your fingers so the lattice is even.
- Stand a toilet roll or a jar of the same size in each basket to set the oval shape.
- Shape each fan into a rounded scallop and pin the peaks upright.
- Let the hanger dry completely, about 24 hours, before you hang it.
Final Quality-Control Checklist
- Each basket has 60 sts in Rnds 8–12 and 66 sts in Rnds 16–17.
- Each basket has 12 lattice loops and 6 fans.
- All three bases measure 6.25 in x 4.5 in (15.9 cm x 11.4 cm).
- The panel has 7 loops at the bottom, 5 after Row 15, and 3 after Row 27.
- Border Row 2 has 178 sts.
- The ring band is sewn securely, stitch for stitch.
- All ends are woven in and hidden on the back.
Troubleshooting
The base curls up like a bowl: Your tension is tight. Go up one hook size for Rnds 1–8.
The base ruffles: Your tension is loose, or there are extra increases. Recount each round and check for 60 sts after Rnd 8.
The lattice looks floppy: Shorten the loops to ch 5 in Rnds 13–14.
The fans flip outward: Work Rnd 17 a little more tightly.
The panel leans to one side: Make sure each decrease row skips the half loop at both ends.
The baskets tilt forward: Add 2 more tacking stitches at the rim, one on each side of the back fan.
Care
Hand wash in cool water with mild soap, then dry flat. Reshape the baskets while they’re still damp.
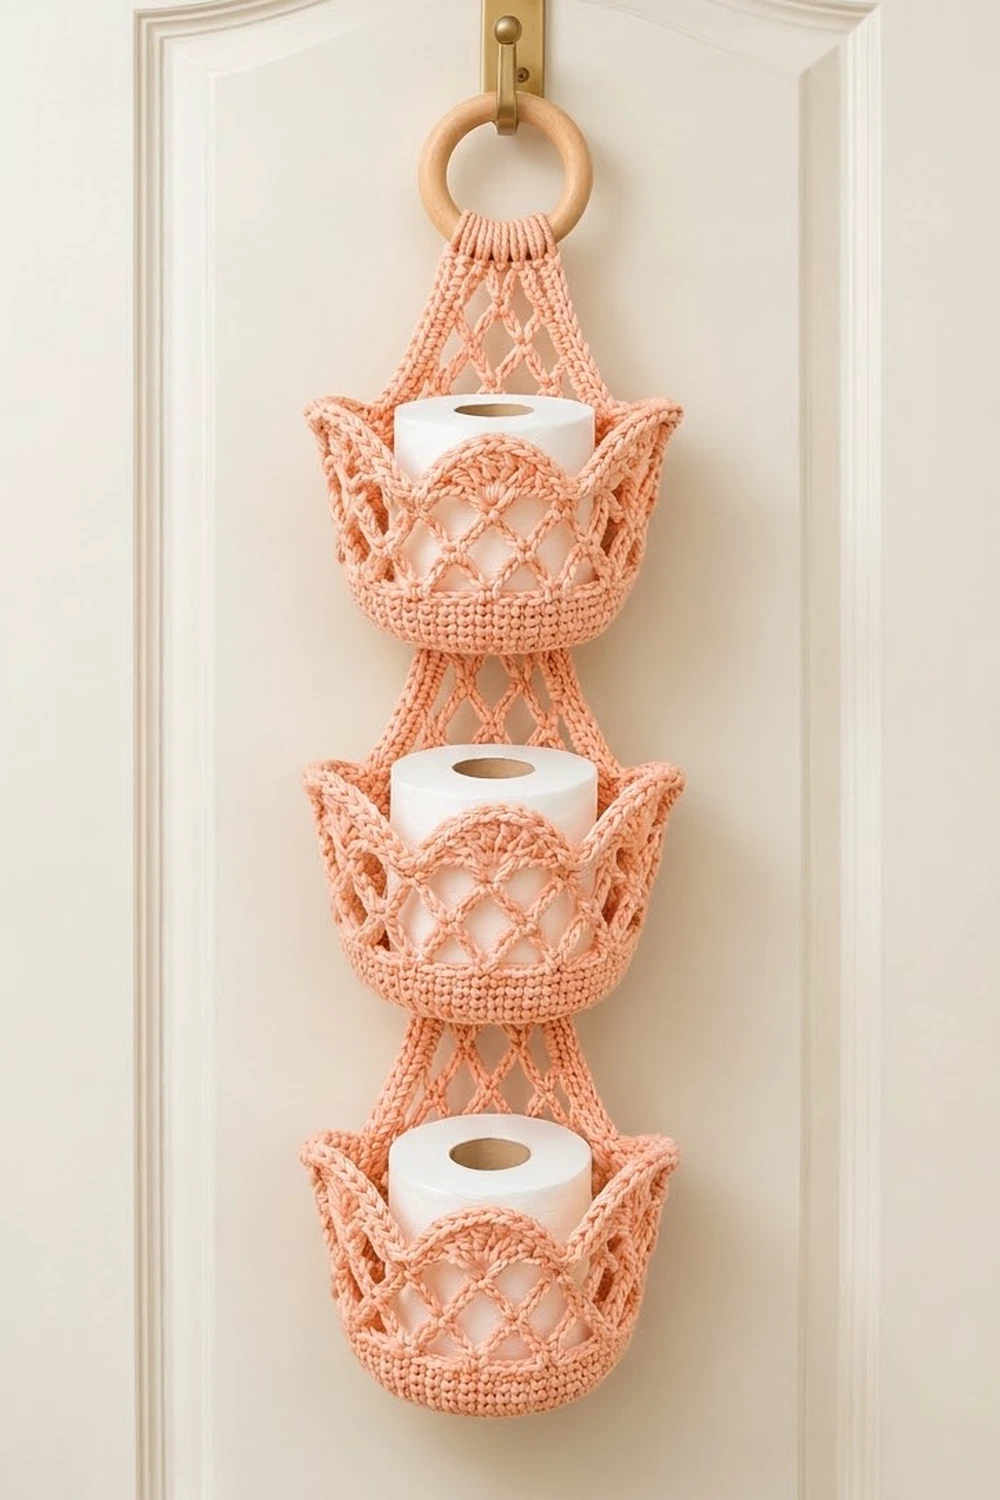
Final Notes
Here’s the full measurement chain. A 60-st base at 14 sc per 4 in (10.2 cm) gives a 6.25 in x 4.5 in (15.9 cm x 11.4 cm) oval. Four solid rounds, two lattice rounds, and the fan rim bring each basket to 3.5 in (8.9 cm). The panel tapers from 7 loops to 3 over 22 in (55.9 cm) of mesh, and the 2-row border widens the bottom to 7.25 in (18.4 cm). If you check each stage before moving on, the finished hanger will measure about 26 in (66.0 cm).
Happy crocheting!