

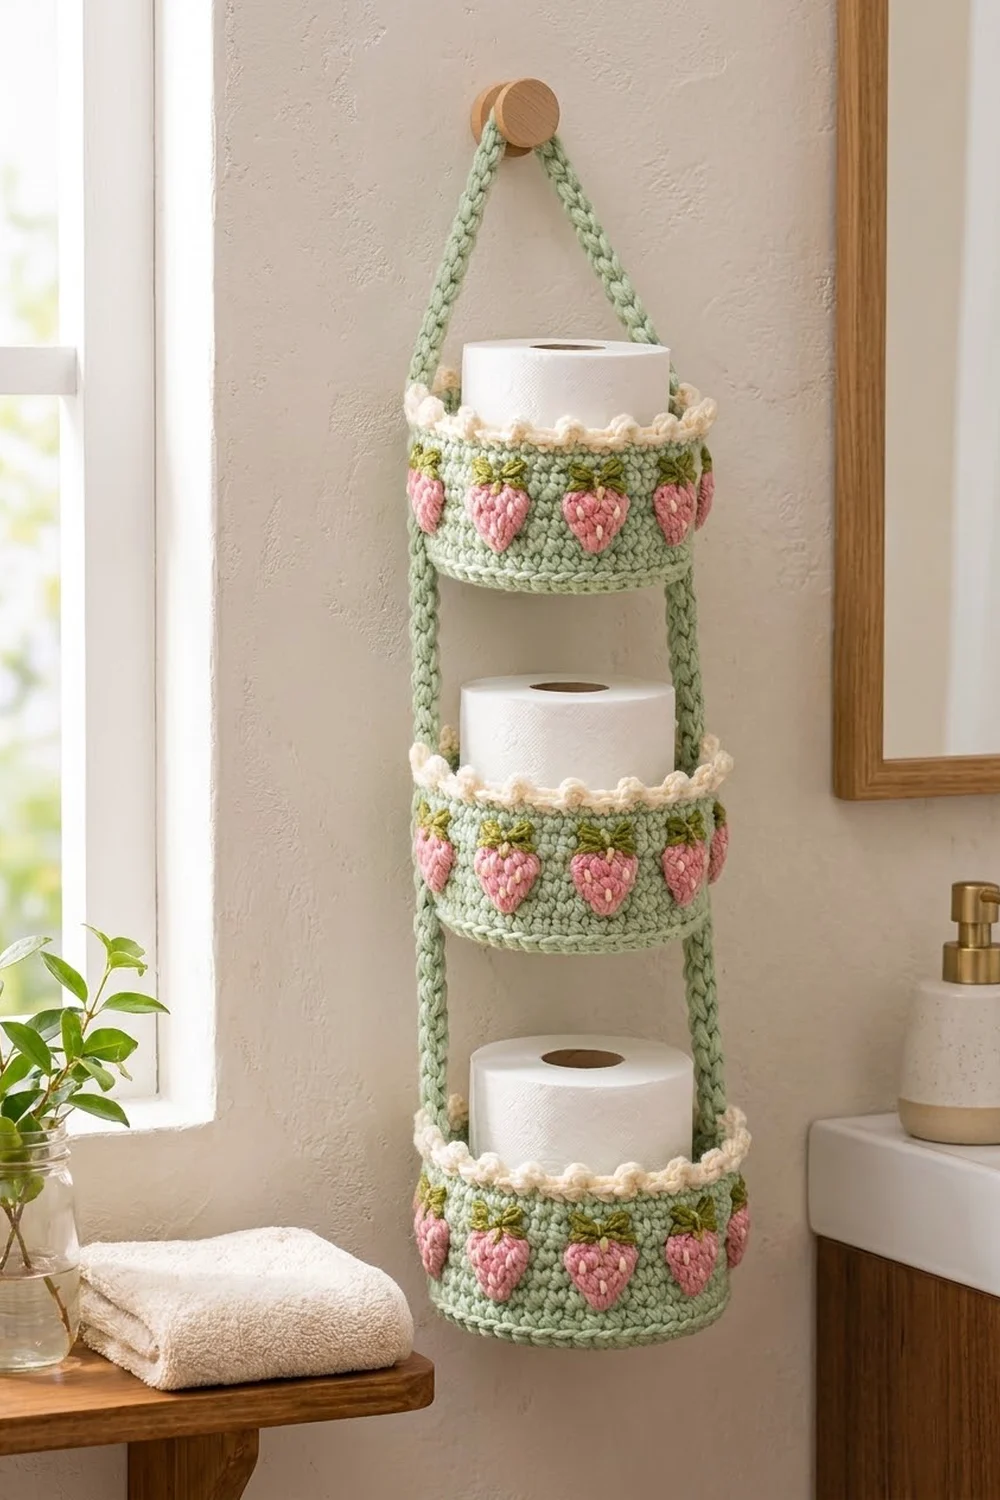
This hanging organizer has three round baskets in three sizes. Two braided-look straps link them and meet in a peak that hangs from a single wall peg. Each basket has a ring of puffy pink strawberries with olive-green leaves and cream seed stitches, plus a cream rim of small bead picots.
The colors are soft sage green, rose pink, olive green and cream. The style is sweet and cottage-like, but the baskets are firm and practical. Each tier holds a standard toilet roll, or small towels, toiletries or craft supplies.
This pattern uses US crochet terms. The finished organizer is about 7.75 in (19.7 cm) wide and about 20 in (50.8 cm) tall, measured from the bottom of the large basket to the hanging peak. The baskets are about 5 in (12.7 cm), 6 in (15.2 cm) and 6.75 in (17.1 cm) across, and each is about 3 in (7.6 cm) tall.
Each basket starts as a flat single crochet circle. A back-loop round turns the wall up, then you work straight rounds. You make the strawberry appliqués separately and sew them on. You sew two flat straps up the sides of all three baskets, add the cream picot rim to each basket, and join the strap tops into a hanging peak.
Finished Size and Construction
- Finished size: about 7.75 in (19.7 cm) wide x 20 in (50.8 cm) tall
- Skill level: Easy-Intermediate
- Terminology: US
- Yarn weight: worsted (#4) cotton
- Hooks: US 7 (4.5 mm) for the baskets and straps; US 6 (4.0 mm) for the strawberries
- Number of pieces: 3 baskets, 2 straps and 42 strawberry appliqués
- Layout: 3 tiers stacked vertically: small on top, medium in the middle, large on the bottom
- Basket sizes: small 5 in (12.7 cm), medium 6 in (15.2 cm) and large 6.75 in (17.1 cm) across
- Size before border: each basket wall is about 2.4 in (6.1 cm) tall
- Border depth: the cream rim adds about 0.5 in (1.3 cm), so each basket is about 3 in (7.6 cm) tall
Materials
Use a smooth, firm worsted-weight cotton or cotton blend. Cotton holds the basket shape well and shows the strawberry texture clearly. The amounts below assume about 85 m (93 yd) per 50 g.
- Sage green (MC): 150 g, about 255 m (279 yd)
- Rose pink (strawberries): 30 g, about 51 m (56 yd)
- Cream (rim and seeds): 30 g, about 51 m (56 yd)
- Olive green (leaves): 15 g, about 26 m (28 yd)
These amounts include a margin of about 15 to 20 percent.
Tools:
- US 7 (4.5 mm) and US 6 (4.0 mm) crochet hooks
- Tapestry needle
- At least 20 stitch markers
- Measuring tape
- Scissors
- Pins or clips
- Wall peg or hook
Abbreviations (US Terms)
- ch – chain
- sl st – slip stitch
- sc – single crochet
- BLO – back loop only
- MR – magic ring
- st(s) – stitch(es)
- Rnd – round
Special stitch – bead picot: Ch 3. Then, twice: yarn over, insert the hook in the 3rd ch from the hook, yarn over and pull up a loop, yarn over and pull through 2 loops. Yarn over and pull through all 3 loops on the hook. This makes a small, round bead that sits upright on the rim.
Gauge and Checkpoints
Gauge: 18 sc x 18 rnds = 4 in (10.2 cm) with the 4.5 mm hook.
Make the small basket base first and use it as your swatch. Check these points as you go:
- Base Rnd 6 (36 sts): about 2.6 in (6.6 cm) across
- Base Rnd 12 (72 sts): about 5 in (12.7 cm) across and lying flat
- Wall after Rnd 11: about 2.4 in (6.1 cm) tall
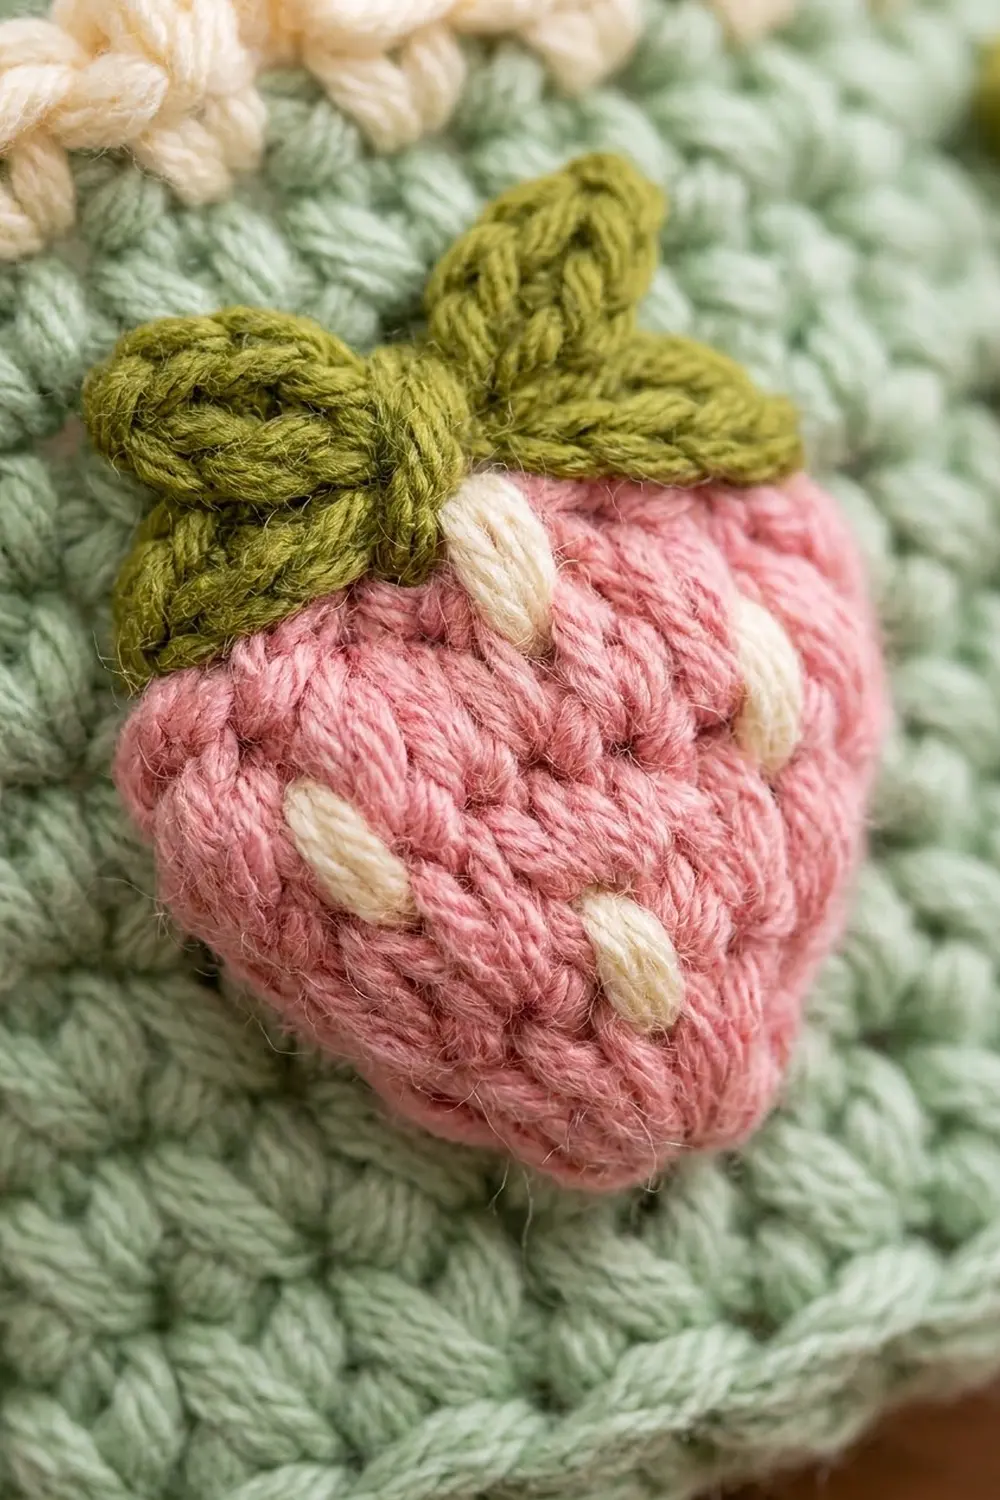
- Strawberry: about 1 in (2.5 cm) wide and 1 in (2.5 cm) tall, including the leaves
If your base is bigger than the checkpoint, go down one hook size. If it is smaller, go up one size. A base that ruffles means you are working too loosely; a base that cups means you are working too tightly. Get the gauge right before you start the other baskets, because the strap stitch map depends on these heights.
Basket Base (Make 3)
Use sage green and the 4.5 mm hook. At the end of each round, join with a sl st to the first sc and ch 1 (the ch 1 does not count as a stitch). Keep the joins stacked in one vertical line. This line is your reference line.
- Rnd 1: 6 sc in MR. (6)
- Rnd 2: 2 sc in each st. (12)
- Rnd 3: (sc 1, 2 sc in next) 6 times. (18)
- Rnd 4: (sc 2, 2 sc in next) 6 times. (24)
- Rnd 5: (sc 3, 2 sc in next) 6 times. (30)
- Rnd 6: (sc 4, 2 sc in next) 6 times. (36)
Keep going the same way, working one more sc between increases in each round. Every round adds exactly 6 stitches. Each round’s total is:
- Rnd 7: 42 sts
- Rnd 8: 48 sts
- Rnd 9: 54 sts
- Rnd 10: 60 sts
- Rnd 11: 66 sts
- Rnd 12: 72 sts – stop here for the small basket
- Rnd 13: 78 sts
- Rnd 14: 84 sts – stop here for the medium basket
- Rnd 15: 90 sts
- Rnd 16: 96 sts – stop here for the large basket
Stagger the increases on even rounds from Rnd 6 onward so the circle stays round instead of turning hexagonal. To do this, put half of the plain stitches before the first increase and the other half after the last one.
At 4.5 stitches per inch, the circumferences are 16 in (40.6 cm) for the small basket, about 18.7 in (47.5 cm) for the medium and about 21.3 in (54.1 cm) for the large.
Basket Wall
Keep working in sage green with no increases.
- Wall Rnd 1: Sc in the BLO of each st around. (72 / 84 / 96)
This round makes a neat ridge along the bottom edge and turns the work upward.
- Wall Rnds 2–11: Sc in each st around. (72 / 84 / 96)
The wall is now about 2.4 in (6.1 cm) tall. Fasten off. You will add the rim after joining.
Strawberry Appliqué (Make 42)
Use rose pink and the 4.0 mm hook. Work each strawberry in rows, starting at the point.
- Row 1: Ch 2, 3 sc in the 2nd ch from the hook. (3)
- Row 2: Ch 1, turn, 2 sc in the first st, sc 1, 2 sc in the last st. (5)
- Row 3: Ch 1, turn, sc 5. (5)
- Row 4: Ch 1, turn, sc 5. (5)
- Edging: Do not turn. Ch 1. Sl st evenly down one side, work 1 sl st in the point, then sl st up the other side to Row 4. Fasten off and leave a 10 in (25.4 cm) tail for sewing.
Leaves: Join olive green with a sl st in the 2nd st of Row 4.
1. Ch 3, sl st in the 2nd ch from the hook, sc in the next ch, sl st in the same Row 4 st.
2. Sl st in the 3rd st and repeat from * to .
3. Sl st in the 4th st and repeat from * to .
You now have 3 leaves fanned across the top. Fasten off.
Seeds: With cream, embroider 3 straight stitches in a small triangle. Make each stitch about 0.125 in (0.3 cm) long.
Placement: Space the strawberries 6 stitches apart, about 1.3 in (3.3 cm). On Wall Rnd 5, count from the reference line and mark st 3, st 9, st 15 and every 6th stitch after that. The small basket gets 12 markers, the medium 14 and the large 16. Center a strawberry on each marker, with the point at Wall Rnd 3 and the leaves reaching Wall Rnd 7. Whipstitch around the pink edge.
Strap (Make 2)
Use sage green and the 4.5 mm hook.
- Foundation: Ch 95.
- Row 1: Sc in the back bump of the 2nd ch from the hook and in each ch across. (94)
- Row 2: Ch 1, turn, sl st in the BLO of each st across. (94)
The sl st row makes a raised, braided-looking ridge. The strap is about 21 in (53.3 cm) long and 0.5 in (1.3 cm) wide. Fasten off and leave a 24 in (61.0 cm) tail.
Strap stitch map (counted from the bottom end):
- Sts 1–14: large basket, about 3 in (7.6 cm)
- Sts 15–25: gap, about 2.4 in (6.1 cm)
- Sts 26–39: medium basket, about 3 in (7.6 cm)
- Sts 40–50: gap, about 2.4 in (6.1 cm)
- Sts 51–64: small basket, about 3 in (7.6 cm)
- Sts 65–94: free top, about 6.7 in (17.0 cm)
Check: 14 + 11 + 14 + 11 + 14 + 30 = 94 sts. Mark sts 14, 25, 39, 50 and 64 on both straps.
Make All Pieces
Before joining, check that you have:
- Sage green: 3 baskets (72, 84 and 96 sts) and 2 straps (94 sts each)
- Strawberries: 42 in total (12 + 14 + 16), already sewn on
Layout:
        /\
       /  \        strap tops, sts 65-94
   [ SMALL  ]     72 sts, 12 strawberries
   |        |     gap, sts 40-50
   [ MEDIUM ]     84 sts, 14 strawberries
   |        |     gap, sts 15-25
   [ LARGE  ]     96 sts, 16 strawberries
Joining
Strap positions: On each basket, place the two straps in gaps between strawberries, exactly half a round apart:
- Small: after st 18 and after st 54 (36 sts apart)
- Medium: after st 24 and after st 66 (42 sts apart)
- Large: after st 24 and after st 72 (48 sts apart)
Every position is a multiple of 6, so each strap sits between two strawberries. Because the two straps are exactly opposite each other, every basket hangs level.
Method: Place the strap with its sc side against the wall and its braided side facing out. Use the long tail to whipstitch one strap stitch to each wall round. On the large basket, sew strap st 1 to Wall Rnd 1 and continue up to strap st 11 at Wall Rnd 11. Leave strap sts 12–14 free for now; they will go against the rim. On the medium basket, start at strap st 26 (Wall Rnds 1–11 = sts 26–36). On the small basket, start at strap st 51 (sts 51–61).
Tension: Sew firmly, but don’t pull. The strap should lie flat without puckering the wall.
Size checkpoint: Before the rim is added, measure along the strap from the top of Wall Rnd 11 on a lower basket to the base ridge of the basket above. It should be 14 sts, about 3.1 in (7.9 cm).
Border: Cream Picot Rim
Border gauge: the same as the basket, 4.5 sc per inch with the 4.5 mm hook. Work the rim on each basket, reaching behind the straps.
- Rim Rnd 1: Join cream at the reference line. Ch 1, sc in each st around, and join. (72 / 84 / 96)
- Rim Rnd 2: Ch 1, sc in the next st, bead picot, sc in the next st; repeat around and join. This gives 72 / 84 / 96 sc plus 36 / 42 / 48 bead picots.
Fasten off. Tack the free strap stitches to the rim: sts 12–14 on the large basket, 37–39 on the medium and 62–64 on the small. Leave the picots free.
Why the math works: Every basket count is a multiple of 6, so the 2-stitch picot repeat always divides evenly. Rim Rnd 1 adds no stitches, so each circumference stays at 16 in (40.6 cm), 18.7 in (47.5 cm) or 21.3 in (54.1 cm). The strap positions are even stitch numbers, so they also fall between picot repeats.
Peak: Bring the free tops of both straps together. Overlap the last 4 sts (sts 91–94) and whipstitch through both layers.
Final Blocking
- Mist each basket until it is damp but not soaked.
- Fill each basket with a rolled towel or a toilet roll to support the wall.
- Press each base flat and push each wall straight up.
- Pinch each bead picot into a round shape.
- Lay the strap gaps straight and flat.
- Let everything dry completely, about 24 hours.
- Hang the organizer on the peg and check that all three tiers are level.
Final Quality-Control Checklist
- Base counts are 72, 84 and 96 sts
- Each wall is 11 rounds, about 2.4 in (6.1 cm) tall
- There are 12, 14 and 16 strawberries, spaced 6 sts apart
- Each strap has 94 sts and is about 21 in (53.3 cm) long
- The straps sit exactly opposite each other on every basket
- Both gaps between tiers are 11 sts
- The rims have 36, 42 and 48 picots
- All yarn ends are woven in
Troubleshooting
- Base ruffles: Your tension is too loose. Go down a hook size, or recount your increases.
- Base cups: Your tension is too tight. Go up a hook size.
- Wall won’t stand up: Make sure Wall Rnd 1 was worked in the BLO.
- Strawberries crowd each other: Make the appliqués with a 3.75 mm hook.
- Basket tilts: One strap is in the wrong place. Recount the strap positions.
- Tiers hang unevenly: Check the stitch-map markers on both straps.
- Picots flop: Tighten your clusters, then reshape them while damp.
Care
Hand wash in cool water with a mild soap. Lay flat to dry and reshape each basket, and don’t hang the organizer while it is still wet.
Final Notes
Here is how the measurements fit together:
- The base counts (72, 84 or 96 sts) set each basket’s circumference.
- Eleven wall rounds give about 2.4 in (6.1 cm) of height.
- The 6-stitch spacing places every strawberry and every strap.
- The 94-stitch strap map keeps the tiers evenly spaced, for a finished height of about 20 in (50.8 cm).
Check each of these and your organizer will hang straight and hold its shape.
Happy crocheting!