

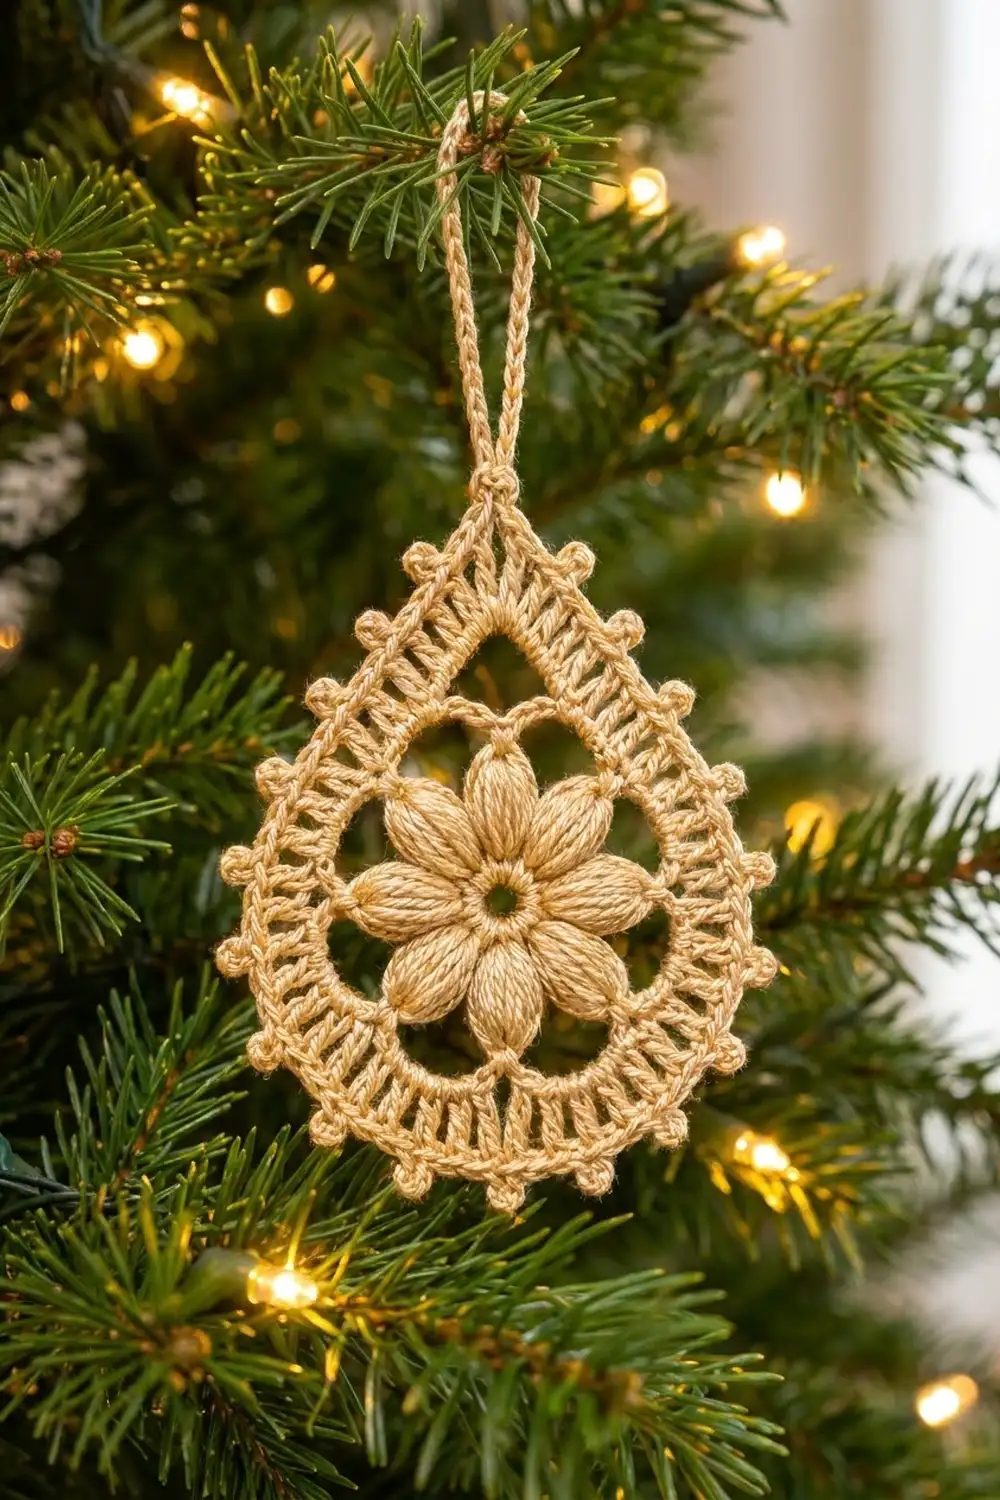
The Golden Bloom Teardrop is a lacy thread ornament with a puffy eight-petal flower at its center. Around the flower sit a ring of open chain arches, a ladder band that grows deeper toward the rounded bottom, and a picot edge. A slim chain loop at the point lets it hang on a tree branch.
It is worked in one color. A champagne, ivory or soft gold cotton looks warm in tree lights and suits rustic, Scandinavian and vintage-style decorations. The puff petals add texture, and the ladder band and picots keep the outline light.
This pattern uses US crochet terms. The finished ornament measures 3.5 in (8.9 cm) wide by 4 in (10.2 cm) tall, not counting the hanging loop. The loop adds about 1.25 in (3.2 cm).
The whole ornament is one piece, worked in the round without turning. You start with a single-crochet ring, add the puff flower and chain loops, then shape the teardrop with a chain bridge at the top and stitches of different heights in the ladder band. Two edging rounds add the border, the picots and the hanging loop.
Finished Size and Construction
- Finished size: 3.5 in (8.9 cm) wide x 4 in (10.2 cm) tall; 5.25 in (13.3 cm) tall including the loop
- Skill level: Intermediate
- Terminology: US crochet terms
- Yarn weight: Size 3 mercerized crochet cotton (CYC 1, super fine / heavy thread)
- Hook: 2.5 mm
- Number of pieces: 1
- Layout: A single teardrop motif with a hanging loop at the point
- Piece size: 3.5 in x 4 in (8.9 cm x 10.2 cm)
- Size before border (after Rnd 6): 3 in x 3.5 in (7.6 cm x 8.9 cm)
- Border depth: 0.25 in (0.6 cm) on every side
Materials
Yarn: Use a smooth, mercerized size 3 cotton. It shows the puff stitches clearly and holds its shape after blocking. Avoid fuzzy or very soft yarns, because they blur the ladder band and the picots.
- Champagne / natural beige (Main Color): 10 g, about 50 m. One ornament uses about 6 g (30 m).
These quantities include a margin for a test swatch and for weaving in ends. If you plan a set of ornaments, multiply the 6 g (30 m) per ornament and add one extra ornament’s worth.
Tools:
– 2.5 mm crochet hook
– Tapestry needle
– Scissors
– Rustproof pins and a blocking mat or folded towel
– Spray bottle, or fabric stiffener (optional)
– Ruler or tape measure
Abbreviations (US Terms)
- ch – chain
- sl st – slip stitch
- sc – single crochet
- hdc – half double crochet
- dc – double crochet
- tr – treble crochet
- sk – skip
- sp – space
- st(s) – stitch(es)
- Rnd – round
Special stitches:
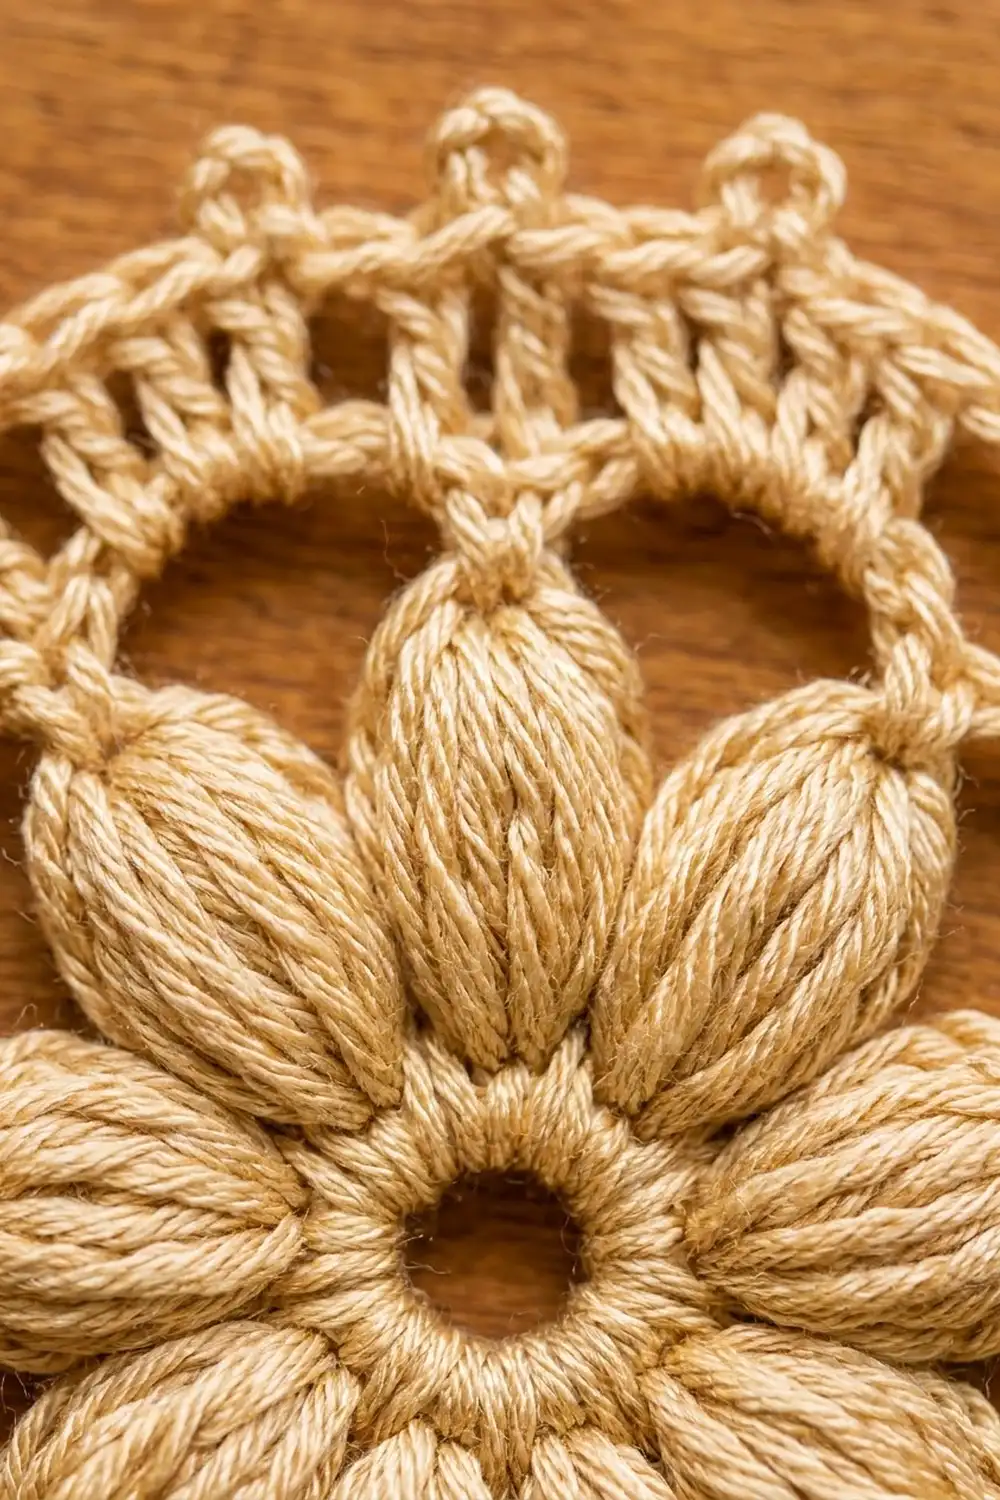
- Puff: Yarn over, insert hook in the stitch, yarn over and pull up a loop to about 0.5 in (1.3 cm). Repeat this 3 more times in the same stitch (9 loops on hook). Yarn over and draw through all 9 loops, then ch 1 to close. The closing ch 1 is not counted as a stitch.
- Picot: Ch 3, then sl st in the 3rd ch from the hook.
Gauge and Checkpoints
Lace ornaments don’t need a gauge swatch in the usual sense. Instead, make one test ornament through Rnd 3 and measure it before you go on.
- Main gauge: The flower through Rnd 3 measures 2.25 in (5.7 cm) across, from loop tip to loop tip.
- Border gauge: 6 sc = 1 in (2.5 cm) along the edge.
Checkpoints (measured lightly flattened, before blocking):
– After Rnd 1: the center hole is about 0.3 in (0.8 cm)
– After Rnd 2: 1.5 in (3.8 cm) across the petals
– After Rnd 3: 2.25 in (5.7 cm)
– After Rnd 5: 2.5 in (6.4 cm) wide x 3 in (7.6 cm) tall
– After Rnd 6: 3 in (7.6 cm) x 3.5 in (8.9 cm)
– After Rnd 7: 3.25 in (8.3 cm) x 3.75 in (9.5 cm)
– After Rnd 8: 3.5 in (8.9 cm) x 4 in (10.2 cm)
If your test is too big by more than 0.25 in (0.6 cm) at Rnd 3, go down to a 2.25 mm hook. If it’s too small by the same amount, go up to a 2.75 mm hook. A small difference is fine, because blocking can adjust about 0.125 in (0.3 cm) in each direction.
Pattern
Rnd 1 – Center Ring
Make a magic ring. Ch 1, then work 16 sc in the ring. Pull the tail until the center hole is about 0.3 in (0.8 cm), then sl st in the first sc to join.
Stitch count: 16 sc.
Rnd 2 – Puff Flower
Ch 1. [Puff in next sc, ch 2, sk next sc] 8 times. Sl st in the top of the first puff to join.
Stitch count: 8 puffs and 8 ch-2 sps.
Each puff is one petal. Pull the loops to the same height every time so the petals come out the same length and look plump. The ch-2 spaces sit between the petals.
Rnd 3 – Chain Loops
Sl st in the next ch-2 sp. Ch 1, then work sc in the same sp, ch 7. [Sc in next ch-2 sp, ch 7] 7 times. Sl st in the first sc to join.
Stitch count: 8 sc and 8 ch-7 loops.
Each loop is anchored between two petals and arches around the tip of a petal. Check the size here: the piece should measure 2.25 in (5.7 cm).
Rnd 4 – Teardrop Foundation
Sl st in the first 3 ch of the next loop, so your hook is at the 4th (center) ch of loop 1.
Ch 1, then work sc in the 4th ch of loop 1. Ch 11, then sc in the 4th ch of loop 2. [Ch 5, sc in the 4th ch of the next loop] 6 times. Ch 5, then sl st in the first sc to join.
Stitch count: 8 sc + one ch-11 + seven ch-5 = 54 sts (8 + 11 + 35).
The ch-11 bridge between loops 1 and 2 becomes the top of the teardrop. It is longer than the ch-5 spaces, so it will rise into the point and leave the small open triangle above the flower. The ch-5 that falls directly opposite the bridge (between loops 5 and 6) is the bottom center.
Rnd 5 – Shaping Ring
Ch 1, then work sc in the same sc as the join. Work sc in each of the next 5 ch, 3 sc in the 6th ch (the center of the ch-11), and sc in each of the last 5 ch. Then work sc in each sc and each ch around. Sl st in the first sc to join.
Stitch count: 54 sts worked 1 per existing st + 2 extra at the point = 56 sc.
The middle sc of the 3-sc group is the point stitch. The other 55 sc split into 27 per side plus 1 bottom-center sc (the 28th st after the point, which sits in the center ch of the bottom ch-5). Check the size: the piece should measure 2.5 in (6.4 cm) wide x 3 in (7.6 cm) tall.
Rnd 6 – Graduated Ladder Band
Sl st in the next 7 sc so your hook is in the point stitch.
Ch 1, then work (sc, ch 2, sc) in the point stitch.
Now work the next 55 sts as follows:
- [Ch 1, sk 1, hdc in next st] 4 times
- [Ch 1, sk 1, dc in next st] 5 times
- [Ch 1, sk 1, tr in next st] 9 times
- [Ch 1, sk 1, dc in next st] 5 times
- [Ch 1, sk 1, hdc in next st] 4 times
- Ch 1, sk last st, sl st in the first sc to join.
Stitch count: 2 sc + ch-2 point sp + 27 ladder sts (4 hdc, 5 dc, 9 tr, 5 dc, 4 hdc) + 28 ch-1 sps.
The 5th tr lands exactly in the bottom-center sc, so the band is symmetrical. The posts grow from hdc near the point to tr at the bottom. That is what turns the round flower into a teardrop: deep at the bottom and short at the top. Check the size: 3 in (7.6 cm) x 3.5 in (8.9 cm).
Border
The border is Rnds 7 and 8. It adds 0.25 in (0.6 cm) on every side, at the border gauge of 6 sc = 1 in (2.5 cm).
Rnd 7 – Single Crochet Edge
Sl st in the ch-2 point sp. Ch 1, then work (sc, ch 2, sc) in the same sp. Sc in the next sc.
Then work sc in each ch-1 sp and in each ladder st around. In each of the 10 ch-1 sps that touch a tr, work 2 sc instead of 1. These are the sps from the one between the last dc and the first tr through the one between the last tr and the next dc.
Sc in the last sc, then sl st in the first sc to join.
Stitch count: 59 sts worked 1 per existing st/sp + 10 extra = 69 sc, plus the ch-2 point sp.
The 59 are: 2 sc in the point, 1 sc on each Rnd 6 sc (2 total), 27 on the ladder sts, and 28 in the ch-1 sps. Per side: 34 sc from the point down to the bottom, plus 1 bottom-center sc (34 + 34 + 1 = 69).
Rnd 8 – Picots and Hanging Loop
Sl st in the ch-2 point sp. Ch 1, then work (sc, ch 18, sc) in the same sp. The ch-18 is the hanging loop.
Sc in the next 3 sc, then work a picot. [Sc in next 4 sc, picot] 16 times. Sc in the last 2 sc. Sl st in the first sc to join, then fasten off.
Stitch count: 71 sc (69 + 2 at the point), 17 picots, 1 ch-18 loop.
Per side: 8 picots, plus 1 picot centered at the bottom (8 + 8 + 1 = 17).
Why the math works: 3 + (16 x 4) + 2 = 69, so every Rnd 7 sc is used exactly once. The picots fall on sc number 3, 7, 11 and so on up to 67, counting from the point. The 9th picot sits on sc 35, the bottom-center stitch, which mirrors the layout on both sides. The 10 extra sc in Rnd 7 sit where the tr section makes the outline longest. Without them, the bottom edge would cup. The point gets no extra sc in Rnd 7 beyond its (sc, ch 2, sc), so it stays sharp.
Weave in all ends along the back of the sc rounds.
Final Blocking
- Wet the ornament fully in cool water. Then roll it in a towel to remove the extra water.
- Lay it right side up on the blocking mat.
- Pin the point first, pulling it up so the open triangle above the flower opens fully.
- Pin the bottom-center picot so the ornament measures 4 in (10.2 cm) from the point to the bottom picot.
- Pin the widest picot on each side so the ornament measures 3.5 in (8.9 cm) across.
- Pin each remaining picot, working evenly from the bottom to the point, so the curve is smooth.
- Shape the chain loops of Rnd 3 into even arches and plump each puff with a fingertip.
- For a stiffer ornament, brush on a light coat of fabric stiffener now.
- Lay the hanging loop flat and straight. Let everything dry completely, about 12 to 24 hours, before unpinning.
Final Quality-Control Checklist
- The center hole is small and round.
- There are 8 puff petals of equal length.
- There are 8 chain loops, each anchored between two petals.
- The top triangle is open and centered above the flower.
- The ladder band is symmetrical: 4 hdc, 5 dc, 9 tr, 5 dc and 4 hdc.
- The edge has 17 picots, with 1 picot centered at the bottom.
- The size is 3.5 in (8.9 cm) x 4 in (10.2 cm), with a loop of about 1.25 in (3.2 cm).
- All ends are woven in and invisible from the front.
Troubleshooting
- Petals are uneven: Pull every puff loop to the same 0.5 in (1.3 cm) height, then close each puff firmly.
- The point is rounded or droopy: Check that you worked 3 sc in the 6th ch in Rnd 5 and (sc, ch 2, sc) in the point in Rnds 6 to 8. Pin the point well during blocking.
- The teardrop is lopsided: Recount Rnd 6. The 5th tr must sit in the bottom-center sc. If it doesn’t, rip back to the point and work the round again.
- The bottom edge cups: Check that you worked 2 sc in each of the 10 tr sps in Rnd 7.
- The edge ruffles: Your border tension is looser than your body tension. Work Rnds 7 and 8 with a 2.25 mm hook.
- The picots are crowded on one side: Recount Rnd 7. It must be 69 sc, or the 4-sc repeat won’t come out even.
Care
Hand wash in cool water with a mild soap, then press out the water in a towel and dry flat, pinned to shape. If you used stiffener, refresh it with a light coat after washing.
Final Notes
Here is the measurement chain to check against. The center ring has a 0.3 in (0.8 cm) hole. The flower measures 1.5 in (3.8 cm) after Rnd 2 and 2.25 in (5.7 cm) after Rnd 3. The shaped ring after Rnd 5 measures 2.5 in x 3 in (6.4 cm x 7.6 cm). The ladder band brings it to 3 in x 3.5 in (7.6 cm x 8.9 cm). The border adds 0.25 in (0.6 cm) per side, for a finished ornament of 3.5 in x 4 in (8.9 cm x 10.2 cm).
If each checkpoint matches, the finished teardrop will come out symmetrical with an evenly spaced picot edge.
Happy crocheting!