

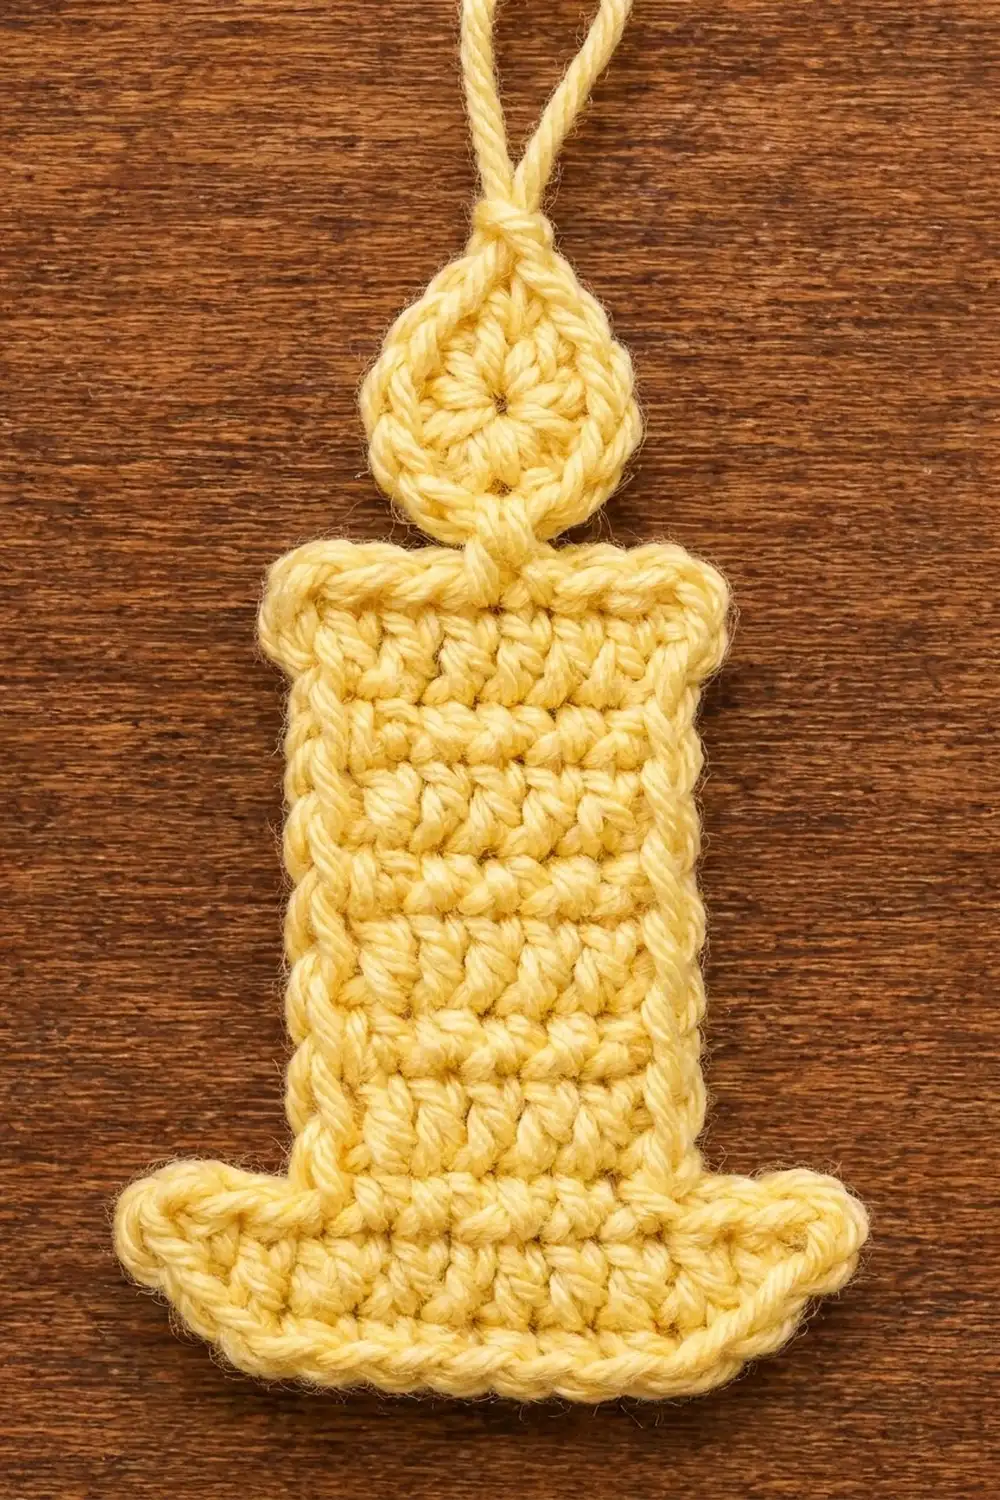
This little candle is a flat Christmas ornament made in one color, a soft butter yellow. It has a wide holder with upturned tips, a straight candle body, and a teardrop flame with a small pointed top and a chain hanging loop.
The look is simple and cozy. The double-crochet body shows clear horizontal ridges, like a hand-dipped taper. A single-crochet edging frames the whole shape so it lies flat and is easy to see on a tree branch. Because it uses only one color, you have no color changes and very few ends to weave in.
The pattern uses US crochet terms. The finished ornament is 4.5 in (11.4 cm) wide at the holder and 6.25 in (15.9 cm) tall without the loop. The hanging loop adds 2 in (5.1 cm).
Construction is quick. First you crochet the holder in rows and keep going with the candle body over the center stitches. Then you edge the holder and body in one round, make the flame in the round, and sew it on. Last, you add the chain loop at the flame tip.
Finished Size and Construction
- Finished size: 4.5 in (11.4 cm) wide x 6.25 in (15.9 cm) tall, loop not included
- Skill level: Easy
- Terminology: US crochet terms
- Yarn weight: Worsted (#4)
- Hook: 4.5 mm (US 7)
- Number of pieces: 1 finished ornament (holder and body worked in one piece, plus a small flame sewn on)
- Layout: Single ornament, nothing to assemble
- Holder and body before edging: holder 4 in (10.2 cm) wide x 0.5 in (1.3 cm) tall; body 2.5 in (6.4 cm) wide x 3.5 in (8.9 cm) tall; total 4 in (10.2 cm) tall
- Edging depth: 0.25 in (0.6 cm) on every side
- Flame: 1.5 in (3.8 cm) wide x 2 in (5.1 cm) tall including the tip
Materials
Use a smooth worsted-weight cotton or cotton blend. Cotton shows each stitch clearly and keeps a flat shape, which matters for the holder tips and the flame point. Acrylic works too, but steam-block it gently. Pale yellow, cream, or soft gold all suit the design. Avoid fuzzy yarns, because they hide the ridges.
- Butter yellow, worsted (#4): 15 g, about 26 m (28 yd)
These amounts include extra for a gauge check and sewing tails.
Tools
– 4.5 mm (US 7) crochet hook
– Tapestry needle
– Scissors
– Stitch marker (optional)
– Ruler or tape measure
– Blocking mat and rust-proof pins
– Spray bottle or steam iron
Abbreviations (US Terms)
- ch: chain
- sl st: slip stitch
- sc: single crochet
- hdc: half double crochet
- dc: double crochet
- st(s): stitch(es)
- RS: right side
- MR: magic ring
Special stitch: Lip point. Work (hdc, dc, hdc) all in the same stitch. This makes the small upturned tip at each outer top corner of the holder.
Gauge and Checkpoints
Gauge: 16 dc and 8 dc rows = 4 in (10.2 cm). In single crochet, 16 sts = 4 in (10.2 cm). So each stitch is 0.25 in (0.6 cm) wide and each dc row is 0.5 in (1.3 cm) tall.
Use the holder and the first two body rows as your test piece. The piece is small, so this also works as your gauge swatch.
Checkpoints:
– After Row 2 (holder): 4 in (10.2 cm) wide x 0.5 in (1.3 cm) tall
– After Row 4 (two body rows): body 2.5 in (6.4 cm) wide; holder plus body 1.5 in (3.8 cm) tall
– After Row 9 (body finished): body 3.5 in (8.9 cm) tall; whole piece 4 in (10.2 cm) tall
– After edging: 4.5 in (11.4 cm) wide at the holder, 3 in (7.6 cm) wide at the body, 4.5 in (11.4 cm) tall
– Flame after Rnd 1: about 1 in (2.5 cm) across
– Flame after Rnd 2: 1.5 in (3.8 cm) wide
If your piece is too big, switch to a 4 mm (US 6) hook. If it is too small, switch to a 5 mm (US 8) hook. Change hooks before you start the body, because the holder width sets the size of everything above it.
Holder
The holder is two rows of sc that make the wide, low base.
Foundation: Ch 17.
Row 1 (RS): Sc in 2nd ch from hook and in each ch across. (16 sc)
Row 2: Ch 1, turn. Sc in each st across. (16 sc)
Check: 4 in (10.2 cm) wide x 0.5 in (1.3 cm) tall. Do not fasten off.
Candle Body
You work the body over the center 10 sts of the holder. Three sts stay free at each end. These become the holder top and the lip points when you do the edging.
Row 3: Ch 1, turn. Sl st loosely in the first 3 sts. Ch 2 (does not count as a st). Dc in the next st and in each of the next 9 sts, leaving the last 3 sts unworked. (10 dc)
Rows 4–9: Ch 2 (does not count as a st), turn. Dc in each st across. (10 dc in each row)
You now have 7 rows of dc (Rows 3–9). Check: body 2.5 in (6.4 cm) wide x 3.5 in (8.9 cm) tall; whole piece 4 in (10.2 cm) tall.
Tip: keep the sl sts in Row 3 loose. If they are tight, the holder top pulls in and the lip points won’t sit level.
Fasten off, leaving a short tail, and weave it in.
Edging Round
The edging is one round of sc around the holder and body. It smooths the dc row ends, squares the corners, and makes the two upturned lip points.
Edging gauge: 1 sc per stitch, 2 sc per dc row end, 1 sc per sc row end, and 3 sc in each square corner.
With RS facing, join yarn with a sl st in the last dc of Row 9 (the top right corner of the body).
Top edge: Ch 1. Work 3 sc in the same st (corner), sc in next 8 sts, 3 sc in the last st (corner).
Count: 10 sts worked 1 each + 4 extra corner sts = 14 sc.
Left body side: Work 2 sc in each of the 7 dc row ends.
Count: 14 sc.
Left holder top: You are now at the 3 free holder sts. Sc in the next 2 sts, then work a Lip point in the outer st. On the side covered by sl sts, work into the top loops of those sl sts.
Count: 3 sts worked 1 each + 2 extra = 5 sts (2 sc, hdc, dc, hdc).
Left holder end: Sc in each of the 2 sc row ends.
Count: 2 sc.
Bottom edge: Working into the free loops of the foundation chain, 3 sc in the first ch (corner), sc in next 14 ch, 3 sc in the last ch (corner).
Count: 16 sts worked 1 each + 4 extra = 20 sc.
Right holder end: Sc in each of the 2 sc row ends.
Count: 2 sc.
Right holder top: Lip point in the outer free st, sc in the next 2 sts.
Count: 3 sts worked 1 each + 2 extra = 5 sts.
Right body side: Work 2 sc in each of the 7 dc row ends.
Count: 14 sc.
Sl st to the first sc to join. Fasten off and weave in.
Round total: 14 + 14 + 5 + 2 + 20 + 2 + 5 + 14 = 76 sts.
Why the math works: A dc row is 0.5 in (1.3 cm) tall and an sc is 0.25 in (0.6 cm) wide. So 2 sc per row end matches the body height exactly: 7 rows x 2 = 14 sc = 3.5 in (8.9 cm). The holder’s sc rows are about as tall as an sc is wide, so 1 sc per row end keeps the ends flat. Each corner gets 2 extra sts (3 sc total in the corner st), which is the standard way to turn a square corner on a flat edge. The lip points put taller sts in the outer st, so the tips rise without pulling on the holder top.
Check: 4.5 in (11.4 cm) wide at the holder, 3 in (7.6 cm) wide at the body, 4.5 in (11.4 cm) tall.
Flame
The flame is a small circle worked in the round, with a pointed tip. The magic ring leaves the small hole in the center that you can see in the finished piece.
Rnd 1: Make a MR. Ch 2 (does not count as a st), 12 dc in the ring. Pull the ring snug but leave a small opening. Sl st to the first dc to join. (12 dc)
Check: about 1 in (2.5 cm) across.
Rnd 2: Ch 1. Sc in the same st as the join, [2 sc in the next st, sc in the next st] 5 times, sc in the last st. (17 sc)
The count is 1 + (5 x 3) + 1 = 17 sc.
Tip: Ch 3, sl st in the 2nd ch from hook, sc in the next ch. Sl st to the first sc of Rnd 2 to join.
Check: 1.5 in (3.8 cm) wide x 2 in (5.1 cm) tall including the tip.
Fasten off, leaving a 12 in (30.5 cm) tail for sewing.
Hanging Loop and Assembly
Hanging loop: Join yarn with a sl st in the sl st at the very top of the flame tip. Ch 16. Sl st in the same spot. Fasten off and weave in. The loop hangs about 2 in (5.1 cm) above the tip.
Attach the flame: Lay the body RS up. Place the flame right above the center of the top edge so the bottom of the flame overlaps the body edging by 0.25 in (0.6 cm). With the sewing tail, make 3–4 small whip stitches through the back of the flame and the top edging only, so nothing shows on the front. Weave in the tail.
Check: total height 6.25 in (15.9 cm), loop not included. That is 4.5 in (11.4 cm) for the edged holder and body, plus 1.75 in (4.4 cm) of flame above the overlap.
Final Blocking
- Lightly mist the ornament with water, or hold a steam iron 1 in (2.5 cm) above it. Never press cotton flat with the iron.
- Lay it RS up on the blocking mat.
- Pin the bottom of the holder in a straight line at 4.5 in (11.4 cm).
- Pin the body sides parallel, 3 in (7.6 cm) apart, keeping the top edge square.
- Pin each lip point slightly up and out so the tips curve like a candle dish.
- Shape the flame into a teardrop 1.5 in (3.8 cm) wide, with the tip pinned straight up.
- Check that the full height is 6.25 in (15.9 cm).
- Let it dry completely before you remove the pins.
Final Quality-Control Checklist
- Holder is 16 sts wide and 2 rows tall
- Body is 10 sts wide and 7 dc rows tall, centered with 3 free sts on each side
- Edging round totals 76 sts
- Both lip points match in height and angle
- Top and bottom corners are square, not ruffled
- Flame has 17 sc in Rnd 2 and a clear pointed tip
- Flame is centered over the body
- Hanging loop is secure and sits straight above the flame tip
- All tails are woven in and trimmed
- Piece lies flat with no cupping or waves
Troubleshooting
Body leans to one side: The body probably isn’t centered. Make sure Row 3 starts in the 4th st and ends with 3 sts unworked.
Body gets wider or narrower: Check each row for exactly 10 dc. The ch 2 at the start of each row does not count as a stitch.
Sides wave along the body: You may be putting 3 sc into some row ends. Use exactly 2 sc per dc row end.
Sides pull in or pucker: Your edging is too tight. Relax your tension, or go up half a hook size for the edging only.
Lip points are flat: Make sure all three sts of the Lip point go into the outer free st, and pin them upward when blocking.
Flame cups: Rnd 2 is too tight. Work it more loosely or use a 5 mm (US 8) hook.
Flame ruffles: You added extra increases. Recount Rnd 2; it should have 17 sc.
Center hole is too large: Pull the magic ring tail tighter before you weave it in.
Ornament twists when hanging: Center the loop right on the tip, and sew the flame only through the back so it stays flat.
Care
Hand wash in cool water with mild soap, roll in a towel to remove water, and dry flat, reshaping the lip points and flame tip. Store flat between seasons.

Final Notes
Each measurement builds on the one before. The holder is 16 sts at 0.25 in (0.6 cm) each, so it is 4 in (10.2 cm) wide. The body is 10 sts, or 2.5 in (6.4 cm) wide, and 7 dc rows at 0.5 in (1.3 cm) each, so it is 3.5 in (8.9 cm) tall. Together the holder and body are 4 in (10.2 cm) tall.
The 76-stitch edging adds 0.25 in (0.6 cm) on every side. That makes the holder 4.5 in (11.4 cm) wide, the body 3 in (7.6 cm) wide, and the height 4.5 in (11.4 cm). The flame adds 1.75 in (4.4 cm) above the overlap, for a finished height of 6.25 in (15.9 cm), plus the 2 in (5.1 cm) loop.
If your holder matches the gauge, the rest of the ornament will come out the right size. Make one for your tree, a few to tie onto gifts, or a small set for a mantel garland.
Happy crocheting!