

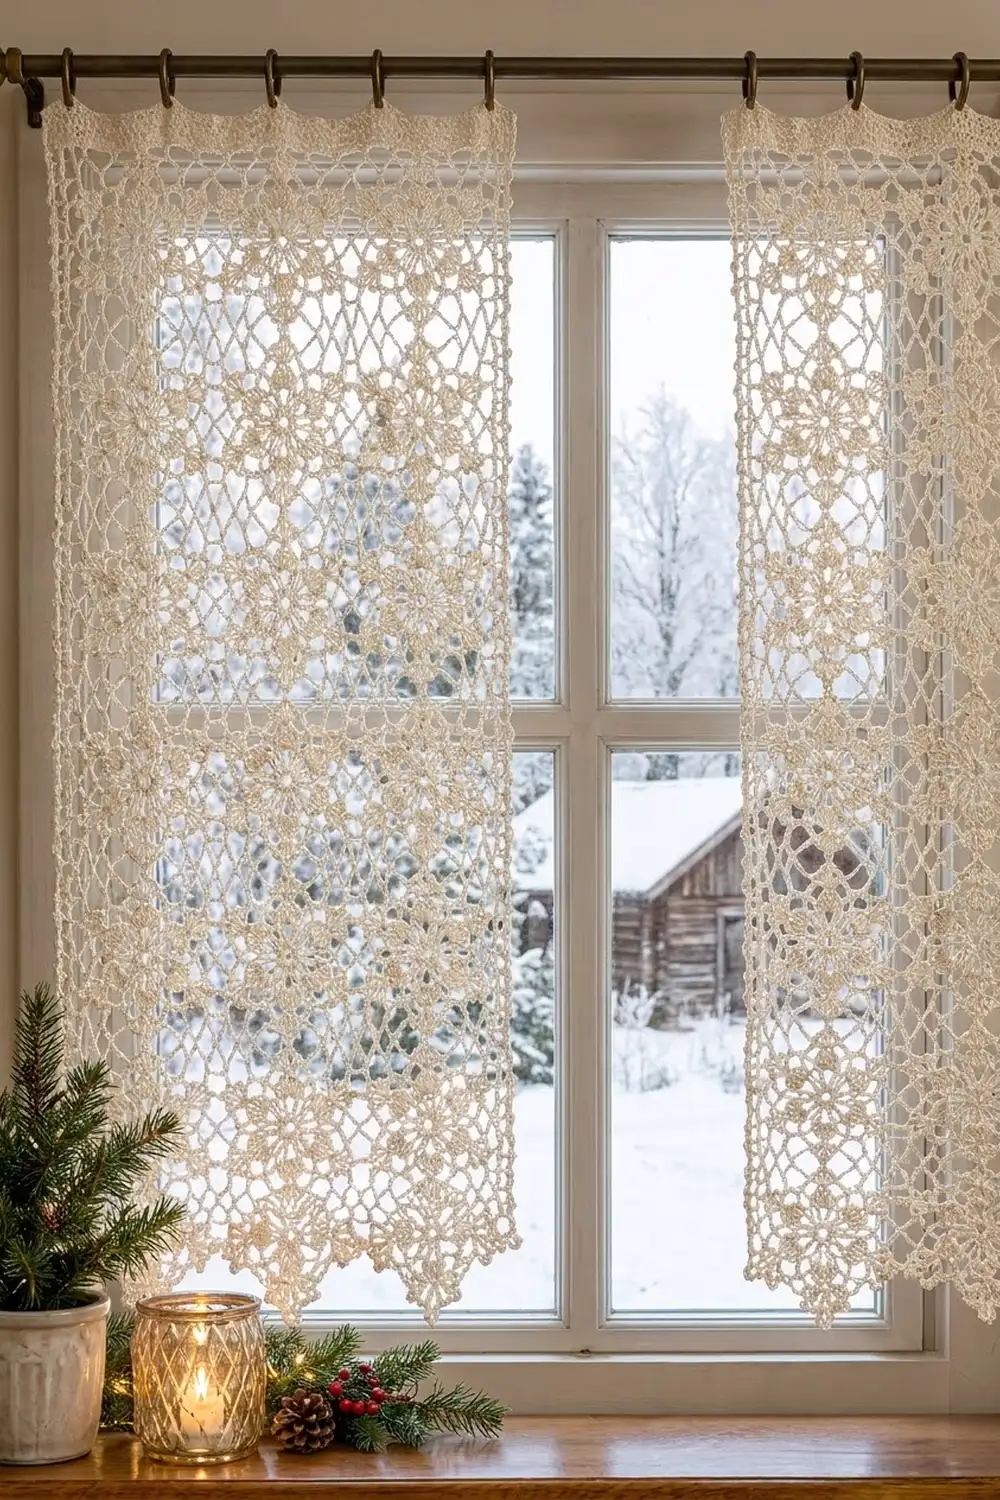
These lace café curtains are made from small six-pointed snowflake motifs joined point to point. The open diamonds between the motifs look like frost on a window. Each panel has a solid header with hanging tabs at the top, and the bottom edge is left as a row of snowflake points.
The pattern uses one color, a soft cream or ivory cotton thread. It makes a quiet, wintry piece that also works all year. Morning light shows off the petals in the middle of each motif and the picots around the points.
All instructions use US crochet terms. Each finished panel is about 12 in (30.5 cm) wide and 38 in (96.5 cm) long, tabs included. The pattern makes two matching panels.
You make each motif in five rounds and join it to its neighbors on the last round (join-as-you-go). Each panel is a grid of 3 motifs across and 10 down. Then you add a header with 6 tab loops and a light chain edging along both sides.
Finished Size and Construction
- Finished size (one panel): 12 in (30.5 cm) wide × 38 in (96.5 cm) long, including tabs
- Skill level: Intermediate
- Terminology: US crochet terms
- Yarn weight: Size 3 mercerized cotton crochet thread (fingering/lace weight)
- Hook: 2.25 mm (US B-1)
- Number of pieces: 60 motifs (30 per panel), joined into 2 panels
- Layout: 3 motifs across × 10 motifs down per panel
- Piece size: one motif measures 4 in (10.2 cm) from side point to side point
- Size before border: 12 in (30.5 cm) × 35 in (88.9 cm) of motif grid per panel
- Border depth: header adds 2 in (5.1 cm) above the top points, plus tabs of about 1 in (2.5 cm). The side edging adds no width.
Materials
Pick a smooth, mercerized cotton thread in size 3. It holds the picots crisply, blocks well, and does not stretch on the rod. Avoid fuzzy blends. They blur the lace and make the open spaces look muddy.
- Cream / ivory (only color): 250 g, about 750 m (820 yd), enough for both panels
Tools:
- 2.25 mm (US B-1) crochet hook
- Tapestry needle with a small eye
- Rust-proof pins and a blocking board or foam mats at least 14 in × 40 in (35.6 cm × 101.6 cm)
- Spray bottle
- Measuring tape
- Locking stitch markers
The quantity includes a margin of about 15% for gauge swatches, the joining and weaving in.
Abbreviations (US Terms)
- ch – chain
- sl st – slip stitch
- sc – single crochet
- dc – double crochet
- tr – treble crochet (yo twice)
- dtr – double treble crochet (yo 3 times)
- trtr – triple treble crochet (yo 4 times)
- sp(s) – space(s)
- st(s) – stitch(es)
- RS – right side
- p (picot): ch 3, sl st in 3rd ch from hook.
- jp (joining picot): ch 1, sl st in the matching picot of the finished neighbor motif, ch 1, sl st in the base of the first ch. A joining picot replaces a normal picot on any point you join.
Gauge and Checkpoints
Make one complete motif and block it before you start the panels. Measure it after each round:
- After Round 1: 0.75 in (1.9 cm) across
- After Round 3 (petals): 2.25 in (5.7 cm) across
- After Round 4: 3 in (7.6 cm) across
- After Round 5, blocked: 4 in (10.2 cm) from side point to side point
Header gauge: 18 dc = 3 in (7.6 cm), and 4 rows of dc = 1.5 in (3.8 cm).
If your motif comes out over 4 in (10.2 cm), go down to a 2 mm hook. If it is smaller than 3.75 in (9.5 cm), go up to a 2.5 mm hook. Being 1/8 in (0.3 cm) off per motif grows to 3/8 in (1.0 cm) across the width and 1.25 in (3.2 cm) down the length, so this check matters.
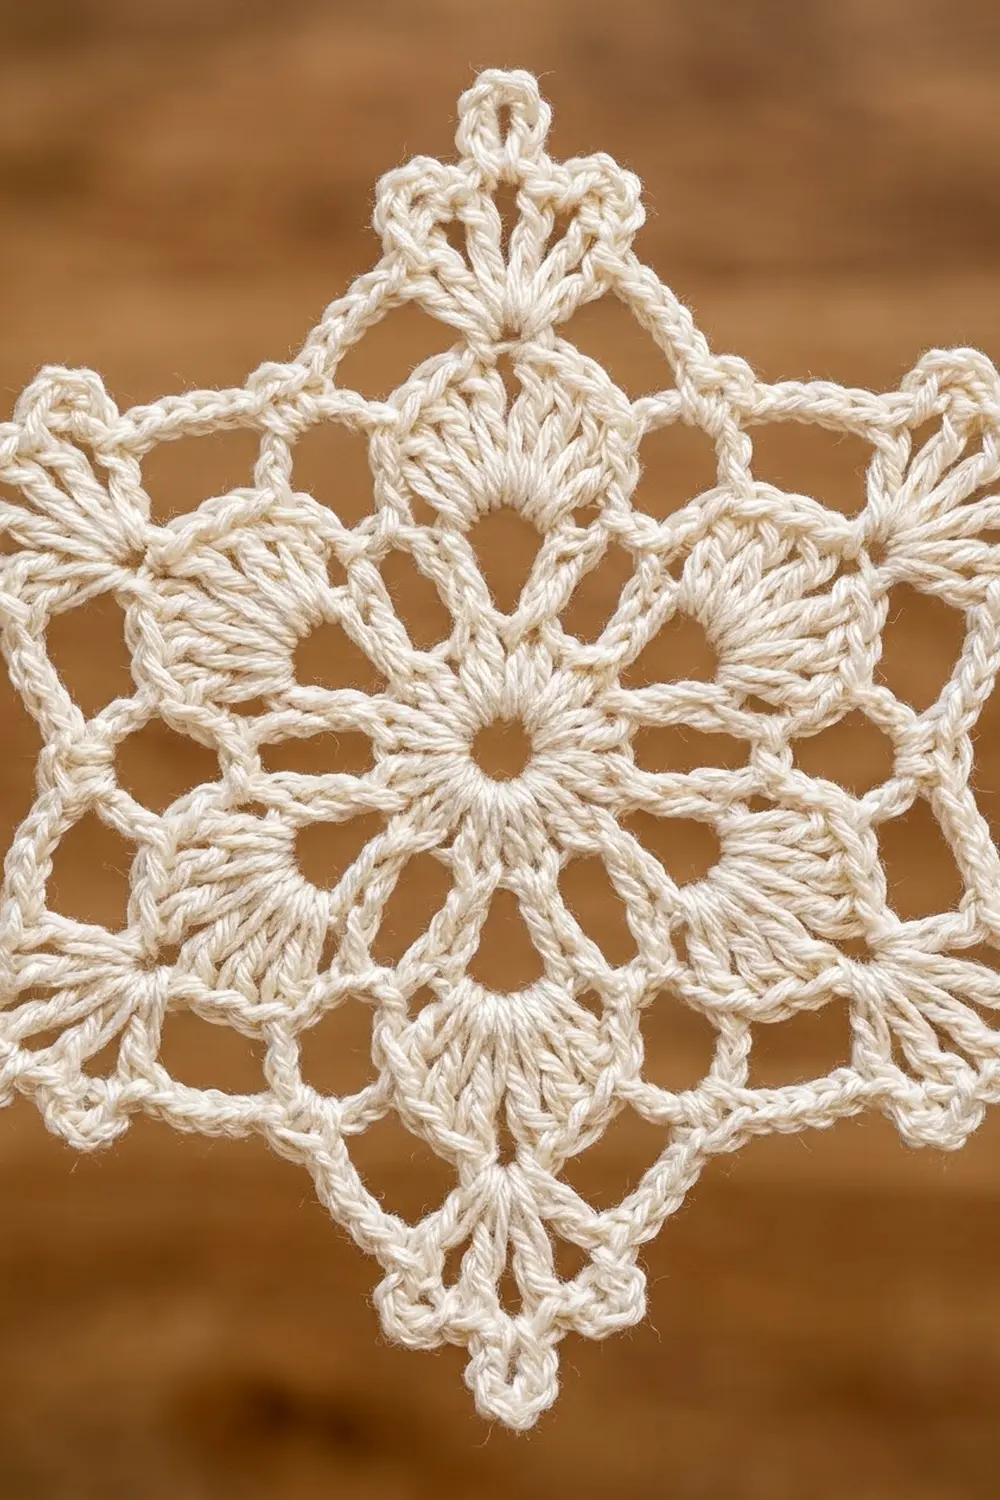
Snowflake Motif
Round 1: Ch 6, sl st in first ch to form a ring. Ch 3 (counts as dc), 17 dc in ring, sl st in top of beginning ch-3. (18 dc)
Round 2: Ch 3 (counts as dc), dc in same st, dc in next st, 2 dc in next st, ch 1. 2 dc in next st, dc in next st, 2 dc in next st, ch 1. Repeat from * 4 more times. Sl st in top of beginning ch-3. (30 dc in 6 groups of 5, plus 6 ch-1 sps)*
Round 3 (petals): Sl st in next 4 dc and into the ch-1 sp. Ch 1, sc in the same sp. Skip next dc, 2 tr in next dc, 3 tr in next dc, 2 tr in next dc, skip next dc, sc in next ch-1 sp. Repeat from * around, leaving out the last sc. Sl st in first sc. (6 petals of 7 tr = 42 tr, plus 6 sc)*
Each petal now has a rounded top. Its center st is the 4th tr, which is the middle of the 3-tr group.
Round 4: Sl st in next 4 tr, so you land on the center tr of the first petal. Ch 1, sc in the same st, ch 7. Sc in center tr of next petal, ch 7. Repeat from * 4 more times. Sl st in first sc. (6 sc, 6 ch-7 sps)*
Round 5 (points): Ch 3 (counts as dc), 2 dc in the same sc, ch 2, p, ch 2, 3 dc in the same sc. This is point P1. In next ch-7 sp, work (3 sc, p, 3 sc). This is an edge, and its picot is the edge picot. In next sc, work (3 dc, ch 2, p, ch 2, 3 dc) for the next point. In next ch-7 sp, work (3 sc, p, 3 sc). Repeat from * 4 more times. Sl st in top of beginning ch-3. Fasten off. (36 dc, 36 sc, 12 picots: 6 point picots and 6 edge picots)*
Point labels: Hold the motif with P1 at the right. Working counterclockwise, the points are P1 (right side, 0°), P2 (upper right), P3 (upper left), P4 (left side), P5 (lower left) and P6 (lower right). Points sit in line with the petals because each point grows from a petal’s center sc.
Make All Pieces
You need 30 motifs per panel, 60 in total, all in cream. Make only the first motif fully and separately. Join every other motif as you work its Round 5.
Layout for one panel, numbered in working order:
Row 1:   [ 1] [ 2] [ 3]   <- header edge
Row 2:   [ 4] [ 5] [ 6]
Row 3:   [ 7] [ 8] [ 9]
Row 4:   [10] [11] [12]
Row 5:   [13] [14] [15]
Row 6:   [16] [17] [18]
Row 7:   [19] [20] [21]
Row 8:   [22] [23] [24]
Row 9:   [25] [26] [27]
Row 10:  [28] [29] [30]   <- pointed lower edge
Joining (Join-As-You-Go)
You join on Round 5 only, and only at point picots. Edge picots are never joined. They stay free and give the lace its sparkle.
- Neighbor to the left: at this motif’s P4, use jp into the left motif’s P1.
- Neighbor above: at this motif’s P2, use jp into the upper motif’s P6. At P3, use jp into the upper motif’s P5.
So each motif joins with one stitch-to-stitch connection per touching point. Nothing is added between motifs. Motif 1 has no joins. Motifs 2 and 3 have 1 join each, and Motif 4 has 2. Motifs 5 and 6 have 3 each.
The grid works because of the motif’s shape. With side points 4 in (10.2 cm) apart, each diagonal point sits 1.73 in (4.4 cm) above or below the center. Rows therefore stack about 3.5 in (8.9 cm) apart, and 10 rows make a grid about 35 in (88.9 cm) long.
Tension: Keep the chains on each side of the jp at the same tension as a normal picot. A tight jp pulls the points into a crease. A loose one leaves a gap at the joint.
Size checkpoint: After Row 3 of motifs, lay the piece flat without stretching it. It should measure 12 in (30.5 cm) wide and about 10.5 in (26.7 cm) from the top points to the bottom points.
Border: Header, Tabs and Side Edging
Border gauge is the same as the header gauge: 6 dc = 1 in (2.5 cm).
Header
Row 1 (RS, fills the V’s along the top): Join thread with a sl st in P1 of Motif 3, the top right corner. Ch 5 (counts as trtr). Then, across Motif 3:
Ch 2, dtr in edge picot (between P1 and P2), ch 2, sc in P2, ch 11, sc in P3, ch 2, dtr in edge picot (between P3 and P4), ch 2, trtr in the joint of P4 and the next motif’s P1.
Repeat this across Motifs 2 and 1. On Motif 1, work the last trtr in its free P4. Turn.
That is 24 sts per motif (2 + 1 + 2 + 1 + 11 + 1 + 2 + 1 + 2 + 1), plus the first ch-5. (3 × 24 + 1 = 73 sts)
Row 2: Ch 3 (counts as dc), dc in each ch and each st across. Work in the chains, not around them, so the row stays level. Turn. (73 dc)
Rows 3–5: Ch 3 (counts as dc), dc in each dc across. Turn. (73 dc each row)
Row 6 (tabs): Ch 1, sc in first 5 dc. Ch 15, skip 3 dc, sc in next 9 dc. Repeat from * 4 more times. Ch 15, skip 3 dc, sc in last 5 dc. Turn. (55 sc, 6 ch-15 loops)*
The math checks out: 6 tabs × 3 skipped sts = 18, and 5 + (5 × 9) + 5 = 55 sc. 18 + 55 = 73.
Row 7: Ch 1, sc in each sc and 20 sc in each ch-15 loop. Fasten off. (55 + 120 = 175 sc)
Tabs fit rods up to 3/4 in (1.9 cm) across.
Side Edging (each side)
Work each side from the bottom up. Join thread with a sl st in the free side point of the bottom motif: P1 of Motif 30 on the right, or P4 of Motif 28 on the left. Ch 1, sc in the same picot. *Ch 12, sc in the next joint up (where the side motif’s diagonal point meets the motif above), ch 12, sc in the next side point. Repeat from * 8 more times, ending in the side point at the base of the header. Then work 2 sc around each row-end of Rows 2–5 (8 sc) and 1 sc in each row-end of Rows 6–7 (2 sc). Fasten off.
Count per side: 1 + (9 × 26) + 10 = 245 sts
The math works because 10 motif rows leave 9 gaps between side points, and each gap takes exactly one 26-st repeat. The chains sit a little inside the side points, so the panel width stays at 12 in (30.5 cm).
Leave the bottom edge unworked. The P5 and P6 points of Motifs 28–30 form the pointed lower edge.
Final Blocking
- Weave in all ends along the dc or sc rounds, never through the chain loops.
- Soak each panel in cool water for 10 minutes. Press out the water in a towel without wringing.
- Pin out the header first, to 12 in (30.5 cm) wide.
- Pin the two side edges straight down. The top points to the bottom points should measure 35 in (88.9 cm).
- Put a pin in every point of the bottom row, and pull each petal round.
- Open the joints so each open diamond between the motifs is the same size.
- Let the panel dry flat completely, then unpin it. Block the second panel to exactly the same measurements.
Final Quality-Control Checklist
- Each motif has 6 petals, 6 points and 12 picots.
- Every jp joins a point picot, never an edge picot.
- Both panels have 3 × 10 motifs and match in length within 1/4 in (0.6 cm).
- Header Rows 2–5 each have 73 dc.
- 6 tabs, evenly spaced, with 9 sc between neighboring tabs.
- Side edging has 245 sts per side.
- The panel measures 12 in × 38 in (30.5 cm × 96.5 cm) including tabs.
Troubleshooting
- Petals cup: Your tr are tight. Use a looser yo, or go up 0.25 mm for Round 3 only.
- Motif ruffles at Round 5: The ch-7 sps are too long for your tension. Work ch 6 instead in Round 4.
- Header ripples: You worked around the chains in Row 2. Rework it with 1 dc in each ch.
- Header pulls the top in: Change each ch-11 in Row 1 to ch 12. In Row 2, skip 1 ch of each ch-12 to keep the count at 73 dc.
- Side edges wave: Use ch 11 instead of ch 12 in the side edging, and work the same number of repeats.
- Panels differ in length: Re-block the shorter panel and pin it to the longer one’s measurements.
Care
Hand wash in cool water with mild soap. Dry flat and re-block, and press lightly through a cloth if needed.
Final Notes
The sizes depend on each other. A 4 in (10.2 cm) motif gives a row pitch of about 3.5 in (8.9 cm). Three motifs across make 12 in (30.5 cm), and ten rows down make 35 in (88.9 cm). The header’s 73 sts (24 per motif plus 1) keep the top straight. It adds 2 in (5.1 cm), and the tabs add about 1 in (2.5 cm), for 38 in (96.5 cm) total. Check the first motif and the first three rows, and the rest will fall into place.
Happy crocheting!