

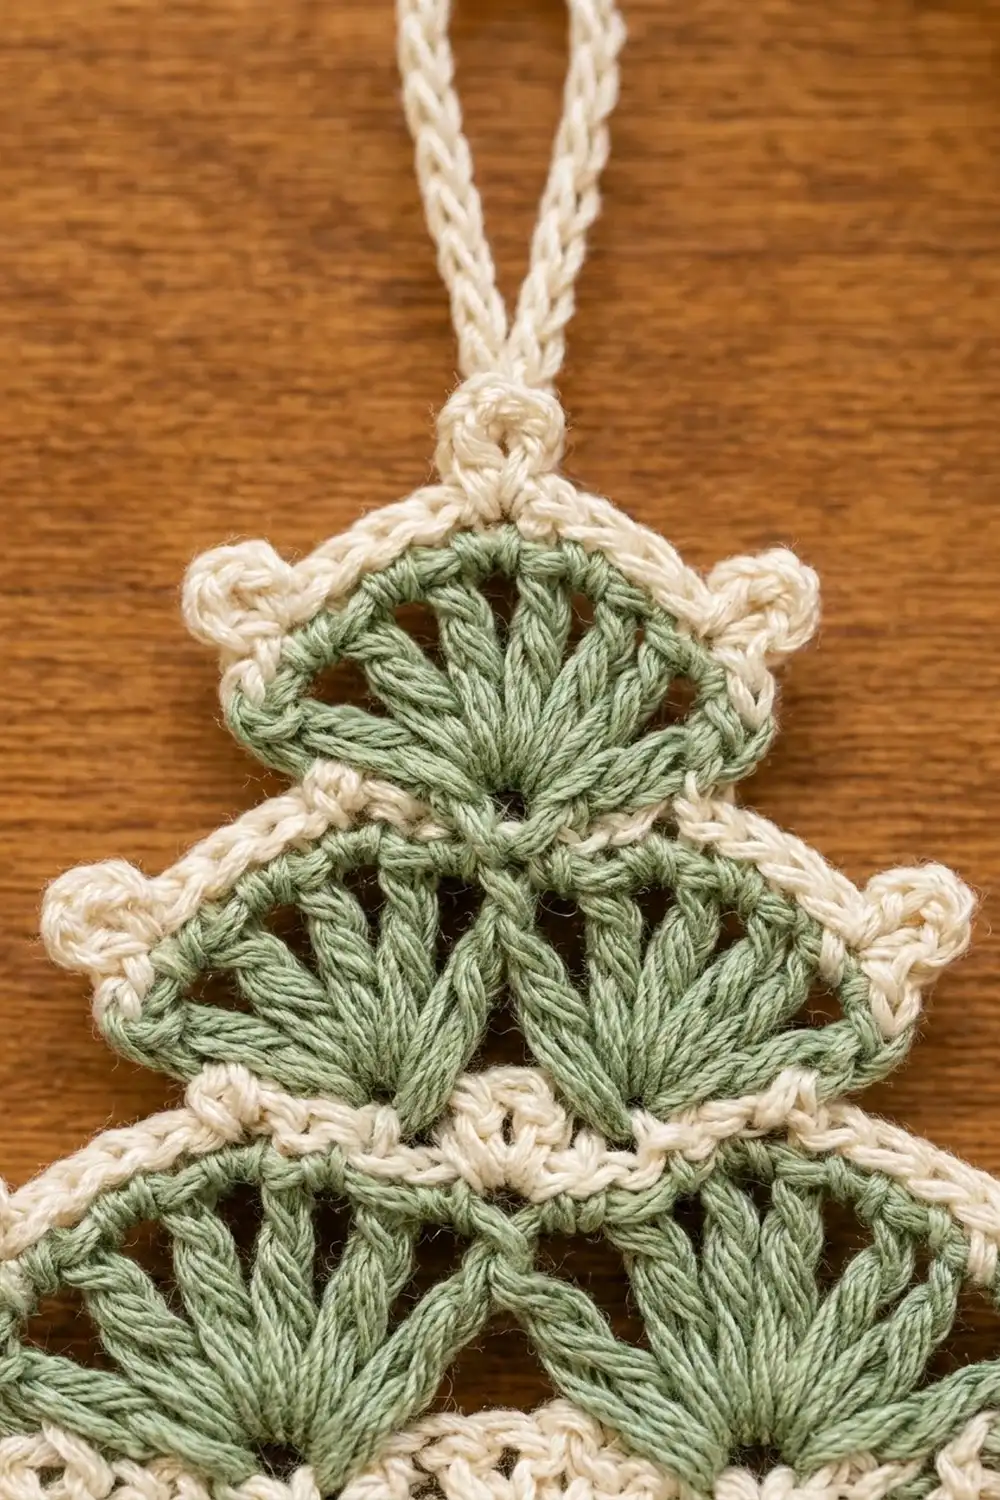
This little tree ornament is built from fan shells. Four tiers of sage green fans step down and outward like the boughs of a fir. Each tier is outlined in cream thread, so the tree shape reads clearly from across the room, even against real pine needles.
The palette is soft and a little vintage: muted sage for the fans and warm cream for the outlines, picots, trunk and hanging loop. Hang it on the tree, tie it to a gift, or clip it to a wreath. The pattern below makes one ornament.
The pattern uses US crochet terms. The finished ornament measures 3.75 in (9.5 cm) wide and 4 in (10.2 cm) tall, not counting the 1.5 in (3.8 cm) hanging loop.
You work it top down in short rows, always with the right side facing. Green fan rows alternate with cream anchor rows, so you fasten off and rejoin at each color change. A cream edging finishes the bottom and sides and adds the loop. The trunk is worked straight down from the center of the bottom tier.
Finished Size and Construction
- Finished size: 3.75 in (9.5 cm) wide x 4 in (10.2 cm) tall, plus a 1.5 in (3.8 cm) loop
- Skill level: Easy-intermediate (thread work, counting into specific stitches)
- Terminology: US
- Yarn weight: Size 3 mercerized cotton crochet thread
- Hook: 2.25 mm (US B-1)
- Number of pieces: 1
- Layout: 4 tiers of fans (1, 2, 2 and 3 fans) with a trunk centered below
- Piece size: 3.75 in (9.5 cm) x 4 in (10.2 cm)
- Size before edging: 3.5 in (8.9 cm) wide x 3.1 in (7.9 cm) tall after Row 7
- Edging depth: about 0.25 in (0.6 cm) at the widest point, including picots
Materials
Use a smooth, mercerized cotton thread in size 3. It shows each stitch crisply and holds starch well. Avoid fuzzy or acrylic threads, because the fans won’t keep a sharp shape. Pick a muted, slightly gray sage and a warm cream rather than bright white so the two colors blend softly.
- Sage green: 5 g, about 8 m (fans)
- Cream/ivory: 5 g, about 8 m (anchor rows, edging, trunk and loop)
Tools:
- 2.25 mm (US B-1) crochet hook
- Tapestry needle
- Small scissors
- Rustproof pins and a blocking board or foam mat
- Spray starch or diluted fabric stiffener
- Ruler or tape measure
These quantities include a margin for a gauge swatch and for the many tails you’ll leave at each color change.
Abbreviations (US Terms)
- ch: chain
- sl st: slip stitch
- sc: single crochet
- tr: treble crochet
- sk: skip
- sp: space
- st(s): stitch(es)
- MR: magic ring
- RS: right side
Picot: Ch 3, then sl st into the front loop and left vertical bar of the sc you just made.
Fan: All of the stated tr worked into one stitch, so they spread into a half-circle.
Gauge and Checkpoints
Gauge: 9 sc and 7 sc rows = 1 in (2.5 cm). One 7-tr fan (Row 1) measures 1.25 in (3.2 cm) wide x 0.6 in (1.5 cm) tall, unblocked.
Rows 1 and 2 are your test swatch. Make them, measure them, and only then carry on. Thread work is unforgiving. A small difference in the first fan grows across four tiers.
Measure the width at the widest point, including picots. Measure the height from the top of the magic ring.
- After Row 2: 1.5 in (3.8 cm) wide, 0.8 in (2.0 cm) tall
- After Row 4: 2.5 in (6.4 cm) wide, 1.6 in (4.1 cm) tall
- After Row 6: 3 in (7.6 cm) wide, 2.5 in (6.4 cm) tall
- After Row 8: 3.75 in (9.5 cm) wide, 3.3 in (8.4 cm) tall
- With trunk: 3.75 in (9.5 cm) wide, 4 in (10.2 cm) tall
If your first fan is too big: If it’s more than 0.1 in (0.3 cm) too wide, go down to a 2.0 mm hook.
If your first fan is too small: Go up to a 2.5 mm hook.
If the fan cups instead of lying flat: Your tr are too short. Pull up the first loop of each tr a little taller.
Pattern
Work every row with the RS facing and don’t turn. Each row starts at the right edge, and you fasten off at the end of each row. Crochet over the tails as you go so there’s less to weave in later. Leave tails about 4 in (10.2 cm) long.
Tier 1
Row 1 (green): MR, ch 4 (counts as first tr), 6 tr in the ring. Pull the ring tight. Fasten off. (7 tr = 1 fan)
The closed ring is the top point of the tree, and the fan opens downward.
Tier 1 Outline
Row 2 (cream): Join with sc in the first tr (top of the ch-4), picot, ch 3, sk 2 tr, sc in next tr, ch 3, sk 2 tr, sc in last tr, picot. Fasten off. (3 sc, 2 ch-3 sps, 2 picots)
These 3 sc are anchors: one at each end and one at the fan’s center (the 4th tr).
Tier 2
Row 3 (green): Join with sl st in the first sc, ch 4 (counts as tr), 6 tr in same sc, sc in next sc, 7 tr in last sc. Fasten off. (14 tr + 1 sc = 15 sts; 2 fans)
Skip the ch-3 spaces. The fans cover them, and the cream chains show as a thin line along the bottom of Tier 1.
Tier 2 Outline
Row 4 (cream): Join with sc in first tr, picot, ch 3, sk 2 tr, sc in next tr (fan center), ch 3, sk last 3 tr of fan, sc in the sc between fans, ch 3, sk first 3 tr of next fan, sc in next tr (fan center), ch 3, sk 2 tr, sc in last tr, picot. Fasten off. (5 sc, 4 ch-3 sps, 2 picots)
From right to left, the anchors are: end, center, junction, center, end.
Tier 3
Row 5 (green): Join with sl st in first sc, ch 1, sc in same sc, 9 tr in next sc (center anchor), sc in next sc (junction), 9 tr in next sc (center anchor), sc in last sc. Fasten off. (18 tr + 3 sc = 21 sts; 2 fans)
These larger fans sit directly below the Tier 2 fans. Tier 3 has the same number of fans as Tier 2, but the extra 2 tr in each fan make it wider.
Tier 3 Outline
Row 6 (cream): Join with sc in first sc, picot, ch 4, sk 4 tr, sc in next tr (5th tr, fan center), ch 4, sk 4 tr, sc in the sc between fans, ch 4, sk 4 tr, sc in next tr (fan center), ch 4, sk 4 tr, sc in last sc, picot. Fasten off. (5 sc, 4 ch-4 sps, 2 picots)
Each half of a 9-tr fan is 4 sts wide, so the chains are ch-4 here.
Tier 4
Row 7 (green): Join with sl st in first sc, ch 4 (counts as tr), 8 tr in same sc, sc in next sc (center), 9 tr in next sc (junction), sc in next sc (center), 9 tr in last sc. Fasten off green. (27 tr + 2 sc = 29 sts; 3 fans)
Checkpoint: 3.5 in (8.9 cm) wide, 3.1 in (7.9 cm) tall. The two outer fans should reach past the Tier 3 corners by about 0.25 in (0.6 cm) on each side.
Edging
Edging gauge: 9 sc = 1 in (2.5 cm). Each picot sticks out about 0.1 in (0.3 cm).
Row 8 (cream, bottom edge): Join with sc in first tr of Row 7, picot, sc in next 8 tr, sc in next sc, picot, sc in next 9 tr, sc in next sc, picot, sc in next 9 tr, picot. Do not fasten off. (29 sc + 4 picots)
Row 8 is a trim row: 27 sc in tr + 2 sc in sc = 29 sc, with 0 extra sc added. The 4 picots sit at the two outer corners and the two fan junctions.
Round 9 (cream, side outline and loop): You are now at the bottom left corner. Work up the left side, across the top, then down the right side.
- Left side: 3 sc around the post of the outermost tr of Tier 4, sk the Row 6 end, 3 sc around the outermost tr post of Tier 3, sk the Row 4 end, 3 sc around the outermost tr post of Tier 2, sk the Row 2 end, 3 sc around the outermost tr post of Tier 1. (12 sc)
- Top: Into the closed ring, work sc, picot, ch 30, sl st in the base of the same sc, sc. (2 sc, 1 picot, 1 loop)
- Right side: Working down, make 3 sc around each outermost tr post of Tiers 1, 2, 3 and 4, skipping the cream row ends. (12 sc)
Sl st in the first sc of Row 8 and fasten off. (Round 9 total: 26 sc, 1 picot, ch-30 loop)
Why the math works: Each tier’s side edge is the height of one tr post, and 3 sc covers that height without ruffling or pulling in. The cream anchor-row ends already have picots. Skipping them leaves those picots standing out at the tier corners. Along the bottom, Row 8 places exactly 1 sc on each of the 29 Row 7 sts, so the scallops stay flat. Both sides have 12 sc, so the tree hangs straight from the loop.
Trunk (cream)
Count the Row 8 sc from the right:
- Sc 1–9: Fan 1
- Sc 10: junction
- Sc 11–19: center fan
- Sc 20: junction
- Sc 21–29: Fan 3
Row 1: With RS facing, join with sc in sc 12, then sc in next 6 sc (through sc 18). (7 sc)
Rows 2–5: Ch 1, turn, sc in each sc across. (7 sc)
Fasten off. The trunk is about 0.8 in (2.0 cm) wide x 0.7 in (1.8 cm) tall, which brings the total height to 4 in (10.2 cm). Keep your tension firm so the trunk stays a neat rectangle.
Final Blocking
- Weave in all tails on the wrong side, running each one through stitches of its own color.
- Lightly mist the ornament with water, or dip it in diluted fabric stiffener and squeeze out the excess.
- Lay it RS up on a blocking mat.
- Pin the top picot first. Then pin the trunk’s bottom corners straight below it, 4 in (10.2 cm) away.
- Pin each tier’s corner picots, keeping the left and right sides mirrored. Tier 4 should measure 3.75 in (9.5 cm) from picot to picot.
- Pin the junction picots on Row 8 so the three bottom scallops are even.
- Smooth each fan with a fingertip so the tr spread evenly.
- If you didn’t use stiffener, spray with starch. Let the ornament dry completely, for at least 4 hours.
- Unpin it and check that the loop hangs straight up from the top picot.
Final Quality-Control Checklist
- Tiers have 1, 2, 2 and 3 fans, top to bottom.
- Fans have 7, 7, 9 and 9 tr.
- Cream anchor rows have 3, 5 and 5 sc.
- Both ends of Rows 2, 4 and 6 have picots.
- Row 8 has 29 sc and 4 picots.
- Round 9 has 12 sc on each side.
- The trunk is 7 sc wide, 5 rows tall and centered under the middle fan.
- The ornament measures 3.75 in (9.5 cm) x 4 in (10.2 cm), with a 1.5 in (3.8 cm) loop.
- No tails show on the RS.
Troubleshooting
Fans ruffle: Your tr are too tall or too loose. Tighten your tension or go down a hook size.
Fans cup or curl: Your tr are too short. Pull up taller loops, or switch to the 2.5 mm hook.
Cream chains sag between anchors: Keep the chains snug. If Row 6 still sags, use ch 3 instead of ch 4.
Tree leans to one side: Check that you skipped the same number of tr on both sides of every center anchor, and that Round 9 has 12 sc on each side.
Trunk is off-center: Recount the Row 8 sc from the right. The trunk should start in sc 12 and end in sc 18.
Loop twists: Untwist the ch-30 and pin it flat before blocking.
Picots flop over: Make the sl st snug, and pin each picot outward while it dries.
Care
Hand wash in cool water with mild soap, roll it in a towel to press out the water, and re-block flat. Store it flat or hanging, away from damp, so the starch stays crisp.

Final Notes
Here is the full measurement chain:
- One 7-tr fan measures 1.25 in (3.2 cm).
- Row 4 reaches 2.5 in (6.4 cm) wide.
- Row 6 reaches 3 in (7.6 cm) wide.
- Row 7 reaches 3.5 in (8.9 cm) wide.
- Row 8 brings the ornament to 3.75 in (9.5 cm) wide and 3.3 in (8.4 cm) tall.
- The 0.7 in (1.8 cm) trunk makes the final height 4 in (10.2 cm).
If your first fan matches gauge, every tier after it will fall into place. Make one, then make a whole forest.
Happy crocheting!