
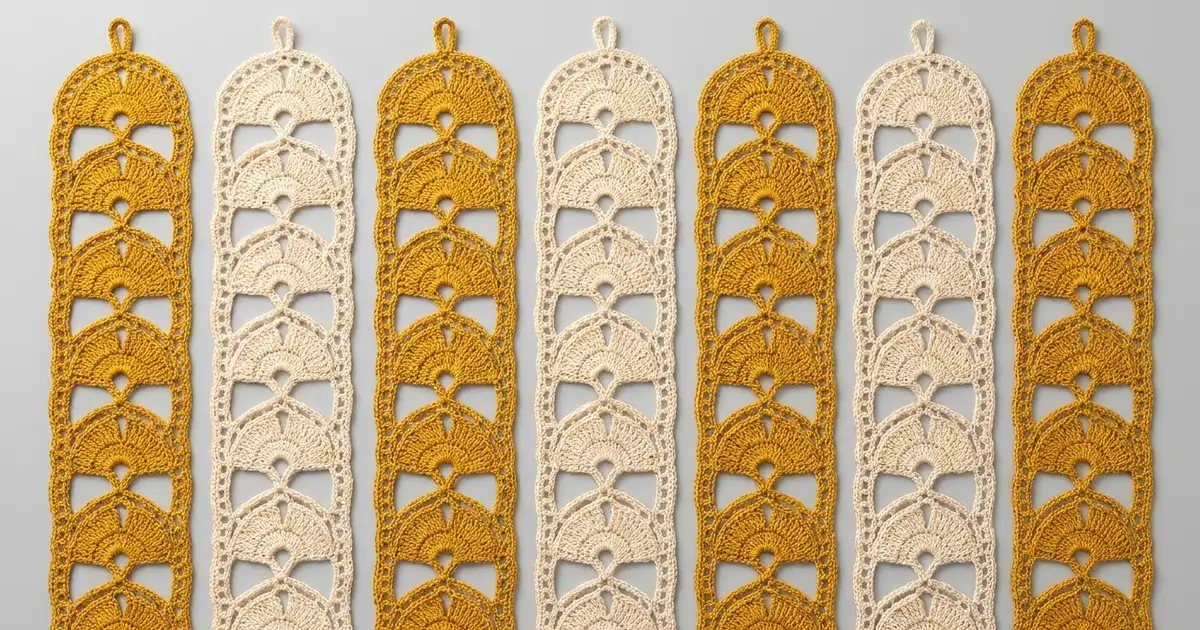
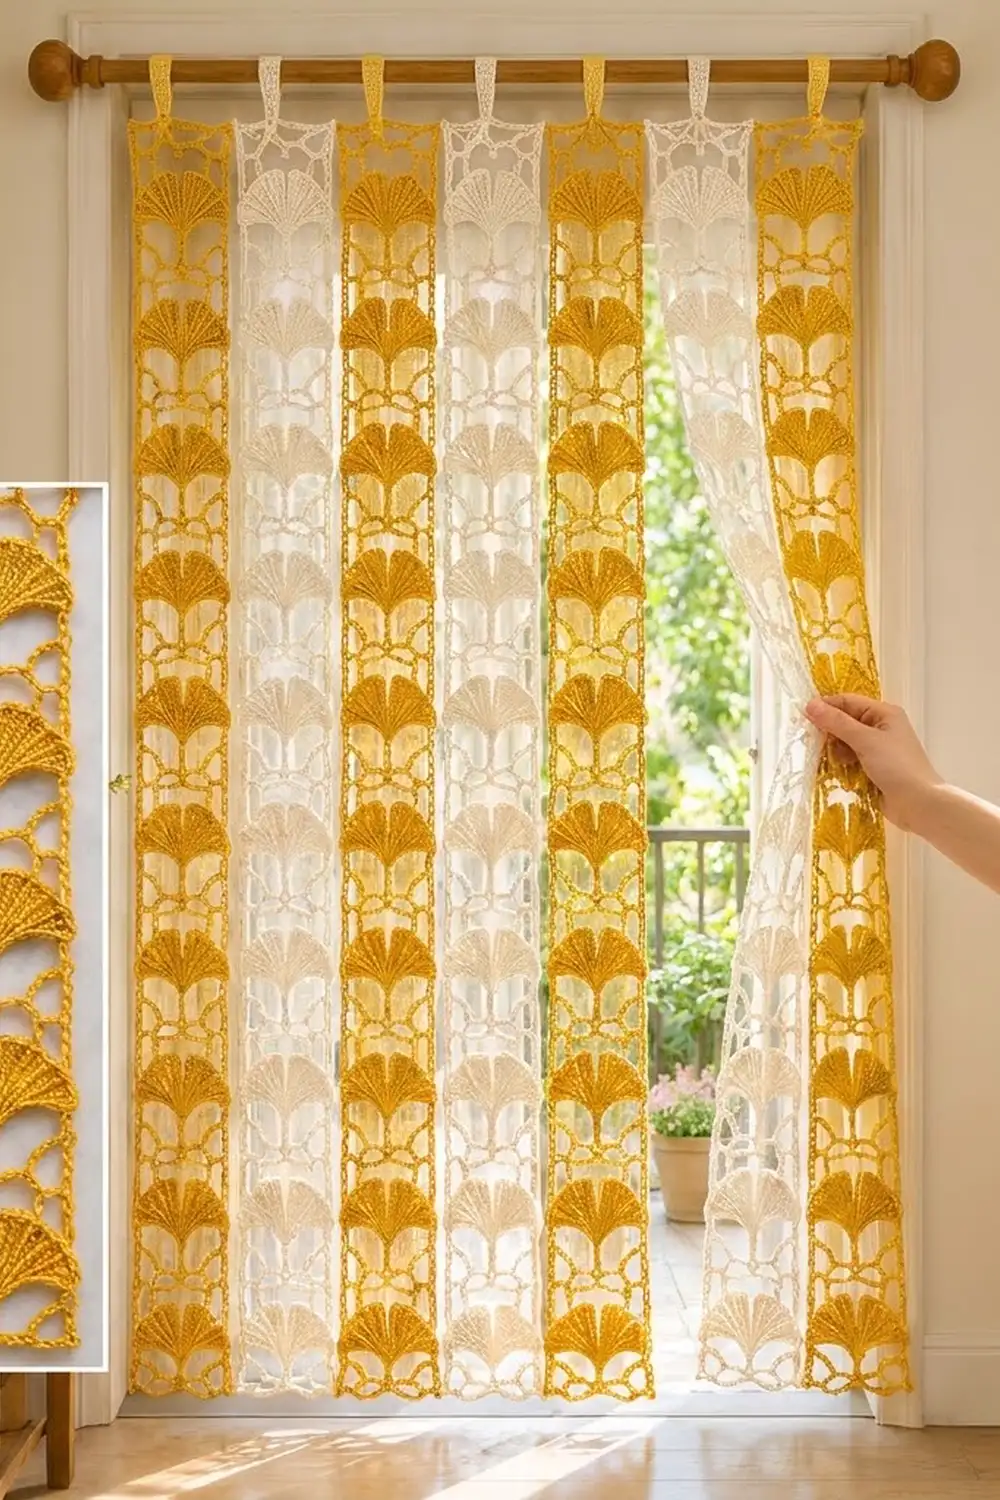
This curtain is made of tall, airy lace strips. Each strip is a column of ginkgo leaf fans stacked inside a frame of chain arches. Light passes through the open mesh, and the solid ribbed fans give the doorway a warm, sunny rhythm.
The sample uses two colors, a deep mustard yellow and a soft cream, in alternating strips: mustard, cream, mustard, cream, mustard, cream, mustard. The style is light and modern, with a nod to vintage filet lace. It works in a doorway, a pantry opening, or a sunny window.
The pattern uses US crochet terms. Each finished strip measures 5.5 in (14.0 cm) wide and 73.5 in (186.7 cm) long, plus a tab loop at the top. Seven strips hung side by side cover 38.5 in (97.8 cm) of rod.
You work each strip flat in rows from the bottom up. A 3-row repeat builds one ginkgo fan and its arches. A center tab is worked straight off the top row, then folded and stitched down. One round of single crochet borders each strip. The strips are not sewn to each other, so they move freely and part easily by hand.
Finished Size and Construction
- Finished strip size: 5.5 in x 73.5 in (14.0 cm x 186.7 cm), plus a tab loop with a 2 in (5.1 cm) drop
- Full curtain width: 38.5 in (97.8 cm) with 7 strips
- Skill level: Intermediate
- Terminology: US
- Yarn weight: DK (weight 3) cotton
- Hook: 4.0 mm (US G-6)
- Number of pieces: 7 separate strips (4 mustard, 3 cream)
- Layout: 7 strips in one row, hung side by side, not joined
- Strip size before border: 5 in x 73 in (12.7 cm x 185.4 cm)
- Border depth: 0.25 in (0.6 cm) on every edge
- Repeat height: 3 in (7.6 cm) after blocking, 24 repeats per strip
Materials
Choose a smooth mercerized or combed DK cotton of about 230 m per 100 g. Cotton gives crisp fans, holds its blocked shape, and stretches very little while hanging. Avoid fuzzy or very slippery fibers, which blur the ribbed texture of the lobes.
- Mustard yellow: 450 g (about 1,035 m), for 4 strips
- Cream: 350 g (about 805 m), for 3 strips
Each strip uses about 95 g. These quantities include a margin for the test strip and for small differences in tension.
Tools:
- 4.0 mm (US G-6) crochet hook, plus 3.75 mm and 4.5 mm hooks for gauge adjustments
- Tapestry needle
- Stitch markers
- Scissors
- Measuring tape
- Blocking mats long enough for 74 in (188.0 cm), or a clean floor and towels
- Rust-proof pins and a spray bottle
- Curtain rod up to 1.25 in (3.2 cm) in diameter
Abbreviations (US Terms)
- ch – chain
- sl st – slip stitch
- sc – single crochet
- dc – double crochet
- dtr – double treble crochet
- sp(s) – space(s)
- BL – back loop only
- FL – front loop only
- st(s) – stitch(es)
Double treble (dtr): Yarn over 3 times. Insert the hook in the stitch or space, yarn over, and pull up a loop (5 loops on hook). Then [yarn over and pull through 2 loops] 4 times.
Fan base: In the same stitch, work (dtr, ch 1, dtr, ch 1, dtr, ch 3, dtr, ch 1, dtr, ch 1, dtr). This makes 6 dtr, 4 ch-1 sps, and 1 center ch-3 sp.
Lobe: [2 dtr in next dtr, 2 dtr in next ch-1 sp] twice, 2 dtr in next dtr. This makes 10 dtr.
Gauge and Checkpoints
Gauge: 21 sc = 5 in (12.7 cm) across Row 1. One 3-row repeat (Rows 3–5) = 3 in (7.6 cm) tall after blocking.
Make one test strip before you start the curtain. Work Rows 1–2, then three repeats of Rows 3–5, then Row 6. Block it exactly the way you will block the finished strips. Lace changes a lot when it is wet-blocked, so always measure after blocking.
Checkpoints on the test strip:
- After Row 1: 5 in (12.7 cm) wide
- After Row 2: 0.75 in (1.9 cm) tall
- After the first repeat: 3.75 in (9.5 cm) tall
- After three repeats: 9.75 in (24.8 cm) tall
- After Row 6: 10 in (25.4 cm) tall and 5 in (12.7 cm) wide
If the test strip is too big, change to a 3.75 mm hook. If it is too small, change to a 4.5 mm hook. If only the height is off, look at your dtr. Wrap the yarn firmly, and pull each loop all the way up to the hook shank so every dtr reaches full height. Keep the test strip as a tension reference for all seven strips.
Strip Pattern
Work all rows flat and turn at the end of each row. Turning chains count as stitches.
Foundation: Ch 22.
Row 1: Sc in 2nd ch from hook and in each ch across. (21 sc)
Row 2: Ch 3 (counts as dc), turn. Skip first st, ch 4, skip next 4 sts, sc in next st 3 times, ch 4, skip next 4 sts, dc in last st. (2 dc, 3 sc, 4 ch-4 sps)
The middle sc of Row 2 sits exactly at the center of the strip, on stitch 11 of Row 1. Every fan grows from this center line.
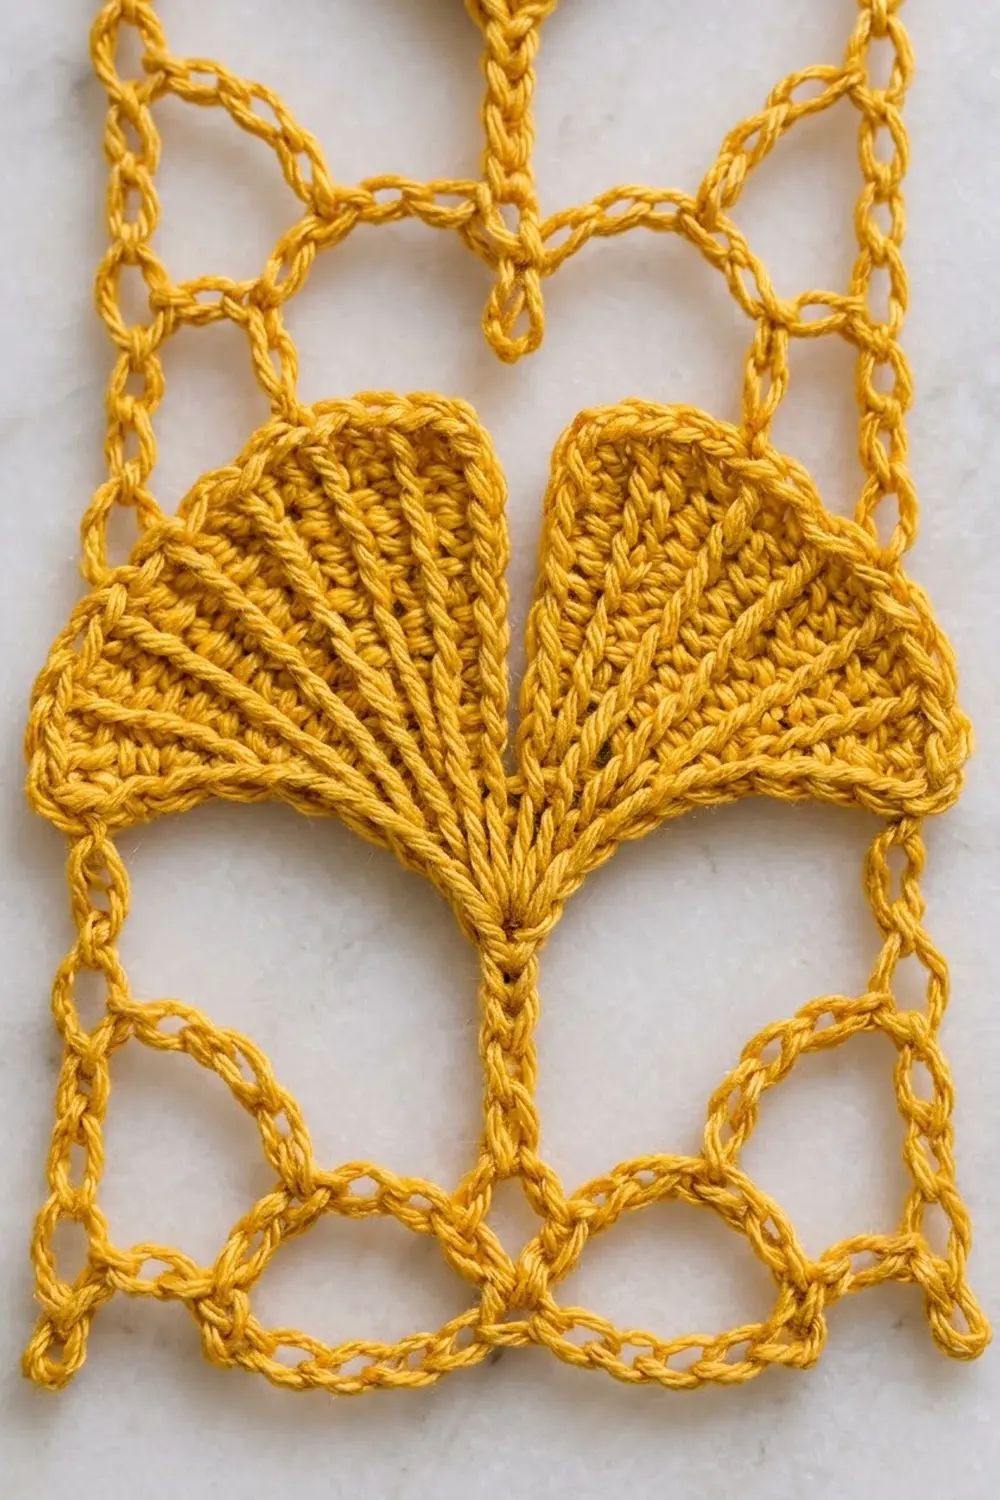
Row 3 (stem and fan base): Ch 5 (counts as dtr), turn. Ch 4, sc in next sc, ch 4, work a Fan base in the next (center) sc, ch 4, sc in next sc, ch 4, dtr in top of turning ch. (2 edge dtr, 2 sc, 4 ch-4 sps, and 1 Fan base of 6 dtr, 4 ch-1 sps, and 1 ch-3 sp)
All 6 dtr of the Fan base come out of one stitch. This narrow point forms the leaf stem.
Row 4 (ginkgo lobes): Ch 5 (counts as dtr), turn. Ch 6, then skip the next ch-4 sp, sc, and ch-4 sp. Work a Lobe over the first 3 dtr and 2 ch-1 sps of the Fan base. Sc in the center ch-3 sp. Work a Lobe over the remaining 3 dtr and 2 ch-1 sps. Ch 6, skip the next ch-4 sp, sc, and ch-4 sp, then dtr in top of turning ch. (2 edge dtr, 2 ch-6 sps, 20 lobe dtr, 1 notch sc)
The sc in the center ch-3 sp pulls the top of the fan down between the two lobes. That makes the split notch that turns a plain fan into a ginkgo leaf. Each lobe has 10 dtr ribs.
Row 5 (arch row): Ch 3 (counts as dc), turn. Ch 4, sc between the 5th and 6th dtr of the first lobe, ch 4, sc in notch sc, ch 4, sc between the 5th and 6th dtr of the next lobe, ch 4, dc in top of turning ch. (2 dc, 3 sc, 4 ch-4 sps)
Row 5 has the same structure as Row 2. The ch-4 arches skim the top of each lobe and frame the leaf. The center sc of Row 5 sits on the notch, so the next fan stacks directly above this one.
Repeat Rows 3–5 until you have 24 repeats (24 ginkgo fans).
Checkpoints on a full strip (blocked measure, or lightly stretched):
- After 12 repeats: 36.75 in (93.3 cm)
- After 24 repeats: 72.75 in (184.8 cm)
Row 6 (top row): Ch 1, turn. Sc in first dc, 4 sc in next ch-4 sp, sc in next sc 3 times, 4 sc in last ch-4 sp, sc in top of turning ch. (21 sc: 5 worked into stitches + 16 worked into spaces)
This row matches Row 1, so the strip is 21 sts wide at both ends. The strip now measures 5 in x 73 in (12.7 cm x 185.4 cm). Fasten off.
Make All Pieces
Make 7 strips:
- Mustard: 4 strips
- Cream: 3 strips
Layout (left to right, as hung):
| M | C | M | C | M | C | M |
M = mustard, C = cream. Each cell is one full-length strip.
Weave in the ends of each strip along the side edges before you move on. Hide them inside the edge dtr posts, where the border will cover them.
Joining: Tabs and Hanging
The strips are never joined to each other. The only joins are the tab loops that attach each strip to the rod. Keeping the strips separate lets the curtain part by hand and lets air move through it.
Tab (make 1 per strip): With the right side facing, count to the 8th st of Row 6. Join yarn in the BL of st 8.
Tab Row 1: Ch 1, sc in BL of sts 8–14. (7 sc)
Tab Rows 2–20: Ch 1, turn, sc in each st across. (7 sc)
The tab is 7 sts wide, about 1.7 in (4.3 cm), and 5 in (12.7 cm) long. Leave a 12 in (30.5 cm) tail and fasten off.
Attaching the tab: Fold the tab to the back of the strip. Line up the 7 sts of Tab Row 20 with sts 8–14 of Row 6, one to one. Whipstitch each tab stitch to its matching Row 6 stitch, catching the back of the stitch just below the loops. Leave the front loops of Row 6 free, because the border works into them.
Sew with even, moderate tension. If you pull too hard, the top edge puckers. If you sew too loosely, the tab twists on the rod.
Size checkpoint: The folded tab forms a loop with about a 2 in (5.1 cm) drop. A rod up to 1.25 in (3.2 cm) in diameter should slide through without stretching the tab.
Border
Work one round of sc around each strip. The border adds 0.25 in (0.6 cm) to every edge.
Border gauge: 4 sc = 1 in (2.5 cm) along the long sides.
Row-end rule for the long sides:
- Row 1 end: covered by the corner group
- Row 2 end (dc): 2 sc
- Each repeat: 5 sc around the Row 3 dtr end, 5 sc around the Row 4 dtr end, and 2 sc around the Row 5 dc end (12 sc per repeat)
- Row 6 end: covered by the corner group
Corner group: 3 sc in the same corner st.
Round 1: With the right side facing, join yarn in the FL of the first st of Row 6 (top right corner).
- Top edge: Ch 1. Work 3 sc in the FL of the first st (corner group), sc in the FL of the next 19 sts, and 3 sc in the FL of the last st (corner group). Work the 7 sts under the tab in their front loops as usual. The tab stands up behind the border.
- First long side: Working down the row ends, work 12 sc per repeat for 24 repeats (288 sc), then 2 sc in the Row 2 end. (290 sc between corner groups)
- Bottom edge: Work 3 sc in the first foundation ch loop (corner group), sc in the next 19 ch loops, and 3 sc in the last ch loop (corner group).
- Second long side: Work 2 sc in the Row 2 end, then 12 sc per repeat for 24 repeats. (290 sc between corner groups)
Join with a sl st to the first sc and fasten off. (630 sc total)
Why the math works:
- Top and bottom: 19 sc plus 2 corner center sts = 21, the same as Row 1 and Row 6. The stitch count stays the same, so the short edges lie flat.
- Long sides: Row 2 (0.5 in / 1.3 cm) plus 24 repeats (72 in / 182.9 cm) = 72.5 in (184.2 cm). At 4 sc per inch, that length needs 290 sc, and 2 + (24 x 12) = 290.
- Total: (2 x 19) + (2 x 290) + (4 x 3) = 38 + 580 + 12 = 630 sc.
Bordered strip size: 5.5 in x 73.5 in (14.0 cm x 186.7 cm).
Final Blocking
- Weave in all remaining ends.
- Soak each strip for 15 minutes in cool water with a little gentle wash.
- Gently press the water out. Roll the strip in a towel and press it; do not wring.
- Lay the strip flat, right side up, on mats or towels.
- Pin the corners so the strip is 5.5 in (14.0 cm) wide.
- Pin the long sides to 73.5 in (186.7 cm), working from the center outward.
- Pin each lobe tip and each notch so the fans open evenly and the notch points down.
- Shape the ch-4 arches into smooth, even curves.
- Let the strip dry completely, then unpin.
- Block all 7 strips to the same measurements so they hang level.
Final Quality-Control Checklist
- Each strip has 24 ginkgo fans, all centered.
- Every fan has two lobes of 10 dtr each, with a clear center notch.
- Row 1 and Row 6 each have 21 sc.
- Each border round has 630 sc.
- Each strip measures 5.5 in x 73.5 in (14.0 cm x 186.7 cm).
- Each tab is 7 sts wide and centered over sts 8–14.
- All 7 strips hang at the same length.
- Colors alternate M, C, M, C, M, C, M.
- No ends show on either side.
Troubleshooting
Fans lean to one side: The Fan base is in the wrong sc. It must go into the center sc of the arch row.
No visible notch: Make sure you worked an sc into the ch-3 sp, not a dtr.
Lobes cup or ruffle: Your dtr are too tight. Pull the loops up to the hook shank, or go up one hook size for Rows 3–4 only.
Long sides wave after the border: There are too many sc per repeat. Work 4 sc instead of 5 around one of the dtr row ends.
Long sides pull in: There are too few sc. Check that you are working 12 sc per repeat.
Strips hang at different lengths: Count the repeats on each strip, then re-block the shorter strips to 73.5 in (186.7 cm).
Tab twists: Re-sew it stitch to stitch, keeping all 7 sts aligned.
Care
Hand wash in cool water with mild soap and dry flat, re-pinning if needed. Rehang the strips while they are still slightly damp to help them settle straight.
Final Notes
Here is the full measurement chain. Row 1 is 21 sc and 5 in (12.7 cm) wide. Each 3-row repeat is 3 in (7.6 cm) tall. Twenty-four repeats plus the base and top rows make 73 in (185.4 cm). The border adds 0.25 in (0.6 cm) on every edge, so each strip finishes at 5.5 in x 73.5 in (14.0 cm x 186.7 cm). Seven strips cover 38.5 in (97.8 cm) of rod. If your test strip meets its checkpoints, all seven strips will match.
Happy crocheting!