
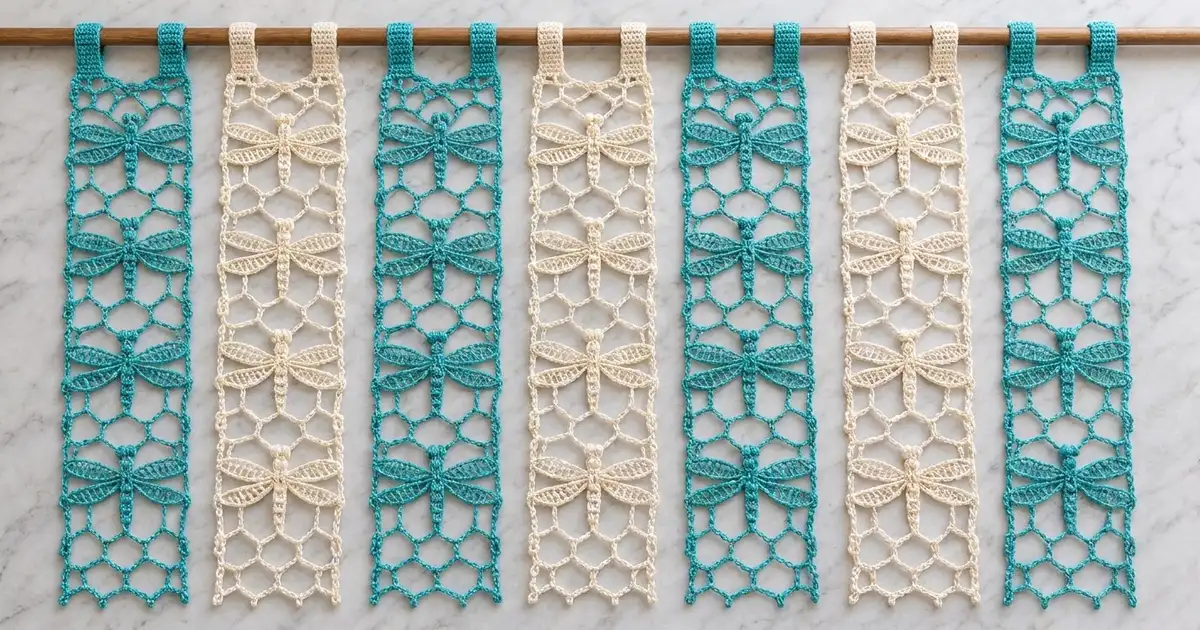
This curtain is made of seven slim lace strips that hang side by side from a rod. Each strip is a light honeycomb net with lace dragonflies down the center. When light comes through the window, the dragonflies show up as crisp outlines against the open cells.
Four strips are turquoise and three are cream, hung in alternating order with turquoise at both outer edges. The strips are not joined to each other, so the curtain moves easily, and you can push the strips aside or tie them back. This pattern uses US crochet terms throughout.
Each finished strip measures 5.8 in × 63.3 in (14.7 cm × 160.8 cm). A 2 in (5.1 cm) tab loop on top brings the hanging length to 65.3 in (165.9 cm). With the seven strips hung edge to edge, the curtain is about 40.6 in (103.1 cm) wide.
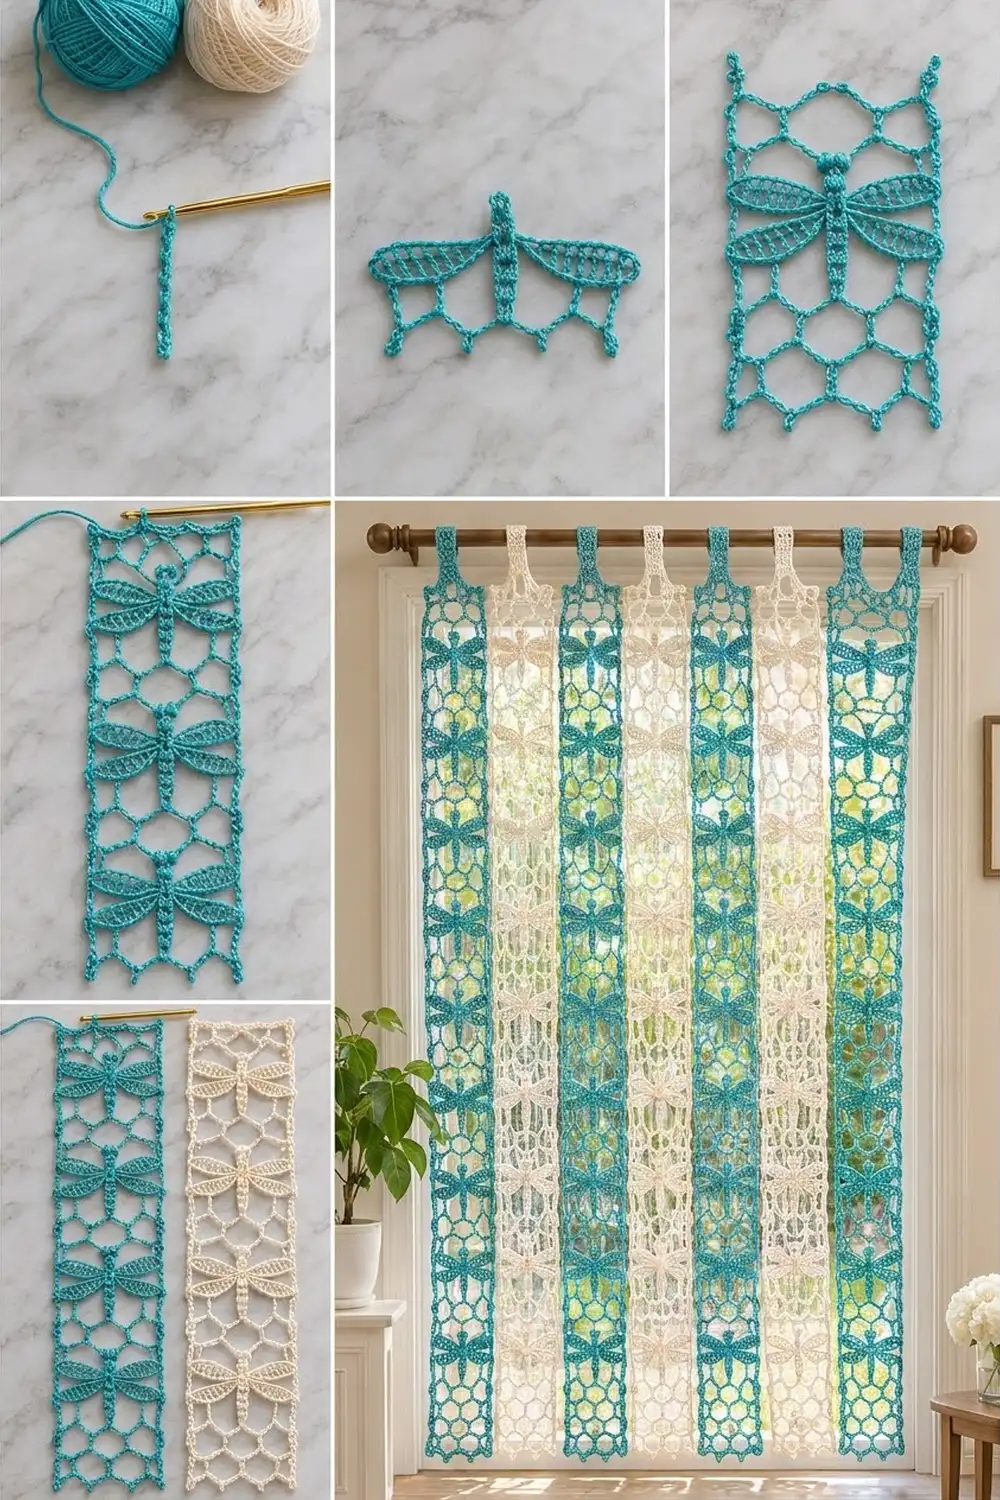
To build each strip, you crochet small rectangular net blocks and separate dragonflies, stack them in a column, and tack each dragonfly to the blocks above and below it. A two-round border then adds straight rails along both long edges, and a tab is worked off the top.
Finished Size and Construction
- Finished strip: 5.8 in × 63.3 in (14.7 cm × 160.8 cm); hanging length with tab 65.3 in (165.9 cm)
- Full curtain: 7 strips, about 40.6 in (103.1 cm) wide when hung edge to edge
- Skill level: Intermediate
- Terminology: US
- Yarn weight: Sport (#2) mercerized cotton
- Hook: 3.5 mm (E-4)
- Number of pieces: 147 (77 net blocks + 70 dragonflies)
- Layout: 7 separate strips; each strip has 11 net blocks and 10 dragonflies stacked in one column
- Piece sizes: net block 5 in × 2.5 in (12.7 cm × 6.4 cm); dragonfly 5 in × 3.5 in (12.7 cm × 8.9 cm)
- Strip size before border: 5 in × 62.5 in (12.7 cm × 158.8 cm)
- Border depth: 0.4 in (1.0 cm) per side
Materials
Use a smooth, mercerized cotton. It gives clean stitch definition, holds its shape under blocking, and hangs well in sunlight. Avoid fuzzy or very stretchy yarns, because the net will droop.
- Turquoise: 300 g / 930 m (4 strips)
- Cream: 250 g / 775 m (3 strips)
- 3.5 mm (E-4) crochet hook
- Tapestry needle
- Rust-proof pins and a blocking board long enough for at least 32 in (81.3 cm) of strip
- Spray bottle
- Locking stitch markers
- Curtain rod up to 1.25 in (3.2 cm) in diameter
These quantities include about a 10% margin for swatching and joining.
Abbreviations (US Terms)
- ch – chain
- sl st – slip stitch
- sc – single crochet
- hdc – half double crochet
- dc – double crochet
- sk – skip
- sp(s) – space(s)
- st(s) – stitch(es)
- RS / WS – right side / wrong side
Bobble (3-dc bobble): [Yarn over, insert hook in the stitch, pull up a loop, yarn over, draw through 2 loops] 3 times in the same stitch, then yarn over and draw through all 4 loops on the hook.
Gauge and Checkpoints
- Border gauge: 5 sc and 5 rows = 1 in (2.5 cm).
- Net gauge: after blocking, Row 1 of a net block = 5 in (12.7 cm) wide, and Rows 1–5 = 2.5 in (6.4 cm) tall.
Make one net block and one dragonfly first. Wet-block them, then measure:
- Net block: 5 in × 2.5 in (12.7 cm × 6.4 cm).
- Dragonfly: 3.5 in (8.9 cm) from head to tail; 5 in (12.7 cm) wingspan.
- Assembled strip: 5 in × 62.5 in (12.7 cm × 158.8 cm).
- Bordered strip: 5.8 in × 63.3 in (14.7 cm × 160.8 cm).
If your test block is more than 0.25 in (0.6 cm) too wide, go down to a 3.25 mm hook. If it is more than 0.25 in (0.6 cm) too narrow, go up to a 3.75 mm hook. Don’t change the stitch counts. Every border number depends on them.
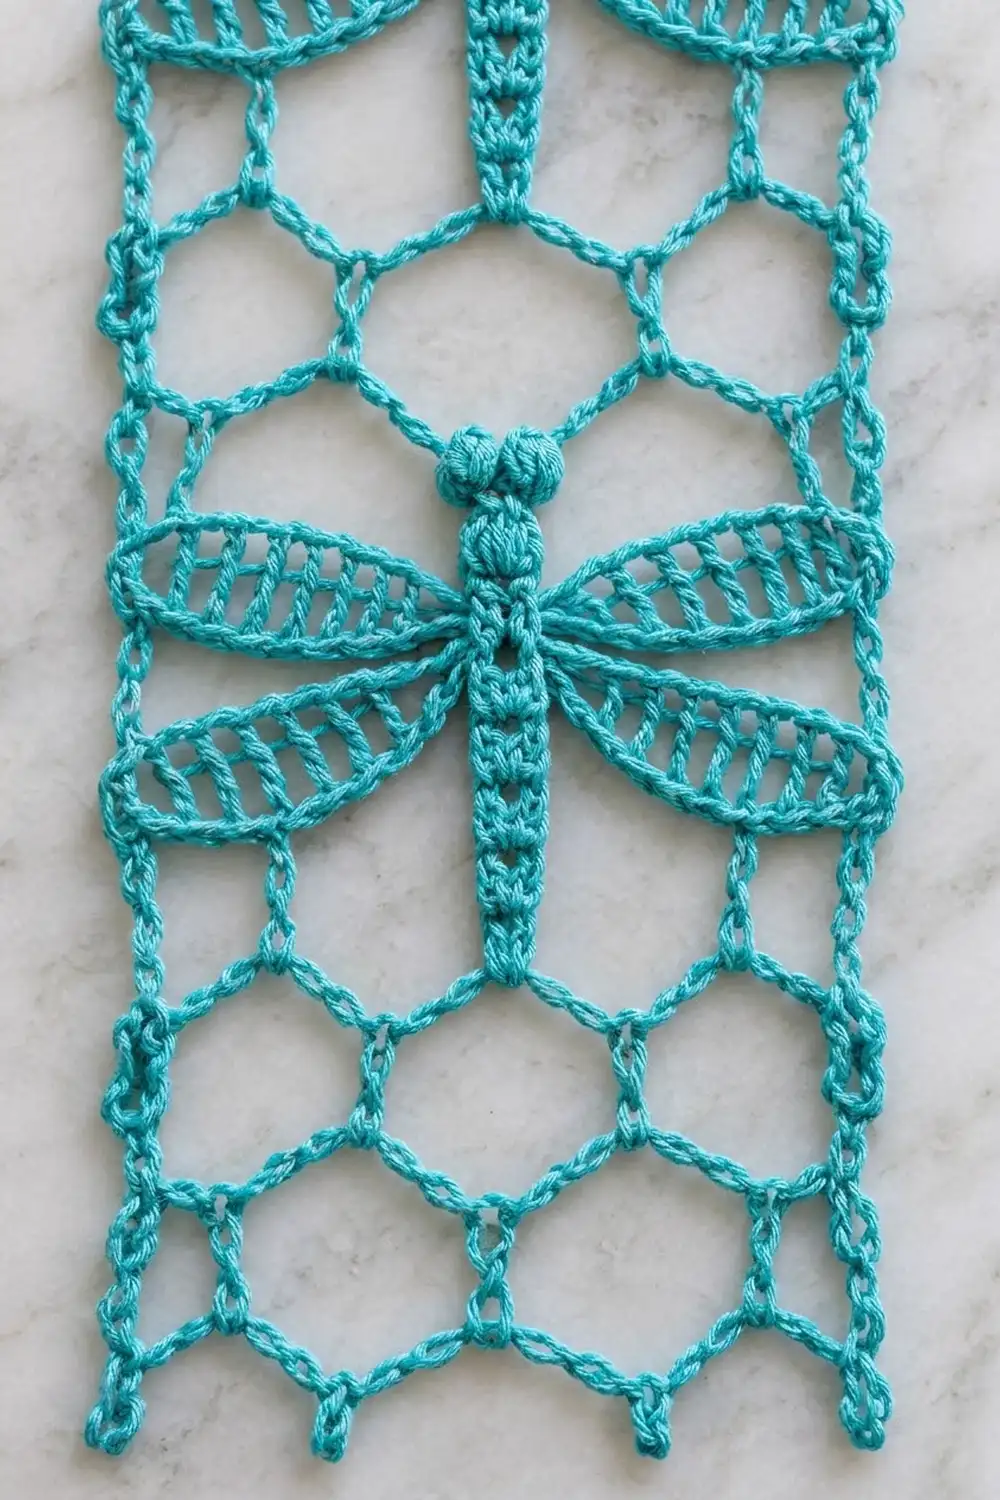
Net Block (Make 11 Per Strip)
Ch 26.
Row 1 (RS): Sc in 2nd ch from hook, ch 5, sk 4 ch, sc in next ch; repeat from * 4 more times. (6 sc, 5 ch-5 loops)*
Row 2: Ch 5 (counts as dc + ch 2), turn. Sc in first ch-5 loop, ch 5, sc in next ch-5 loop; repeat from * 3 more times. Ch 2, dc in last sc. (5 sc, 4 ch-5 loops, 2 ch-2 sps, 2 dc including the turning ch)*
Row 3: Ch 1, turn. Sc in first dc, ch 5, sk ch-2 sp or sc as needed, sc in next ch-5 loop; repeat from * 3 more times. Ch 5, sc in 3rd ch of turning ch-5. (6 sc, 5 ch-5 loops)*
Rows 4–5: Repeat Rows 2–3. (Row 5: 6 sc, 5 ch-5 loops)
Fasten off. Each sc is a small knot where the loops meet. Once blocked, the ch-5 loops open into the honeycomb cells.
Checkpoint: 5 in × 2.5 in (12.7 cm × 6.4 cm).
Dragonfly (Make 10 Per Strip)
Body
Ch 16.
Rnd 1: Sl st in 2nd ch from hook (this is the tail). Sc in next 9 ch (abdomen), then hdc in next 4 ch (thorax). In the last ch, work (bobble, ch 1, bobble) for the eyes. Now rotate and work in the free loops on the other side of the chain: hdc in next 4 ch, sc in next 9 ch, sl st in the same ch as the first sl st. (30 sts: 2 sl st, 18 sc, 8 hdc, 2 bobbles; plus 1 ch-1 sp between the eyes)
Fasten off. The unworked first chain sticks out slightly at the end; this is the tail tip.
Checkpoint: the body measures 3.5 in (8.9 cm) from tail tip to eyes and about 0.5 in (1.3 cm) wide.
Wings (Make 4 Per Dragonfly)
On each side of the thorax, count the hdc starting from the head: H1, H2, H3, H4. The upper wings go on H1 and the lower wings go on H3, on both sides.
Row 1: With RS facing, join yarn with a sl st in the marked hdc. Ch 13. Dc in 6th ch from hook, [ch 1, sk 1 ch, dc in next ch] 3 times, ch 1, sk 1 ch, sl st in the same hdc. (5 posts including the turning ch, 5 ch-1 sps)
The dc posts become the crossbars of the wing.
Edge Rnd: Ch 1; do not turn. Working along the top edge toward the tip, work 2 sc in each of the 5 sps, over the ch-1 bars. Work 5 sc around the turning-ch post at the tip. Then work along the bottom edge back toward the body, working 2 sc in each of the 5 sps over the foundation chain. Sl st in the same hdc. (25 sc)
Fasten off. The 3rd sc of the 5-sc tip fan is the wing tip, which you’ll use for the border. Mark it.
Checkpoint: each wing is 2.25 in (5.7 cm) long. The full wingspan is 2.25 + 0.5 + 2.25 = 5 in (12.7 cm).
Make All Pieces
| Color | Strips | Net blocks | Dragonflies |
|---|---|---|---|
| Turquoise | 4 | 44 | 40 |
| Cream | 3 | 33 | 30 |
| Total | 7 | 77 | 70 |
One strip (top to bottom):
B11
D10
B10
D9
B9
...
D2
B2
D1
B1   (bottom)
B = net block, D = dragonfly. Each dragonfly’s head points up.
Curtain order (left to right):
T C T C T C T
T = turquoise, C = cream.
Joining
Block all pieces flat before joining (see Final Blocking). It’s much easier to tack pieces that already lie flat.
Each strip uses the same yarn color throughout. Join each dragonfly to the column using two tacks with a tapestry needle:
- Tail tack: Lay the dragonfly above the block below it. Sew the tail tip to the center (3rd) ch-5 loop of that block’s Row 5, using 3 small whipstitches.
- Head tack: Place the next block above the dragonfly, with its foundation chain facing down. Sew the ch-1 sp between the eyes to the center of the block’s 3rd foundation span, between the 13th and 14th foundation chains, using 3 whipstitches.
Each dragonfly fills its own 3.5 in (8.9 cm) gap between blocks, with no net behind it. Keep the tacks firm, but don’t let them pull. The body should lie straight, without bunching or stretching.
Lay the strip flat as you go. Each repeat (block + dragonfly) should add 6 in (15.2 cm).
Size checkpoint: 11 blocks × 2.5 in + 10 dragonflies × 3.5 in = 27.5 + 35 = 62.5 in (158.8 cm). The strip should be 5 in (12.7 cm) wide.
Border
Border gauge: 5 sts = 1 in (2.5 cm). Use the same color as the strip.
Rnd 1 (RS): Join yarn in the first foundation ch of B1, at the bottom-right corner.
- Bottom edge: 3 sc in the first ch (corner), sc in next 24 ch, 3 sc in the last ch (corner). (30 sts)
- Left side, going up. For each block, work into the row ends: 2 sc in Row 1, 3 sc in Row 2, 2 sc in Row 3, 3 sc in Row 4, 2 sc in Row 5. (12 sts per block)
- Each dragonfly gap on the left: Ch 8, sc in the lower wing tip, ch 4, sc in the upper wing tip, ch 4. (18 sts)
- Total left side: 11 × 12 + 10 × 18 = 132 + 180 = 312 sts
- Top edge (Row 5 of B11): 3 sc in the first sc (corner), [4 sc in next ch-5 loop, sc in next sc] 4 times, 4 sc in the last loop, 3 sc in the last sc (corner). (3 + 20 + 4 + 3 = 30 sts)
- Right side, going down: Work the left side in reverse. On each block: 2, 3, 2, 3, 2 sc into the row ends. In each dragonfly gap: ch 4, sc in the upper wing tip, ch 4, sc in the lower wing tip, ch 8. (312 sts)
- Join with a sl st in the first sc.
Rnd 1 total: 30 + 312 + 30 + 312 = 684 sts
Rnd 2: Ch 1, sc in each st and ch around, working 3 sc in the center sc of each corner group. Join.
- Each short end: 30 + 4 = 34 sts
- Each long side: 312 sts
- Total: 34 + 312 + 34 + 312 = 692 sts (684 + 4 corners × 2)
Fasten off.
Why the math works:
- Short ends: 26 sts match the 26 foundation chains at the bottom. At the top they match the 6 sc + 5 loops × 4 sc of Row 5. The 2 extra sts at each end are the corner increases.
- Long sides: 312 sts ÷ 62.5 in = 5.0 sts per in, which matches the border gauge, so the rails lie flat without rippling.
- Each block gives 12 sts over 2.5 in (4.8 per in).
- Each dragonfly gap gives 18 sts over 3.5 in (5.1 per in).
- The chain rails do two jobs: they create the straight side edges, and they anchor all four wing tips.
Checkpoint: 5.8 in × 63.3 in (14.7 cm × 160.8 cm).
Tab
The top edge has 34 sts in Rnd 2, including the corners.
- With RS facing, skip the first 7 sts and join yarn in the 8th st.
- Row 1: Ch 1, sc in the same st and the next 19 sts. (20 sc, leaving 7 sts unworked at the other end)
- Rows 2–20: Ch 1, turn, sc in each st. (20 sc)
- Fasten off, leaving a 16 in (40.6 cm) tail.
The tab measures 4 in × 4 in (10.2 cm × 10.2 cm). Fold it to the WS and whipstitch Row 20 along the seam between Rnds 1 and 2. This makes a 2 in (5.1 cm) loop that fits rods up to 1.25 in (3.2 cm) across.
Final Blocking
- Soak the finished strip in cool water for 15 minutes, then press out the water without wringing.
- Lay it on towels and roll them up to take out more moisture.
- Pin the strip in sections to 5.8 in (14.7 cm) wide, pinning both rails every 2 in (5.1 cm).
- Open each honeycomb cell with a pin in the center of each ch-5 loop.
- Spread each dragonfly’s wings: upper wings angled slightly up, lower wings slightly down, with the wing tips touching the rails.
- Straighten the body and pin the eyes.
- Let the section dry completely, then move on to the next section.
- Check the length of the whole strip: 63.3 in (160.8 cm).
Final Quality-Control Checklist
- Every net block has 6 sc and 5 loops in Row 5.
- Every dragonfly body has 30 sts, and every wing has 25 edge sc.
- Wing tips are anchored to the rails on both sides.
- Rnd 1 has 312 sts on each long side; Rnd 2 has 692 sts in total.
- The tab is centered, with 7 unworked sts on each side.
- All strips match in length to within 0.25 in (0.6 cm).
- Ends are woven in along the rails or bodies, out of sight.
Troubleshooting
- Net cells look like diamonds: Block again and pin the center of each loop open sideways.
- The rail ripples: Your stitches are too loose. Work the ch-8 and ch-4 rails more firmly, or redo Rnd 1 with a smaller hook.
- The strip narrows at the dragonflies: The rail chains are too short. Check your chain gauge: 5 ch should measure 1 in (2.5 cm).
- Wings curl: Pin them and steam them lightly. Work the 2-sc groups a little looser next time.
- Strips are different lengths: Check the tacks. A tack that is too tight shortens a gap.
Care
Hand wash in cool water with a mild soap and dry flat, re-pinning if needed. Keep the strips out of the dryer so the lace doesn’t shrink or warp.
Final Notes
The measurement chain is:
- A 5 in × 2.5 in (12.7 cm × 6.4 cm) block and a 5 in × 3.5 in (12.7 cm × 8.9 cm) dragonfly.
- These stack into a 62.5 in (158.8 cm) strip.
- The border makes it 5.8 in × 63.3 in (14.7 cm × 160.8 cm).
- The tab brings the hanging length to 65.3 in (165.9 cm).
- Seven strips make a curtain about 40.6 in (103.1 cm) wide.
If you check each stage as you go, your curtain will hang straight.
Happy crocheting!