

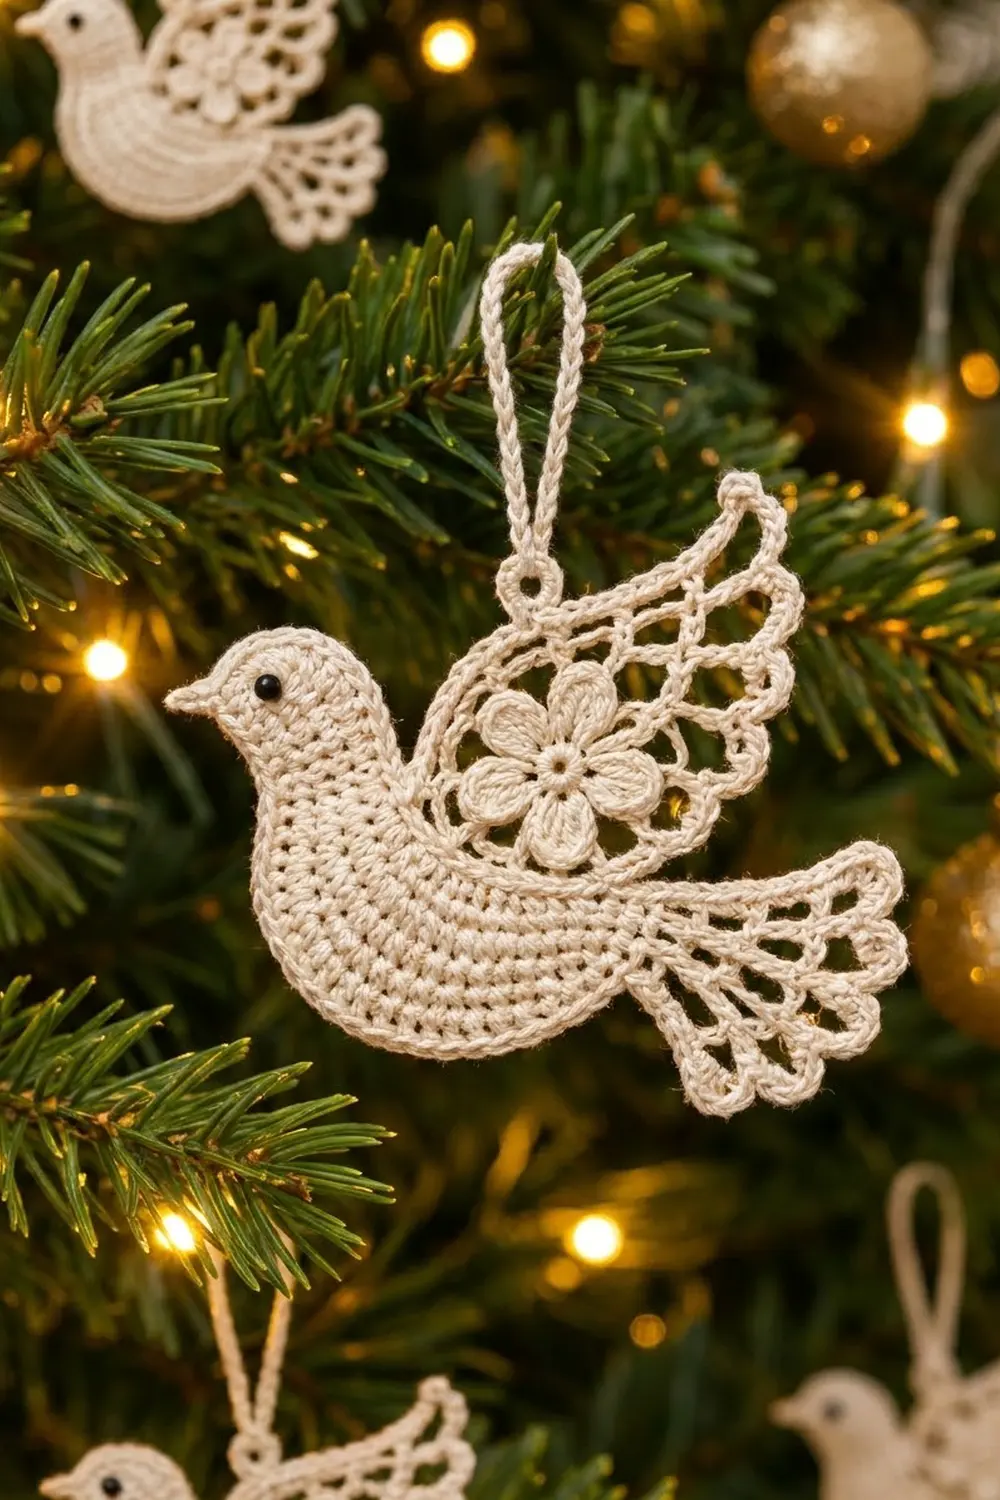
This little dove is a lacy, heirloom-style tree ornament in soft ivory cotton thread. It has a solid body with a round head and a pointed beak. The lacy wing has a raised six-petal flower at its center, and the open fan tail ends in picot scallops. A tiny black bead makes the eye, and a crocheted loop lets it hang straight on a branch.
The look is classic and calm: one color, crisp stitch definition, and a mix of solid and open textures. It suits a white-and-gold tree, a gift tag, or a wedding favor.
This pattern uses US crochet terms. The finished ornament measures about 4.5 in (11.4 cm) wide and 3.5 in (8.9 cm) tall. The hanging loop adds about 1.5 in (3.8 cm).
Construction is simple to follow. You crochet the body in rounds around a foundation chain. Then you work the fan tail in rows directly off the tail end. A reverse single crochet border finishes the body edge and adds the beak. The wing and flower are made separately, layered onto the back, and stitched down. Last, you add the bead eye and the hanging loop.
Finished Size and Construction
- Finished size: 4.5 in (11.4 cm) wide x 3.5 in (8.9 cm) tall, plus a 1.5 in (3.8 cm) loop
- Skill level: Intermediate
- Terminology: US terms
- Yarn weight: Size 3 crochet cotton thread (Lace, weight 0)
- Hook: 2.25 mm (B-1)
- Number of pieces: 1 ornament, built from a body-with-tail piece, a layered wing, and a flower appliqué
- Layout: Single ornament; wing sewn over the back, flower sewn onto the wing center
- Body piece size: 3.5 in (8.9 cm) x 1.5 in (3.8 cm) before border
- Body after border: 3.75 in (9.5 cm) x 1.75 in (4.4 cm)
- Border depth: 1/8 in (0.3 cm)
Materials
Choose a mercerized cotton thread in size 3. It holds lace shapes well, blocks crisply, and keeps its sheen. Avoid fuzzy or very soft thread, because the picots and open fan will lose definition.
- Ivory (main color): 10 g / 30 m of size 3 cotton thread
- Black: one 3 mm black glass bead, or 1 m of black embroidery floss for a French knot eye
These quantities include a margin of about 40% for swatching and tails.
Tools:
- 2.25 mm (B-1) crochet hook
- Tapestry needle
- Sewing needle and ivory sewing thread
- Stitch markers (3)
- Rustproof pins and a blocking mat
- Spray starch or fabric stiffener (optional)
- Small scissors
Abbreviations (US Terms)
- ch – chain
- sl st – slip stitch
- sc – single crochet
- hdc – half double crochet
- dc – double crochet
- tr – treble crochet
- sp(s) – space(s)
- st(s) – stitch(es)
- rev sc – reverse single crochet (crab stitch)
- rep – repeat
Special stitches:
- Picot: Ch 3, sl st in the 3rd ch from hook. Picots never count as stitches.
- Reverse sc: Work from left to right (if right-handed). Insert hook in the next st to the right, yarn over, pull up a loop, yarn over, pull through both loops.
Gauge and Checkpoints
Gauge: 7 hdc and 5 hdc rows = 1 in (2.5 cm) with a 2.25 mm hook.
Make one body first and measure it before you go further. Lay it flat without stretching.
- After Body Rnd 1: 3 in (7.6 cm) long x 0.75 in (1.9 cm) tall at the head end
- After Body Rnd 2: 3.25 in (8.3 cm) x 1.25 in (3.2 cm)
- After Body Rnd 3: 3.5 in (8.9 cm) x 1.5 in (3.8 cm)
- After Tail: fan extends about 1.25 in (3.2 cm) and spreads about 1.75 in (4.4 cm) wide at the scallops
- After Wing: 2.25 in (5.7 cm) long x 1.75 in (4.4 cm) wide
- Flower: 0.75 in (1.9 cm) across
If your body is too big, go down one hook size or tighten your foundation chain. If it is too small, go up one hook size. A difference of 1/8 in (0.3 cm) is fine and will disappear in blocking.
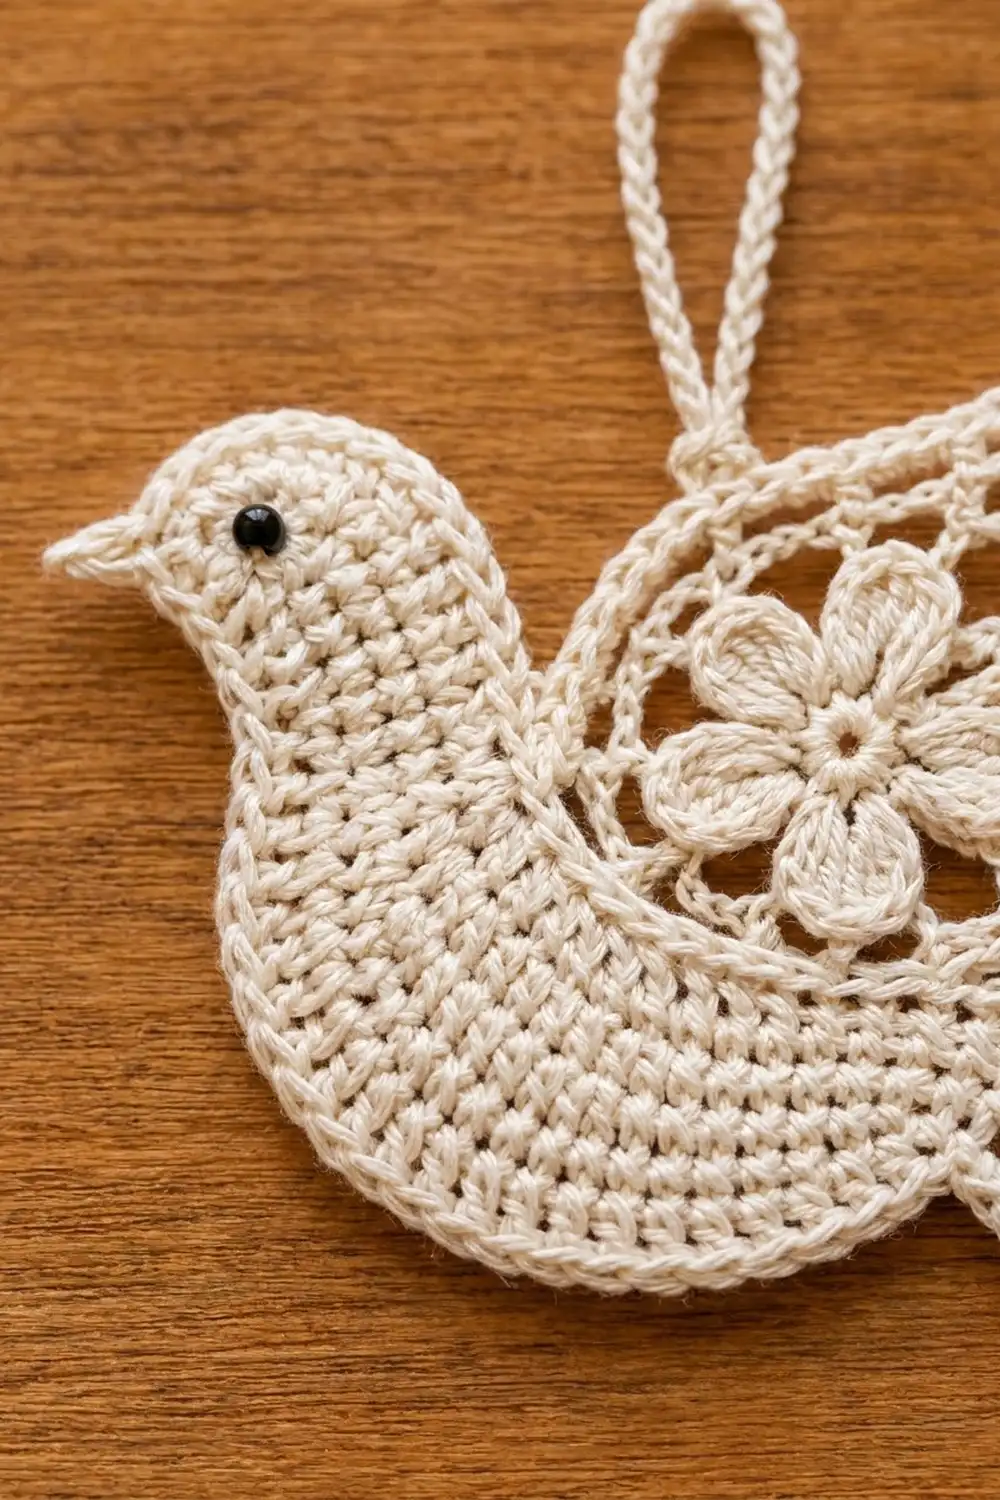
Body
Start at the tail end and work around both sides of the chain. The taller stitches build the round head.
Foundation: Ch 21.
Rnd 1: Sc in 2nd ch from hook and next 4 ch, hdc in next 5 ch, dc in next 9 ch, 7 dc in last ch. Working along the opposite side of the foundation, dc in next 9 ch, hdc in next 5 ch, sc in next 4 ch, 2 sc in same ch as first sc. Join with sl st to first sc. (46 sts)
Stitch map for Rnd 1: top sts 1–19, head sts 20–26, belly sts 27–44, tail sts 45–46.
Rnd 2: Ch 2 (does not count as a st here and throughout). Hdc in each of first 19 sts (top); 2 hdc in each of next 7 sts (head, 14 hdc); [hdc in next 2 sts, 2 hdc in next st] 6 times (belly, 24 hdc); 3 hdc in each of last 2 sts (tail, 6 hdc). Join to first hdc. (63 sts)
Rnd 3: Ch 2. Hdc in each of first 19 sts (top); [hdc in next st, 2 hdc in next st] 7 times (head, 21 hdc); [hdc in next 3 sts, 2 hdc in next st] 6 times (belly, 30 hdc); [hdc in next st, 2 hdc in next st] 3 times (tail, 9 hdc). Join to first hdc. (79 sts) Fasten off.
Stitch map for Rnd 3: top sts 1–19, head sts 20–40, belly sts 41–70, tail sts 71–79. Place a marker in st 70 and another in st 1.
The top stays straight because it has no increases. The head grows as a half circle, 7 sts per round. The belly gains 6 sts per round, which creates the gentle bulge.
Tail
The tail is worked in rows over 11 sts of Rnd 3: st 70, sts 71–79, and st 1. With the right side facing, join ivory with sl st in st 70.
Row 1: Ch 1, sc in st 70, [ch 2, skip next st, sc in next st] 5 times, ending in st 1. Turn. (6 sc, 5 ch-2 sps)
Row 2: Ch 3 (counts as dc), [ch 3, dc in next sc] 5 times. Turn. (6 dc, 5 ch-3 sps)
Row 3: Ch 4 (counts as tr), [ch 5, tr in next dc] 5 times, working the last tr in the top of the turning ch-3. Turn. (6 tr, 5 ch-5 sps)
Row 4 (scallops): Ch 1, sc in first tr, in next ch-5 sp work (hdc, 2 dc, picot, dc, picot, 2 dc, hdc), sc in next tr; rep from * 4 more times, working the last sc in the top of the turning ch-4. (36 sts: 6 sc + 5 scallops of 6 sts each; 10 picots)* Fasten off.
The chain spaces get longer each row (2, 3, then 5), so the tail opens into a fan with five lacy lobes.
Wing
The wing starts as a small lace ring. Feather arches then grow from one side of it.
Rnd 1: Ch 6, join with sl st to form a ring. Ch 1, 12 sc in ring. Join to first sc. (12 sc)
Rnd 2: Ch 1, sc in first sc, ch 3, [sc in next sc, ch 3] 11 times. Join to first sc. (12 sc, 12 ch-3 sps)
Rnd 3: Sl st in first ch-3 sp, ch 1, sc in same sp, ch 4, [sc in next sp, ch 4] 11 times. Join to first sc. (12 sc, 12 ch-4 sps)
Number the ch-4 sps 1 to 12 in working order. Sps 1–7 become the feathers. Sps 8–12 become the lower edge.
Row 4 (feather arches): Sl st in sp 1, ch 1, sc in sp 1, ch 5, sc in sp 2, ch 6, sc in sp 3, ch 7, sc in sp 4, ch 8, sc in sp 5, ch 10, sc in sp 6, ch 12, sc in sp 7. Turn. (7 sc, 6 arches)
Row 5 (edging): Ch 1, sc in first sc. Then:
- In ch-12 arch: (sc, hdc, 3 dc, tr, picot, tr, 3 dc, hdc, sc), sc in next sc. (12 sts in arch)
- In ch-10 arch: (sc, hdc, 3 dc, picot, 3 dc, hdc, sc), sc in next sc. (10 sts)
- In ch-8 arch: (sc, hdc, 2 dc, picot, 2 dc, hdc, sc), sc in next sc. (8 sts)
- In each of the ch-7, ch-6, and ch-5 arches: (sc, hdc, dc, picot, dc, hdc, sc), sc in next sc. (6 sts each)
Row 5 total: 55 sts (7 sc + 12 + 10 + 8 + 6 + 6 + 6) and 6 picots.
Lower edge: Do not turn. Continue around the ring: 4 sc in each of sps 12, 11, 10, 9, and 8. (20 sc) Sl st in first sc of Row 5. Fasten off, leaving a 12 in (30.5 cm) tail for sewing.
The longest arch forms the raised wing tip. The arches get shorter toward the body.
Flower
Rnd 1: Make a magic ring. Ch 1, 6 sc in ring. Pull tight and join to first sc. (6 sc)
Rnd 2: (Ch 2, 3 dc, ch 2, sl st) in next sc; rep from * 5 more times. (6 petals)* Fasten off, leaving a 6 in (15.2 cm) tail.
Cup each petal slightly with your fingers so it sits raised above the wing.
Border
The border is one round of reverse sc around the body only, from one side of the tail to the other. Work it before assembly.
Border gauge: 1 rev sc per st, about 7 rev sc per 1 in (2.5 cm) of edge. It adds 1/8 in (0.3 cm) along each edge.
The tail used 11 of the 79 sts in Rnd 3. That leaves 79 − 11 = 68 sts: top 18 (sts 2–19), head 21 (sts 20–40), and belly 29 (sts 41–69).
With the right side facing, join ivory with sl st in st 69, the belly stitch right next to the tail. Ch 1.
- Belly: Rev sc in st 69 and in each st back to st 41. (29 rev sc)
- Head: Rev sc in next 14 sts (sts 40–27). For the beak: ch 4, sl st in 2nd ch from hook, sc in next ch, hdc in next ch. Rev sc in next 7 sts (sts 26–20). (21 rev sc; beak not counted)
- Top: Rev sc in next 18 sts (sts 19–2). (18 rev sc)
Border total: 68 rev sc (29 + 21 + 18). Sl st into the base of the tail and fasten off.
Why the math works: Each body stitch gets exactly one rev sc, so the edge length stays the same and the body stays flat. There are no corners to add, because the increases for the curves are already built into Rnds 2 and 3. The beak sits on the upper front of the head because it comes after 14 of the 21 head sts, counting from the belly.
Final Blocking
- Weave in all ends except the sewing tails on the wing and flower.
- Soak the body, wing, and flower in cool water for 10 minutes. Press out the water in a towel.
- Pin the body to 3.75 in (9.5 cm) x 1.75 in (4.4 cm). Pin the head round and the beak pointing forward.
- Pin the tail fan open, with one pin in each tr top and one in each picot.
- Pin the wing to 2.25 in (5.7 cm) x 1.75 in (4.4 cm), opening each arch and pinning every picot. Point the long arch upward as the wing tip.
- Mist with starch if you want a stiffer ornament. Let everything dry completely.
- Assembly: Lay the wing over the back so its lower edge rests on the body about 1 in (2.5 cm) behind the head. The tip should rise above the top edge and point toward the tail. Using the wing’s sewing tail, whipstitch the 20 sc of the lower edge and the lower half of the ring to the body.
- Using the flower’s tail, sew the flower over Rnds 1–2 of the wing ring, tacking between the petals.
- Sew the bead eye about 0.5 in (1.3 cm) behind the base of the beak, centered in Rnd 2 of the head.
- Hanging loop: Join ivory at the top of the wing ring, above the flower. Ch 22, sl st in same st. Ch 1, work 30 sc over the chain loop, sl st at the base. Fasten off and weave in.
- Check the full size: 4.5 in (11.4 cm) x 3.5 in (8.9 cm), with a 1.5 in (3.8 cm) loop.
Final Quality-Control Checklist
- Body Rnd 3 has 79 sts; the border has 68 rev sc.
- The tail shows 5 open lobes and 10 picots.
- Wing Row 5 has 55 sts and 6 picots; the lower edge has 20 sc.
- The flower has 6 even petals.
- The beak points forward on the upper front of the head.
- The bead eye sits level and is secure.
- The wing lies flat with no gaps between it and the body.
- The ornament hangs level from the loop.
Troubleshooting
- Body curls or cups: Your Rnd 1 chain is too tight. Remake it with a looser chain, or use a larger hook for the chain only.
- Belly ruffles: You added extra increases. Recount Rnds 2 and 3 section by section.
- Tail fan won’t open: Your ch-5 sps are too tight. Block with more pins.
- Wing tip flops: Starch the wing and pin the ch-12 arch straight while it dries.
- Ornament tilts: Move the loop a few stitches toward the heavier tail side.
- Flower sinks into the ring: Tack it only at the center and between the petals, not at the petal tips.
Care
Hand wash in cool water with mild soap, then dry flat, pinned to shape. Store flat in tissue paper so the picots and wing tip keep their form.
Final Notes
The measurement chain is short and easy to check. Body Rnd 1 measures 3 in (7.6 cm) long. Rnd 3 measures 3.5 in (8.9 cm) x 1.5 in (3.8 cm), and the border brings the body to 3.75 in (9.5 cm) x 1.75 in (4.4 cm). The tail adds the fan and the wing adds height, so the finished ornament measures 4.5 in (11.4 cm) x 3.5 in (8.9 cm). Check each stage, and your dove will match every time.
Happy crocheting!