

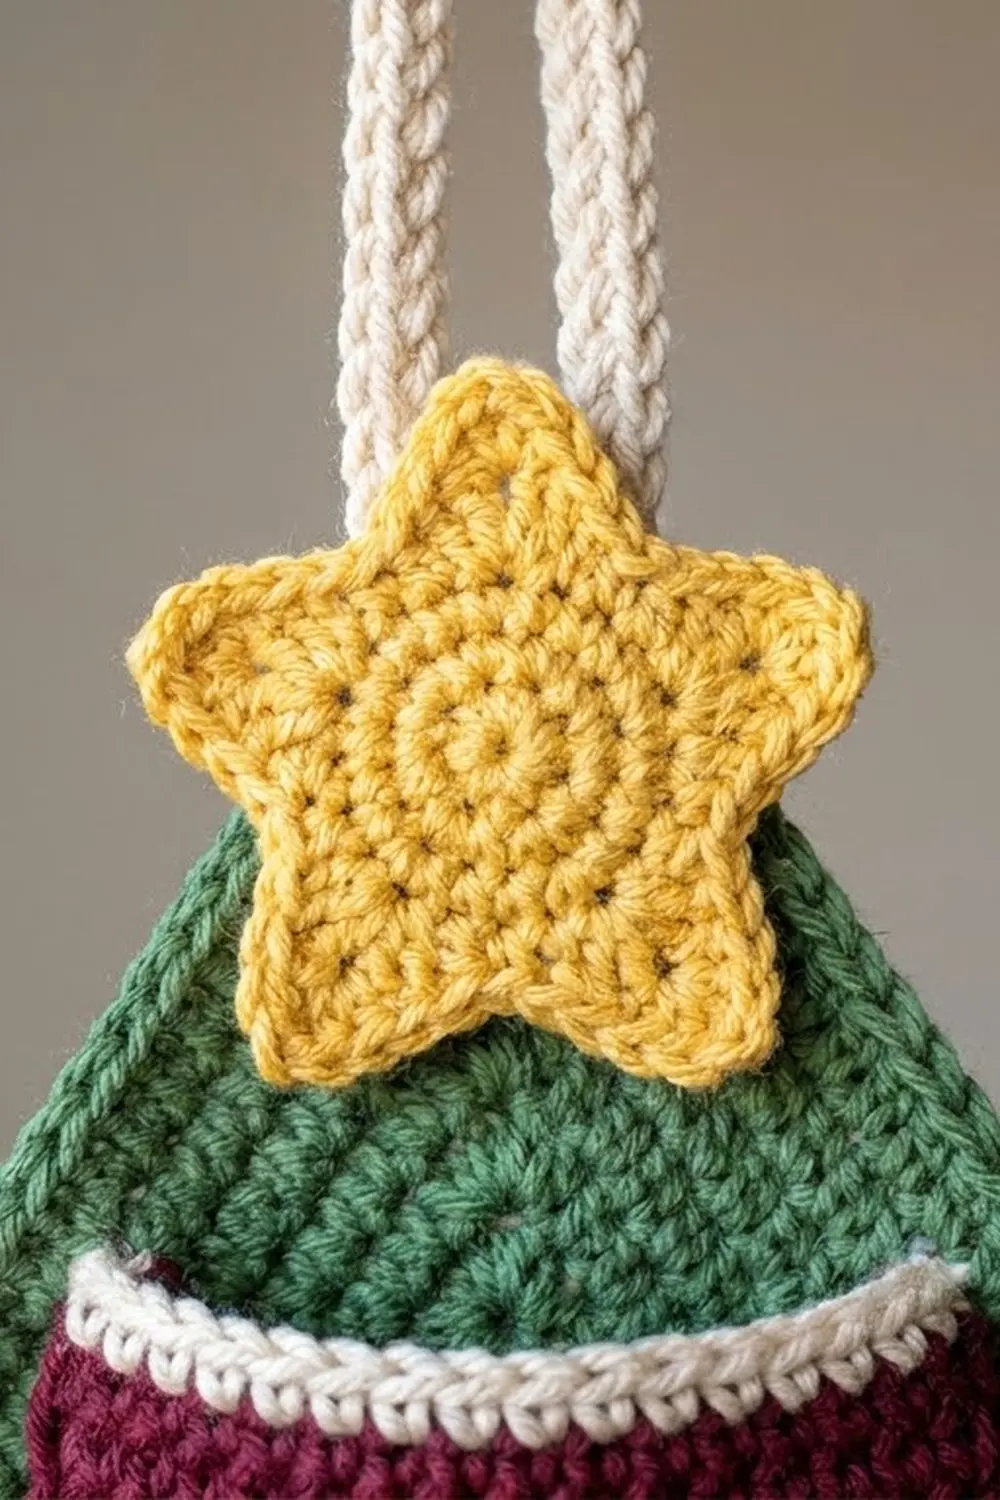
This Evergreen Pocket Tree is a wall organizer shaped like a three-tier Christmas tree. Three deep burgundy pockets stack down the center, each trimmed with a cream rim and a beaded edge. A golden star sits at the top, and a cream corded loop lets you hang it from a hook or doorknob.
The colors are classic holiday: forest green, burgundy, cream, and gold. The style is clean and graphic. The single crochet rows are dense enough to hold their shape with keys, mail, and gloves in the pockets.
This pattern uses US crochet terms. The finished tree is 10.2 in (25.9 cm) wide and 13.5 in (34.3 cm) tall without the loop, or about 16.5 in (41.9 cm) including the loop.
You work the tree panel from the bottom up in single crochet rows, shaping it with decreases and short extensions for the tier flares. The pockets are half-bowls worked in rows from a short chain. You sew the pockets to the panel, add a single crochet border, then attach the star and loop.
Finished Size and Construction
- Finished size: 10.2 x 13.5 in (25.9 x 34.3 cm) without the loop
- Skill level: Intermediate
- Terminology: US
- Yarn weight: Worsted (#4)
- Hook: 5.0 mm (H-8)
- Number of pieces: 6 (1 tree panel, 3 pockets, 1 star, 1 hanging loop)
- Layout: Pockets stacked down the center line, star at the tip, loop behind the star
- Panel size before border: 9.7 x 13 in (24.6 x 33.0 cm)
- Pocket sizes (width x height): Large 6.3 x 3.5 in (16.0 x 8.9 cm), Medium 5.1 x 2.75 in (13.0 x 7.0 cm), Small 4 x 2.25 in (10.2 x 5.7 cm)
- Border depth: 0.25 in (0.6 cm), one round
Materials
Use smooth worsted-weight acrylic or a cotton blend. Cotton blends give crisper stitches and a firmer panel. Avoid fuzzy yarns, because they hide the crab-stitch rim. These amounts assume about 200 m per 100 g:
- Green (panel and border): 55 g / 110 m
- Burgundy (pockets): 40 g / 80 m
- Cream (pocket rims and loop): 15 g / 30 m
- Yellow or gold (star): 5 g / 10 m
All quantities include a margin of about 20% for swatching, sewing, and tails.
Tools:
– 5.0 mm (H-8) crochet hook, plus 4.5 mm and 5.5 mm hooks in case you need to adjust gauge
– Tapestry needle
– 6 locking stitch markers
– Scissors
– Measuring tape
– Blocking mat and rust-proof pins
– Spray bottle
Abbreviations (US Terms)
- ch: chain
- sl st: slip stitch
- sc: single crochet
- hdc: half double crochet
- dc: double crochet
- sc2tog: single crochet 2 together
- sc3tog: single crochet 3 together
- BLO: back loop only
- rsc: reverse single crochet (crab stitch)
- st(s): stitch(es)
Extension sc (ext sc): Insert your hook into the base (bottom chain) of the last sc made. Yarn over, pull up a loop, yarn over, and pull through 1 loop to make a new base chain. Then yarn over and pull through 2 loops. Each ext sc adds 1 stitch beyond the end of the row.
Reverse sc (rsc): Without turning, work from left to right (if you’re right-handed). Insert the hook into the next stitch to the right, pull up a loop, yarn over, and pull through 2 loops.
Gauge and Checkpoints
Gauge: 14 sc and 16 rows = 4 in (10.2 cm). One sc is about 0.29 in wide, and one row is 0.25 in (0.6 cm) tall.
Make the small pocket first as your test piece. After Row 3, its straight edge should measure about 3.8 in (9.7 cm). If it does, your panel should come out at the right size too.
Panel checkpoints:
– Row 1: 34 sts = 9.7 in (24.6 cm) wide
– After Row 16: 4 in (10.2 cm) tall
– After Row 30: 7.5 in (19.1 cm) tall
– After Row 52: 13 in (33.0 cm) tall
If your work is too big, switch to a hook 0.5 mm smaller. If it’s too small, switch to a hook 0.5 mm larger. Don’t change the stitch or row counts, because the pocket placement depends on them.
Tree Panel
Use green. Unless a row says otherwise, start each row with ch 1 and turn. The ch 1 doesn’t count as a stitch. On Rows 17 and 31, the ch 4 replaces it.
Tier 1
Row 1: Ch 35, sc in 2nd ch from hook and in each ch across. (34)
Row 2: Sc in each st. (34)
Row 3 (decrease row): Sc2tog, sc to last 2 sts, sc2tog. (32)
Rows 4–5: Sc in each st. (32)
Row 6: Repeat Row 3. (30)
Rows 7–8: Sc in each st. (30)
Row 9: Repeat Row 3. (28)
Rows 10–11: Sc in each st. (28)
Row 12: Repeat Row 3. (26)
Rows 13–14: Sc in each st. (26)
Row 15: Repeat Row 3. (24)
Row 16: Sc in each st. (24)
The tier is now 6.9 in (17.5 cm) wide at the top and 4 in (10.2 cm) tall.
Tier 2
Row 17 (flare row): Ch 4 and turn. Sc in 2nd ch from hook and in the next 2 ch (3 sts). Sc in each of the 24 sts, then work 3 ext sc. 3 + 24 + 3 = 30 sts, 8.6 in (21.8 cm) wide. The flare sticks out on both sides with a small pointed tip.
Row 18: Sc in each st. (30)
Row 19: Sc2tog, sc to last 2 sts, sc2tog. (28)
Row 20: Sc in each st. (28)
Rows 21–30: Repeat Rows 19–20 five more times. The decrease rows give 26, 24, 22, 20, and 18 sts. Row 30 ends with 18 sts.
Tier 3
Row 31 (flare row): Ch 4 and turn. Sc in 2nd ch from hook and in the next 2 ch. Sc in each of the 18 sts, then work 3 ext sc. 3 + 18 + 3 = 24 sts, 6.9 in (17.5 cm) wide.
Row 32: Sc in each st. (24)
Row 33: Sc2tog, sc to last 2 sts, sc2tog. (22)
Row 34: Sc in each st. (22)
Rows 35–50: Repeat Rows 33–34 eight more times. The decrease rows give 20, 18, 16, 14, 12, 10, 8, and 6 sts. Row 50 ends with 6 sts.
Row 51: Sc2tog 3 times. (3)
Row 52: Sc3tog. (1)
Don’t fasten off. Put the live loop on a locking marker to hold it for the border.
Pockets
Use burgundy. Start each row with ch 1 and turn; the ch 1 doesn’t count as a stitch.
Rows 1–3 make a flat half-oval base. The unworked side of the starting chain and the row ends of Rows 1–3 form a straight edge, and this edge sits against the panel. Working Row 4 in the back loops only turns the walls up. The unused front loops from Row 4 end up on the outside of the pocket.
Large Pocket
Row 1: Ch 17. Work 2 sc in 2nd ch from hook, sc in next 14 ch, 2 sc in last ch. (18)
Row 2: Work 2 sc in each of the first 2 sts, sc in next 14, then 2 sc in each of the last 2 sts. 4 + 14 + 4 = 22.
Row 3: [Sc in next, 2 sc in next] twice, sc in next 14, [2 sc in next, sc in next] twice. 6 + 14 + 6 = 26.
Row 4: Working in BLO, sc in each st. (26)
Rows 5–15: Sc in each st. (26)
That gives 12 wall rows, 3 in (7.6 cm) tall. Fasten off burgundy and leave a 24 in (61.0 cm) tail for sewing.
Rim Row A: With the outside facing, join cream in the first st. Ch 1, sc in each st. (26)
Rim Row B: Don’t turn. Ch 1, rsc in each st. (26) Fasten off.
Medium Pocket
Row 1: Ch 13. Work 2 sc in 2nd ch from hook, sc in next 10 ch, 2 sc in last ch. (14)
Row 2: Work 2 sc in each of the first 2 sts, sc in next 10, then 2 sc in each of the last 2 sts. 4 + 10 + 4 = 18.
Row 3: [Sc, 2 sc in next] twice, sc in next 10, [2 sc in next, sc] twice. 6 + 10 + 6 = 22.
Row 4: Working in BLO, sc in each st. (22)
Rows 5–12: Sc in each st. (22) That’s 9 wall rows, 2.25 in (5.7 cm) tall. Leave a long sewing tail.
Rim Rows A–B: Work as for the Large Pocket. (22 sc, then 22 rsc)
Small Pocket
Row 1: Ch 9. Work 2 sc in 2nd ch from hook, sc in next 6 ch, 2 sc in last ch. (10)
Row 2: Work 2 sc in each of the first 2 sts, sc in next 6, then 2 sc in each of the last 2 sts. 4 + 6 + 4 = 14.
Row 3: [Sc, 2 sc in next] twice, sc in next 6, [2 sc in next, sc] twice. 6 + 6 + 6 = 18.
Row 4: Working in BLO, sc in each st. (18)
Rows 5–10: Sc in each st. (18) That’s 7 wall rows, 1.75 in (4.4 cm) tall. Leave a long sewing tail.
Rim Rows A–B: Work as for the Large Pocket. (18 sc, then 18 rsc)
Pocket height check: Each pocket’s height is its wall rows plus the 2 rim rows:
– Large: 12 + 2 = 14 rows = 3.5 in (8.9 cm)
– Medium: 9 + 2 = 11 rows = 2.75 in (7.0 cm)
– Small: 7 + 2 = 9 rows = 2.25 in (5.7 cm)
Star
Use yellow.
Round 1: Make a magic ring. Ch 1, work 10 sc in the ring, then sl st to the first sc. (10)
Round 2: Ch 4, sc in 2nd ch from hook, hdc in next ch, dc in next ch, skip 1 st, sl st in next st. Repeat from * to * 5 times in total. (5 points)
Fasten off and leave a tail. The star is about 2 in (5.1 cm) across.
Hanging Loop
Use cream. Ch 50, then sl st into the back bump of the 2nd ch from hook and each ch across. (49 sl sts) This makes a firm cord about 10 in (25.4 cm) long. Fasten off and leave a tail.
Make All Pieces
- Green: 1 tree panel (the border comes later)
- Burgundy with cream rims: 1 large, 1 medium, and 1 small pocket
- Yellow: 1 star
- Cream: 1 hanging loop
Layout (panel rows, counted from the bottom):
Rows 46–52 + tip  [  STAR  ]   loop sewn behind
Rows 31–39        [ SMALL  ]   14 sts wide
Rows 18–28        [ MEDIUM ]   18 sts wide
Rows 3–16         [ LARGE  ]   22 sts wide
Rows 1–2          base, left open
Joining
Lightly steam or spray-block the panel and pockets first. Use locking markers to mark the center stitch of the panel on Rows 3, 18, and 31.
Method: Whipstitch with the burgundy tail. Go through the outer loops of the pocket edge and one full stitch of the panel.
Large Pocket, stitch by stitch:
– Base: The base edge is 16 chain loops plus 3 row ends on each side, which is 22 edge units. Sew it across 22 centered stitches on Row 3, one unit per stitch. Row 3 has 32 sts, so 5 sts stay free on each side.
– Sides: Each side of the pocket has 14 row ends (12 wall rows plus 2 rim rows). Sew one row end to each panel row, going straight up from Row 3 through Row 16. The tree is 24 sts wide at Row 16, so 1 st stays free on each side.
Medium Pocket: The base is 12 chain loops plus 3 row ends on each side, which is 18 units. Sew it across 18 centered sts on Row 18, which has 30 sts. Each side has 11 row ends and runs up through Row 28, which has 20 sts.
Small Pocket: The base is 6 chain loops plus 3 row ends on each side, which is 14 units. Sew it across 14 centered sts on Row 31, which has 24 sts. Each side has 9 row ends and runs up through Row 39, which has 16 sts.
Leave the rims unsewn so the pockets stay open. Keep your tension snug but relaxed. If the panel puckers behind a pocket, loosen those stitches.
Size checkpoint: The panel should still measure 9.7 x 13 in (24.6 x 33.0 cm) and lie flat.
Border
Border gauge: Same as the panel, 14 sc = 4 in (10.2 cm). Work 1 sc per row end.
Put the live green loop back on your hook at the top point.
Round 1:
– Top point: Work 3 sc in the top of the Row 52 st. (3)
– Left side: Work down the side with 1 sc in each row end from Row 51 to Row 1, but work 3 sc in the row ends of Rows 31 and 17 to make the flare tips. Also work 1 sc in the underside of each of the 3 extension sts at both flares. 51 + 4 (extra sts at the tips) + 6 (undersides) = 61.
– Bottom: Work 3 sc in the first foundation ch, sc in the next 32 ch, and 3 sc in the last ch. 34 + 4 = 38.
– Right side: Work up the side the same way. (61)
– Sl st to the first sc.
Total: 3 + 61 + 38 + 61 = 163 sts. Fasten off.
Why the math works: An sc row is 0.25 in tall and an sc is about 0.29 in wide. On the slanted edges, each row steps in by up to half a stitch, so the diagonal edge measures about 0.27–0.29 in per row. That’s almost exactly one sc width, so 1 sc per row end lies flat. The 3-sc groups at the corners and flare tips add the extra length needed to turn those points. The border adds 0.25 in (0.6 cm) on every side:
– Width: 9.7 + 0.5 = 10.2 in (25.9 cm)
– Height: 13 + 0.5 = 13.5 in (34.3 cm)
Attach the star and loop: Fold the loop in half. Sew both ends to the back of the panel at Rows 48–51 so about 3 in (7.6 cm) of loop shows above the tip. Sew the star over the tip on the front, covering Rows 46–52.
Final Blocking
- Lightly mist the whole organizer until it’s damp, not soaked.
- Lay it face up on the blocking mat.
- Pin the base edge straight to 10.2 in (25.9 cm).
- Pin the top point 13.5 in (34.3 cm) above the base, centered.
- Pin out each flare tip so it’s sharp and matches the tip on the other side.
- Shape each pocket rim into a smooth half-oval. Stuff the pockets loosely with plastic bags so they hold their curve.
- Let it dry completely, for at least 24 hours, before you hang it.
Final Quality-Control Checklist
- The tree measures 10.2 x 13.5 in (25.9 x 34.3 cm).
- The flare tips on the left and right match.
- The border has 163 sts, with no gaps at the flare undersides.
- The pockets are centered and level, and the gaps between them are even.
- The rims are open and the crab stitch is even.
- The star is secure and the loop holds the weight of full pockets.
- All ends are woven in on the back.
Troubleshooting
- Panel too narrow: Your gauge is tight. Go up 0.5 mm and recheck Row 1.
- Uneven flare tips: Check that each flare row has exactly 3 chain sc and 3 ext sc.
- Border ruffles: You probably worked extra sc on the slanted edges. Use only 1 sc per row end.
- Pocket stays flat instead of cupping: Row 4 wasn’t worked in BLO. Rip back and rework it.
- Organizer tilts on the wall: The loop is off-center. Re-sew it on the center stitch line.
- Crab stitch looks tight or twisted: Pull each loop up a little taller before you finish the stitch.
Care
Empty the pockets, hand wash in cool water, and lay flat to dry. Reshape the rims and flare tips while the piece is still damp.

Final Notes
Each measurement builds on the one before. A gauge of 14 sc = 4 in (10.2 cm) gives a 34-stitch base 9.7 in (24.6 cm) wide, and 52 rows give a height of 13 in (33.0 cm). The 163-stitch border brings the tree to 10.2 x 13.5 in (25.9 x 34.3 cm). The pockets take up 22, 18, and 14 stitches, so each one fits inside its tier with stitches to spare. Check each stage before you move on, and the finished tree will come out flat and square.
Happy crocheting!