

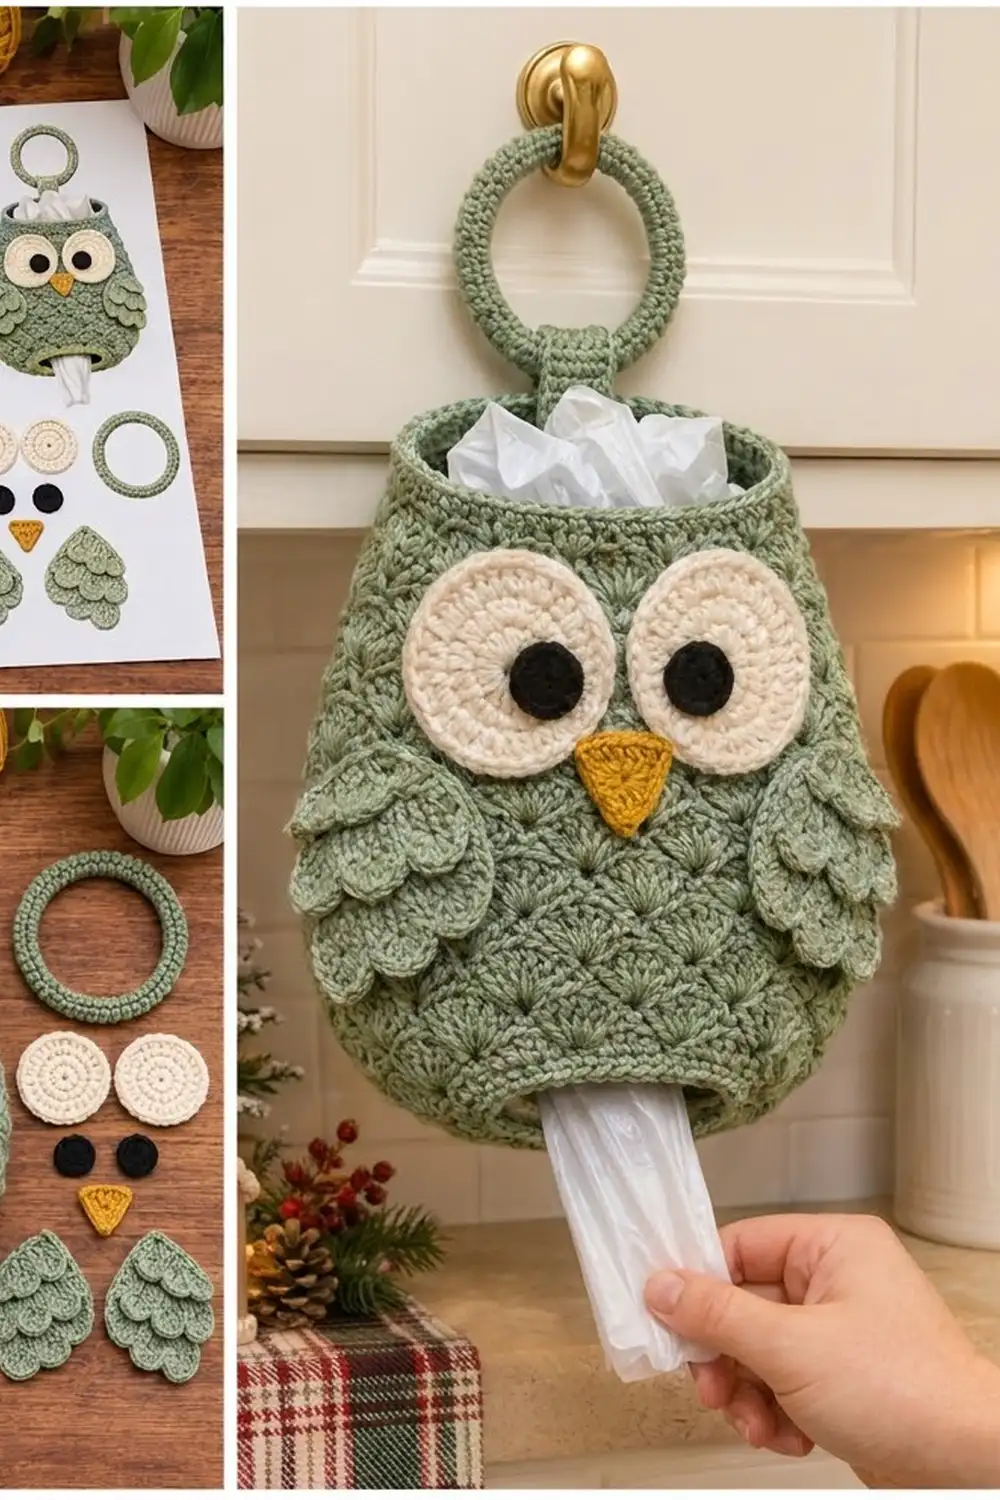
This owl bag holder makes storing plastic bags in the kitchen a little more cheerful. The body is a soft, egg-shaped pouch covered in rounded shell texture that looks like feathers. Big cream eyes, round black pupils, a mustard-gold beak and two layered, scalloped wings give it a friendly face. A covered ring at the top lets it hang from a cabinet knob or hook.
The colors are calm and cozy. Sage green is used for the body, ring, strap and wings. The eyes are cream, the pupils are black and the beak is mustard gold. It suits a farmhouse kitchen all year and looks especially sweet next to holiday decor.
This pattern uses US crochet terms. The finished body measures about 10 in (25.4 cm) wide at its widest point and 8.5 in (21.6 cm) tall. From the top of the ring to the bottom of the body, it hangs about 13.5 in (34.3 cm).
The body is worked in one seamless piece from the bottom up. You start with a chain ring that becomes the opening where bags come out, then increase across the rounded base. Next come shell rounds that make the body wider and then narrower by changing the shell size. A short sc rim finishes the top. The eyes, pupils, beak, wings, strap and covered ring are made separately and sewn on.
Finished Size and Construction
- Finished size: body 10 in (25.4 cm) wide x 8.5 in (21.6 cm) tall, laid flat
- Hanging length: about 13.5 in (34.3 cm) including ring
- Skill level: Easy-intermediate
- Terminology: US
- Yarn weight: Worsted (#4)
- Hook: 5.0 mm (H-8)
- Number of pieces: 1 body plus 9 small add-on pieces (ring, strap, 2 eyes, 2 pupils, beak, 2 wings)
- Layout: single hanging pouch; no blocks to join
- Body circumference: 15 in (38.1 cm) at base, 20 in (50.8 cm) at widest, 12.5 in (31.8 cm) at rim
- Size before border: 6.25 in (15.9 cm) rim width flat, 8 in (20.3 cm) tall
- Border depth: 0.25 in (0.6 cm) at the rim, 0.25 in (0.6 cm) around the bottom opening
Materials
Choose a smooth worsted-weight yarn so the shells look crisp. Acrylic or a cotton-acrylic blend is ideal for a kitchen piece because it washes well and holds its shape.
- Sage green: 170 g / 310 m (body, ring cover, strap, wings)
- Cream: 15 g / 27 m (eyes)
- Black: 5 g / 9 m (pupils)
- Mustard gold: 5 g / 9 m (beak)
These amounts include about 15 percent extra to allow for swatching and differences in tension.
Tools:
- 5.0 mm (H-8) crochet hook
- One 3 in (7.6 cm) plastic or wooden ring
- Stitch markers
- Yarn needle
- Scissors
- Rust-proof pins and a blocking surface
- Spray bottle
Abbreviations (US Terms)
- ch – chain
- sl st – slip stitch
- sc – single crochet
- dc – double crochet
- sc2tog – single crochet 2 together
- BLO – back loop only
- FL – front loop
- rev sc – reverse single crochet (crab stitch)
- sk – skip
- st(s) – stitch(es)
- RS – right side
Shell: a group of dc worked into one stitch. The center of a 5-dc shell is its 3rd dc. The center of a 7-dc shell is its 4th dc.
Reverse sc: Work from left to right (if you are right-handed). Insert the hook into the next st to the right, yarn over and pull up a loop, then yarn over and pull through both loops.
Gauge and Checkpoints
- Sc gauge: 16 sts and 16 rows = 4 in (10.2 cm)
- Dc gauge: 16 sts and 8 rounds = 4 in (10.2 cm)
- Shell gauge: one 5-dc repeat (6 sts) = 1.5 in (3.8 cm); one 7-dc repeat (8 sts) = 2 in (5.1 cm); 2 shell rounds = 1 in (2.5 cm)
Make one eye first as a test. If it measures 2.5 in (6.4 cm) across, your gauge is close. Then check the body at these points:
- After Rnd 3: 15 in (38.1 cm) around
- After Rnd 5: 7.5 in (19.1 cm) flat
- After Rnd 13: 10 in (25.4 cm) flat; height along the side 5.75 in (14.6 cm)
- After Rnd 19: rim 6.25 in (15.9 cm) flat; height 8 in (20.3 cm)
If it’s too big: go down to a 4.5 mm hook. If it’s too small: go up to a 5.5 mm hook. Shell rounds often come out taller than expected, so check height as well as width.

Body
Work in joined rounds with the RS facing. Do not turn.
Rnd 1 (bottom opening): Ch 30 and sl st to the first ch to form a ring, without twisting the chain. Ch 1, sc in each ch around, sl st to first sc. (30 sts)
Rnd 2: Ch 1, sc in next st, 2 sc in next st; repeat from * 15 times, sl st to first sc. (45 sts)
Rnd 3: Ch 1, sc in next 2 sts, 2 sc in next st; repeat from * 15 times, sl st to first sc. (60 sts)
The piece now curves up gently into a shallow cup. This is the rounded base that holds the bags.
Rnd 4 (first shell round): Ch 1, sc in first st, sk 2, 5 dc in next st, sk 2, sc in next st; repeat from * around. On the last repeat, stop after the second sk 2 and sl st to the first sc. (10 shells + 10 sc = 60 sts)
Rnd 5: Sl st in each of next 2 dc, ch 1, sc in next dc (center of shell), 5 dc in next sc, sc in center dc of next shell; repeat from * around, ending with 5 dc in last sc, sl st to first sc. (10 shells + 10 sc = 60 sts)
Each shell sits on an sc, and each sc sits in the center of a shell from the round below. This staggers the shells like feathers.
Rnd 6 (growth round): Sl st in each of next 2 dc, ch 1, sc in next dc, 7 dc in next sc, sc in center dc of next shell; repeat from * around, ending with 7 dc in last sc, sl st to first sc. (10 shells of 7 dc + 10 sc = 80 sts)
Rnds 7–13: Sl st in each of next 3 dc, ch 1, sc in next dc (4th dc, center), 7 dc in next sc, sc in center dc of next shell; repeat from * around, ending with 7 dc in last sc, sl st to first sc. (80 sts each round)
Check: the body should be 10 in (25.4 cm) flat and 5.75 in (14.6 cm) tall along the side.
Rnd 14 (shaping round): Sl st in each of next 3 dc, ch 1, sc in next dc, 5 dc in next sc, sc in center dc of next shell; repeat from * around, ending with 5 dc in last sc, sl st to first sc. (10 shells of 5 dc + 10 sc = 60 sts)
Rnds 15–16: Work as Rnd 5. (60 sts each round)
Rnd 17 (conversion round): Ch 1, sc in next 4 sts, sc2tog; repeat from * 10 times, sl st to first sc. (40 sc worked one per stitch + 10 sc2tog = 50 sts)
Rnds 18–19: Ch 1, sc in each st around, sl st to first sc. (50 sts each round)
Don’t fasten off. You’ll work the rim border next.
Covered Ring
With sage green, attach the yarn to the ring with a sl st. Work sc tightly around the ring until it is fully covered, about 60 sc. Push the stitches together as you go so none of the ring shows through. Sl st to the first sc and fasten off. The covered ring is about 3.5 in (8.9 cm) across.
Strap
With sage green, ch 5.
Row 1: Sc in 2nd ch from hook and in each ch across, turn. (4 sts)
Rows 2–16: Ch 1, sc in BLO of each st across, turn. (4 sts)
Working in the back loops gives the strap fine ridges. It measures 1 in (2.5 cm) wide x 4 in (10.2 cm) long. Fasten off, leaving a long tail.
Eyes (Make 2)
With cream, make a magic ring. Join each round with a sl st to the first sc.
Rnd 1: Ch 1, 6 sc in ring. (6 sts)
Rnd 2: Ch 1, 2 sc in each st around. (12 sts)
Rnd 3: Ch 1, sc in next st, 2 sc in next; repeat around. (18 sts)
Rnd 4: Ch 1, sc in next 2 sts, 2 sc in next; repeat around. (24 sts)
Rnd 5: Ch 1, sc in next 3 sts, 2 sc in next; repeat around. (30 sts)
Fasten off, leaving a long tail. Each eye is about 2.5 in (6.4 cm) across.
Pupils (Make 2)
With black, work Rnds 1–2 of the eye. (12 sts) Fasten off, leaving a long tail. Each pupil is about 1 in (2.5 cm) across.
Beak
With mustard gold, ch 7.
Row 1: Sc in 2nd ch from hook and in each ch across, turn. (6 sts)
Row 2: Ch 1, sc2tog, sc in next 2 sts, sc2tog, turn. (4 sts)
Row 3: Ch 1, sc2tog twice, turn. (2 sts)
Row 4: Ch 1, sc2tog. (1 st)
Edging: Ch 1 and sc evenly around all three sides, working 3 sc in each corner. Sl st to the first sc. Fasten off, leaving a long tail. The beak is a downward-pointing triangle about 1.5 in (3.8 cm) wide x 1 in (2.5 cm) tall.
Wings (Make 2)
Each wing is a teardrop shape worked from the pointed top down. It finishes with four tiers of overlapping scallops.
With sage green, ch 2.
Row 1: 3 sc in 2nd ch from hook, turn. (3 sts)
Row 2: Ch 1, 2 sc in first st, sc in next, 2 sc in last, turn. (5 sts)
Row 3: Ch 1, sc in BLO of each st, turn. (5 sts)
Row 4: Ch 1, 2 sc in first st, sc to last st, 2 sc in last, turn. (7 sts)
Row 5: Ch 1, sc in each st, turn. (7 sts)
Row 6: Repeat Row 4. (9 sts)
Row 7: Ch 1, sc in BLO of each st, turn. (9 sts)
Row 8: Repeat Row 4. (11 sts)
Row 9: Repeat Row 5. (11 sts)
Row 10: Repeat Row 4. (13 sts)
Row 11: Ch 1, sc in BLO of each st, turn. (13 sts)
Row 12: Repeat Row 5. (13 sts)
Row 13: Ch 1, sc2tog, sc in next 9 sts, sc2tog, turn. (11 sts)
Row 14: Ch 1, sc2tog, sc in next 7 sts, sc2tog, turn. (9 sts)
Row 15 (bottom scallops): Ch 1, sc in first st, sk 1, 5 dc in next st, sk 1, sc in next st; repeat from * once more. (2 scallops: 3 sc + 10 dc = 13 sts) Fasten off.
Rows 3, 7 and 11 are all worked with the same side facing you, and that side is the RS. Because those rows go into back loops only, each one leaves a line of free front loops on the row below it.
Feather tiers: Hold the wing with the RS facing and the point at the top. For each tier, join sage green to the first free FL of the row named.
- Tier A (FL of Row 10, 13 loops): Sc in first FL, sk 1, 5 dc in next FL, sk 1, sc in next FL; repeat from * 3 times. (3 scallops: 4 sc + 15 dc = 19 sts) Fasten off.
- Tier B (FL of Row 6, 9 loops): Work as Tier A, repeating from * 2 times. (2 scallops: 3 sc + 10 dc = 13 sts) Fasten off.
- Tier C (FL of Row 2, 5 loops): Work as Tier A, repeating from * once. (1 scallop: 2 sc + 5 dc = 7 sts) Fasten off.
Each tier hangs down over the rows below it. From top to bottom, the wing shows 1, 2, 3, then 2 scallops, stacked like feathers. The finished wing is about 3.25 in (8.3 cm) wide x 4 in (10.2 cm) tall.
Border
The border has two parts: a firm rim at the top and a clean edge around the bottom opening. Use the sc gauge for the border: 16 sts = 4 in (10.2 cm).
Rim, Rnd 20: Continuing from Rnd 19, ch 1, rev sc in each st around, sl st to first st. (50 sts) Fasten off.
When the body is flattened, that is 25 sts across the front and 25 across the back. At 4 sts per inch, 25 sts = 6.25 in (15.9 cm), which matches the Rnd 19 checkpoint. The rev sc adds 0.25 in (0.6 cm) of height. It also makes a corded edge that won’t stretch out when you stuff bags in.
Bottom opening edging: With the RS facing, join sage green to any free loop of the Rnd 1 foundation chain. Ch 1, sc in each free loop around, sl st to first sc. (30 sts) Fasten off.
Flattened, that is 15 sts per side, and 15 sts = 3.75 in (9.5 cm). Both border rounds work one stitch into each stitch with no increases or decreases. That is why the counts match the rounds below and neither opening flares or puckers.
Assembly
Weave in all ends on the add-on pieces before sewing them on.
- Pupils: Center a pupil on each eye and whipstitch around its edge with black.
- Eyes: Flatten the body so the round joins sit at the center back. Place the eyes side by side on the front, touching in the middle, with their tops 1 in (2.5 cm) below the rim. Sew them on with cream.
- Beak: Center the beak below the point where the eyes meet, overlapping their lower edges slightly. Sew it on with gold.
- Wings: Place one wing on each side, with the tips angled slightly inward and the tops about 3.5 in (8.9 cm) below the rim. Sew around the edge of the wing’s flat base only, so the scallops can lift freely.
- Strap: Slide the strap through the ring and fold it in half. Sew both ends to the inside of the rim at the center back, overlapping the rim by 0.5 in (1.3 cm). About 1.5 in (3.8 cm) of folded strap shows above the rim.
Final Blocking
- Mist the body until it is damp, not soaked.
- Stuff it with a bundle of bags or a small towel to give it a rounded egg shape.
- Smooth the shells with your fingers so each one fans out evenly.
- If the wing scallops curl, pin them flat and mist them.
- Pat the eyes flat and round.
- Let everything dry completely, for at least 12 hours, before hanging.
Final Quality-Control Checklist
- The body is 10 in (25.4 cm) wide at its widest and about 8.5 in (21.6 cm) tall.
- The rim lies at 6.25 in (15.9 cm) flat with no ruffling.
- The bottom opening lies at 3.75 in (9.5 cm) flat and lets bags out easily.
- Every shell round has exactly 10 shells.
- The eyes are level and the same size, and the beak points straight down.
- The wings sit at the same height on both sides.
- The strap is secure and the ring is fully covered.
- All ends are woven in and hidden.
Troubleshooting
The shells drift into a spiral. You may be starting the round in the wrong dc. Count to the exact center dc each round.
The body ruffles in the middle. Your dc may be loose. Use a smaller hook for Rnds 6–13 only.
The rim flares. Check that Rnd 17 has 50 sts, and work the rev sc more tightly.
The bottom opening is too tight. Make the foundation chain with a hook one size larger.
The wing scallops face the wrong way. Make sure Rows 3, 7 and 11 are worked in BLO and that you work the tiers with the RS facing.
The ring shows through. Add more sc and push them tightly together.
Care
Hand wash in cool water and lay flat to dry, reshaping the body around a towel. Don’t wring it, because that can stretch the shells.
Final Notes
All the measurements in this owl build on each other. The 30-st opening flattens to 3.75 in (9.5 cm). The 60-st base and lower shells measure 7.5 in (19.1 cm) flat. The larger 7-dc shells bring the widest part to 80 sts and 10 in (25.4 cm). Then the smaller shells and the Rnd 17 decreases bring the rim back to 50 sts and 6.25 in (15.9 cm). The border adds 0.25 in (0.6 cm) of height without changing the width. If your piece matches each checkpoint, the finished owl will match too.
Happy crocheting!