

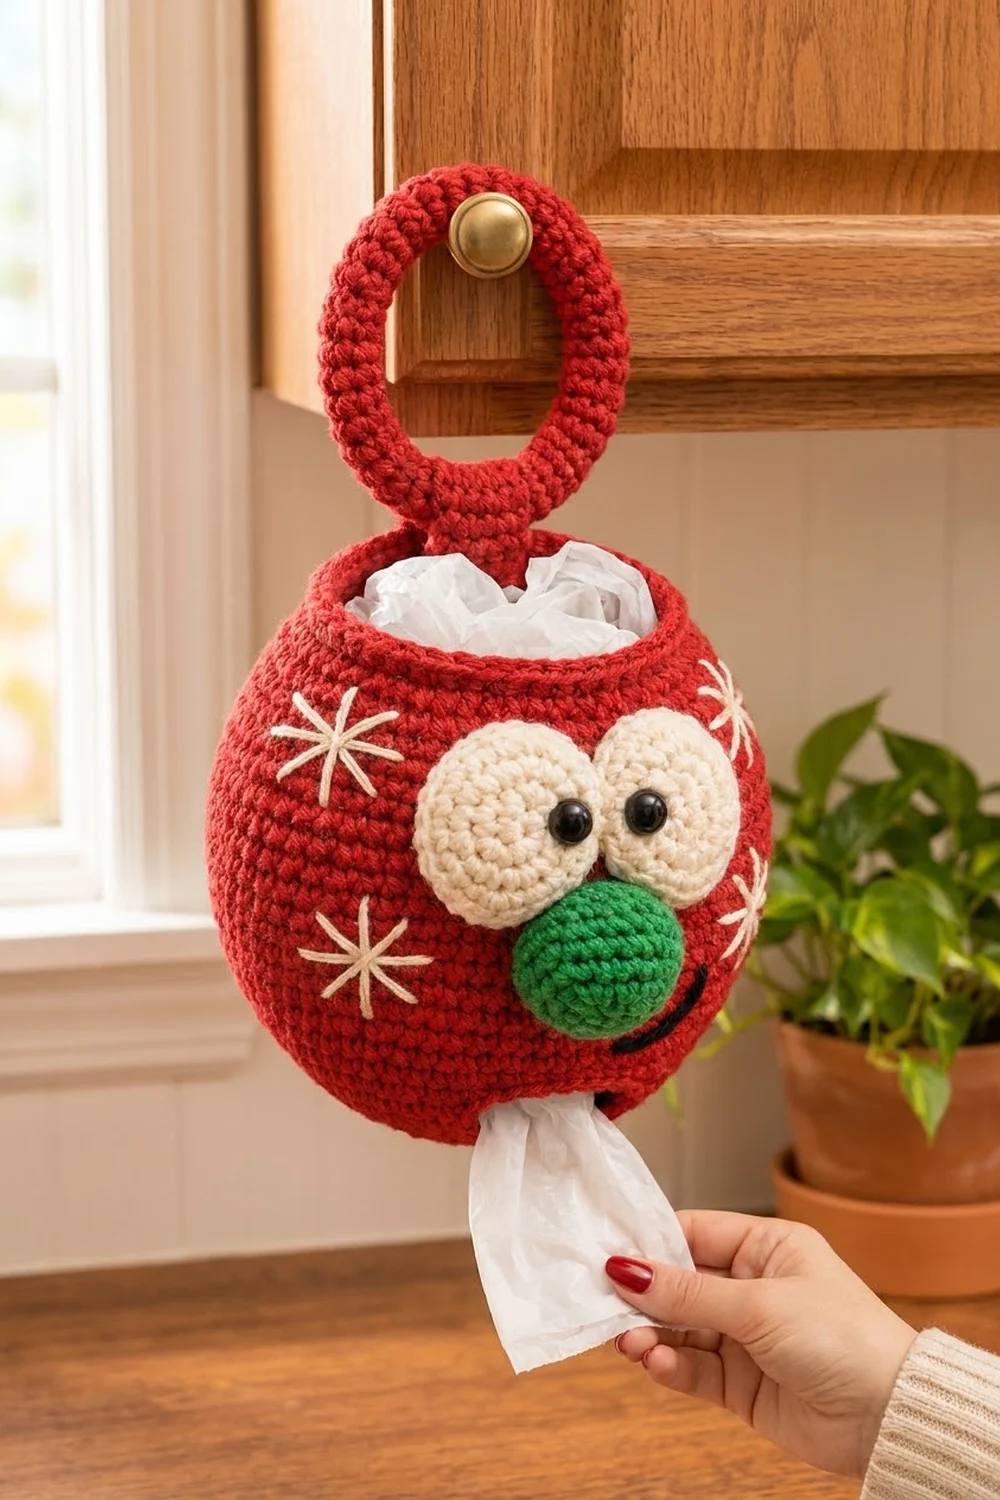
This cheerful holder makes a kitchen chore a little more festive. A round red body holds your plastic grocery bags. Two big cream eyes, a puffy green nose, and a crooked black smile give it a goofy face. Four cream snowflakes are stitched around the face. You stuff bags in through the open top and pull them out one at a time through a slit near the bottom.
The colors are classic Christmas: tomato red, cream, bright green, and black. The style is close to amigurumi, with tight single crochet worked in a spiral. That makes the fabric firm, so it holds its round shape without a lining.
This pattern uses US crochet terms. The finished body is about 7.5 in (19.1 cm) wide laid flat and 7 in (17.8 cm) tall. Including the hanging ring, it is about 11.75 in (29.8 cm) long.
The construction is simple. You work the body in one piece from the bottom up, with the bag slit built into the lower front. A short crab-stitch rim finishes the top. Next you make a padded hanging ring, a tab, two eyes, a nose, and a smile, and sew them on. You embroider the snowflakes last.
Finished Size and Construction
- Finished size: body 7.5 in (19.1 cm) wide x 7 in (17.8 cm) tall; total hanging length 11.75 in (29.8 cm)
- Skill level: easy-intermediate
- Terminology: US
- Yarn weight: worsted (#4)
- Hook: 4.0 mm (G-6)
- Number of pieces: one finished holder, made from one body plus small sewn-on parts (2 ring layers, 1 tab, 2 eyes, 1 nose, 1 smile)
- Layout: single item; face on the front, slit at the lower front, ring at the back of the rim
- Body before rim: about 6.4 in (16.3 cm) tall
- Rim (border) depth: about 0.6 in (1.5 cm)
- Bag slit: 3 in (7.6 cm) wide
- Hanging ring: about 4 in (10.2 cm) outside, 2.75 in (7.0 cm) inside
Materials
Choose a smooth worsted-weight acrylic or cotton blend. Acrylic is lighter and easy to wash. Cotton is stiffer and holds the round shape a little better. Avoid fuzzy yarns, because the face pieces look best with crisp stitches.
- Red (main color): 110 g / 200 m
- Cream: 15 g / 27 m (eyes and snowflakes)
- Green: 10 g / 18 m (nose)
- Black: 3 g / 5 m (smile)
All quantities include a margin of about 15 percent to cover gauge differences and a test piece.
Tools:
- 4.0 mm (G-6) crochet hook
- Two 12 mm black safety eyes with backs
- Small handful of polyester fiberfill
- Stitch markers (at least 2)
- Tapestry needle
- Scissors
- Measuring tape
- Pins
For the cream version, swap red and cream, and make the nose and snowflakes in red.
Abbreviations (US Terms)
- MR – magic ring
- ch – chain
- sl st – slip stitch
- sc – single crochet
- inc – 2 sc in the same stitch
- dec – single crochet 2 together (invisible decrease recommended)
- sk – skip
- st(s) – stitch(es)
- Rnd – round
- rev sc – reverse single crochet (crab stitch)
Special stitch – reverse single crochet: Work from left to right (if you are right-handed). Insert the hook into the next stitch to the right, yarn over, and pull up a loop. Yarn over again and pull through both loops. This makes a twisted, corded edge.
Gauge and Checkpoints
Gauge: 16 sc and 18 rnds = 4 in (10.2 cm) in spiral sc.
Test one piece first. Make the nose, or work the body through Rnd 8, and measure it before you go further.
Checkpoints:
- After body Rnd 8 (48 sts): the flat base is about 3.5 in (8.9 cm) across.
- After body Rnd 14 (60 sts): the circumference is 15 in (38.1 cm), about 7.5 in (19.1 cm) wide laid flat.
- After body Rnd 32 (42 sts): the top opening is 10.5 in (26.7 cm) around, about 5.25 in (13.3 cm) across laid flat.
- Each eye: about 2.2 in (5.6 cm) across.
- Nose: about 1.8 in (4.6 cm) across.
If your pieces are too big, switch to a 3.75 mm hook. If they are too small, switch to a 4.5 mm hook. The fabric should be firm with no visible gaps. If you can see holes, go down a hook size even if the width is close, because the bags will press on the fabric.

Body
Work in a continuous spiral and don’t join the rounds. Put a marker in the first stitch of each round and move it up as you go. The start of each round sits at the back center of the body.
Base:
- Rnd 1: 6 sc in MR. (6)
- Rnd 2: inc in each st around. (12)
- Rnd 3: (sc, inc) 6 times. (18)
- Rnd 4: (2 sc, inc) 6 times. (24)
- Rnd 5: (3 sc, inc) 6 times. (30)
- Rnd 6: (4 sc, inc) 6 times. (36)
- Rnd 7: (5 sc, inc) 6 times. (42)
- Rnd 8: (6 sc, inc) 6 times. (48)
Checkpoint: the base lies flat and is about 3.5 in (8.9 cm) across.
Lower sides and bag slit:
- Rnd 9: sc in each st around. (48)
- Rnd 10: (7 sc, inc) 6 times. (54)
- Rnd 11: sc in each st around. (54)
- Rnd 12 (slit round): 21 sc, ch 12, sk 12 sts, 21 sc. (42 sc + 12 ch = 54)
- Rnd 13: 21 sc, 12 sc into the chains (work into the back bump of each ch), 21 sc. (54)
The 12 skipped stitches make a slit 3 in (7.6 cm) wide. It sits at the front center, directly opposite the round marker. The bags come out here.
Widest section:
- Rnd 14: (8 sc, inc) 6 times. (60)
- Rnds 15–24: sc in each st around. (60) — 10 rounds
Checkpoint: the circumference is 15 in (38.1 cm), about 7.5 in (19.1 cm) wide laid flat.
Shaping the shoulder:
- Rnd 25: (8 sc, dec) 6 times. (54)
- Rnds 26–27: sc in each st around. (54)
- Rnd 28: (7 sc, dec) 6 times. (48)
- Rnd 29: sc in each st around. (48)
- Rnd 30: (6 sc, dec) 6 times. (42)
- Rnds 31–32: sc in each st around. (42)
Checkpoint: the top opening is 10.5 in (26.7 cm) around. The body is about 6.4 in (16.3 cm) tall laid flat. Don’t fasten off. Go straight on to the Border section.
Hanging Ring (make 2 layers)
With red, ch 36. Join with a sl st to the first ch to form a ring, taking care not to twist the chain.
- Rnd 1: sc in each ch around. (36)
- Rnd 2: (5 sc, inc) 6 times. (42)
- Rnd 3: (6 sc, inc) 6 times. (48)
Sl st into the next st and fasten off. Leave a long tail on one layer only.
Assembling the ring: Hold the two layers wrong sides together. Use the long tail to whipstitch the inner edges together through all 36 sts. Tuck a thin strip of fiberfill between the layers all the way around. Then join the outer edges by working 48 sl st through both layers. You now have a soft, padded loop about 4 in (10.2 cm) across the outside and 2.75 in (7.0 cm) across the inside.
Tab
With red, ch 7.
- Row 1: sc in 2nd ch from hook and in each ch across. (6)
- Rows 2–14: ch 1, turn, sc in each st across. (6)
Fasten off and leave a long tail. The tab is 1.5 in (3.8 cm) wide and about 3.1 in (7.9 cm) long.
Eyes (make 2)
With cream:
- Rnd 1: 6 sc in MR. (6)
- Rnd 2: inc in each st around. (12)
- Rnd 3: (sc, inc) 6 times. (18)
- Rnd 4: (2 sc, inc) 6 times. (24)
- Rnd 5: (3 sc, inc) 6 times. (30)
Sl st into the next st and fasten off, leaving a long tail. Each eye is a flat circle about 2.2 in (5.6 cm) across.
Insert a 12 mm safety eye between Rnds 2 and 3, slightly off center toward what will be the inner edge. Mirror the placement on the second eye so both pupils look toward the nose. Snap the backs on firmly.
Nose
With green:
- Rnd 1: 6 sc in MR. (6)
- Rnd 2: inc in each st around. (12)
- Rnd 3: (sc, inc) 6 times. (18)
- Rnd 4: (2 sc, inc) 6 times. (24)
- Rnds 5–7: sc in each st around. (24) — 3 rounds
- Rnd 8: (2 sc, dec) 6 times. (18)
Fasten off and leave a long tail. The nose is a domed half-ball about 1.8 in (4.6 cm) across. Stuff it firmly just before you sew it on.
Smile
With black, ch 11. Sl st in the 2nd ch from hook and in each ch across. (10 sl st)
Fasten off, leaving tails at both ends. The smile is a thin cord about 2 in (5.1 cm) long.
Assembly
Lay the body flat with the slit facing you. Center the face above the slit.
- Eyes: Pin the eyes side by side and touching, with their top edges about 1.25 in (3.2 cm) below the rim. Whipstitch around each edge with cream.
- Nose: Pin the stuffed nose so it overlaps the lower inner edges of both eyes by about 0.5 in (1.3 cm). Whipstitch the open edge in place, adding a little more fiberfill before you close it.
- Smile: Lay the cord in a gentle curve to the lower right of the nose, about 0.5 in (1.3 cm) below it. Sew it down with the tails, then weave them in on the inside.
- Snowflakes: Thread cream onto a tapestry needle and embroider four snowflakes, each about 1.25 in (3.2 cm) across. Each one is 4 straight stitches crossing at a single center point, which gives 8 spokes. Put one at the upper left and one at the upper right beside the eyes. Put one at the lower left and one at the lower right beside the nose.
- Ring and tab: Fold the tab in half around the bottom of the hanging ring. Place it at the back center of the finished rim, with one end inside the body and one end outside, so the rim is sandwiched between them. Sew through all layers along both sides and across the bottom. Leave about 0.25 in (0.6 cm) of tab showing between the rim and the ring.
Border
You work the rim directly onto the last body round. It uses the same gauge as the body: 16 sts = 4 in (10.2 cm).
- Rnd 33: sc in each st around. (42)
- Rnd 34: sc in each st around, then sl st into the next st to end the spiral. (42)
- Rnd 35: ch 1, rev sc in each st around. Join with a sl st to the first st. (42)
Fasten off and weave in the end on the inside. Then do Assembly step 5.
When the body is laid flat, the rim splits into two sides: 21 sts across the front and 21 sts across the back (21 + 21 = 42). At 4 sts per inch, each side spans 5.25 in (13.3 cm). That matches the flat width of the opening after Rnd 32.
Why the math works: The rim has no increases or decreases, so it keeps the same 42-stitch circumference as Rnd 32. Crab stitch is short and tight, so it pulls the edge in slightly and makes a neat rolled lip that doesn’t flare. The three rounds add about 0.6 in (1.5 cm), which takes the body from 6.4 in (16.3 cm) to 7 in (17.8 cm) tall.
Final Blocking
- Fill the body loosely with plastic bags or a rolled towel so it keeps its rounded shape.
- Lightly mist the body with water. Don’t soak it; the safety eyes and stuffing should stay dry.
- Smooth the face pieces flat with your hands and check that the snowflakes lie evenly.
- Shape the ring into a true circle and lay it flat.
- Check the measurements: 7.5 in (19.1 cm) wide and 7 in (17.8 cm) tall.
- Let it dry completely, for at least 12 hours.
- Take out the filler and load it with real bags.
Final Quality-Control Checklist
- The body is 7.5 in (19.1 cm) wide and 7 in (17.8 cm) tall.
- The slit is 3 in (7.6 cm) wide and centered on the front, directly below the nose.
- The rim has 42 sts and a smooth crab-stitch edge.
- Both eyes are the same size, about 2.2 in (5.6 cm) across, with the pupils facing the nose.
- The safety eye backs are snapped on tightly.
- The nose is firmly stuffed and sewn all the way around.
- The four snowflakes are evenly spaced and the same size.
- The tab is centered at the back and sewn through all layers.
- All ends are woven in on the inside.
Troubleshooting
The base cups instead of lying flat. Your increases are too tight. Loosen your tension or go up a hook size for Rnds 1–8.
The body looks like a tube, not a ball. Check that you worked the increases in Rnd 14 and the decreases in Rnds 25, 28, and 30.
The slit is crooked or off center. Your marker may have drifted. Count 21 sts from the marker before you start the chain.
Bags slip out of the slit too easily. Work Rnd 12 as 22 sc, ch 10, sk 10 sts, 22 sc. Then work Rnd 13 as 22 sc, 10 sc into the chains, 22 sc. The count stays at 54.
The ring flops or bends. Add a little more fiberfill between the layers, or crochet Rnd 1 over a 3 in (7.6 cm) plastic ring.
Gaps show between stitches. Go down a hook size. The fabric needs to be firm.
Care
Hand wash in cool water with mild soap and lay flat to dry. Don’t tumble dry, because heat can damage the safety eyes.
Final Notes
The whole design comes down to one chain of measurements. A gauge of 16 sts per 4 in (10.2 cm) gives a 3.5 in (8.9 cm) base at 48 sts. The body widens to 60 sts, or 7.5 in (19.1 cm) laid flat, then narrows to 42 sts at the top opening. The 42-stitch crab-stitch rim keeps that opening at 5.25 in (13.3 cm) per side and brings the height to 7 in (17.8 cm). The 4 in (10.2 cm) ring brings the total hanging length to about 11.75 in (29.8 cm).
Check your gauge and count your stitches at each checkpoint. You’ll end up with a holder that keeps its shape and makes everyone smile when they reach for a bag.
Happy crocheting!