

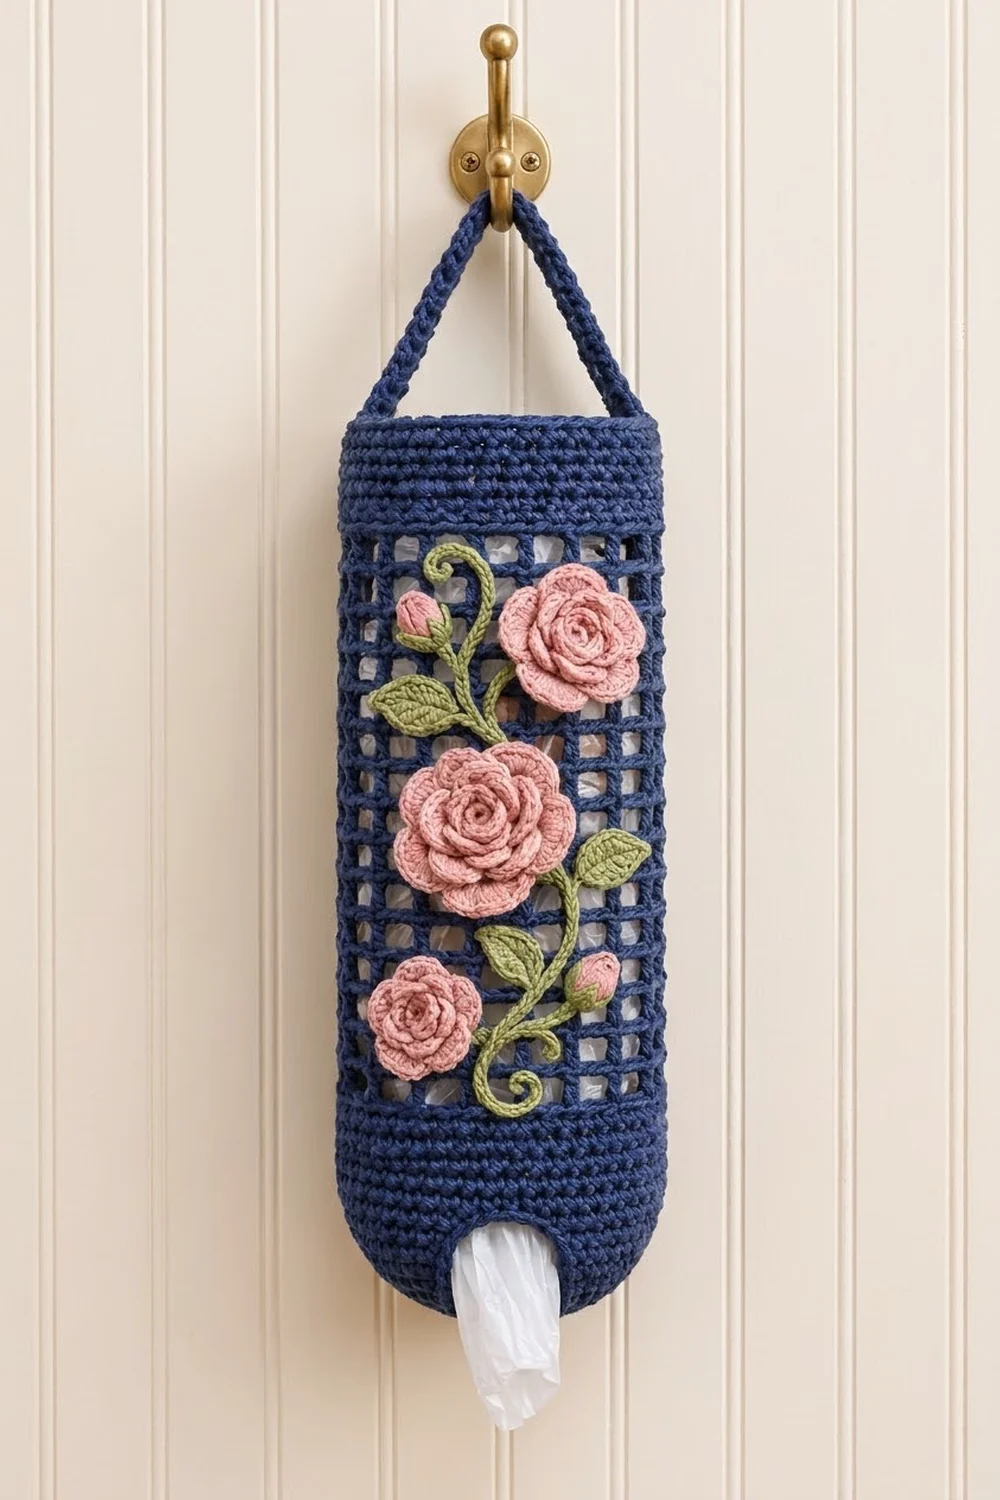
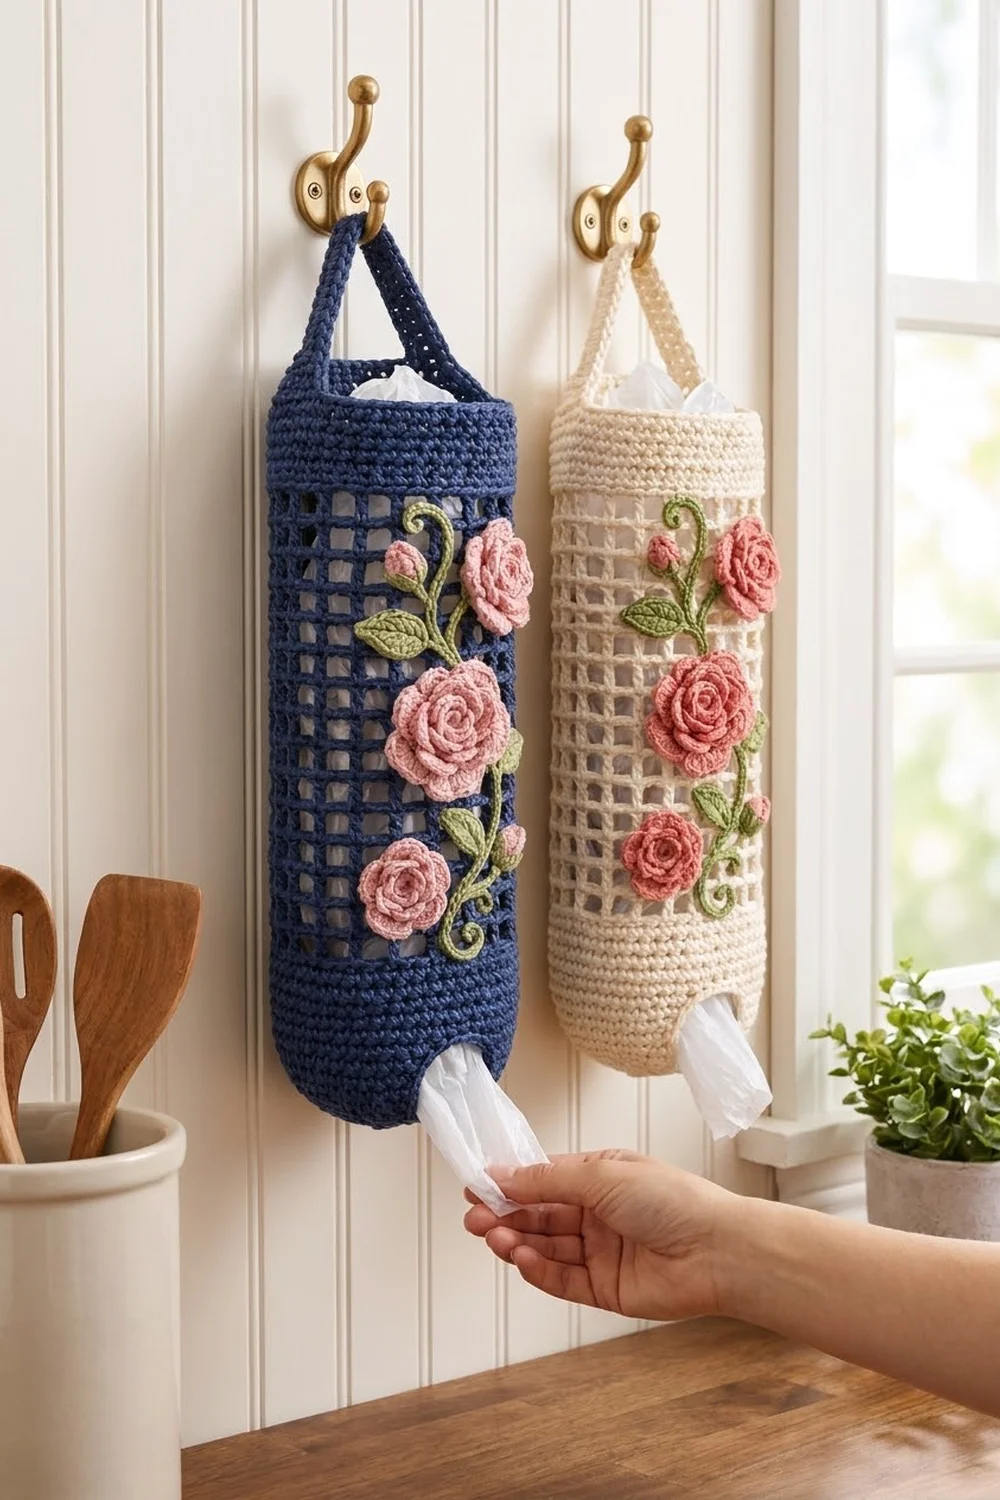
This hanging bag holder looks like a garden trellis in deep navy cotton. The body is a tall tube of open square mesh. It has a solid band at the top and a rounded solid base, and a small hole in the base lets you pull out one bag at a time.
Dusty-pink rolled roses and buds sit on the front, linked by a sage-green vine with five leaves and a curled tendril. The navy makes the pink and green stand out, and the open mesh shows how full the holder is.
The pattern uses US crochet terms. The finished body is 6 in (15.2 cm) wide laid flat and 16.1 in (40.9 cm) tall. With the strap, it hangs about 21.1 in (53.6 cm) from the hook.
You crochet the body in one piece from the bottom up. Start at the dispensing hole, increase to shape the rounded base, work the mesh tube straight up and finish with a solid top border. Then sew on the strap and the appliqués.
Finished Size and Construction
- Finished size: 6 in (15.2 cm) wide flat x 16.1 in (40.9 cm) tall; 12 in (30.5 cm) around
- Hanging length with strap: about 21.1 in (53.6 cm)
- Skill level: Intermediate (the body is easy; the appliqués need care)
- Terminology: US
- Yarn weight: Worsted (#4) cotton
- Hook: 4.5 mm (US 7)
- Number of pieces: 1 body, plus a sewn-on strap and appliqués (3 roses, 2 buds with calyxes, 1 vine, 2 branches, 5 leaves)
- Layout: One tube worked in joined rounds without turning
- Body circumference: 48 stitches, which makes 16 mesh squares
- Size before border: 15 in (38.1 cm) tall (base plus mesh)
- Border depth: Top band about 1.1 in (2.8 cm); the hole edging is 1 round
Materials
Use a smooth worsted cotton or cotton blend. Cotton holds the tube shape and won’t sag when the holder is full. Avoid fuzzy or very stretchy acrylics.
- Color A, navy: 60 g / 93 m (body, top border, strap)
- Color B, dusty pink: 15 g / 23 m (roses and buds)
- Color C, sage green: 10 g / 16 m (vine, branches, leaves, calyxes)
These amounts include about 20 percent extra for your gauge check and sewing tails.
Tools:
- 4.5 mm (US 7) crochet hook
- Stitch marker
- Tapestry needle
- Scissors
- Rust-proof pins
- Tape measure
Abbreviations (US Terms)
- ch: chain
- sl st: slip stitch
- sc: single crochet
- hdc: half double crochet
- dc: double crochet
- st(s): stitch(es)
- sp: space
- beg: beginning
- rnd(s): round(s)
- inc: 2 sc in the same stitch
Special stitch – Mesh square: 1 dc plus a ch-2 space. Each mesh square uses 3 stitches of the round: the dc and its 2 chains.
Special stitch – Picot tip: Ch 2, then sl st in the 2nd ch from the hook. You use this at the point of each leaf.
Gauge and Checkpoints
- Sc gauge: 16 sc and 18 rnds = 4 in (10.2 cm)
- Mesh gauge: 4 mesh squares = 3 in (7.6 cm); 7 mesh rnds = 4 in (10.2 cm)
Use the start of the body as your gauge test. Work Rnds 1–13 and measure. If the size is right, just keep going.
Checkpoints:
- After Rnd 5, the base is a shallow cup and its outer edge measures 12 in (30.5 cm) around.
- After Rnd 13, the solid base measures about 3 in (7.6 cm) along the side, from the hole to the top of the round.
- After 7 mesh rounds (Rnd 20), the mesh measures 4 in (10.2 cm) tall.
- After Rnd 34, the body is 15 in (38.1 cm) tall.
- After Rnd 39, the body is 16.1 in (40.9 cm) tall.
If your base comes out too big, go down half a hook size. If it’s too small, go up half a hook size. Change the hook, not the stitch counts. The mesh needs a multiple of 3 stitches, and the border math depends on having 48.
Body
Work in joined rounds with the right side facing out. Do not turn.
Dispensing Hole and Rounded Base
With Color A, ch 24. Join with a sl st in the first ch to make a ring, without twisting the chain. This ring is the dispensing hole. It is 6 in (15.2 cm) around and about 1.9 in (4.8 cm) across.
Rnd 1: Ch 1, sc in each ch around, join with sl st in first sc. (24 sc)
Rnd 2: Ch 1, sc in next 3 sts, inc in next st; repeat from * 5 more times, join. (30 sc)
Rnd 3: Ch 1, sc in next 4 sts, inc; repeat from * 5 more times, join. (36 sc)
Rnd 4: Ch 1, sc in next 5 sts, inc; repeat from * 5 more times, join. (42 sc)
Rnd 5: Ch 1, sc in next 6 sts, inc; repeat from * 5 more times, join. (48 sc)
These increases are spaced further apart than a flat circle needs, so the base curves up into a rounded cup with the hole at the center.
Rnds 6–13: Ch 1, sc in each st around, join. (48 sc in each round; 8 rounds)
Put a marker at the join. It marks one side fold of the holder.
Mesh Tube
Rnd 14 (mesh setup): Ch 5 (counts as dc and ch 2), skip next 2 sc, dc in next sc, ch 2, skip next 2 sc; repeat from * 14 more times, join with sl st in 3rd ch of beg ch-5. (16 dc and 16 ch-2 sps = 16 mesh squares = 48 sts)
Rnds 15–34: Ch 5 (counts as dc and ch 2), skip ch-2 sp, dc in next dc, ch 2, skip ch-2 sp; repeat from * 14 more times, join with sl st in 3rd ch of beg ch-5. (16 mesh squares in each round; 20 rounds)
You now have 21 mesh rounds. Each dc sits on the dc below it, so the squares line up in straight columns. The body measures 15 in (38.1 cm): 3 in (7.6 cm) of base plus 12 in (30.5 cm) of mesh.
Don’t fasten off. Go straight on to the Border.
Border
Border gauge: 16 sc = 4 in (10.2 cm), the same as the base. Flatten the body with the marker at one side fold. Each flat side then has 24 stitches and measures 6 in (15.2 cm).
Top Band
Rnd 35 (conversion round): Ch 1, sc in same st as join, 2 sc in next ch-2 sp, sc in next dc, 2 sc in next ch-2 sp; repeat from * 14 more times, join. (16 sc worked 1 per dc + 32 sc added in the spaces = 48 sc. Each flat side has 24 sc: 8 in dc and 16 in spaces.)
Rnds 36–39: Ch 1, sc in each st around, join. (48 sc in each round; 24 per flat side)
Fasten off and weave in the end. The band is 5 rounds and about 1.1 in (2.8 cm) deep.
Hole Edging
Join Color A in any free loop of the starting chain.
Hole Rnd: Ch 1, sc in each free loop around, join. (24 sc; 12 per flat side)
Fasten off and weave in the end.
Why the math works: The body has 48 stitches from Rnd 5 to the top. Sixteen mesh squares x 3 stitches = 48. The conversion round puts exactly 3 sc over each square: 1 in the dc and 2 in the space. Laid flat, each side has 8 squares x 3 = 24 stitches, or 6 in (15.2 cm). The border adds height but no width, so the band stays the same width as the mesh. The hole edging is 1 sc per chain, so the hole stays 6 in (15.2 cm) around and doesn’t ruffle or tighten.
Strap
With Color A, ch 49.
Row 1: Sc in 2nd ch from hook and in each ch across, turn. (48 sc)
Row 2: Ch 1, sc in each st across. (48 sc)
Fasten off and leave a long tail at each end. The strap is 12 in (30.5 cm) long and about 0.5 in (1.3 cm) wide.
With the body flattened, sew one end inside the band at the marker (st 1 of Rnd 39). Sew the other end at the opposite fold (st 25). Overlap each end 0.75 in (1.9 cm) down inside the band. The strap rises about 5 in (12.7 cm) above the rim.
Appliqués
Leave a long tail on every piece for sewing.
Roses (make 3)
Large rose: With Color B, ch 50.
– Row 1: Sc in 2nd ch from hook and in each ch across, turn. (49 sc)
– Row 2: Ch 1, sl st in first sc. Skip 1, 5 hdc in next sc, skip 1, sl st in next sc; work this 5 times for 5 small petals. Then skip 1, 7 dc in next sc, skip 1, sl st in next sc; work this 7 times for 7 large petals. (12 petals; 1 + 12 x 4 = 49 sts used)
Roll the strip from the small-petal end and keep the base level. Sew through every layer at the base. The rose is about 2.5 in (6.4 cm) across.
Medium rose: Ch 42. Row 1: 41 sc. Row 2: sl st in first sc, then 4 petals of 5 hdc and 6 petals of 6 dc. (10 petals; 1 + 10 x 4 = 41) Roll and sew. It is about 2 in (5.1 cm) across.
Small rose: Ch 30. Row 1: 29 sc. Row 2: sl st in first sc, then 3 petals of 5 hdc and 4 petals of 6 dc. (7 petals; 1 + 7 x 4 = 29) Roll and sew. It is about 1.5 in (3.8 cm) across.
Buds (make 2)
Bud: With Color B, ch 6. Starting in the 3rd ch from hook, work 2 dc in each of the next 4 ch. (8 dc) Fasten off, roll tightly into a teardrop shape and sew the base closed.
Calyx: With Color C, make a magic ring, ch 1, work 6 sc in the ring and join. (6 sc) Partly close the ring around the base of the bud and sew it on. Each bud is about 1 in (2.5 cm) long.
Vine and Branches
Main vine: With Color C, ch 36. Sl st in the back bump of the 2nd ch from hook and in each back bump across. (35 sl sts, about 8.75 in / 22.2 cm) The bottom 2.5 in (6.4 cm) becomes the tendril.
Branches (make 2): Ch 9. Sl st in back bump of 2nd ch from hook and each across. (8 sl sts, about 2 in / 5.1 cm)
Leaves (make 5)
With Color C, ch 7. Sc in 2nd ch from hook, hdc in next ch, dc in next 2 ch, hdc in next ch. In the last ch, work (sc, picot tip, sc). Then work along the other side of the chain: hdc, dc in next 2 ch, hdc, sc in last ch. Join with sl st in first sc. (12 sts plus 1 picot)
Each leaf is about 1.5 in (3.8 cm) long and has a pointed tip.
Arranging the Appliqués
Flatten the body with the marker at one side fold. Pin the design to the center front, within the mesh between Rnds 17 and 33.
- Lay the vine in a gentle S-curve from the upper left down to the lower center. Coil the bottom 2.5 in (6.4 cm) into a flat spiral.
- Large rose: center front, a little left, halfway up the mesh.
- Medium rose: upper right, just under the top band.
- Small rose: lower left, about 2 in (5.1 cm) above the base.
- Put one bud at the top end of the vine. Use one branch to connect the second bud at lower right.
- Run the second branch from the vine toward the medium rose.
- Place the leaves along the vine: two at upper left, one at center right, one at lower right and one at lower left.
The roses go on top of the vine, and the leaves tuck slightly under the rose edges. Sew with matching yarn through the front layer only. Catch the dc posts and ch-2 strands rather than a single chain, so the mesh stays square.
Final Blocking
- Mist the body lightly with water, keeping the roses mostly dry.
- Put a rolled towel inside to shape a cylinder 12 in (30.5 cm) around.
- Straighten the mesh columns so they run straight up from the base.
- Measure: 16.1 in (40.9 cm) tall and 6 in (15.2 cm) wide flat.
- Round out the base and open the hole to about 1.9 in (4.8 cm) across.
- Fluff the rose petals and press the leaves flat.
- Let it dry completely before you take out the towel.
Final Quality-Control Checklist
- Base: 13 sc rounds, with 48 stitches from Rnd 5 onward
- Mesh: 21 rounds of 16 squares, with straight columns
- Top band: 5 rounds of 48 sc, 24 per flat side
- Hole edging: 24 sc, lying flat
- Body: 16.1 in (40.9 cm) tall, 6 in (15.2 cm) wide flat
- Strap: 48 sc, sewn firmly at both side folds
- 3 roses, 2 buds, 5 leaves, 1 vine with tendril, 2 branches
- Appliqués sewn through the front layer only, all ends woven in
Troubleshooting
Base lies flat instead of cupping: Your sc is too loose. Redo Rnds 1–13 with a smaller hook.
Base ruffles: You have extra increases. Rnd 5 must have exactly 48 stitches.
Mesh leans or spirals: Join each round in the 3rd ch of the ch-5, and work every dc into the dc below, not into the space.
Top band flares: Work only 2 sc in each ch-2 space in Rnd 35.
Hole is too tight: Make the starting chain with a hook one size larger.
Roses look flat: Roll them tighter and sew through every layer at the base.
Mesh puckers behind appliqués: Your sewing is too tight. Take it out and sew more loosely.
Care
Hand wash in cool water with mild soap. Dry it flat over a rolled towel, and don’t tumble dry, so the roses keep their shape.
Final Notes
Here is how the measurements build up:
- The 24-stitch ring makes a hole 6 in (15.2 cm) around.
- By Rnd 5 the base reaches 48 stitches, or 12 in (30.5 cm) around.
- The base adds 3 in (7.6 cm) of height and the mesh adds 12 in (30.5 cm), for 15 in (38.1 cm) before the border.
- The top band adds 1.1 in (2.8 cm). The body is then 16.1 in (40.9 cm) tall and 6 in (15.2 cm) wide flat.
- The strap rises about 5 in (12.7 cm), for a hanging length of about 21.1 in (53.6 cm).
Keep 48 stitches all the way up and the roses will sit on a straight, even trellis.
Happy crocheting!