

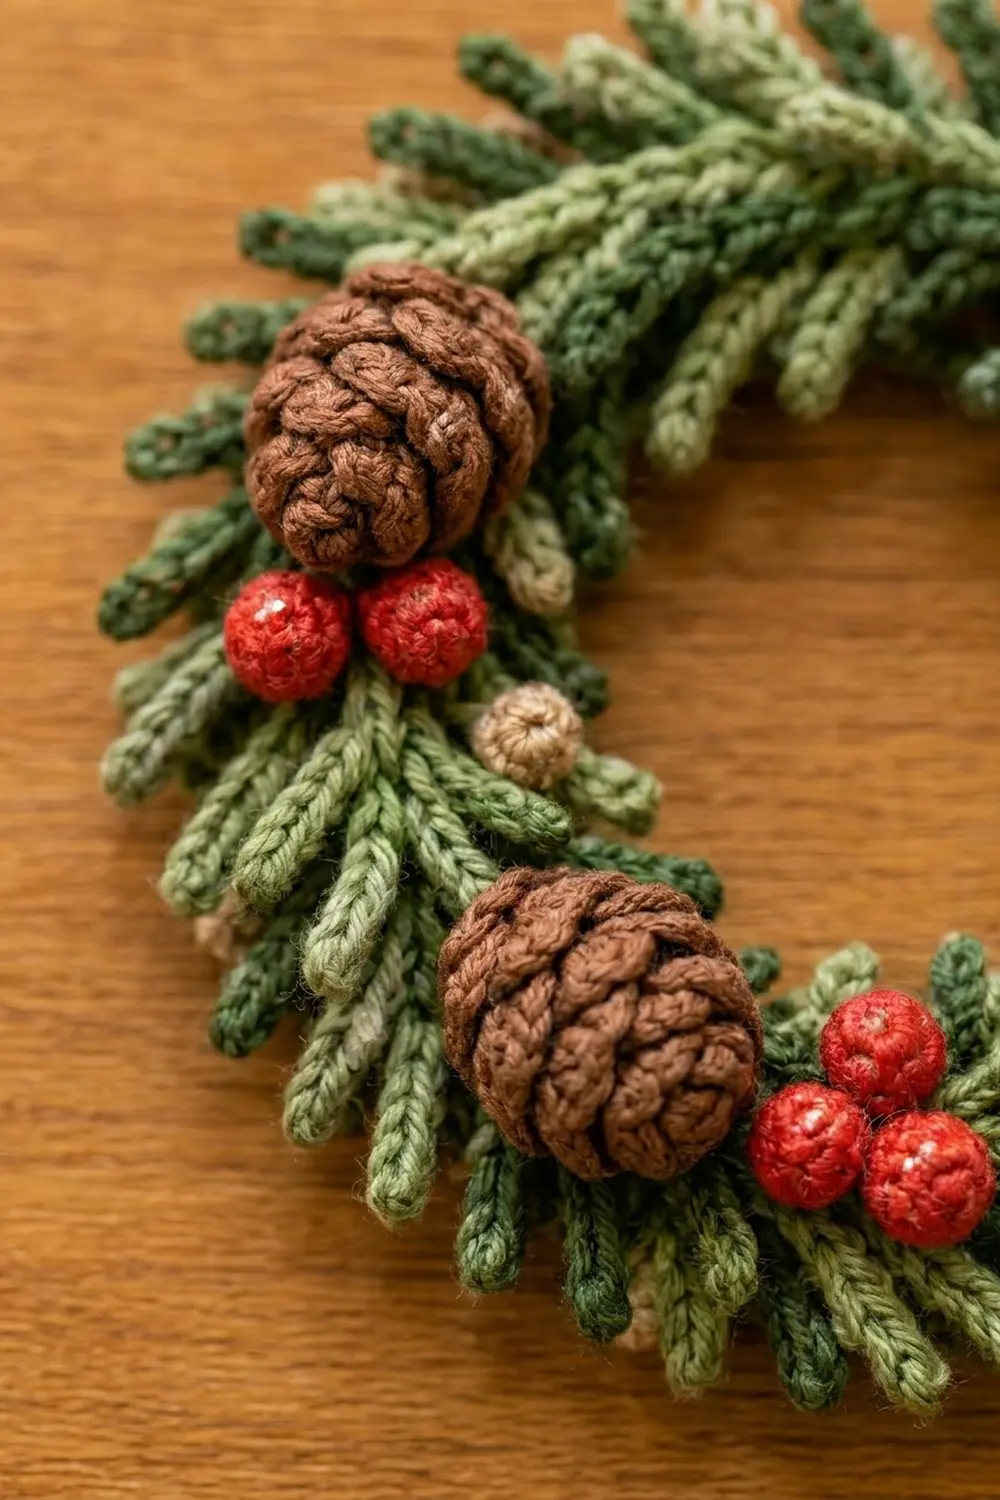
This little wreath is made to hang on the tree. A soft sage ring is covered in layered evergreen sprigs in two shades of green. Three textured brown pinecones, clusters of red berries, and tiny tan buds sit on top. A cream corded bow with a hanging loop finishes it at 12 o’clock.
The style is rustic and slightly realistic, like a tiny front-door wreath. The colors are sage green, forest green, brown, red, tan, and cream. The pattern uses US crochet terms throughout.
The finished ornament is about 4 in (10.2 cm) across the greenery and about 5.5 in (14.0 cm) tall with the hanging loop. The base ring with its border is 2.7 in (6.9 cm) across.
The construction is simple:
- Crochet a flat ring in joined rounds and edge it with crab stitch.
- Make 12 slip-stitch sprigs, 3 pinecones, 8 berries, 6 buds, and four short cream cords for the bow and loop.
- Sew everything onto the front of the ring.
Finished Size and Construction
- Finished size: about 4 in (10.2 cm) across; 5.5 in (14.0 cm) tall with the loop
- Skill level: Intermediate (small-scale work and a lot of sewing)
- Terminology: US crochet terms
- Yarn weight: DK (light worsted, #3)
- Hook: 3.25 mm (US D-3)
- Number of pieces: 1 finished ornament, made from 1 base ring and 31 small components (12 sprigs, 3 pinecones, 8 berries, 6 buds, 1 bow from 3 cords, 1 hanging loop)
- Layout: sprigs all angled clockwise; pinecones at 10, 3, and 7 o’clock; bow at 12 o’clock
- Base ring size: 2.5 in (6.4 cm) outside diameter, with a 1.6 in (4.1 cm) center opening
- Size before border: 2.5 in (6.4 cm)
- Border depth: 1 round of crab stitch, about 0.1 in (0.3 cm) on each side, bringing the ring to 2.7 in (6.9 cm)
Materials
Choose a smooth, tightly plied DK cotton or cotton blend. Plied cotton shows the slip-stitch needles clearly and helps the pinecone scales stand up. Avoid fuzzy or brushed yarns, because the sprig detail gets lost in them.
- Sage green: 8 g / 35 m (base ring and 6 sprigs)
- Forest green: 6 g / 25 m (6 sprigs)
- Brown: 4 g / 15 m (3 pinecones)
- Red: 2 g / 8 m (8 berries)
- Tan: 1 g / 5 m (6 buds)
- Cream: 2 g / 8 m (bow and hanging loop)
These amounts include extra for swatching and long sewing tails.
Tools:
- 3.25 mm (US D-3) crochet hook
- Tapestry needle
- 4 stitch markers
- A few brown yarn scraps for stuffing the pinecones
- Pins, a blocking mat, and a spray bottle
- Scissors
Abbreviations (US Terms)
- ch – chain
- sl st – slip stitch
- sc – single crochet
- sc2tog – single crochet 2 stitches together
- rev sc – reverse single crochet (crab stitch)
- BLO / FLO – back loop only / front loop only
- MR – magic ring
- st(s) – stitch(es)
Special stitches:
- Needle: ch 4, then sl st in the 2nd ch from the hook and in the next 2 ch. Each needle uses 3 sl sts and sticks out about 0.4 in (1.0 cm).
- Scale: work (sc, ch 1, sc) all in the same free front loop.
- Rev sc (crab stitch): work from left to right. Insert the hook in the next stitch to the right, yarn over, and pull up a loop. Yarn over again and pull through both loops.
- Cord: sl st in the back bump of each chain. This makes a firm, rounded rope.
Gauge and Checkpoints
Gauge: 6 sc and 7 rounds = 1 in (2.5 cm). For the slip-stitch cord, 8 sts = 1 in (2.5 cm).
Make the base ring first and use it as your swatch. All the other measurements depend on it.
Checkpoints:
- After Round 1, the center opening is 1.6 in (4.1 cm) across.
- After Round 3, the ring is 2.5 in (6.4 cm) across and lies flat.
- After the border, the ring is 2.7 in (6.9 cm) across.
- Each sprig is 2 in (5.1 cm) long and 0.8 in (2.0 cm) wide.
- Each pinecone is 0.9 in (2.3 cm) long and 0.6 in (1.5 cm) wide.
If your ring is too big, change to a 3.0 mm hook. If it’s too small, change to a 3.5 mm hook. If the ring cups or ruffles, see Troubleshooting. Do not change the stitch counts.
Part 1: Base Ring
With sage green, ch 30. Sl st in the first ch to form a ring, taking care not to twist the chain.
Round 1: Ch 1 (does not count as a stitch), sc in next 4 ch, 2 sc in next ch 6 times. Join with a sl st to the first sc. (36 sts)
Round 2: Ch 1, sc in next 5 sts, 2 sc in next st 6 times. Join. (42 sts)
Round 3: Ch 1, sc in next 6 sts, 2 sc in next st 6 times. Join. (48 sts)
Do not fasten off. Go to the Border section and work Round 4 now. Then come back here to make the components.
Each round adds 6 stitches. At this gauge, one round makes the ring about 0.3 in (0.8 cm) wider. That needs about 6 more stitches around, so the ring stays flat.
Part 2: Evergreen Sprigs (make 12)
Make 6 sprigs in sage green and 6 in forest green. Leave an 8 in (20.3 cm) starting tail for sewing. This tail ends up at the base of the sprig.
Ch 17.
Side A: Sl st in the 2nd ch from the hook (this is the tip). Needle, sl st in next 2 ch of the stem 7 times. Sl st in the last ch. (16 stem sl sts, 7 needles)
Side B: Turn the piece so you can work along the free loops on the other side of the starting chain. Ch 1 (does not count as a stitch). Needle, sl st in next 2 free loops 7 times. Sl st in the last 2 free loops. (16 stem sl sts, 7 needles)
Fasten off at the tip and weave in that end.
Each sprig has: 32 stem sl sts and 14 needles. The stem is 2 in (5.1 cm) long, and the needles make the sprig 0.8 in (2.0 cm) wide.
Pinch each needle so it points slightly toward the tip. This gives the swept-back look of real pine.
Part 3: Pinecones (make 3)
With brown, leave a 10 in (25.4 cm) starting tail.
Round 1: 6 sc in MR. Pull closed. (6 sts)
Round 2: Sc in next st, 2 sc in next st 3 times. (9 sts)
Round 3: Sc in next 2 sts, 2 sc in next st 3 times. (12 sts)
Round 4: Sc in BLO of each st. (12 sts)
Round 5: Sc in BLO of each st. (12 sts)
Round 6: Working in BLO, sc in next 2 sts, sc2tog 3 times. (9 sts)
Stuff the pinecone firmly with brown scraps.
Round 7: Sc in next st, sc2tog 3 times. (6 sts)
Fasten off. Thread the tail through the front loops of the last 6 sts and pull the opening closed. Rounds 3, 4, and 5 now each have 12 free front loops.
Scales: Hold the cone with the magic-ring end up. Join brown in any free front loop of Round 3. Scale in next front loop, sl st in next front loop 6 times. Repeat on the free loops of Round 4, then Round 5. (18 scales total, 6 per round)
Start each round one loop over from where the previous round started so the scales are staggered. Fasten off and weave in the end.
Part 4: Berries and Buds
Red berry (make 8): With red, work 6 sc in MR and pull closed. Round 2: sc in each st. (6 sts) Fasten off. Thread the tail through the front loops and pull closed to make a ball about 0.3 in (0.8 cm) across. Keep the tail for sewing.
Tan bud (make 6): With tan, work 5 sc in MR, pull very tight, and sl st to the first sc. (5 sts) Each bud is about 0.2 in (0.5 cm) across.
Part 5: Bow and Hanging Loop
Make all cream pieces with the cord stitch. Leave a 6 in (15.2 cm) tail at each end of each piece.
- Bow loops: Ch 41, cord across. (40 sl sts, 5 in / 12.7 cm)
- Bow tails: Ch 17, cord across. (16 sl sts, 2 in / 5.1 cm)
- Center wrap: Ch 9, cord across. (8 sl sts, 1 in / 2.5 cm)
- Hanging loop: Ch 25, cord across. (24 sl sts, 3 in / 7.6 cm)
Putting the bow together:
- Sew the ends of the bow-loop cord together to make a ring.
- Flatten the ring and pinch the center to form two loops.
- Fold the tails cord at its center and place it under the pinch, so two 1 in (2.5 cm) tails hang down.
- Wrap the center wrap around all the layers and sew its ends together at the back.
The finished bow is about 2.25 in (5.7 cm) wide.
Fold the hanging loop in half and sew both ends to the back of the bow. The loop stands about 1.5 in (3.8 cm) tall.
Part 6: Assembly
Pin everything in place before you sew. Use this clock-face layout, seen from the front:
                 12:00  BOW + LOOP
        11:00 tan bud        1:00 tan bud
     10:00 PINECONE              2:00 red berry
                                 2:30 tan bud
   9:00 2 red berries            3:00 PINECONE
     8:30 tan bud                4:00 tan bud
                                 4:30 2 red berries
       7:00 PINECONE        5:00 tan bud
               6:00 3 red berries
Sprigs: Place one sprig every 30 degrees around the ring, alternating sage and forest green. Put each sprig’s base on the ring and point its tip clockwise and slightly outward. Each sprig should overlap the next by about half its length. Sew along the stem only, through Round 2 of the ring, so the needles stay free. The tips reach about 0.65 in (1.7 cm) past the bordered edge.
Pinecones: Sew each cone on through its closed end, with the tip angled outward, at 10, 3, and 7 o’clock.
Berries and buds: Sew each one through to the ring so it nestles between the needles, following the layout.
Bow: Sew the bow to the top of the ring at 12 o’clock, stitching through the center wrap only.
Border
Work this round on the base ring right after Round 3, before you sew on any components.
Border gauge: 6 rev sc = 1 in (2.5 cm), the same as the ring.
Round 4: Ch 1, rev sc in each st around. Join. Fasten off and weave in the end. (48 sts)
Because the ring is round, check your count in quarters. Place markers at stitches 1, 13, 25, and 37. Each quarter has exactly 12 rev sc, and 12 x 4 = 48.
Why the math works: The border has one stitch in each stitch and no increases. The outer edge stays at 48 sts, which is 8 in (20.3 cm) around and 2.5 in (6.4 cm) across. The rope-like crab stitch adds only about 0.1 in (0.3 cm) on each side, so the ring is 2.7 in (6.9 cm) across.
Final Blocking
- Lightly mist the ornament with water. Don’t soak it, because the stuffed pinecones are slow to dry.
- Lay it face up on a blocking mat.
- Pin the ring to a 2.7 in (6.9 cm) circle and the greenery to a 4 in (10.2 cm) circle.
- Use your fingertips to spread the needles outward and sweep them toward each sprig tip.
- Shape the bow loops so they are round, and pin the hanging loop straight up.
- Let the ornament dry completely, about 6 to 8 hours.
- Optional: brush a little diluted fabric stiffener on the back of the ring only.
Final Quality-Control Checklist
- The ring measures 2.7 in (6.9 cm) and lies flat.
- The border has 48 rev sc, with 12 in each quarter.
- There are 12 sprigs, each with 14 needles, all angled clockwise.
- The greenery measures 4 in (10.2 cm) across.
- There are 3 pinecones, each with 18 staggered scales.
- The 8 red berries and 6 tan buds match the layout.
- The bow is centered at 12 o’clock and the loop is sewn on firmly.
- No sewing stitches show on the front.
- All ends are woven in on the back.
Troubleshooting
The ring cups like a bowl: Your rounds are too tall. Pull up a slightly shorter loop on each sc. Keep the counts the same.
The ring ruffles: Your rounds are too short. Pull up a slightly taller loop on each sc.
The sprig needles curl or twist: Work the slip stitches more loosely, or use a hook one size larger for the sprigs only.
The pinecone scales lie flat: Check that you worked Rounds 4 to 6 in BLO, so the front loops are free for the scales.
The berries look lumpy: Pull the closing tail tight and roll each berry between your palms.
The ornament tilts on the tree: Before you sew the hanging loop down, adjust it until the wreath hangs straight.
Care
Spot clean only, with cool water and mild soap. Reshape, dry flat, and store flat in a box so the needles and bow stay crisp.

Final Notes
Each measurement leads to the next:
- The 30-chain foundation makes a 1.6 in (4.1 cm) opening.
- Three rounds bring the ring to 48 sts and 2.5 in (6.4 cm).
- The 48-stitch crab-stitch border brings it to 2.7 in (6.9 cm).
- The 2 in (5.1 cm) sprigs reach 0.65 in (1.7 cm) past the edge on each side, which makes a 4 in (10.2 cm) wreath.
Check the ring first, and the rest will fit.
Happy crocheting!