

The Blush Grace Angel is a small, lacy thread ornament for the tree. It has a round cream face, a gold halo and a textured rose-pink bodice. The skirt flares out in open diamond mesh, and two cream wings with teardrop openings frame the body.
The color palette is dusty rose, warm cream and soft gold. The look is vintage and delicate, but the stitches are simple: single crochet, double crochet, chain loops and one bobble stitch. Tiny cream French knots above the hem add a bead-like touch without any extra supplies.
This pattern uses US crochet terms. The finished angel measures 4 in (10.2 cm) across the wings and 4.25 in (10.8 cm) tall, plus a 1.25 in (3.2 cm) hanging loop.
The angel is worked in one piece. You crochet the head in rounds, then work the bodice in rows from the bottom of the head. The skirt mesh follows straight on from the bodice. The wings are then worked into the side edges of the bodice, and the halo and hanging loop are worked onto the head. There is no sewing apart from weaving in ends and adding the knots.
Finished Size and Construction
- Finished size: 4 in (10.2 cm) wide × 4.25 in (10.8 cm) tall, plus 1.25 in (3.2 cm) loop
- Skill level: Intermediate (thread work, bobbles, working into row-ends)
- Terminology: US
- Thread weight: Size 3 crochet cotton (Lace / 0)
- Hook: 2.25 mm (US B-1)
- Number of pieces: 1 (single ornament, worked continuously)
- Layout: Head on top with halo; bodice centered below; wings on each side; skirt below the bodice
- Piece size before hem and wing edging: about 3.5 in (8.9 cm) wide × 3.75 in (9.5 cm) tall
- Edging depth: hem scallops about 0.25 in (0.6 cm); wing edging about 0.25 in (0.6 cm)
Materials
Use a smooth mercerized cotton thread in size 3. It shows stitch detail clearly and holds a crisp shape after blocking. Avoid fuzzy or very soft blends, because the mesh and the wing openings will close up.
- Dusty rose: 8 g, about 22 m (bodice, skirt)
- Cream: 5 g, about 14 m (head, wings, hanging loop, French knots)
- Soft gold: 1 g, about 3 m (halo)
These quantities include a margin of about 25% for your gauge swatch and tails.
Tools:
– 2.25 mm (US B-1) crochet hook
– Tapestry needle (small eye)
– Scissors
– 2 stitch markers
– Foam blocking mat and rustproof pins
– Spray starch or a 1:1 mix of school glue and water (optional, for stiffening)
Abbreviations (US Terms)
- ch – chain
- sl st – slip stitch
- sc – single crochet
- hdc – half double crochet
- dc – double crochet
- sk – skip
- sp – space
- st(s) – stitch(es)
- BLO – back loop only
- RS / WS – right side / wrong side
Bobble: Yarn over, insert hook in the stitch, yarn over and pull up a loop, yarn over and draw through 2 loops. Repeat from * to * 3 more times in the same stitch (5 loops on hook). Yarn over and draw through all 5 loops. Bobbles are always worked on WS rows so they pop out toward the RS.
Gauge and Checkpoints
Gauge matters more for an ornament than you might expect. A small difference in tension changes the wing reach and the skirt flare. Make the head first and measure it before you go on.
- Head gauge: Rounds 1–4 = 1 in (2.5 cm) in diameter.
- Bodice checkpoint: After Row 7, the bodice is 1.5 in (3.8 cm) wide at the bottom and 1 in (2.5 cm) tall.
- Skirt checkpoint: After Row 10, the mesh is about 3.25 in (8.3 cm) wide at the bottom edge.
- Wing checkpoint: Each finished wing reaches 1.25 in (3.2 cm) out from the bodice.
- Final checkpoint: 4 in (10.2 cm) wide × 4.25 in (10.8 cm) tall.
If your head is too big (over 1.125 in / 2.9 cm), go down to a 2.0 mm hook. If it is too small (under 0.875 in / 2.2 cm), go up to a 2.5 mm hook. Change the hook, not the stitch counts. Every later section is counted from the head’s 24 stitches.
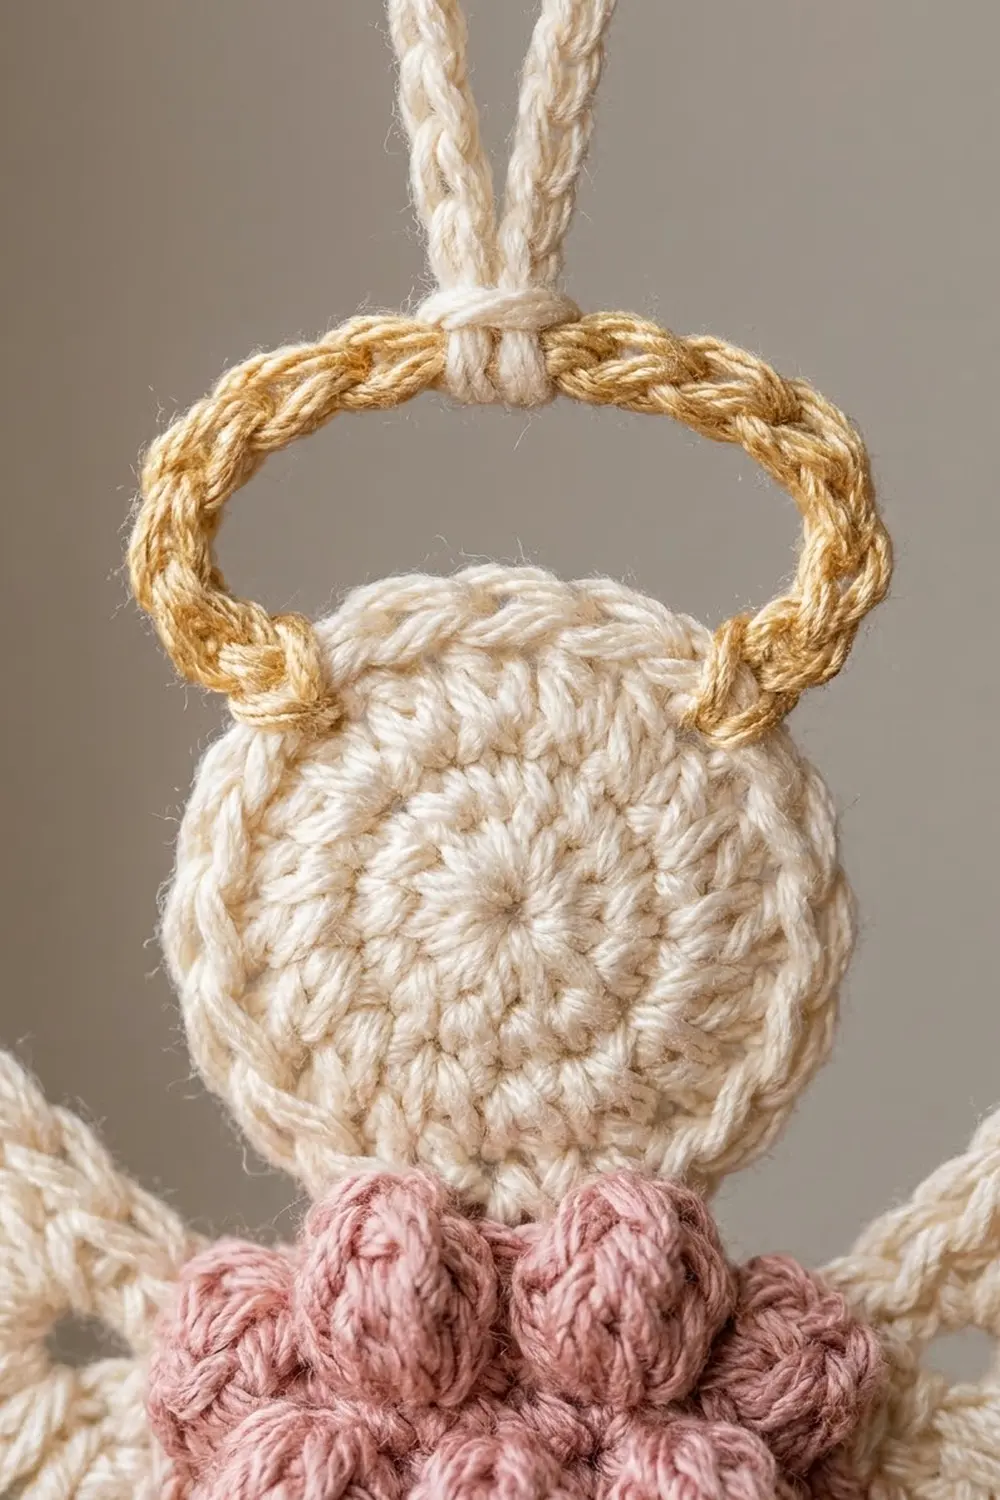
Head (Cream)
Work in joined rounds. Do not turn.
Round 1: Make a magic ring. Ch 1, work 6 sc in the ring, then sl st to the first sc. (6 sts)
Round 2: Ch 1, 2 sc in each st around, then sl st to the first sc. (12 sts)
Round 3: Ch 1, sc in next st, 2 sc in next st; repeat from * 5 more times. Sl st to the first sc. (18 sts)
Round 4: Ch 1, sc in each of next 2 sts, 2 sc in next st; repeat from * 5 more times. Sl st to the first sc. (24 sts)
Fasten off and leave a 4 in (10.2 cm) tail. Number the Round 4 stitches 1 to 24, with stitch 1 being the first sc of the round. Turn the head so that stitch 1 sits at the top center. Stitch 13 is then directly opposite at the bottom center. Put a marker in stitch 10 and another in stitch 16.
Measure now: the head should be 1 in (2.5 cm) across.
Bodice (Dusty Rose)
The bodice is worked in rows into the bottom of the head. Turn at the end of each row.
Row 1 (RS): With the RS facing, join rose with a sl st in stitch 10. Ch 1, then sc in stitches 10 through 16. (7 sc)
Row 2 (WS): Ch 1, turn. Work 2 sc in the first st. Bobble in next st, sc in next st; repeat from * once more. Bobble in next st, then 2 sc in the last st. (9 sts: 6 sc + 3 bobbles)
Row 3 (RS): Ch 1, turn. Sc in each st across. (9 sc)
Row 4 (WS): Ch 1, turn. Work 2 sc in the first st. Bobble in next st, sc in next st; repeat from * 2 more times. Bobble in next st, then 2 sc in the last st. (11 sts: 7 sc + 4 bobbles)
Row 5 (RS): Ch 1, turn. Sc in each st across. (11 sc)
Row 6 (WS): Ch 1, turn. Sc in the first st. Bobble in next st, sc in next st; repeat from * 4 more times. (11 sts: 6 sc + 5 bobbles)
Row 7 (RS): Ch 1, turn. Sc in each st across. (11 sc)
The increases at the start and end of Rows 2 and 4 shift each bobble row over by half a step. That gives the staggered, honeycomb arrangement of 3, 4 and 5 bobbles.
Checkpoint: the bodice should be 1.5 in (3.8 cm) wide at Row 7 and 1 in (2.5 cm) tall. Don’t fasten off; carry straight on to the skirt.
Skirt Mesh (Dusty Rose)
Row 8 (WS): Ch 1, turn. Sc in the first st. Ch 5, sk 1 st, sc in next st; repeat from * 4 more times. (5 ch-5 loops; 11 sts used)
Row 9 (RS): Ch 5, turn. Sc in the first ch-5 sp. Ch 5, sc in next ch-5 sp; repeat from * 3 more times. Ch 5, then sc in the last sc. (6 ch-5 loops)
Row 10 (WS): Ch 5, turn. Sc in the first ch-5 sp. Ch 5, sc in next ch-5 sp; repeat from * 4 more times. Ch 5, then sc in the 3rd ch of the turning ch. (7 ch-5 loops)
Each row gains one loop because the turning ch-5 adds a loop at the start, and the last loop is anchored on the edge. This is what makes the skirt flare into a triangle. The sc anchors sit in the middle of the loops below them, so the open diamonds form on their own.
Checkpoint: Row 10 should be about 3.25 in (8.3 cm) wide. Don’t fasten off; the hem comes next.
Border: Skirt Hem and Wing Edging
Edging gauge: One finished scallop is about 0.5 in (1.3 cm) wide and 0.25 in (0.6 cm) deep.
Skirt Hem
Row 11 (RS): Ch 1, turn. In each of the 7 ch-5 loops, work (sc, hdc, 3 dc, hdc, sc). (7 scallops; 7 sts per scallop = 49 sts)
Fasten off and weave in the end.
Why the math works: A ch-5 loop under tension is about as long as 7 short stitches. Seven stitches fill it without stretching it or making it ruffle. Seven scallops at about 0.5 in (1.3 cm) each, sitting slightly over each other where they meet, give a hem width of 3.5 in (8.9 cm).
Wings (Cream, Make Two in Place)
Work one wing on each side edge of the bodice. Each side edge has 7 row-ends, one for each of Rows 1 to 7.
Row 1 (RS): With the RS facing, join cream in the row-end of bodice Row 1 (at the top, next to the head). Ch 1, then work 1 sc in each row-end down to Row 7. (7 sc)
Row 2: Ch 3 (counts as a dc), turn. Dc in the first st. Work 2 dc in each of the next 6 sts. (14 dc)
Row 3: Ch 1, turn. Sc in the first st. This is the top of the wing.
– Upper lobe: Ch 9, sk 2 sts, sc in next st; repeat from * 2 more times.
– Lower lobe: Ch 6, sk 1 st, sc in next st; repeat from * once more. The last sc goes into the top of the turning ch.
You now have 3 ch-9 loops and 2 ch-6 loops, with sc anchors at stitches 1, 4, 7, 10, 12 and 14.
Row 4 (edging): Ch 1, turn. You start at the bottom of the wing.
– In each ch-6 loop, work (sc, hdc, 3 dc, hdc, sc), then sl st in the next sc anchor. (7 sts per loop)
– In each ch-9 loop, work (2 sc, hdc, 5 dc, hdc, 2 sc), then sl st in the next sc anchor. (11 sts per loop)
Total: 14 + 33 = 47 edging sts and 5 scallops. Fasten off.
Why the math works: The ch-9 loops are longer, so they stand out farther and make the larger upper lobe. Eleven stitches fill a ch-9 loop the same way 7 fill a ch-6 loop. The bigger 9-chain loop next to the smaller 6-chain loop makes a natural notch where the two lobes meet. The empty middle of each loop becomes the teardrop opening.
Repeat Rows 1–4 on the other side edge. Again, join at the row-end of Row 1 and work down toward Row 7, so the two wings mirror each other.
Halo (Gold)
Join gold with a sl st in the BLO of head stitch 21. Ch 16, then sl st in the BLO of head stitch 5. The chain now spans 9 stitches across the top of the head. Work 24 sc over the ch-16 loop, then sl st in the BLO of stitch 21. Fasten off. The arch rises 0.5 in (1.3 cm) above the head and is 1.25 in (3.2 cm) wide.
Hanging Loop (Cream)
Join cream in the 12th sc of the halo, which is its top center. Ch 24, then sl st in the same sc. Ch 1, work 32 sc over the loop, and sl st to the first sc. Fasten off. Folded flat, the loop stands 1.25 in (3.2 cm) tall.
French Knots (Cream)
Thread the needle with cream. Make one French knot (wrap twice) on each of the 6 sc anchors of Row 10. These anchors sit just above the hem. Weave in all ends.
Final Blocking
- Lay the angel face down on a towel and steam it lightly, holding the iron about 1 in (2.5 cm) above the thread. Don’t press down.
- Turn it face up on the blocking mat.
- Pin the head into a 1 in (2.5 cm) circle and pin the halo into a smooth arch.
- Pin the skirt hem to 3.5 in (8.9 cm), with a pin in the point of each scallop.
- Pin each diamond in the mesh open.
- Pin each wing out to 1.25 in (3.2 cm) from the bodice, with a pin in each of the 5 scallops and a pin through each teardrop opening.
- Spray with starch, or brush on the glue mix, then dab off the extra with a paper towel.
- Let it dry completely (at least 6 hours) before you unpin it.
- Check the size: 4 in (10.2 cm) wide × 4.25 in (10.8 cm) tall.
Final Quality-Control Checklist
- Head is round and flat, 1 in (2.5 cm) across
- Bodice shows 3, 4 and 5 bobbles in staggered rows, all on the RS
- Skirt has 5, 6 and 7 mesh loops and 7 even scallops
- Both wings have 5 scallops, with the larger lobe on top
- Halo is centered over stitch 1 and sits evenly
- Hanging loop is centered on the halo
- 6 French knots are evenly placed
- All ends are woven in and nothing shows on the RS
Troubleshooting
Bobbles sink to the back: Work them only on WS rows. Push each one through to the RS with your finger as you go.
Skirt curls: Your chains are too tight. Chain more loosely, or use a 2.5 mm hook just for the ch-5 loops.
Hem ruffles: Check that each scallop has exactly 7 stitches. Tight chains combined with the full stitch count can also cause ruffling, so loosen your chains.
Wings droop: Stiffen them more, and pin through every teardrop opening while they dry.
Halo leans to one side: Count again. It should start at stitch 21 and end at stitch 5, with stitch 1 at the center.
Wings look different from each other: Both wings must start at the row-end of Row 1 so the upper lobes match.
Care
Wash gently by hand in cool water, roll in a towel, and reshape it flat to dry. Starch it again if it softens. Store it flat in a box between seasons.

Final Notes
Everything is measured from the head. A 1 in (2.5 cm) head gives a bodice 1.5 in (3.8 cm) wide and 1 in (2.5 cm) tall. The mesh grows to about 3.25 in (8.3 cm), and the scalloped hem finishes at 3.5 in (8.9 cm). The wings bring the total width to 4 in (10.2 cm), and the halo brings the height to 4.25 in (10.8 cm). If the head measures correctly, the rest of the angel will too. Make one angel, check it against these numbers, and then make a few more for the tree.
Happy crocheting!