

These lace curtain strips are made of soft pink flowers on a green vine. Each strip stacks five flower-and-leaf motifs into one long vertical panel, and a light green chain lattice down the sides gives it the look of a garden trellis. Two strips hung side by side frame a window without blocking the light.
There are three colors. Blush pink is used for the eight pointed petals, cream for the small ring at each flower’s center, and sage green for the leaves, chain frames, side lattice and hanging loops. The petals are made of graduated stitches with a picot at each tip, so they look lacy and slightly sculptural.
This pattern uses US crochet terms. Each finished strip measures about 7 in (17.8 cm) wide and 52 in (132.1 cm) long from the top of the hanging loops to the bottom leaf tip.
Construction is simple and modular. You crochet 10 motifs in rounds, joining each new motif to the previous one at the large leaf tips as you go. Next, you work a two-round green border around each strip to build the side lattice. Hanging loops go on last.
Finished Size and Construction
- Finished size (each strip): 7 in x 52 in (17.8 cm x 132.1 cm), loops included
- Skill level: Intermediate
- Terminology: US crochet terms
- Yarn weight: DK (light worsted, #3) cotton or cotton blend
- Hook: 3.5 mm (E-4)
- Number of pieces: 10 motifs, joined into 2 strips of 5
- Layout: 1 motif wide x 5 motifs tall per strip
- Single motif size: 6.5 in x 10 in (16.5 cm x 25.4 cm)
- Strip size before border: 6.5 in x 50 in (16.5 cm x 127.0 cm)
- Border depth: about 0.25 in (0.6 cm) per edge, plus hanging loops about 1.6 in (4.1 cm) tall
Materials
Use a smooth, mercerized or combed DK cotton. Cotton holds the petal points crisply and blocks well. It also doesn’t stretch much when hung, which matters for a panel this long.
- Cream (center): 25 g, about 60 m
- Blush pink (petals): 100 g, about 240 m
- Sage green (leaves, frame, border, loops): 150 g, about 360 m
These quantities are for both strips and include a margin of roughly 15% for gauge swatching and tension differences.
Tools:
– 3.5 mm (E-4) crochet hook
– Tapestry needle
– Scissors
– Locking stitch markers (about 10)
– Blocking mats and rust-proof pins
– Spray bottle
– Measuring tape
Abbreviations (US Terms)
- ch – chain
- sl st – slip stitch
- sc – single crochet
- hdc – half double crochet
- dc – double crochet
- tr – treble crochet
- sp – space
- st(s) – stitch(es)
Picot: Ch 3, then sl st in the 3rd ch from the hook.
Large Leaf: Ch 11. Starting in the 2nd ch from the hook, work sc, hdc, dc, dc, tr, tr, dc, dc, hdc, sc (10 sts) along one side of the foundation chain. Ch 2 for the tip. Rotate the leaf and work along the other side of the chain into the free loops: sc, hdc, dc, dc, tr, tr, dc, dc, hdc, sc (10 sts). Sl st into the first sc. That gives 20 sts plus a ch-2 tip. The unworked center of the foundation chain forms a raised vein.
Small Leaf: Ch 8. Starting in the 2nd ch from the hook, work sc, hdc, dc, dc, dc, hdc, sc (7 sts). Ch 2 for the tip. Work along the other side of the chain: sc, hdc, dc, dc, dc, hdc, sc (7 sts). Sl st into the first sc. That gives 14 sts plus a ch-2 tip.
Gauge and Checkpoints
Chain gauge: 5 ch = 1 in (2.5 cm), relaxed.
Make one full motif before you commit to the project, then check these measurements:
- After Round 2 (cream center): 1.25 in (3.2 cm) across
- After Round 5 (petals complete): 5 in (12.7 cm) from petal tip to opposite petal tip
- After Round 6 (leaf frame): 6.5 in (16.5 cm) wide from small leaf tip to small leaf tip, and 10 in (25.4 cm) tall from large leaf tip to large leaf tip
If your motif is too big: Go down to a 3.25 mm (D-3) hook. Petals that flare more than 0.25 in (0.6 cm) beyond the target usually mean the dc stitches are being pulled up too tall.
If your motif is too small: Go up to a 3.75 mm (F-5) hook. Also make sure your ch-7 loops in Round 3 aren’t tight, because they set the petal length.
Each motif’s height is multiplied by 5 along the strip, so a 0.25 in (0.6 cm) error per motif becomes 1.25 in (3.2 cm) per strip.
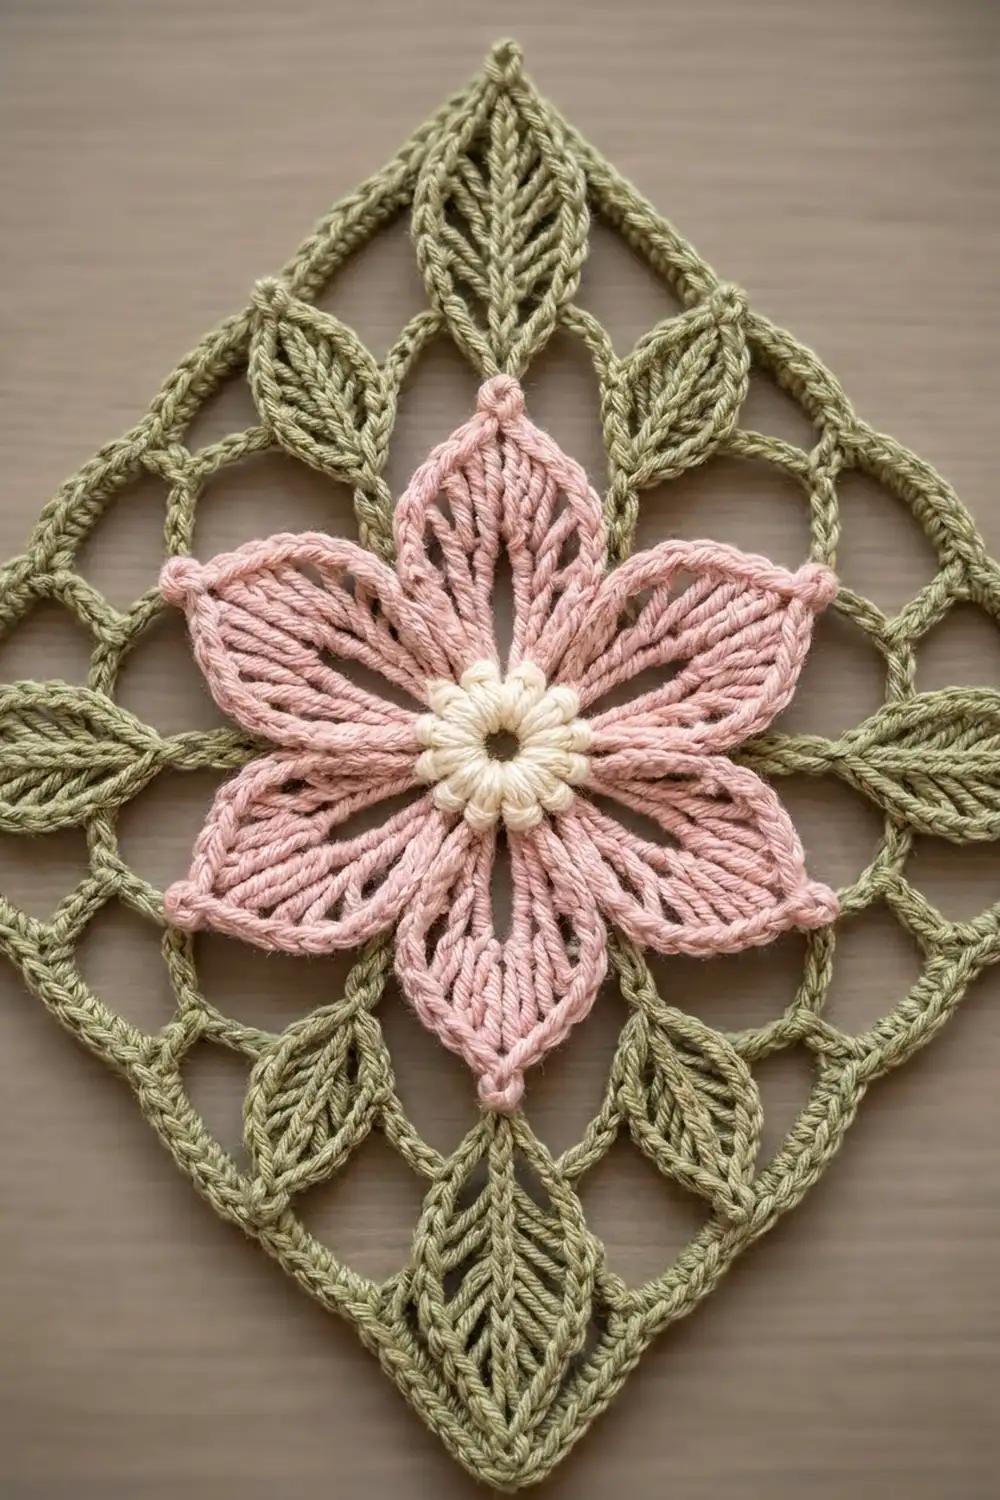
Motif Pattern (Make 10)
Join each round with a sl st to the first st unless stated otherwise. Ch 1 at the start of a round doesn’t count as a stitch.
Cream Center
Round 1 (cream): Ch 4 and sl st to form a ring. Ch 1, work 8 sc in the ring. Join. (8 sc)
Round 2: Ch 1, work 2 sc in each st around. Join and fasten off. (16 sc)
Checkpoint: 1.25 in (3.2 cm) across.
Blush Petals
Round 3 (pink): Join pink with a sl st in any sc. Ch 1, sc in the same st, ch 7, skip next st, sc in next st… repeat from * as written here: (sc in next st, ch 7, skip 1 st) 8 times. Join to the first sc. (8 sc and 8 ch-7 sps)*
Round 4: Work this sequence in each ch-7 sp: (sc, hdc, 3 dc, ch 3, 3 dc, hdc, sc). After each petal, sl st in the next Round 3 sc. (8 petals of 10 sts each, plus a ch-3 tip, for 80 sts and 8 ch-3 tips; 8 sl sts between petals)
Round 5 (petal outline): Work along each petal as follows. Skip the first sc. Sc in the next 4 sts (hdc and 3 dc). In the ch-3 tip, work (2 sc, picot, 2 sc). Sc in the next 4 sts (3 dc and hdc). Skip the last sc. Sl st in the Round 3 sc between petals, working behind Round 4. Repeat for all 8 petals and fasten off. (12 sc and 1 picot per petal, for 96 sc and 8 picots; 8 sl sts)
Working into both sides of each petal and adding the extra sc at the tip makes the pointed, ribbed petal shape. The picot gives each tip its bobble.
Checkpoint: 5 in (12.7 cm) from tip to tip.
Green Leaf Frame
Hold the flower with one picot at 12 o’clock. The picots now sit at 12, 1:30, 3, 4:30, 6, 7:30, 9 and 10:30.
Round 6 (green): Join green with a sl st in the 12 o’clock picot.
- Top spray: Ch 3 for the stem, then make a Large Leaf. Sl st in each of the 3 stem ch to get back to the picot.
- Ch 12 and sl st in the 1:30 picot. This makes an arc.
- Diagonal spray: Ch 3, make a Small Leaf, then sl st back down the 3 stem ch.
- Ch 12 and sl st in the 3 o’clock picot. Don’t add a leaf here; this point is a side anchor.
- Ch 12 and sl st in the 4:30 picot. Work a diagonal spray.
- Ch 12 and sl st in the 6 o’clock picot. Work a bottom spray the same way as the top spray, with the leaf pointing down.
- Ch 12 and sl st in the 7:30 picot. Work a diagonal spray.
- Ch 12 and sl st in the 9 o’clock picot.
- Ch 12 and sl st in the 10:30 picot. Work a diagonal spray.
- Ch 12 and sl st in the 12 o’clock picot. Fasten off.
Round 6 totals: 8 ch-12 arcs, 2 Large Leaves and 4 Small Leaves.
Checkpoint: 6.5 in x 10 in (16.5 cm x 25.4 cm).
Join-As-You-Go Between Motifs
Motif 1 of each strip is worked exactly as written. For Motifs 2–5, change the top spray only. When you reach the leaf tip, replace the ch 2 with: ch 1, sl st into the ch-2 tip of the previous motif’s bottom Large Leaf, ch 1. Then finish the leaf as usual.
Make All Pieces
- Cream: 10 centers
- Blush pink: 10 petal sets
- Sage green: 10 leaf frames, 2 borders and 8 hanging loops
Layout (each strip, both strips identical):
[ Loops ]
[ M1 ]
[ M2 ]
[ M3 ]
[ M4 ]
[ M5 ]
Joining
The motifs are joined only at the large leaf tips (see the join-as-you-go instructions above), so each joint is one sl st through the previous leaf’s ch-2 tip. Keep that sl st relaxed. If it’s pulled tight, the leaves bunch up and the strip gets shorter.
Lay out the strip after each join. The leaf tips should meet point to point in a straight vertical line, and the 3 o’clock and 9 o’clock picots of every motif should line up.
Checkpoint: each strip measures 6.5 in x 50 in (16.5 cm x 127.0 cm) before the border.
Border (Side Lattice)
Border gauge: 5 sc = 1 in (2.5 cm) when worked over chain loops.
Each motif has 3 anchor points on each long side: the upper small leaf tip, the side picot (3 or 9 o’clock) and the lower small leaf tip. The top and bottom ends each have 1 extra anchor at the large leaf tip.
Round 1 (green): Join green at the upper-left small leaf tip of Motif 1. Ch 1 and sc in the tip.
- Left side, working down: For each motif, work ch 15, sc in the side picot, ch 15, sc in the lower small leaf tip. Between motifs, work ch 18 and sc in the next motif’s upper small leaf tip.
- Bottom end: Ch 18, sc in the bottom large leaf tip, ch 18, sc in the lower-right small leaf tip.
- Right side, working up: Repeat the side sequence in reverse.
- Top end: Ch 18, sc in the top large leaf tip, ch 18, then join to the first sc.
Round 1 counts:
– Each long side: 5 motifs x 3 anchors = 15 sc, with 10 ch-15 loops and 4 ch-18 loops
– Each end: 1 sc, with 2 ch-18 loops
– Round total: 32 sc anchors and 32 loops
Round 2: Ch 1. Work 1 sc in each sc anchor, 15 sc in each ch-15 loop and 18 sc in each ch-18 loop. Join and fasten off.
Round 2 counts:
– Each long side: 15 + (10 x 15) + (4 x 18) = 237 sc (this count includes both corner anchors)
– Each end: 1 + (2 x 18) = 37 sc
– Round total: (2 x 237) + (2 x 37) = 548 sc
Why the math works: Each loop gets exactly 1 sc per chain, so Round 2 lies flat and doesn’t ruffle or pull in. The loop lengths match the distances between anchors at gauge: about 3 in (7.6 cm) inside a motif and about 3.6 in (9.1 cm) between motifs. That keeps the lattice straight and lets it form the open hexagon outline around each flower.
Hanging Loops
The corner anchors sit about 1.8 in (4.6 cm) below the top leaf tip, and the midpoints of the top sections sit about 0.9 in (2.3 cm) below it. The loop lengths below make up that difference, so all four loops end up level.
- Join green at the top-left corner sc. Ch 34 and sl st in the same st. Ch 1 and work 34 sc into the loop. Fasten off.
- Count to the 9th sc of the left top section, starting from the corner. Join there and work a ch-25 loop the same way, covering it with 25 sc.
- Repeat at the 9th sc of the right top section, counting from the right corner. Then repeat a ch-34 loop at the top-right corner.
Each loop folds to about 1.6 in (4.1 cm) above the top leaf tip.
Final Blocking
- Weave in all ends along stitches of the same color.
- Soak each strip in cool water for 10 minutes, then press out the water in a towel. Don’t wring it.
- Pin the strip flat to 7 in x 50.5 in (17.8 cm x 128.3 cm), not counting the loops.
- Pin out every petal tip, leaf tip and lattice anchor.
- Pin the leaf veins straight and the hexagon outlines symmetrical.
- Leave the strip pinned until it’s completely dry, usually 24 hours.
Final Quality-Control Checklist
- Every motif has 8 petals with 12 sc each and a picot at each tip
- Every motif has 2 Large Leaves, 4 Small Leaves and 8 ch-12 arcs
- The leaf-tip joins line up in a straight vertical line
- Round 2 of the border has 237 sc on each long side and 37 sc on each end
- All 4 hanging loops are level
- Both strips are the same length, within 0.5 in (1.3 cm)
Troubleshooting
- Petals cup: The Round 3 ch-7 loops are too tight. Redo them more loosely, or go up a hook size for that round.
- Leaves curl: Block them firmly, and check that you worked into the free loops on the second side of the leaf.
- Lattice sags: Your chain gauge is loose. Use 1 fewer ch per loop and the matching sc count, and recount the totals.
- Strip twists when hung: The leaf-tip join sl sts are uneven. Redo them with matching tension.
Care
Hand wash in cool water with a mild detergent and dry flat, reshaping the points as it dries. Avoid tumble drying, and don’t hang the strips while they’re wet.
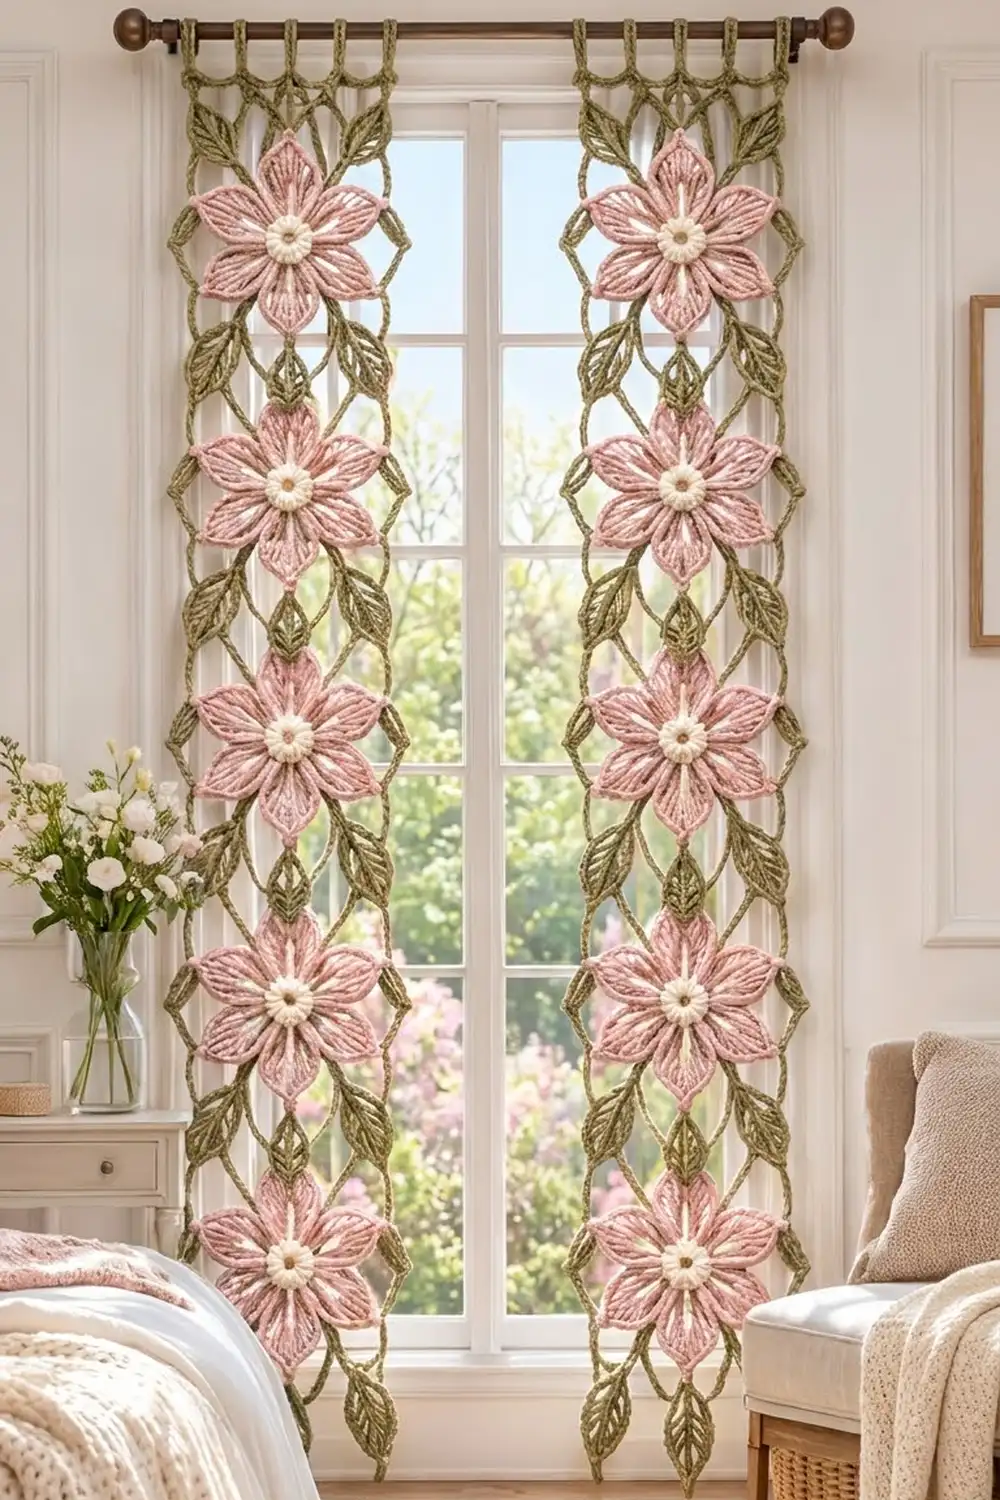
Final Notes
Here is the full measurement chain:
- Cream center: 1.25 in (3.2 cm)
- Finished flower: 5 in (12.7 cm)
- Full motif: 6.5 in x 10 in (16.5 cm x 25.4 cm)
- Five joined motifs: 50 in (127.0 cm)
- Bordered strip: 7 in x 50.5 in (17.8 cm x 128.3 cm)
- With hanging loops: 52 in (132.1 cm)
If you check the first motif against these numbers, the two strips will come out right. Happy crocheting!