

This little letter R is a soft, sturdy keychain you can clip to a bag, a set of keys, or a gift as a personal tag. The letter is worked in a fresh sage green. Three small lavender flowers with sunny yellow centers and muted green leaves sit on top of it.
The style is simple and cottage-garden pretty. The dense single crochet fabric keeps the letter firm and flat, so the shape stays crisp, and the raised flowers add dimension and color.
This pattern uses US crochet terms. The finished letter measures 3.2 in (8.1 cm) wide by 4.2 in (10.7 cm) tall after edging, not counting the key ring hardware.
You build the letter in four stages. First you work the stem as a straight strip. Next you add the bowl to the stem’s side edge in two short bars and close it with rounded rows. Then you work the diagonal leg down from the bowl. Finally, one round of edging tidies everything, and you sew on the flowers, leaves, and key ring.
Finished Size and Construction
- Finished size: 3.2 in x 4.2 in (8.1 cm x 10.7 cm)
- Skill level: Easy to intermediate (row-end work, simple shaping)
- Terminology: US crochet terms
- Yarn weight: DK / light worsted (weight 3) cotton
- Hook: 3.0 mm (US C/2 or D/3)
- Number of pieces: 1 letter, plus 3 flowers and 4 leaves for appliqué
- Layout: Single letter, no joining
- Letter size before edging: 3.0 in x 4.0 in (7.6 cm x 10.2 cm)
- Edging depth: 0.1 in (0.3 cm) on each side
- Flower size: 0.9 in (2.3 cm) across
- Leaf size: 0.7 in (1.8 cm) long
Materials
Choose a smooth, mercerized or combed cotton in DK weight. Cotton holds the letter’s shape, shows the stitch texture clearly, and stands up to handling on a keychain. Avoid fuzzy or very stretchy yarns because they blur the letter’s edges.
Yarn (approx. 2.4 m per gram DK cotton):
- Sage green (letter): 10 g / 24 m
- Lavender (petals): 3 g / 7 m
- Yellow (flower centers): 1 g / 2 m
- Leaf green (leaves): 2 g / 5 m
These quantities include a safety margin of about 25% for swatching and tails.
Tools:
- 3.0 mm crochet hook
- Tapestry needle
- Scissors
- Stitch markers (2 or 3)
- Gold split key ring, 1 in (2.5 cm), with a short 3-link chain and jump ring
- Small flat-nose pliers
- Blocking mat and rust-proof pins
- Spray bottle
Abbreviations (US Terms)
- ch – chain
- sl st – slip stitch
- sc – single crochet
- hdc – half double crochet
- dc – double crochet
- sc2tog – single crochet 2 together
- st(s) – stitch(es)
- MR – magic ring
- sp – space
- RS / WS – right side / wrong side
Special technique – sc in row-ends: Insert your hook under the outer 2 strands of the edge stitch at the end of each row. Work exactly 1 sc per row-end throughout. This pattern’s gauge is square (5 sts and 5 rows per inch), so 1 sc per row-end lies perfectly flat.
Gauge and Checkpoints
Gauge: 5 sc and 5 rows = 1 in (2.5 cm) in single crochet, worked firmly.
The letter itself makes a good test piece. Work the stem first and measure it before going any further.
Checkpoints:
- After the stem: 1.0 in x 4.0 in (2.5 cm x 10.2 cm).
- After bowl Row 5: each bar sticks out 1.0 in (2.5 cm) from the stem.
- After the bowl: the top of the letter is 2.8 in (7.1 cm) wide.
- After the leg: the letter is 3.0 in x 4.0 in (7.6 cm x 10.2 cm).
- After edging: the letter is 3.2 in x 4.2 in (8.1 cm x 10.7 cm).
If your stem is too big (for example 1.2 in / 3.0 cm wide), go down 0.25–0.5 mm in hook size. If it is too small, go up 0.25–0.5 mm. If your stitch width matches but your row height doesn’t, adjust how you wrap the yarn, not the hook. Row-end edging only lies flat when your stitches and rows are close to square.
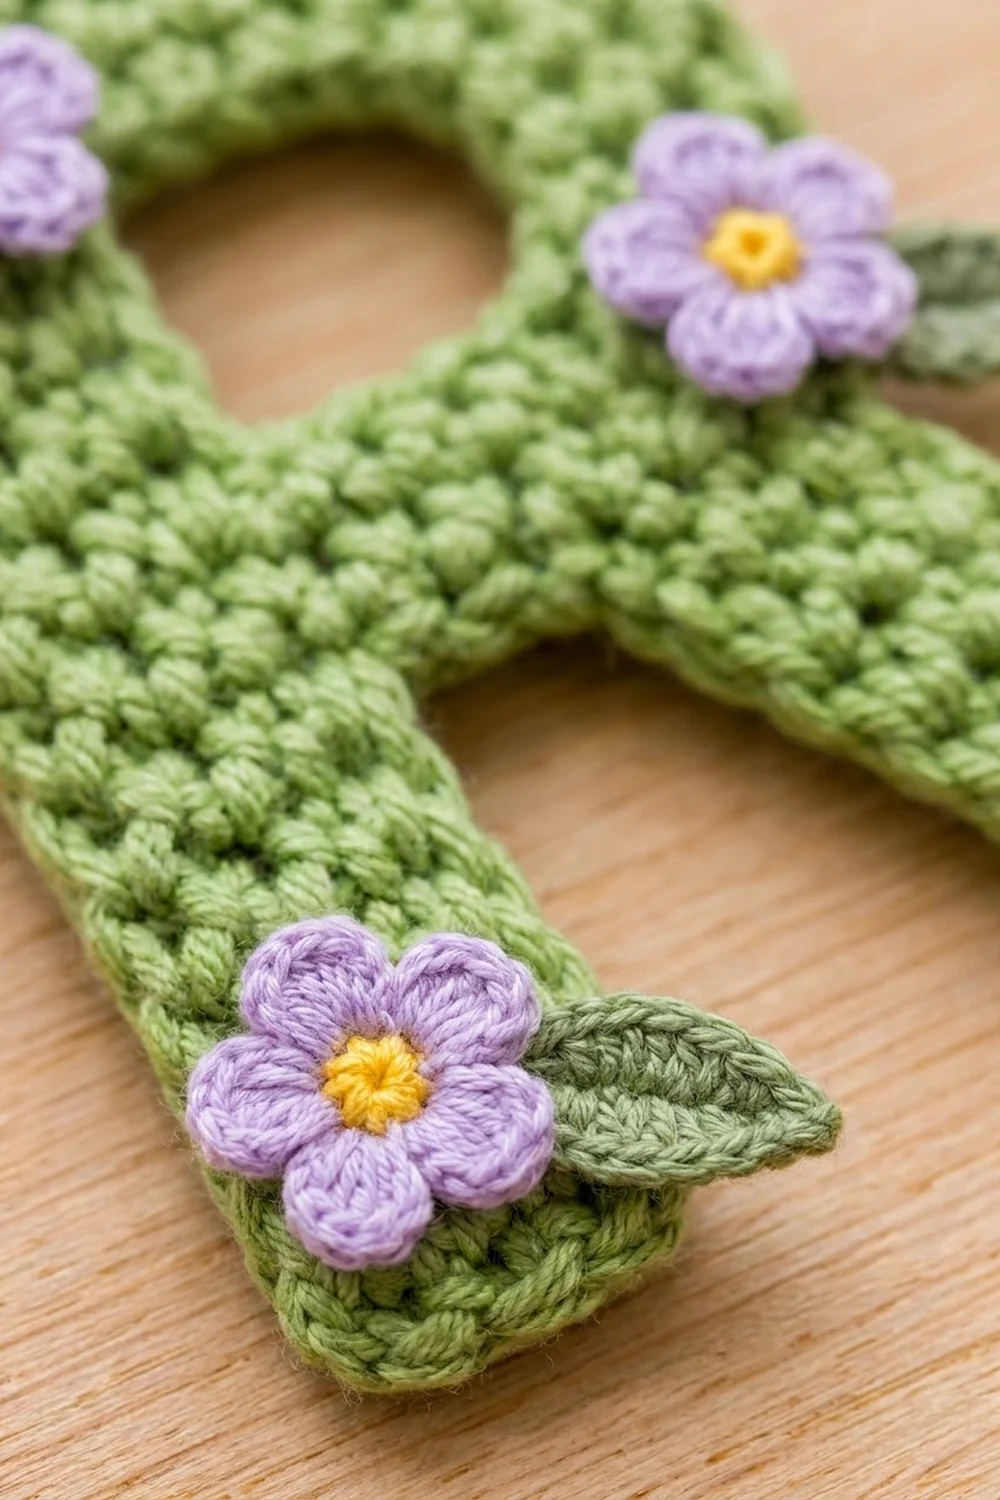
Letter R Pattern
Part 1: Stem
With sage green, ch 6.
Row 1: Sc in 2nd ch from hook and in each ch across. Turn. (5 sc)
Rows 2–20: Ch 1 (does not count as a st), sc in each st across. Turn. (5 sc)
Fasten off and weave in the starting tail. Turn the stem so Row 20 is at the top.
Checkpoint: 1.0 in x 4.0 in (2.5 cm x 10.2 cm).
The stem’s right edge has 20 row-ends, which we number from the bottom (Row 1) to the top (Row 20). Place a marker in the row-end of Row 13 and another in the row-end of Row 10.
Part 2: Bowl
You work the bowl sideways into the stem’s right edge, so the bowl’s rows run vertically. It starts as two separate bars: a top bar and a middle bar. The gap between them becomes the hole in the R.
Top bar:
Row 1: With RS facing, join sage green in the row-end of Row 20. Ch 1, then sc in the row-ends of Rows 20, 19, 18, and 17. Turn. (4 sc)
Rows 2–5: Ch 1, sc in each st across. Turn. (4 sc)
Fasten off. Row 5 ends at the lower edge of the top bar, next to the hole.
Leave the stem row-ends of Rows 16, 15, and 14 unworked. These 3 row-ends form the left side of the hole.
Middle bar:
Row 1: With RS facing, join sage green in the row-end of Row 13 (marked). Ch 1, then sc in the row-ends of Rows 13, 12, and 11. Turn. (3 sc)
Rows 2–5: Ch 1, sc in each st across. Turn. (3 sc)
Do not fasten off. Your yarn is at the lower edge of the middle bar.
Closing the bowl:
Row 6: Ch 1, turn, sc in each of the 3 middle-bar sts, ch 3, then sc in each of the 4 sts of top bar Row 5. Turn. (7 sc + 3 ch = 10 sts)
The ch-3 closes the right side of the hole. The hole is now 0.6 in (1.5 cm) tall and 1.0 in (2.5 cm) wide.
Row 7: Ch 1, sc in each of the 4 sc, sc in each of the 3 chs, sc in each of the 3 sc. Turn. (10 sc)
Row 8: Ch 1, sc2tog, sc in each of the next 6 sts, sc2tog. Turn. (8 sts)
Row 9: Ch 1, sc2tog, sc in each of the next 4 sts, sc2tog. (6 sts)
Fasten off. The decreases in Rows 8 and 9 round off both the top-right corner and the lower curve of the bowl.
Checkpoint: The top of the letter is 2.8 in (7.1 cm) wide (5 stem sts + 9 bowl rows = 14 units at 0.2 in each).
Part 3: Diagonal Leg
You work the leg downward from the lower edge of the bowl. The lower edge is made of the row-ends of bowl Rows 1–9 along the bottom of the middle bar and the closing rows. Bowl Rows 1 and 2 stay free, which creates the notch between the stem and the leg.
Row 1: With RS facing, join sage green in the lower row-end of bowl Row 3. Ch 1, then sc in the lower row-ends of bowl Rows 3, 4, 5, 6, and 7. Turn. (5 sc)
Row 2: Ch 1, sc in each st across. Turn. (5 sc)
Row 3 (shift row): Ch 1, then work across so the sc2tog is at the end nearest the stem: sc2tog, sc in the next 2 sts, and 2 sc in the outer-edge st. If you are traveling the other way, work 2 sc in the first (outer) st, sc 2, then sc2tog. Turn. (1 + 2 + 2 = 5 sts)
Rows 4–5: Ch 1, sc in each st across. Turn. (5 sc)
Row 6: Repeat Row 3. (5 sts)
Rows 7–8: Ch 1, sc in each st across. Turn. (5 sc)
Row 9: Repeat Row 3. (5 sts)
Row 10: Ch 1, sc in each st across. (5 sc)
Fasten off.
Each shift row moves the leg 1 st (0.2 in / 0.5 cm) to the right. That adds up to 3 sts over the leg. The gap between the stem and the leg starts at 0.4 in (1.0 cm) and widens to 1.0 in (2.5 cm) at the bottom. Leg Row 10 sits level with stem Row 1.
Checkpoint: 3.0 in x 4.0 in (7.6 cm x 10.2 cm). The leg’s outer edge reaches 15 units (0.2 in each) from the left edge.
Edging
Edging gauge: The same as the body: 5 sc = 1 in (2.5 cm). One sc round adds 0.1 in (0.3 cm) to each edge.
Rnd 1 (outer edge): With RS facing, join sage green in the first st of stem Row 20 at the top-left corner. Ch 1 and work clockwise. Segment counts below are sc only. Each ch-1 corner is listed separately.
- Top edge: sc in each of the 5 sts of stem Row 20, then sc in the top row-ends of bowl Rows 1–9. (14 sc)
- Bowl right end: sc in each of the 6 sts of bowl Row 9. (6 sc)
- Bowl lower curve: sc in the lower row-ends of bowl Rows 9 and 8. (2 sc)
- Leg outer side: sc in each row-end of leg Rows 1–10. (10 sc)
- Ch 1 (corner).
- Leg bottom: sc in each of the 5 sts of leg Row 10. (5 sc)
- Ch 1 (corner).
- Leg inner side: sc in each row-end of leg Rows 10–1. (10 sc)
- Notch top: sc in the lower row-ends of bowl Rows 2 and 1. (2 sc)
- Stem right side: sc in the row-ends of stem Rows 10–1. (10 sc)
- Ch 1 (corner).
- Stem bottom: sc in each of the 5 foundation chs. (5 sc)
- Ch 1 (corner).
- Stem left side: sc in the row-ends of stem Rows 1–20. (20 sc)
- Ch 1 (corner), then sl st to the first sc.
Rnd 1 total: 14 + 6 + 2 + 10 + 5 + 10 + 2 + 10 + 5 + 20 = 84 sc, plus 5 ch-1 corners = 89 sts.
Hole edging: Join sage green at the hole and sl st loosely around it. Work 3 sl st in stem row-ends 16–14, 5 sl st in the row-ends of top bar Rows 1–5, 3 sl st in the ch-3, and 5 sl st in the row-ends of middle bar Rows 5–1. Join. (16 sl st) Fasten off.
Why the math works: Every edge gets exactly 1 sc per stitch or row-end, and the gauge is square, so the edging is the same length as the edge beneath it. The ch-1 corners let the 5 square corners turn without cupping. The rounded corners were already shaped by the decreases in bowl Rows 8–9, so they need no extra stitches. The hole edging uses slip stitches so the 0.6 in x 1.0 in (1.5 cm x 2.5 cm) opening stays open.
Flowers (Make 3)
Rnd 1: With yellow, MR, 5 sc in the ring. Pull the ring closed and sl st to the first sc. (5 sc) Fasten off yellow.
Rnd 2: Join lavender in any sc. In the same st: (ch 2, 2 dc, ch 2, sl st). Move to the next st. Repeat from * 4 more times. (5 petals)
Fasten off, leaving a 10 in (25.4 cm) tail for sewing. Each flower measures 0.9 in (2.3 cm) across.
Leaves (Make 4)
With leaf green, ch 6. The ch nearest the hook becomes the leaf tip.
- First side: Skip the first ch from the hook. Sc in the next ch, then hdc, dc, hdc, and (sc, ch 1, sc) all in the last ch.
- Second side: Rotate and work along the other side of the foundation: hdc, dc, hdc, sc, then sl st in the tip ch.
Fasten off, leaving an 8 in (20.3 cm) tail. Each leaf measures 0.7 in (1.8 cm) long.
Assembly
- Top-left flower: Pin a flower over the top-left corner so it overlaps the top edge of the stem. Tuck 2 leaves under its left side, pointing outward.
- Bowl flower: Pin a flower on the lower curve of the bowl. Tuck 1 leaf under its right side so it points right.
- Stem flower: Pin a flower near the bottom of the stem. Tuck 1 leaf under its lower-right side so it points down and to the right.
- Sew each leaf with small stitches through its base. Sew each flower around its yellow center and between the petals, keeping the petals free.
- Open the jump ring with pliers and slide it through the top edging, 1 st to the right of the stem (above bowl Row 1). Attach the chain and split key ring, then close the jump ring firmly.
Final Blocking
- Weave in all ends on the WS before blocking.
- Lightly mist the letter (not the flowers) until it is damp.
- Pin the letter to 3.2 in x 4.2 in (8.1 cm x 10.7 cm) on a blocking mat.
- Pin the stem and leg straight. Keep the notch at 1.0 in (2.5 cm) wide at the bottom.
- Pin the hole open at 0.6 in x 1.0 in (1.5 cm x 2.5 cm).
- Let it dry completely. Unpin and gently fluff the petals with your fingertip.
Final Quality-Control Checklist
- Stem: 5 sts wide and 20 rows tall
- Bowl bars: 4 sts (top) and 3 sts (middle), with 3 row-ends skipped between them
- Bowl Rows 6–9 count 10, 10, 8, and 6 sts
- Leg holds 5 sts on every row, with shifts in Rows 3, 6, and 9
- Edging: 84 sc + 5 ch-1 corners
- Hole edging: 16 sl st
- Letter measures 3.2 in x 4.2 in (8.1 cm x 10.7 cm)
- 3 flowers, each with 5 petals
- 4 leaves sewn on (2 + 1 + 1)
- Jump ring closed tightly, with no gap
Troubleshooting
- The stem is wavy: Your foundation chain is too tight. Redo it with a hook 0.5 mm larger.
- The bowl edge ruffles: You worked more than 1 sc into some row-ends. Count 4 + 3 stitches on the first rows of the bars.
- The hole closed up: You worked into the ch-3 too tightly in Row 7. Work it more loosely, and block the hole open.
- The leg drifts too far right: You added extra shift rows. Shift only in Rows 3, 6, and 9.
- The edging cups: Your tension is tight. Loosen up or go up a hook size for the edging round only.
- The petals flop: Pull the magic ring tighter and keep the dc stitches compact.
Care
Hand wash in cool water with mild soap, press out the water in a towel, and lay it flat to dry. Don’t wring it, because twisting can loosen the flower stitching.
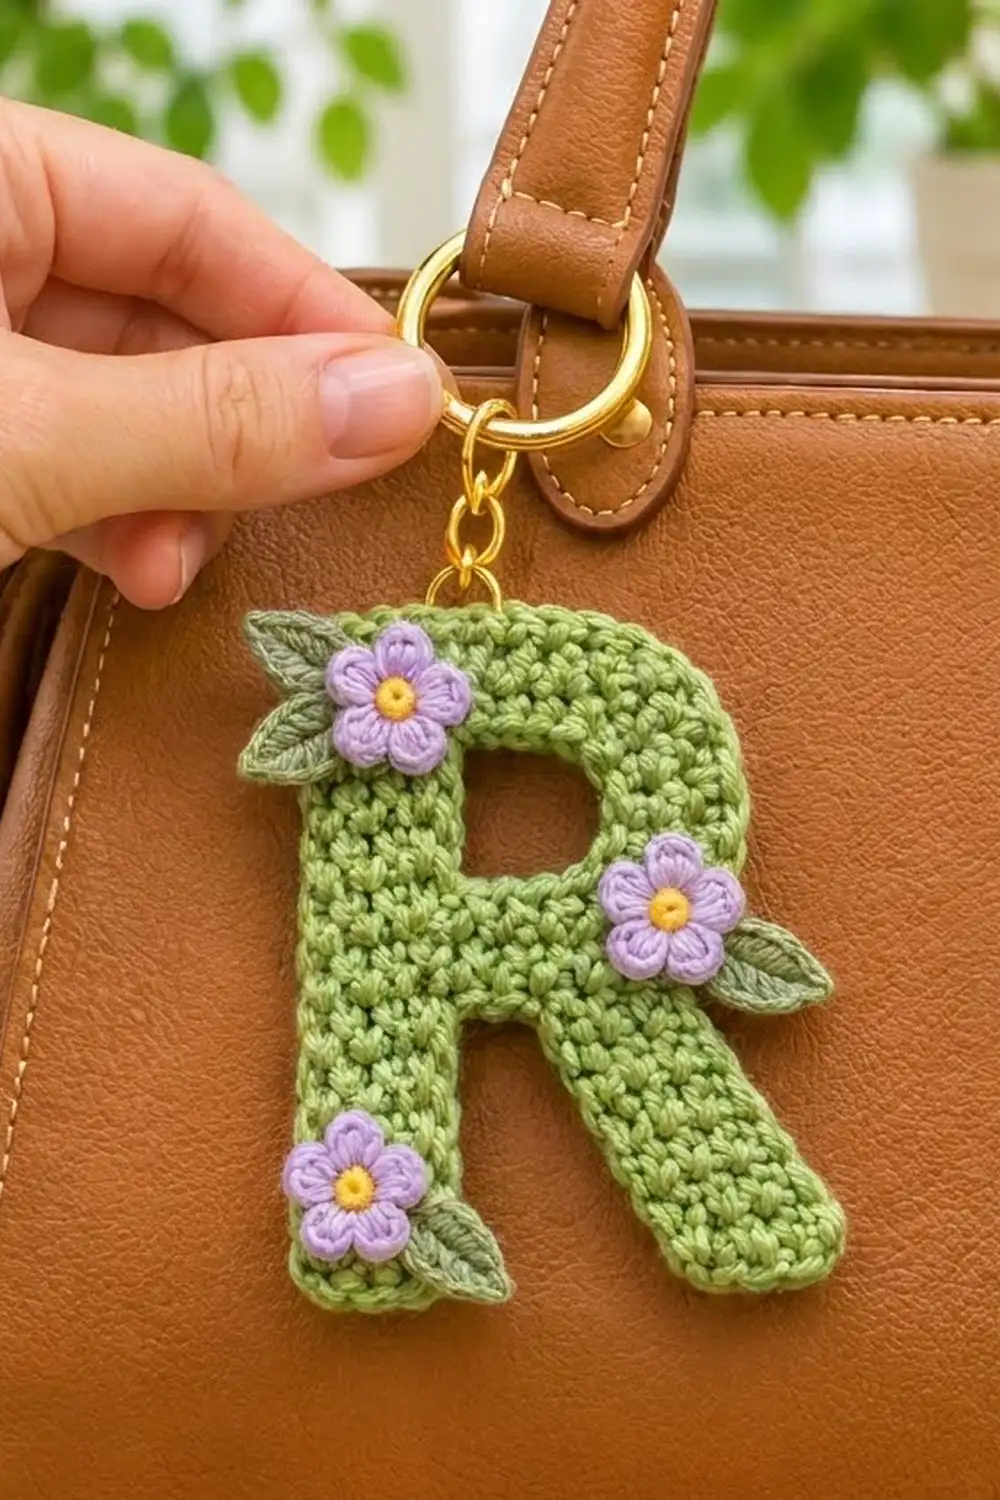
Final Notes
Your measurements build on each other. The stem is 1.0 in x 4.0 in (2.5 cm x 10.2 cm). The bowl brings the width to 2.8 in (7.1 cm). The leg finishes the letter at 3.0 in x 4.0 in (7.6 cm x 10.2 cm). The 84 sc + 5 ch edging brings it to 3.2 in x 4.2 in (8.1 cm x 10.7 cm). If you check each stage, the flowers will sit exactly where they should, and your R will hang straight and neat from its gold ring.
Happy crocheting!