

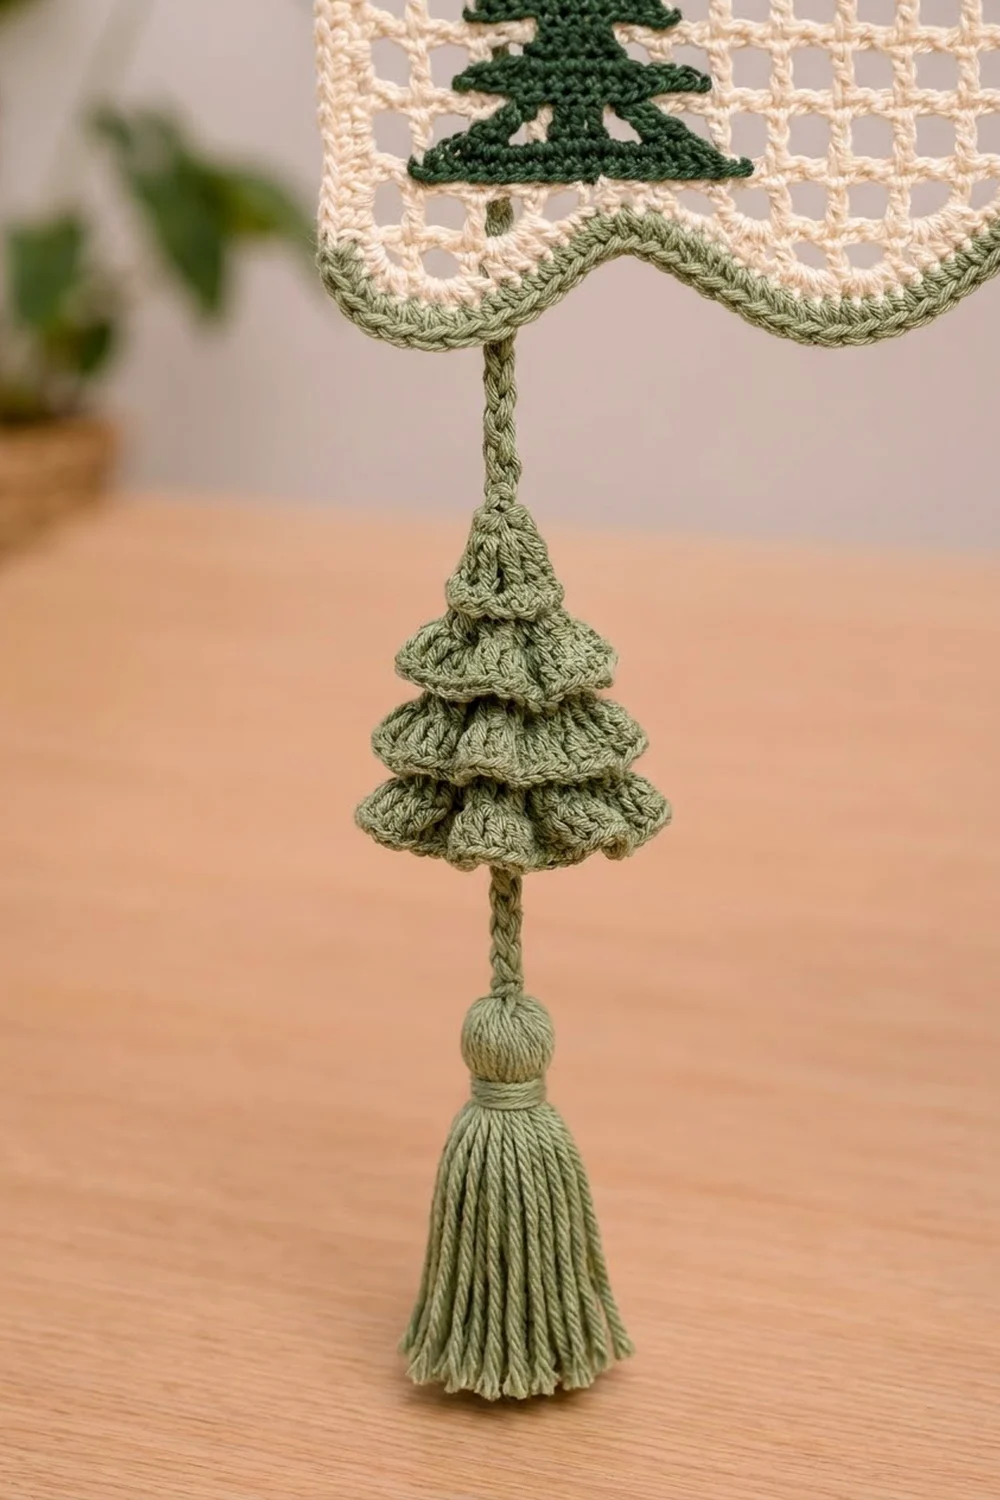
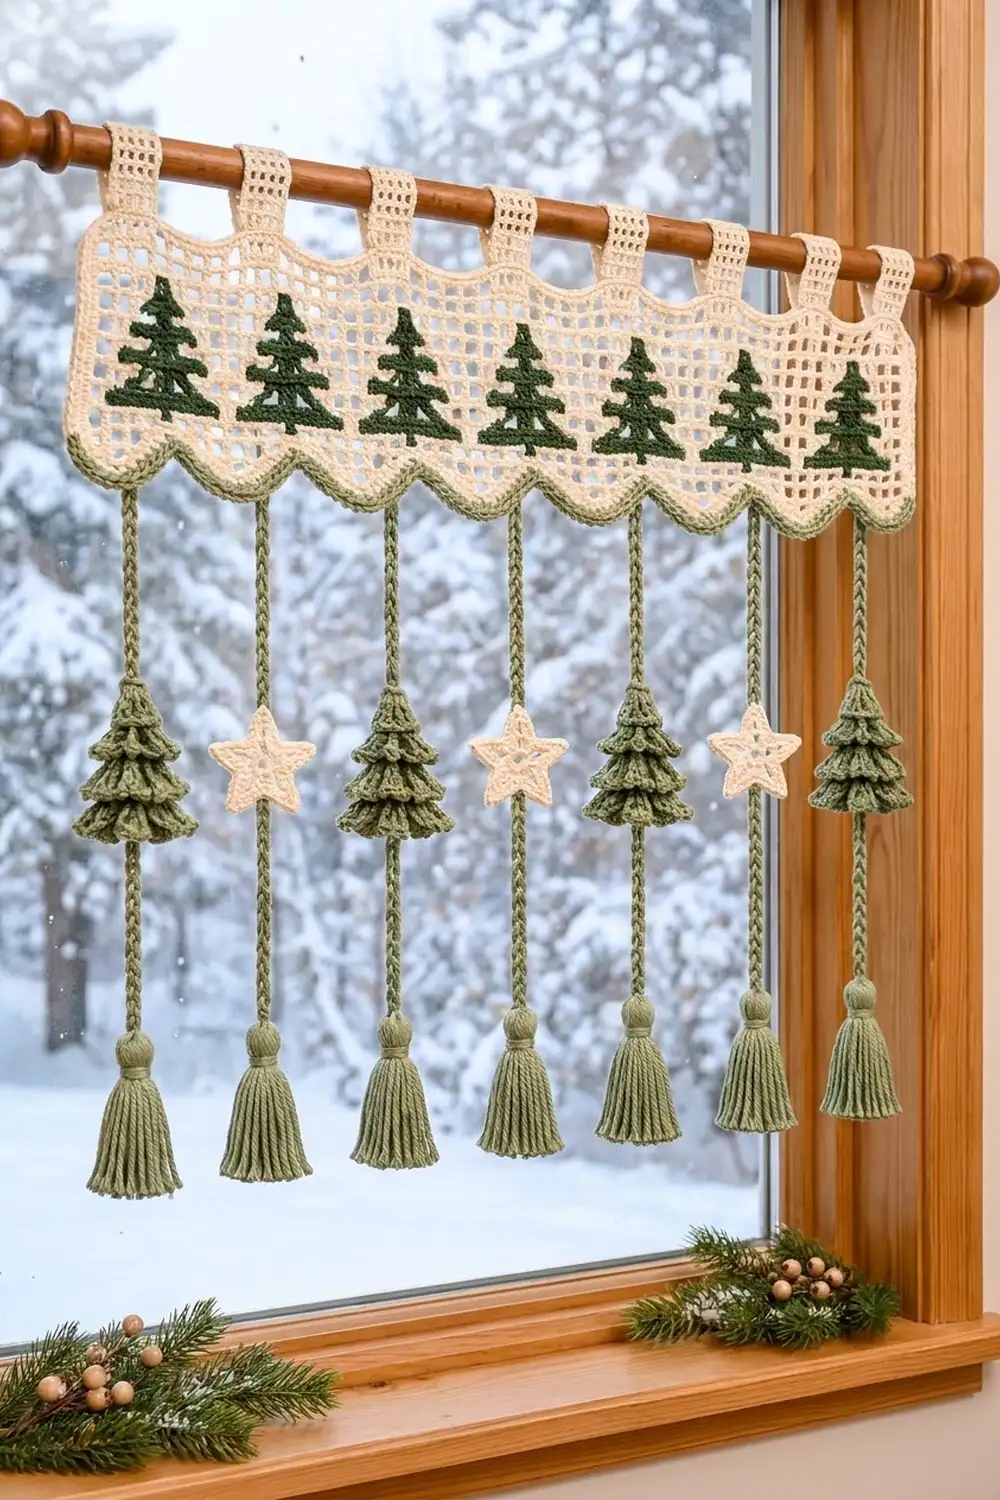
This valance brings a quiet row of pine trees to your window. A cream filet-mesh panel holds seven forest-green trees. Below it hang seven sage-green cords with ruffled 3D trees, cream stars and soft tassels.
The palette is cream, forest green and sage green. The look is calm and Scandinavian-inspired, with filet’s open grid letting winter light through. The pattern uses US crochet terms throughout.
The finished panel measures 29 in (73.7 cm) wide by 7 in (17.8 cm) deep at the scallop peaks. Each drop hangs a further 15.5 in (39.4 cm) including its tassel.
Construction is simple. You work the panel flat from the top edge down, then crochet the tabs into the free loops of the foundation chain. Next you add the scalloped border, then make the seven drops and sew them on.
Finished Size and Construction
- Finished size: 29 in × 7 in (73.7 cm × 17.8 cm), plus the drops
- Skill level: Intermediate
- Terminology: US
- Yarn weight: Worsted (#4) cotton
- Hooks: 5.0 mm (H-8) for the panel, 4.0 mm (G-6) for the drops
- Number of pieces: 1 panel and 7 drops attached to it
- Layout: 7 tree repeats in one row, 57 mesh squares wide by 12 rows
- Panel size before border: 28.5 in × 6 in (72.4 cm × 15.2 cm)
- Border depth: 1 in (2.5 cm) at the bottom (scallop plus trim), 0.25 in (0.6 cm) at each side
Materials
Use a smooth, mercerized or combed worsted-weight cotton. Cotton gives crisp mesh and holds blocking well, and the ruffles on the 3D trees keep their shape.
- Color A, Cream: 170 g (325 m)
- Color B, Forest Green: 70 g (135 m)
- Color C, Sage Green: 70 g (135 m)
Tools:
– 5.0 mm (H-8) and 4.0 mm (G-6) hooks
– Tapestry needle
– 7 small yarn bobbins
– Rust-proof pins and a blocking mat
– A 4 in (10.2 cm) cardboard rectangle for tassels
– A small amount of fiberfill
– Scissors and a measuring tape
All quantities include a margin of about 15% for swatching and tails.
Abbreviations (US Terms)
- ch – chain
- sl st – slip stitch
- sc – single crochet
- hdc – half double crochet
- dc – double crochet
- tr – treble crochet
- sc2tog – single crochet 2 together
- rev sc – reverse single crochet (crab stitch)
- FLO / BLO – front loop only / back loop only
- MR – magic ring
- sp – space
- st(s) – stitch(es)
- RS / WS – right side / wrong side
Special stitches
- Open square: ch 2, skip 2 sts (or the ch-2 sp), dc in the next dc.
- Filled square: over an open square, work 2 dc in the ch-2 sp and dc in the next dc. Over a filled square, dc in each of the next 3 sts.
- Rev sc: working from left to right, insert the hook in the next st to the right, pull up a loop, yarn over and pull through 2 loops.
Every square is 3 sts wide, so a row of 57 squares has 1 + (57 × 3) = 172 sts.
Gauge and Checkpoints
Gauge: 4 squares and 4 rows = 2 in (5.1 cm) in filet mesh with a 5.0 mm hook.
Test before you start. Chain 33 and work 10 open squares for 8 rows. The swatch should measure 5 in × 4 in (12.7 cm × 10.2 cm). Next, make one 3D tree with the 4.0 mm hook. It should stand 2.75 in (7.0 cm) tall.
Checkpoints:
– After Row 1: 28.5 in (72.4 cm) wide
– After Row 3: 1.5 in (3.8 cm) tall
– After Row 10: 5 in (12.7 cm) tall
– After Row 12: 6 in (15.2 cm) tall
– After the border: 29 in × 7 in (73.7 cm × 17.8 cm)
If your swatch is too big, go down half a hook size. If it is too small, go up half a hook size. A tolerance of ±0.5 in (1.3 cm) in width is fine for a valance.
Panel
The panel is worked flat from the top edge down. Row 1 is a RS row. Each row starts with ch 5, which counts as the first dc plus the ch-2 of square 1, except Row 1.
Color work: wind one bobbin of B for each tree (7 bobbins). For the last yarn-over of the dc before a green square, pull through with B. While you work green squares, carry A inside them, laying it along the top of the previous row and working over it. When a tree grows or shrinks by one square, B floats one square across the WS. Leave these floats loose and tack them down at the end.
Foundation: With A and the 5.0 mm hook, ch 174.
Row 1 (RS): Dc in the 4th ch from the hook and in each ch across. The skipped 3 ch count as a dc. Turn. (172 sts)
Row 2: Ch 5, skip the next 2 dc, dc in the next dc. Open square; repeat from * across. Turn. (57 open squares, 172 sts)
Row 3: Ch 5, dc in the next dc, then work open squares across. Work the last dc in the 3rd ch of the turning ch-5. Turn. (57 open squares)
Tree rows: Each tree row is written as 1 open square, then the 7-square tree section repeated 7 times, then 1 open square. That gives 1 + (7 × 8) = 57 squares. All filled squares are in B.
- Row 4 (tip): each tree section is 3 open, 1 filled, 3 open. (7 filled squares)
- Row 5: 2 open, 3 filled, 2 open. (21 filled)
- Row 6: 1 open, 5 filled, 1 open. (35 filled)
- Row 7 (second tier starts): 2 open, 3 filled, 2 open. (21 filled)
- Row 8: 1 open, 5 filled, 1 open. (35 filled)
- Row 9 (widest row): 7 filled. (49 filled)
- Row 10 (trunk): 3 open, 1 filled, 3 open. (7 filled)
Every tree row is still 57 squares and 172 sts. Because each tree is symmetrical, the rows read the same in both directions.
Cut the B bobbins, leaving 6 in (15.2 cm) tails.
Rows 11–12: With A only, work 57 open squares. Do not fasten off after Row 12. Row 12 ends at the bottom-left corner, ready for the border.
Checkpoint: 28.5 in × 6 in (72.4 cm × 15.2 cm).
Tabs
Turn the panel so the foundation chain is at the top, RS facing. Number the free loops of the foundation chain 1–172 from right to left.
Each tab sits over squares 4–6 of its tree repeat. Tab 1 covers sts 10–19. After that, skip 14 sts between tabs. The edge allowance works out as 9 + (7 × 10) + (6 × 14) + 9 = 172.
Tab Row 1: Join A in st 10 and ch 5. Then work dc in st 13, ch 2, dc in st 16, ch 2, dc in st 19. Turn. (3 open squares, 10 sts)
Tab Rows 2–10: Ch 5, dc in the next dc, ch 2, dc in the next dc, ch 2, dc in the 3rd ch of the turning ch. Turn.
Fasten off, leaving a 12 in (30.5 cm) tail. Each tab measures 1.5 in × 5 in (3.8 cm × 12.7 cm). Repeat for all 7 tabs.
Fold each tab to the WS and whipstitch its last row to the back of Row 2. The loops fit rods up to 1.25 in (3.2 cm) in diameter.
Border
Border gauge: the scallop row follows the panel gauge, 6 sts per 1 in (2.5 cm) of mesh edge. Rev sc is worked 1 per st and lies flat at the same rate.
Row 13 (RS, scallops, A): Turn so the RS faces you. Ch 1 and sc in the first dc. Then work the following sequence 7 times:
- Valley: 2 sc in the next sp, sc in the next dc (3 sts)
- 2 hdc in the next sp, hdc in the next dc (3 sts)
- 2 dc in the next sp, dc in the next dc (3 sts)
- 2 tr in the next sp, tr in the next dc (3 sts)
- Peak: 3 tr in the next sp, tr in the next dc (4 sts)
- 2 tr in the next sp, tr in the next dc (3 sts)
- 2 dc in the next sp, dc in the next dc (3 sts)
- 2 hdc in the next sp, hdc in the next dc (3 sts)
To finish, work 2 sc in the last sp and sc in the 3rd ch of the turning ch.
That is 172 sts worked 1 per existing st, plus 7 extra (one at each peak), for 179 sts.
Row 14 (trim, C): Fasten off A. With the RS still facing, join C in the last st of Row 13. Ch 1, then rev sc in each st back to the start. Fasten off. (179 sts)
Side edging (A): With the RS facing, join A at a top corner. Work 2 sc in each of the 12 row ends, then 1 sc in the end of Row 13. Fasten off and repeat on the other side. (25 sc per side)
Why the math works:
– Each tree repeat is 8 squares, or 24 sts. The scallop covers those 24 sts plus 1 peak increase, so each scallop has 25 sts and sits exactly under its tree.
– The 1 extra st per peak rounds the curve without ruffling.
– Rev sc adds no stitches, so the trim lies flat.
– One dc row is about as tall as 2 sc, so the sides stay straight.
The scallops add 0.75 in (1.9 cm) and the trim adds 0.25 in (0.6 cm), for a finished depth of 7 in (17.8 cm). Each scallop spans 3.5 in (8.9 cm).
Make All Drop Pieces
Use the 4.0 mm hook for all drop pieces.
Cord (make 7, C): Ch 49. Sl st in the back bump of the 2nd ch from the hook and in each ch across. (48 sl sts, 12 in / 30.5 cm)
3D Tree (make 4, B):
– Rnd 1: 6 sc in a MR. Do not pull the ring fully closed. (6)
– Rnd 2: Sc in each st. (6)
– Rnd 3 (Tier 1): In the FLO, work (hdc, dc) in each st. (12)
– Rnd 4: In the BLO of Rnd 2, work [sc, 2 sc in the next st] 3 times. (9)
– Rnd 5: Sc in each st. (9)
– Rnd 6 (Tier 2): In the FLO of Rnd 5, work (hdc, dc) in each st. (18)
– Rnd 7: In the BLO of Rnd 5, work [sc in the next 2 sts, 2 sc in the next st] 3 times. (12)
– Rnd 8: Sc in each st. (12)
– Rnd 9 (Tier 3): In the FLO of Rnd 8, work (hdc, dc) in each st. (24)
– Rnd 10: In the BLO of Rnd 8, sc2tog 6 times. (6) Stuff lightly.
– Rnd 11: Sc2tog 3 times. (3) Leave the hole open and fasten off.
Each tree measures 2.75 in (7.0 cm) tall and 2 in (5.1 cm) across the bottom tier.
Star (make 3, A):
– Rnd 1: In a MR, ch 1 and work 10 sc. Sl st to the first sc and leave a small center hole. (10)
– Rnd 2: Ch 5, sl st in the 2nd ch from the hook, then sc, hdc and dc in the next 3 ch. Skip the next sc and sl st in the following sc. Repeat from * 4 more times. (5 points)
Each star measures 2.25 in (5.7 cm) across.
Tassel (make 7, C): Wrap the yarn 30 times around the 4 in (10.2 cm) card. Tie the top with the cord’s bottom tail and cut the loops at the bottom. Wrap the neck 0.5 in (1.3 cm) below the top and trim the tassel to 3.5 in (8.9 cm).
Drop layout (left to right, under scallops 1–7):
Scallop:  1     2     3     4     5     6     7
Drop:    Tree  Star  Tree  Star  Tree  Star  Tree
Attaching the Drops
- Thread the trees. Run a tapestry needle with the cord’s top end down through the MR and out of the bottom hole. Slide the tree so its tip sits 3.5 in (8.9 cm) below the top of the cord. Close the bottom hole snugly around the cord and tack it in place.
- Place the stars. Sew each star to the front of its cord, centered 3.5 in (8.9 cm) down.
- Tie on the tassels. Tie a tassel to the bottom end of each cord.
- Attach the cords. Sew the top of each cord to the WS of Row 14 at the scallop peak, behind the 2 middle tr. Use firm, even stitches so the cord hangs straight without puckering the trim.
Checkpoint: all 7 tassels should hang at the same level, 15.5 in (39.4 cm) below the peaks.
Final Blocking
- Weave in all ends along dc posts, and tack down any B floats.
- Spray the panel until it is damp, or wet it and roll it in a towel.
- Pin it to 29 in × 7 in (73.7 cm × 17.8 cm). Pin each corner first, then the scallop peaks.
- Square up the mesh by running a ruler along the rows.
- Shape the tree ruffles and star points with your fingers, and comb out the tassels.
- Let everything dry completely before you unpin it.
Final Quality-Control Checklist
- [ ] 57 squares across, with 172 sts in every panel row
- [ ] 7 trees, each with 1-3-5-3-5-7-1 filled squares
- [ ] 7 tabs, each centered over a tree
- [ ] Row 13 has 179 sts, and Row 14 has 179 rev sc
- [ ] 25 sc on each side edge
- [ ] Drops in the order tree, star, tree, star, tree, star, tree
- [ ] Final size 29 in × 7 in (73.7 cm × 17.8 cm)
Troubleshooting
- The mesh is slanting: check that every row starts with ch 5 and ends in the turning ch. Block it square.
- The trees look blurry: pull the B yarn through on the final yarn-over of the dc before each green square.
- The scallops ruffle: your tr stitches are too loose. Work them more firmly, or use a 4.5 mm hook for Row 13.
- The scallops cup: the rev sc is too tight. Loosen your tension on Row 14.
- The tabs won’t fit your rod: add 2 more tab rows. Each one adds 0.5 in (1.3 cm).
- The drops twist: wet-block the cords and let them hang straight while they dry.
Care
Hand wash in cool water with a mild soap. Reshape the valance and dry it flat. Do not tumble dry.
Final Notes
The measurement chain works like this. The gauge of 4 squares per 2 in (5.1 cm) gives 57 squares, which make a 28.5 in (72.4 cm) panel. Twelve rows make it 6 in (15.2 cm) deep. The border brings it to 29 in × 7 in (73.7 cm × 17.8 cm). Seven 12 in (30.5 cm) cords with tassels finish the cascade. If each checkpoint matches, the finished valance will too.
Happy crocheting!