

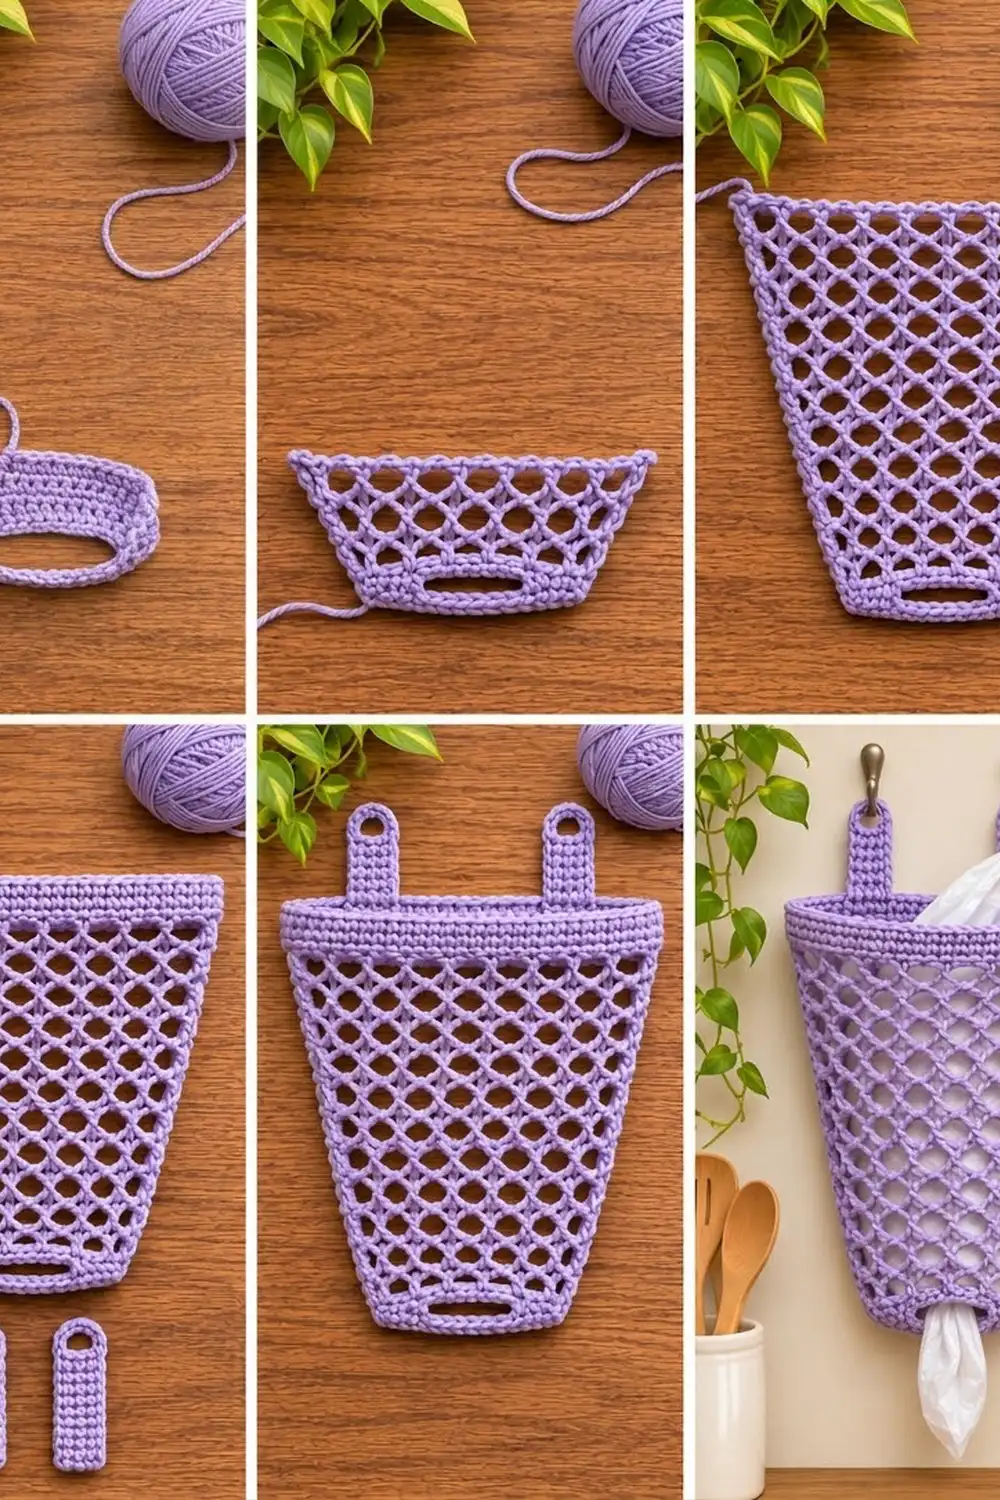
This Lavender Lattice Bag Holder keeps your plastic grocery bags together in one tidy place that lets air through. You stuff bags in through the wide top and pull them out one at a time through a slot near the bottom.
The design uses one soft lavender yarn. A solid single crochet band forms the bottom, an open diamond net forms the body, and a firm single crochet band finishes the rim. Two small tabs with eyelet holes let it hang from wall hooks or cabinet knobs.
The pattern uses US crochet terms. Laid flat, the finished holder measures 7 in (17.8 cm) wide at the bottom, 10 in (25.4 cm) wide at the top and 14 in (35.6 cm) tall. With the tabs it is 16.5 in (41.9 cm) tall.
Construction is simple:
– A chain closes the bottom.
– You work the bottom band in rounds, with the slot built in.
– You switch to a chain-loop mesh that widens over three increase rounds.
– You turn the mesh back into solid stitches for the top band.
– You sew on two tabs made separately.
Finished Size and Construction
- Finished size (flat): 7 in (17.8 cm) bottom width, 10 in (25.4 cm) top width, 14 in (35.6 cm) height
- Height with tabs: 16.5 in (41.9 cm)
- Skill level: Easy to intermediate
- Terminology: US crochet terms
- Yarn weight: Worsted (#4)
- Hook: 5.0 mm (H-8)
- Number of pieces: 3 (1 body, 2 tabs)
- Layout: Body worked in the round from the bottom up; tabs sewn to the inside back of the rim
- Piece sizes: Body as above; each tab 1.25 in (3.2 cm) wide x 4 in (10.2 cm) long
- Size before top band: 10 in (25.4 cm) wide x 12 in (30.5 cm) tall
- Top band (border) depth: 2 in (5.1 cm)
Materials
Choose a smooth worsted-weight cotton or cotton blend. Cotton holds the mesh shape well, stretches little under the weight of the bags, and washes easily. Acrylic also works, but the mesh will sag a little more.
- Lavender: 150 g, about 255 m (based on 85 m per 50 g)
These amounts include a margin of about 15 percent for gauge differences and swatching.
Tools:
- 5.0 mm (H-8) crochet hook
- Tapestry needle
- Scissors
- 3 stitch markers
- Measuring tape
- Pins and a blocking mat or towel
- Spray bottle
Abbreviations (US Terms)
- ch – chain
- sc – single crochet
- sc2tog – single crochet 2 together
- sl st – slip stitch
- sk – skip
- st(s) – stitch(es)
- sp – space
- rnd – round
- ch-5 loop – the chain-5 arch of the mesh
Special stitch – Mesh increase (mesh inc): Work sc, ch 5, sc all in the same ch-5 loop. This turns one loop from the previous round into two loops in the current round.
Gauge and Checkpoints
Single crochet gauge: 16 sc x 18 rnds = 4 in (10.2 cm).
Mesh gauge: 1 ch-5 loop (sc to sc) = 1 in (2.5 cm) wide; 3 mesh rnds = 2 in (5.1 cm) tall, measured flat and relaxed.
Use the bottom band as your gauge test before you work the whole body. After Rnd 1, the flattened bottom must measure 7 in (17.8 cm) across.
Checkpoints (flat measurements):
- After the bottom band: 7 in (17.8 cm) wide, 2 in (5.1 cm) tall
- After Mesh Rnd 3: 7 in (17.8 cm) wide, 4 in (10.2 cm) total height
- After Mesh Rnd 6: 8 in (20.3 cm) wide, 6 in (15.2 cm) total height
- After Mesh Rnd 9: 9 in (22.9 cm) wide, 8 in (20.3 cm) total height
- After Mesh Rnd 12: 10 in (25.4 cm) wide, 10 in (25.4 cm) total height
- After Mesh Rnd 15: 10 in (25.4 cm) wide, 12 in (30.5 cm) total height
- After the top band: 10 in (25.4 cm) wide, 14 in (35.6 cm) total height
If your piece is too big, go down one hook size to 4.5 mm. If it is too small, go up one size to 5.5 mm. The mesh can be slightly off because blocking evens it out, but the solid bands should be within 1/4 in (0.6 cm) of the target.
Bottom Band
Work the bottom band in joined rounds. The foundation chain becomes the closed bottom seam, so no sewing is needed.
Rnd 1 (foundation): Ch 29. Sc in 2nd ch from hook and in each of the next 27 ch (28 sc). Rotate the work. Working into the opposite side of the foundation chain, sc in each of the 28 ch. Join with sl st to first sc. (56 sc)
The first 28 sts are the front face and the last 28 sts are the back face. Place a marker in the first st of each face.
Rnds 2–4: Ch 1, sc in each st around, join. (56 sc)
Rnd 5 (slot round): Ch 1, sc in next 7 sts, ch 14, sk 14 sts, sc in next 7 sts (front face complete), sc in each of the next 28 sts, join. (42 sc + 14 ch = 56 sts)
Rnd 6: Ch 1, sc in each of the 7 sc, sc in each of the 14 ch, sc in each of the remaining 35 sc, join. (56 sc)
The slot is 14 sts, or 3.5 in (8.9 cm), wide. It is centered on the front face with 7 sts on each side.
Rnds 7–9: Ch 1, sc in each st around, join. (56 sc)
Checkpoint: 9 rnds at 18 rnds per 4 in = 2 in (5.1 cm) tall. Flat width: 28 sts at 4 sts per inch = 7 in (17.8 cm).
Mesh Body
Each mesh round starts with slip stitches that take you to the center of a loop. This puts every sc at the top of a loop, which creates the diamond pattern.
Mesh Rnd 1 (conversion to mesh): Ch 1, sc in first st, ch 5, sk 3 sts, sc in next st, ch 5, sk 3 sts; repeat from * 12 more times, join with sl st to first sc. (14 ch-5 loops)*
Check: each repeat uses 4 sts (1 sc + 3 skipped), and 14 x 4 = 56. Seven loops sit on the front and seven on the back.
Mesh Rnds 2–3: Sl st in first 3 ch of the next loop, ch 1, sc in same loop, ch 5, sc in next loop, ch 5; repeat from * around, join to first sc. (14 loops)*
Mesh Rnd 4 (increase): Sl st to center of first loop, ch 1, (sc, ch 5, sc) in same loop, ch 5, sc in next loop, ch 5 6 times, mesh inc in next loop, ch 5, sc in next loop, ch 5 6 times, join. (16 loops)
The two increases fall at the two side folds, so both sides taper evenly.
Mesh Rnds 5–7: Repeat Mesh Rnd 2. (16 loops)
Mesh Rnd 8 (increase): Sl st to center of first loop, ch 1, (sc, ch 5, sc) in same loop, ch 5, sc in next loop, ch 5 7 times, mesh inc in next loop, ch 5, sc in next loop, ch 5 7 times, join. (18 loops)
Mesh Rnds 9–11: Repeat Mesh Rnd 2. (18 loops)
Mesh Rnd 12 (increase): Sl st to center of first loop, ch 1, (sc, ch 5, sc) in same loop, ch 5, sc in next loop, ch 5 8 times, mesh inc in next loop, ch 5, sc in next loop, ch 5 8 times, join. (20 loops)
Mesh Rnds 13–15: Repeat Mesh Rnd 2. (20 loops)
Checkpoint: 15 mesh rnds at 3 rnds per 2 in = 10 in (25.4 cm) of mesh. Total height is now 12 in (30.5 cm). Flat width: 20 loops ÷ 2 faces = 10 loops = 10 in (25.4 cm).
Make All Pieces
You need 3 pieces in total, all in lavender:
- 1 body (bottom band, mesh, top band): about 120 g
- 2 tabs: about 5 g each
Tab (make 2):
Ch 6.
Row 1: Sc in 2nd ch from hook and in each ch across, turn. (5 sc)
Rows 2–14: Ch 1, sc in each st across, turn. (5 sc)
Row 15 (eyelet): Ch 1, sc in first st, ch 3, sk 3 sts, sc in last st, turn. (2 sc + 3 ch = 5 sts)
Row 16: Ch 1, sc in first sc, 3 sc in ch-3 sp, sc in last sc, turn. (5 sc)
Row 17: Ch 1, sc in each st across, turn. (5 sc)
Row 18 (rounded top): Ch 1, sc2tog, sc in next st, sc2tog. (3 sts)
Fasten off, leaving a 12 in (30.5 cm) tail for sewing.
Each tab is 5 sts = 1.25 in (3.2 cm) wide and 18 rows = 4 in (10.2 cm) long.
Tab layout on the back face (40 sts of the top band):
| 8 sts | TAB (5) | 14 sts | TAB (5) | 8 sts |
side fold                           side fold
8 + 5 + 14 + 5 + 8 = 40 sts.
Border: Top Band
The top band is the border of the holder. It uses the same single crochet gauge as the bottom band: 16 sc and 18 rnds = 4 in (10.2 cm).
Rnd T1 (conversion round): Sl st to center of first loop, ch 1, sc in the sc at the top of the loop, 3 sc in the next ch-5 loop; repeat from * around, join. (20 sc worked 1-per-existing-sc + 60 sc worked into loops = 80 sc)*
The “existing sc” are the 20 sc of Mesh Rnd 15, and the loops are its 20 ch-5 loops.
Per side: 80 sts ÷ 2 = 40 sts on the front and 40 on the back. There are no separate corner stitches. The side folds fall between the 40th and 41st sts and between the 80th and 1st sts.
Rnds T2–T9: Ch 1, sc in each st around, join. (80 sc; 40 per side)
Fasten off and weave in the end.
Why the math works: The top of the mesh has 20 loops, each 1 in (2.5 cm) wide, so it is 20 in (50.8 cm) around. Converting each loop and its sc into 4 sc gives 80 sc. At 4 sc per inch, 80 sc measure 20 in (50.8 cm) around, which is 40 sts = 10 in (25.4 cm) per flat side. The band matches the mesh exactly, so it neither ruffles nor pulls in.
Depth: 9 rnds at 18 rnds per 4 in = 2 in (5.1 cm). Total body height = 2 in + 10 in + 2 in = 14 in (35.6 cm).
Joining: Attaching the Tabs
Lay the body flat with the slot facing down, so the back face is on top. Mark the tab positions on the back of the top band using the layout above: count 8 sts in from each side fold and place a marker. Each tab covers the next 5 sts toward the center.
Slide the bottom 1.5 in (3.8 cm) of each tab (about Rows 1–7) inside the holder, against the back of the top band. The remaining 2.5 in (6.4 cm), including the eyelet, stands above the rim.
Use the long tail and a tapestry needle to whipstitch. Sew each of the 5 sts of Row 1 of the tab to one sc of Rnd T2. Then sew the side edges of the tab to Rnds T2–T9, one row to one round. Sew through the inside layer only, so the stitches don’t show from the front.
Keep your tension firm but flat. If the rim puckers, your stitches are too tight. If a tab wobbles, add a second line of stitches across Rnd T5.
Checkpoint: Height with tabs = 14 in + 2.5 in = 16.5 in (41.9 cm). The tab centers sit 19 sts, or 4.75 in (12.1 cm), apart.
Final Blocking
- Weave in all remaining ends along the solid bands, not through the mesh.
- Lay the holder flat on a blocking mat with the slot on top and centered.
- Mist it evenly with water until it is damp but not dripping.
- Pin the bottom band to 7 in (17.8 cm) wide and the top band to 10 in (25.4 cm) wide.
- Pin the overall height to 14 in (35.6 cm), keeping the sides straight and even.
- Gently open each mesh loop with your fingers so the diamonds look even.
- Flatten the tabs and open each eyelet with a pencil tip.
- Let it dry completely before you unpin it.
Final Quality-Control Checklist
- Bottom band: 56 sc, 9 rnds, 2 in (5.1 cm) tall
- Slot: 14 sts, 3.5 in (8.9 cm) wide, centered on the front with 7 sts on each side
- Mesh: 15 rnds of 14, then 16, 18 and 20 loops
- Increases sit at both side folds
- Top band: 80 sc, 40 per side, 9 rnds
- Width: 7 in (17.8 cm) at the bottom, 10 in (25.4 cm) at the top
- Height: 14 in (35.6 cm) for the body, 16.5 in (41.9 cm) with tabs
- Tabs: 5 sts wide, 18 rows, eyelet open and level
- Both tabs at the same height and evenly spaced
Troubleshooting
The bottom curls into a bowl: You added stitches at the ends of the foundation. Work only 1 sc in each chain on both sides.
The slot gapes or ripples: Your ch 14 is too tight or too loose. Rework it so it lies flat against the 14 sc below.
The mesh twists sideways: Some drift from the slip stitches is normal. Block firmly, and keep the increases on the side folds even if the round start drifts.
The top band ruffles: Go down one hook size for Rnds T1–T9.
The top band pulls in: Loosen your tension or go up one hook size for Rnds T1–T9.
The tabs stretch: Use cotton yarn and sew the full 1.5 in (3.8 cm) overlap.
Care
Machine wash cold on a gentle cycle inside a laundry bag, then reshape the holder and lay it flat to dry. Don’t hang it while wet, because the weight of the water will stretch the mesh.

Final Notes
Here is the measurement chain:
– Bottom band: 56 sts, 7 in (17.8 cm) wide and 2 in (5.1 cm) tall.
– Mesh: 15 rounds that grow from 14 to 20 loops and add 10 in (25.4 cm) of height.
– Top band: 80 sts that match the 10 in (25.4 cm) mesh width and add the final 2 in (5.1 cm).
– Tabs: two 4 in (10.2 cm) tabs bring the hanging height to 16.5 in (41.9 cm).
Check each stage before you move on, and your holder will hang straight and let bags out smoothly.
Happy crocheting!