

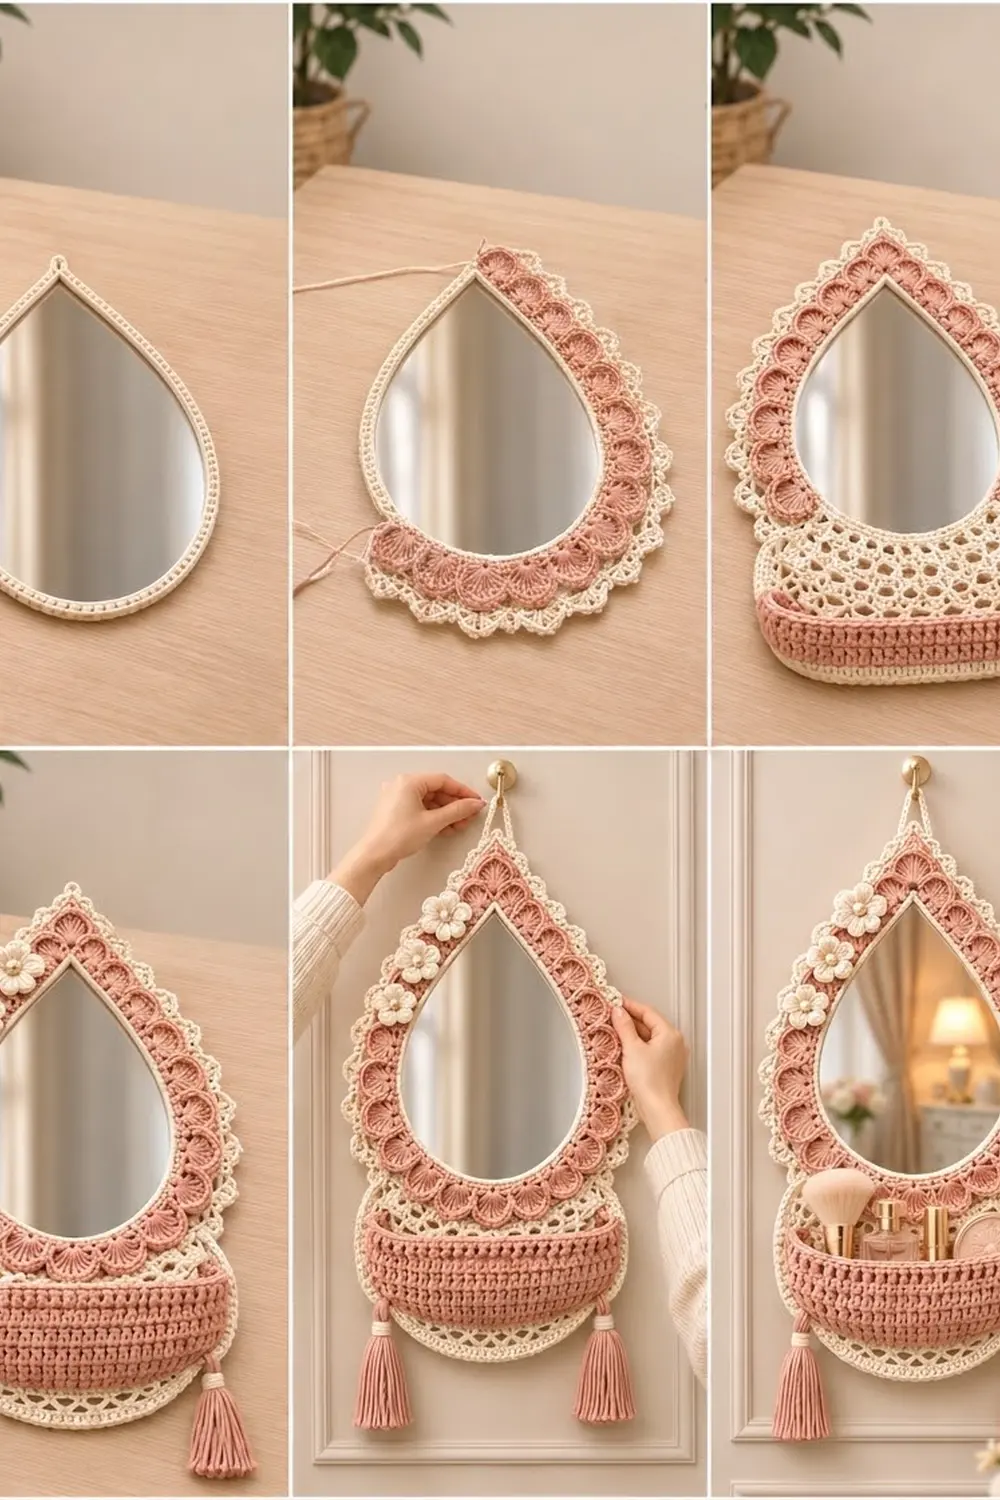
This teardrop wall mirror has a dusty pink shell frame, a cream lace edge, and a small basket pocket for brushes and perfume. Three cream flowers with pearl centers sit along the upper left side, and two pink tassels hang below the pocket.
The palette is two colors: dusty rose pink and soft cream. The style is romantic boho, with fans, picots, and an open mesh. All instructions use US crochet terms.
The finished mirror measures about 12 in (30.5 cm) wide and 20.5 in (52.1 cm) tall, not counting the hanging loop and tassels. The frame alone is 12 x 16.5 in (30.5 x 41.9 cm) after the border.
First you work the frame in rounds from the inside edge outward. Then you make a half-circle mesh panel, a pocket, three flowers, and two tassels. Everything is mounted on a felt backing with a 7 x 10 in (17.8 x 25.4 cm) teardrop mirror.
Finished Size and Construction
- Finished size: 12 x 20.5 in (30.5 x 52.1 cm), without loop and tassels
- Skill level: Intermediate
- Terminology: US
- Yarn weight: Worsted (#4) cotton
- Hook: 4.0 mm (G-6)
- Number of pieces: 1 frame, 1 mesh panel, 1 pocket, 3 flowers, 2 tassels, 1 hanging loop, all joined into one mirror
- Layout: Frame on top, mesh panel behind its lower edge, pocket across the panel
- Frame size before border: 10 x 14 in (25.4 x 35.6 cm)
- Frame size after border: 12 x 16.5 in (30.5 x 41.9 cm)
- Border depth: 1 in (2.5 cm)
Materials
Use a smooth, mercerized or matte worsted cotton. Cotton holds the shells crisply and does not stretch under the pocket’s weight.
- Color A, Dusty Rose: 90 g / 140 m
- Color B, Cream: 120 g / 185 m
These amounts include a margin of about 20 percent.
Tools and notions:
- 4.0 mm (G-6) hook
- Teardrop acrylic or glass mirror, 7 x 10 in (17.8 x 25.4 cm)
- Stiff felt, one sheet at least 12 x 16 in (30.5 x 40.6 cm)
- Strong craft glue suitable for mirrors
- 3 pearl buttons or beads, 12 mm
- Stitch markers, tapestry needle, scissors
- Cream sewing thread and a sewing needle
- Cardboard 4.5 in (11.4 cm) tall for the tassels
Abbreviations (US Terms)
- ch: chain
- sl st: slip stitch
- sc: single crochet
- hdc: half double crochet
- dc: double crochet
- fsc: foundation single crochet
- BLO: back loop only
- sk: skip
- sp: space
- st(s): stitch(es)
Special stitches:
- Shell: 5 dc in the same st.
- Fan: 7 dc in the same st.
- Picot: ch 3, sl st in the first ch.
- Mesh unit: (dc, ch 1) in the same sp.
Gauge and Checkpoints
Gauge: 18 sc and 20 rounds = 4 in (10.2 cm). A dc round is about 0.5 in (1.3 cm) tall.
Make the frame first. It sets the size of every other piece, so check it against the mirror before you go on.
Checkpoints:
- Rnd 1: the inner edge is 24 in (61.0 cm) around and covers the mirror edge by 0.25 in (0.6 cm).
- After Rnd 3: the cream band is 0.6 in (1.5 cm) wide.
- After Rnd 5: the frame measures 10 x 14 in (25.4 x 35.6 cm).
- After the border: 12 x 16.5 in (30.5 x 41.9 cm).
If Rnd 1 is too big and shows the mirror’s edge, go down half a hook size. If it is too small and buckles over the glass, go up half a size. Don’t add or remove stitches, because the shell repeats depend on having 120 stitches in Rnd 3.
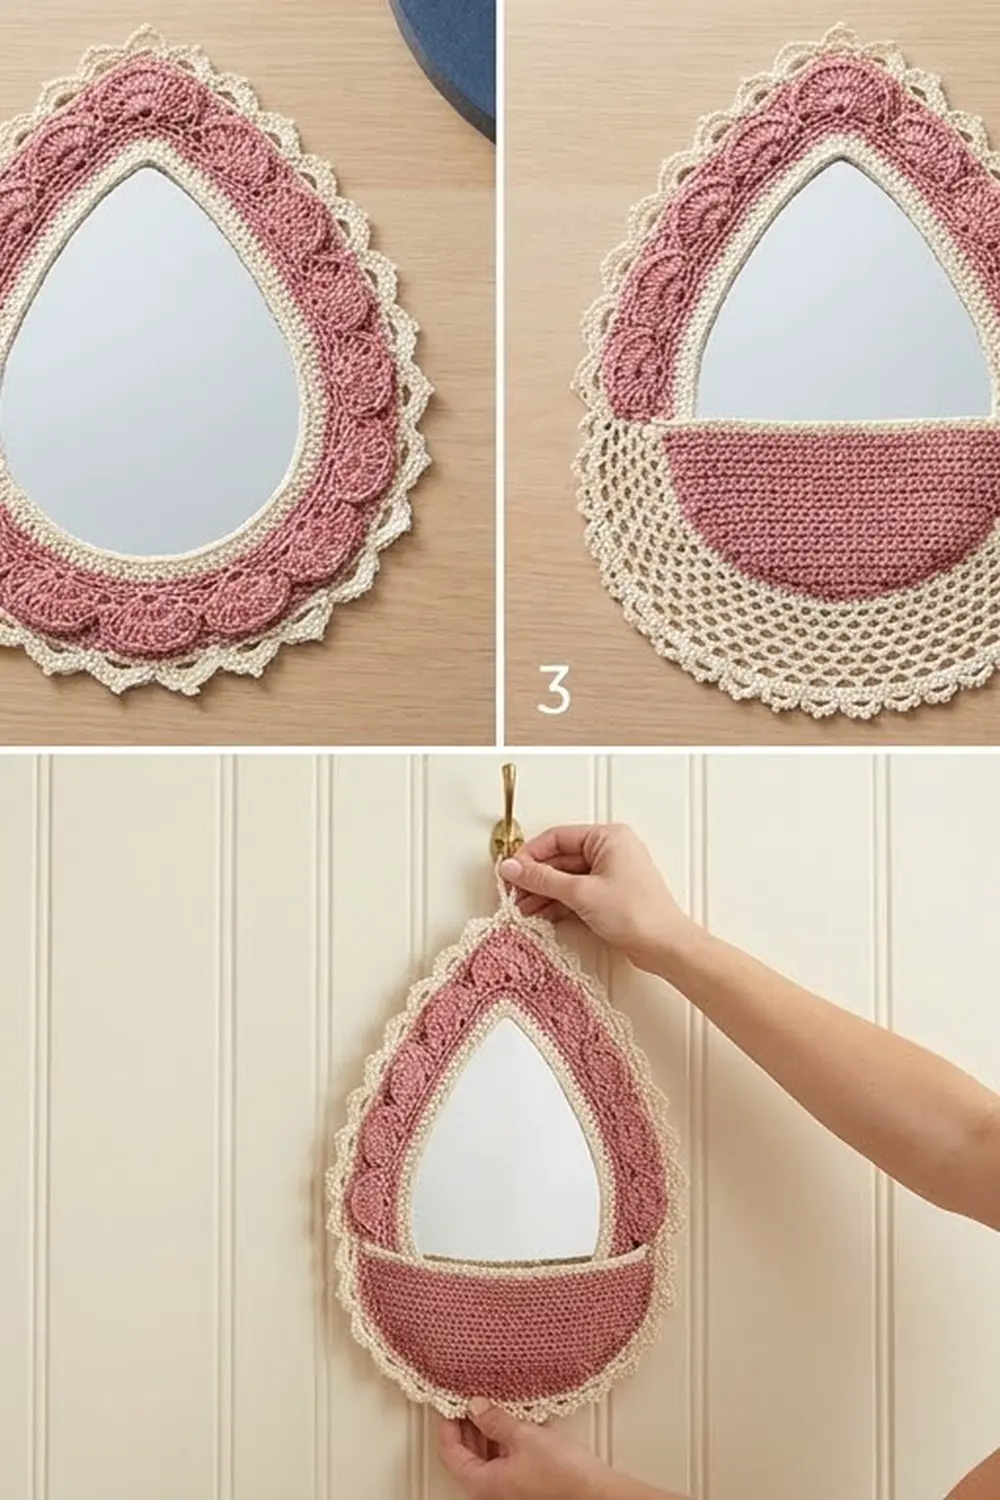
Frame
Work in joined rounds with the right side facing. The first stitch of each round is the tip of the teardrop.
Rnd 1 (B): Fsc 108, then join to the first fsc with a sl st, making sure the strip isn’t twisted. Mark the first st as the tip. (108 sts)
Rnd 2 (B): Ch 1, 3 sc in the tip st, sc in next 35 sts, [2 sc in next st, sc in next 11 sts] 3 times, 2 sc in next st, sc in next 35 sts, join. (114 sts)
The 3 sc at the tip keep it pointed. The 4 increases sit around the bottom curve.
Rnd 3 (B): Sl st in the next st, which is the center of the tip group. Ch 1, 3 sc in the same st, sc in next 36 sts, [2 sc in next st, sc in next 12 sts] 3 times, 2 sc in next st, sc in next 37 sts, join. Fasten off. (120 sts)
Rnd 4 (A, shells): Join A in the center tip st. Ch 3 (counts as dc), 4 dc in the same st, [sk 2, sc in next st, sk 2, shell in next st] 19 times, sk 2, sc in next st, sk 2, join to the top of the ch-3. (20 shells, 120 sts: 100 dc + 20 sc)
Rnd 5 (A, fans): Sl st in the next 2 dc, which brings you to the center dc of the tip shell. Ch 3, 6 dc in the same st, sc in the next sc, [fan in the center dc of the next shell, sc in the next sc] 19 times, join. Fasten off. (20 fans, 160 sts: 140 dc + 20 sc)
Each fan sits on top of a shell. This stacks two layers of pink scallops and puts a fan right at the tip.
Border
Border gauge: 160 sts around, which divides into 40 arches of 4 sts each.
Border Rnd 1 (B): Join B in the center (4th) dc of the tip fan. Ch 1, sc in each st around, join. (160 sc worked one per existing st + 0 extra = 160 sts)
Border Rnd 2 (B): Ch 1, sc in the first st, [ch 5, sk 3, sc in next st] 39 times, ch 5, sk 3, join to the first sc. (40 sc, 40 ch-5 loops)
Border Rnd 3 (B): Sl st in the first ch-5 loop. In each loop, work (3 sc, picot, 3 sc). Join and fasten off. (240 sc, 40 picots)
Why the math works: each arch uses 1 sc plus 3 skipped sts, so 40 x 4 = 160 sts. The ch-5 loop is longer than the 3 sts it skips, which gives the outer edge the extra length it needs to lie flat. Six sc fit evenly into each loop. The border adds 1 in (2.5 cm) on all sides.
Mesh Panel
The half-circle panel shows below the frame and supports the pocket. Work it in turned rows with B.
Row 1: Make a magic ring. Ch 4 (counts as dc + ch 1), (dc, ch 1) twice in the ring, dc in the ring. Pull the ring closed and turn. (4 ch-1 sps)
Rows 2–12: Ch 4 (counts as dc + ch 1). Work 1 mesh unit in each ch-1 sp, but in the spaces listed below, work 2 mesh units instead. Finish with dc in the 3rd ch of the turning ch and turn.
Each row gains 1 sp from the turning chain, plus 1 sp for every doubled space. Spread the doubled spaces evenly and change their positions from row to row.
- Row 2: double 2 sps (7 sps)
- Row 3: double 3 sps (11 sps)
- Row 4: double 2 sps (14 sps)
- Row 5: double 3 sps (18 sps)
- Row 6: double 2 sps (21 sps)
- Row 7: double 3 sps (25 sps)
- Row 8: double 2 sps (28 sps)
- Row 9: double 3 sps (32 sps)
- Row 10: double 2 sps (35 sps)
- Row 11: double 3 sps (39 sps)
- Row 12: double 2 sps (42 sps)
Edging: Don’t turn. Ch 1, sc in the first sp, [ch 3, sc in next sp] 41 times. Fasten off. (42 sc, 41 ch-3 loops)
Checkpoint: the panel is 12 in (30.5 cm) across the straight edge and 6 in (15.2 cm) deep.
Work the pocket in joined rounds with the right side facing.
Rnd 1 (A): Ch 31. Sc in the 2nd ch from the hook, sc in next 28 ch, 3 sc in the last ch. Working along the other side of the chain, sc in next 28 ch, 2 sc in the same ch as the first sc, join. (62 sts)
Rnd 2 (A): Ch 1, 2 sc in the first st, sc in next 28 sts, [2 sc in next st] 3 times, sc in next 28 sts, [2 sc in next st] 2 times, join. (68 sts)
Rnd 3 (A): Ch 1, sc BLO in each st, join. (68 sts) This makes the turning ridge between the base and the sides.
Rnd 4 (A): Ch 3 (counts as dc), dc in each st, join. (68 sts)
Place 4 markers: 2 at each short end of the oval, 2 sts apart.
Rnds 5–9 (A): Ch 3, dc in each st, working 2 dc in each marked st, join. Move the markers up as you go. (Rnd 5: 72 sts, Rnd 6: 76 sts, Rnd 7: 80 sts, Rnd 8: 84 sts, Rnd 9: 88 sts) Fasten off.
Rnds 10–11 (B): Ch 1, sc in each st, join. (88 sts) Fasten off at the end of Rnd 11 and leave a 24 in (61.0 cm) tail.
Checkpoint: flattened, the pocket is 10 in (25.4 cm) wide and 4 in (10.2 cm) tall, with a 6.7 in (17.0 cm) base.
Flowers (make 3)
Rnd 1 (B): Magic ring, 10 sc in the ring, join. (10 sts)
Rnd 2 (B): [Sc in next st, (hdc, 3 dc, hdc) in next st] 5 times, join. (5 petals, 30 sts) Fasten off and leave a tail.
Sew a pearl button to the center of each flower. Each flower is 1.5 in (3.8 cm) across.
Tassels (make 2)
Wrap A 30 times around the 4.5 in (11.4 cm) cardboard. Tie the top with a strand of A and cut the bottom loops. Wrap B tightly 6 times around the tassel, 0.75 in (1.9 cm) below the top, and knot it. Trim the tassel to 4.5 in (11.4 cm).
Make All Pieces
- Color A: frame Rnds 4–5, pocket Rnds 1–9, 2 tassels
- Color B: frame Rnds 1–3 and border, mesh panel, pocket rim, 3 flowers, hanging loop
Layout:
          [loop]
            /\
       [  frame   ]
       [ flowers  ]   <- flowers on upper left
       [  mirror  ]
   [mesh][ pocket ][mesh]
     [tassel]  [tassel]
Joining and Assembly
- Backing. Trace the frame before the border onto felt, 10 x 14 in (25.4 x 35.6 cm), and cut it out. Center the mirror on it and glue it down.
- Frame. Lay the frame on top so that Rnd 1 covers the mirror edge by 0.25 in (0.6 cm). With sewing thread, sew through Rnd 3 into the felt every 0.5 in (1.3 cm). Leave the border free.
- Mesh panel. Place the panel’s straight edge across the back of the felt, 2 in (5.1 cm) above the frame’s lower edge, and whipstitch it to the felt. The panel extends 4 in (10.2 cm) below the frame, and its corners show past the sides.
- Pocket. Flatten the pocket so that 44 sts of Rnd 11 form the back wall. Whipstitch those 44 sts, one stitch to one stitch, along a 10 in (25.4 cm) line across the mesh and the frame’s lower border. Then sew the pocket base to Rows 9–10 of the mesh.
- Tension. Sew snugly but not tightly. If the frame ripples, take out the stitches and sew again with more slack.
- Flowers. Sew them on the pink band along the upper left side, 1.5 in (3.8 cm) apart.
- Tassels. Tie one at each lower corner of the pocket, at the mesh edge.
- Hanging loop. Join B at the tip with a sl st. Ch 25, sl st in the 2nd ch from the hook and in each ch back down, then sl st at the tip. This makes a loop 2.5 in (6.4 cm) tall.
Size checkpoint: the assembled mirror is 12 x 20.5 in (30.5 x 52.1 cm).
Final Blocking
- Before assembly, lightly mist the frame, the panel, and the flowers.
- Pin the frame flat to 12 x 16.5 in (30.5 x 41.9 cm), with a pin in every picot.
- Pin the panel into a 12 x 6 in (30.5 x 15.2 cm) half circle and open up the mesh.
- Shape the pocket by stuffing it with a towel.
- Let everything dry completely before you assemble.
Final Quality-Control Checklist
- Rnd 3 has 120 sts, and the frame has 20 shells and 20 fans
- A fan is centered at the tip
- The border has 40 arches and 40 picots
- The mesh panel has 42 sps in Row 12
- The pocket has 88 sts at the rim
- The mirror edge is completely hidden
- The pocket stays secure when you load it
Troubleshooting
- Frame cups: your tension is tight. Go up a hook size for Rnds 4–5.
- Frame ruffles: your fans are loose. Try 6-dc fans instead. Rnd 5 then has 140 sts and the border has 35 arches.
- Tip is rounded: make sure the 3 sc go into the center tip st in Rnds 2–3.
- Mesh waves: double fewer spaces in the next row.
- Pocket sags: add a second line of stitching through the base.
Care
Spot clean with a damp cloth. Don’t put the mirror in water.
Final Notes
The measurement chain starts with 108 sts, which make a 24 in (61.0 cm) inner edge. Three cream rounds bring the count to 120 for 20 shells. The fans take it to 160, and the border’s 40 arches finish the frame at 12 x 16.5 in (30.5 x 41.9 cm). The 12 in (30.5 cm) panel and 10 in (25.4 cm) pocket complete the mirror at 20.5 in (52.1 cm) tall.
Happy crocheting!