

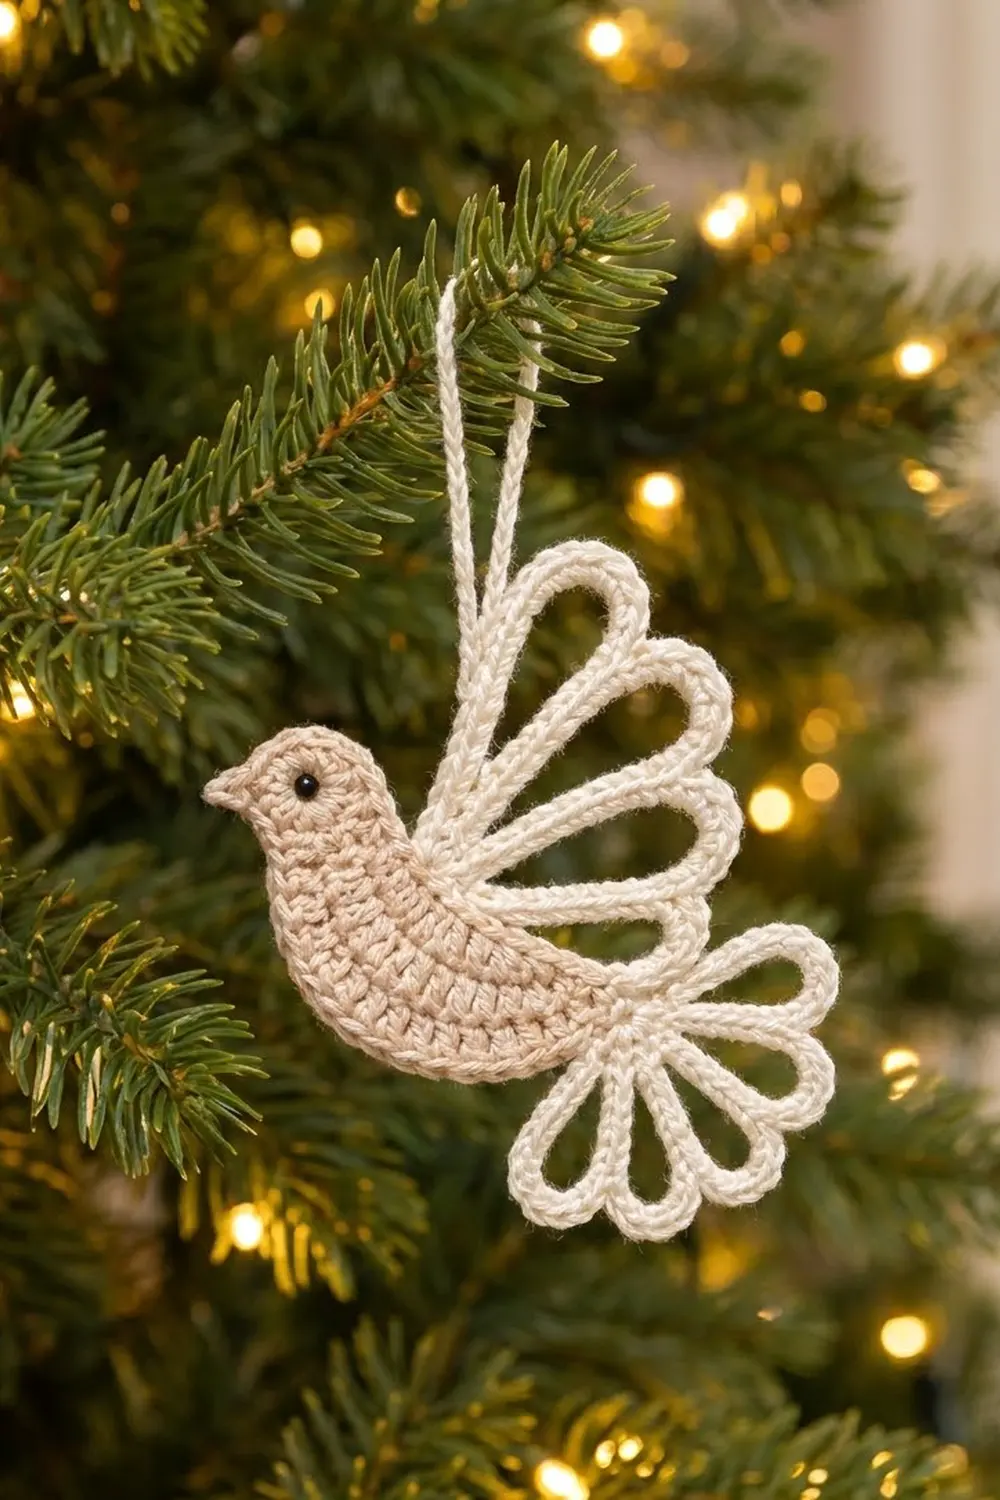
The Filigree Dove is a light, lacy Christmas ornament. It pairs a solid beige body with an airy wing and tail made of open loops. Its soft neutral colors suit rustic, Scandinavian or all-white trees, and it also works well as a gift-tag topper.
The body is worked in light beige and the loops in cream, with a tiny black bead for the eye. The finished dove measures about 5 in (12.7 cm) wide and 4 in (10.2 cm) tall without the hanger. The hanging loop adds about 2.75 in (7.0 cm).
The pattern uses US crochet terms. You first crochet a half-oval body in turned rows, then build a small head on one end. One edging round outlines the bird and makes the beak. Finally, the cream wing loops, tail loops and hanger are worked straight into that edging. There is no sewing apart from attaching the eye.
Finished Size and Construction
- Finished size: about 5 in (12.7 cm) wide × 4 in (10.2 cm) tall, plus a 2.75 in (7.0 cm) hanger
- Skill level: Easy–Intermediate
- Terminology: US
- Yarn weight: #2 fine (sport) cotton
- Hook: 2.75 mm (C-2)
- Number of pieces: 1 (single motif; wing, tail and hanger worked on)
- Layout: one standalone ornament
- Body size before edging: 3.6 in (9.1 cm) wide × 1.8 in (4.6 cm) tall at the head
- Body size after edging: 4 in (10.2 cm) × 2.2 in (5.6 cm)
- Edging depth: 0.2 in (0.5 cm) on each side
Materials
Choose a smooth, tightly plied cotton or cotton blend. Mercerized cotton gives the loops crisp definition and helps them hold their shape after blocking. Avoid fuzzy or very splitty yarns, because the loops depend on clean stitch texture.
- Light beige (body): 6 g / 12 m (13 yd)
- Cream (wing, tail, hanger): 8 g / 16 m (17.5 yd)
- Black: one 4 mm black bead, or 20 cm (7.9 in) of black embroidery floss for a French knot
Tools:
– 2.75 mm (C-2) crochet hook
– Tapestry needle
– Beading needle or fine sewing needle with beige thread (for a bead eye)
– Scissors
– Blocking mat and rust-proof pins
– Spray bottle, or diluted fabric stiffener (optional)
All quantities include about a 20% margin for swatching and weaving in ends.
Abbreviations (US Terms)
- ch: chain
- sl st: slip stitch
- sc: single crochet
- hdc: half double crochet
- sc2tog: single crochet 2 together
- st(s): stitch(es)
- RS: right side
- inc: 2 sc in the same stitch
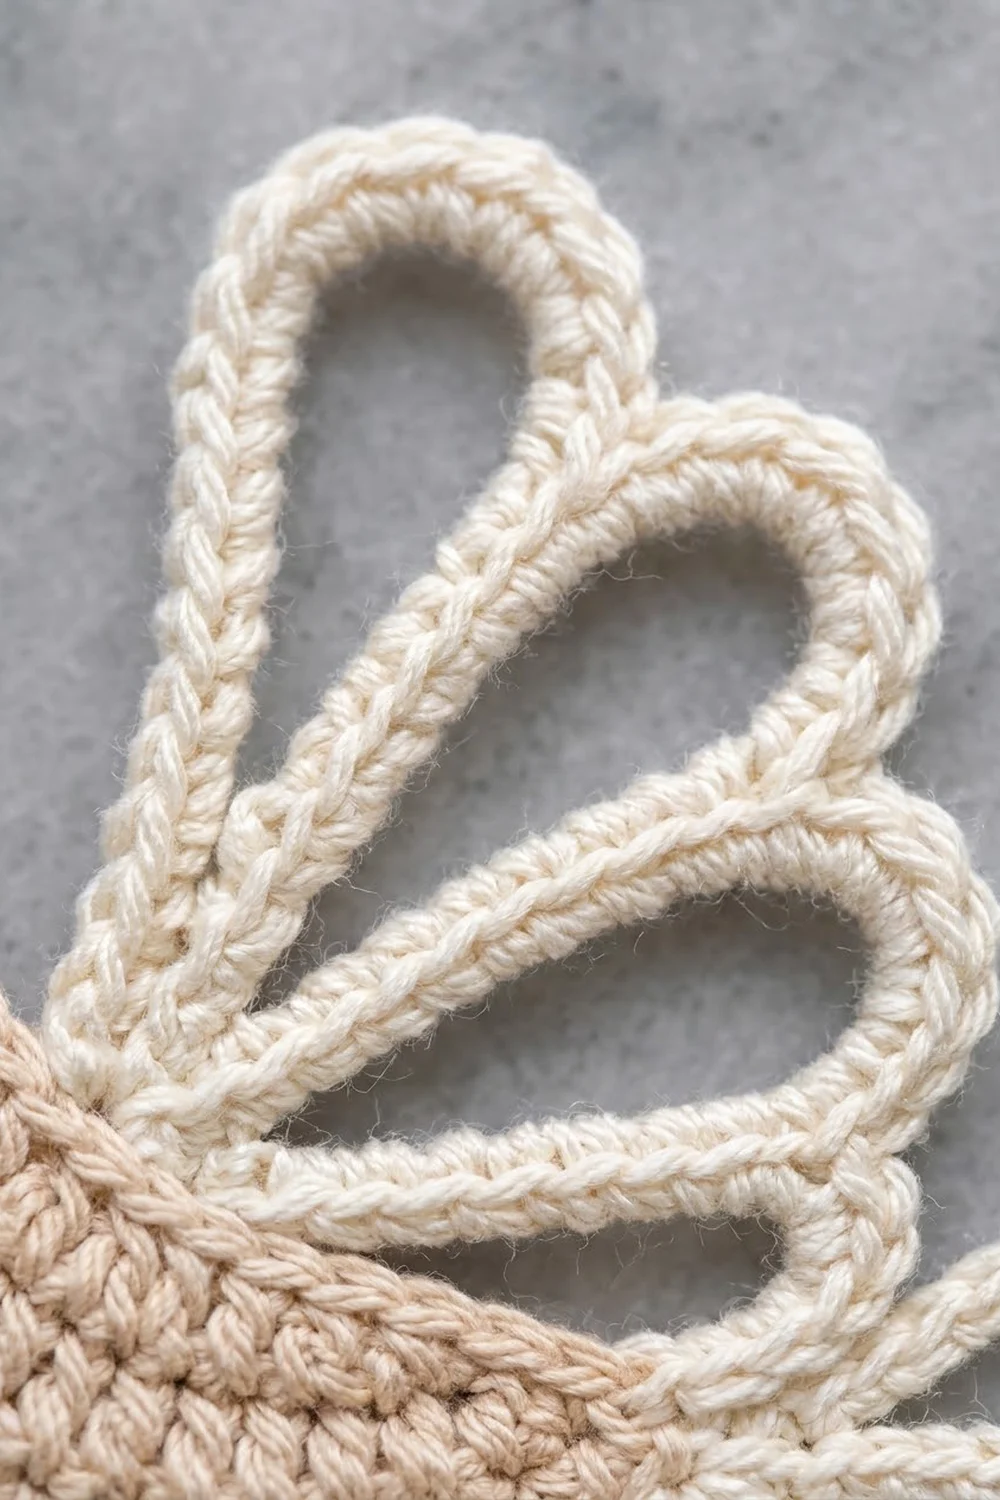
Special technique: covered loop. Ch the number given, then sl st into the same base stitch to close the chain into a ring. Ch 1, then work the stated number of sc into the ring, covering the chain completely. Sl st into the same base stitch to finish the loop.
Gauge and Checkpoints
Gauge: 22 sc and 22 rows = 4 in (10.2 cm) in sc worked in rows.
The ornament is small, so the body itself works as your test piece. Make the body and head first and measure before you start the edging.
- After Row 1: the strip is about 1.5 in (3.8 cm) long.
- After Row 6: the straight back edge is 3.6 in (9.1 cm) wide and the piece is 1.1 in (2.8 cm) deep at the center.
- After the head: the body is 1.8 in (4.6 cm) tall at the head end.
- After the edging: the body is 4 in (10.2 cm) × 2.2 in (5.6 cm).
If your body is too big, go down to a 2.5 mm hook. If it is too small or feels stiff, go up to a 3 mm hook. Changing the hook by half a size changes the body width by roughly 0.3 in (0.8 cm). Keep the same hook for the loops so they stay in proportion to the body.
Body (Light Beige)
The body is half of an oval, worked in turned rows. The foundation chain lies along the straight back edge, and each row wraps around the belly. The increases sit only in the two curved end sections, while the center 6 stitches stay straight. Each row therefore grows by exactly 4 stitches.
Ch 9.
Row 1 (RS): 2 sc in 2nd ch from hook, sc in next 6 ch, 2 sc in last ch. (10 sc)
Row 2: Ch 1, turn. 2 sc in each of first 2 sts, sc in next 6 sts, 2 sc in each of last 2 sts. (14 sc)
Row 3: Ch 1, turn. (Sc in next st, 2 sc in next st) twice, sc in next 6 sts, (2 sc in next st, sc in next st) twice. (18 sc)
Row 4: Ch 1, turn. (Sc in next 2 sts, 2 sc in next st) twice, sc in next 6 sts, (2 sc in next st, sc in next 2 sts) twice. (22 sc)
Row 5: Ch 1, turn. (Sc in next 3 sts, 2 sc in next st) twice, sc in next 6 sts, (2 sc in next st, sc in next 3 sts) twice. (26 sc)
Row 6: Ch 1, turn. (Sc in next 4 sts, 2 sc in next st) twice, sc in next 6 sts, (2 sc in next st, sc in next 4 sts) twice. (30 sc)
Check: in Row 6, the end sections use 10 stitches each and the center uses 6, which adds up to the 26 stitches of Row 5. Do not fasten off.
The end where Row 6 finishes becomes the head end. The other end is the tail end.
Head (Light Beige)
The head is worked sideways into the row ends at the head end of the straight back edge.
Head Row 1: Ch 1. Rotate the piece so you are working along the straight edge. Work 1 sc into the end of each row, from Row 6 to Row 1. (6 sc)
Head Row 2: Ch 1, turn. Sc in each st across. (6 sc)
Head Row 3: Ch 1, turn. Sc2tog, sc in next 2 sts, sc2tog. (4 sc)
Head Row 4: Ch 1, turn. Sc2tog twice. (2 sc)
Head Row 4 ends at the outer front corner of the head, which is where the beak goes. Do not fasten off. The body now measures 1.8 in (4.6 cm) tall at the head.
Edging and Beak (Light Beige)
This single round is the border of the piece. It outlines the whole bird and forms the beak.
Border gauge: 1 sc per stitch, row end or chain, at the same 22 sc per 4 in (10.2 cm). Sc rows at this gauge are as tall as sc stitches are wide, so working 1 sc into each row end keeps the edge flat.
Edging Round:
1. Beak: Ch 4, sl st in 2nd ch from hook, sc in next ch, hdc in next ch. (3 sts)
2. Head front: Work 1 sc into the end of each head row, from Head Row 4 down to Head Row 1. (4 sc)
3. Belly: Sc in each st of Row 6, working from the head end to the tail end. (30 sc)
4. Back edge: Work 1 sc into each of the 6 row ends on the tail side, then 1 sc into each of the 8 free loops of the foundation chain. (14 sc)
5. Back of head: Work 1 sc into the end of each head row, from Head Row 1 up to Head Row 4. (4 sc)
6. Top of head: Sc in each of the 2 sts of Head Row 4. (2 sc)
Sl st into the base of the beak to join. Fasten off and weave in the ends.
Edging total: 4 + 30 + 14 + 4 + 2 = 54 sc, plus the 3-stitch beak.
Why the math works: Row 6 already contains the curve increases, so the belly needs exactly 1 sc per stitch and no extras. The row ends and chain loops are all worked 1-to-1 at a square gauge, so the edge neither ruffles nor pulls in. The edging adds 0.2 in (0.5 cm) all around, which brings 3.6 in (9.1 cm) up to 4 in (10.2 cm) and 1.8 in (4.6 cm) up to 2.2 in (5.6 cm).
Back-edge numbering: Number the 14 back-edge sc B1–B14, starting at the tail corner. B1–B6 sit over the tail-side row ends and B7–B14 over the foundation chain. The last 3 belly sc before the tail corner are L28, L29 and L30.
Wing (Cream)
The wing is made of 4 covered loops worked into neighboring stitches, so they fan out from one narrow base. Each loop is longer than the one before it, and the tallest sits nearest the head.
Hold the bird with the RS facing and the back edge at the top. Join cream with a sl st in B8.
- Wing Loop 1 (in B8): Ch 16, sl st in B8. Ch 1, work 22 sc into the loop, sl st in B8. Sl st in B9.
- Wing Loop 2 (in B9): Ch 18, sl st in B9. Ch 1, work 24 sc into the loop, sl st in B9. Sl st in B10.
- Wing Loop 3 (in B10): Ch 20, sl st in B10. Ch 1, work 26 sc into the loop, sl st in B10. Sl st in B11.
- Wing Loop 4 (in B11): Ch 22, sl st in B11. Ch 1, work 28 sc into the loop, sl st in B11.
Fasten off. The wing uses 22 + 24 + 26 + 28 = 100 sc.
Checkpoint: Loop 4 stands about 1.75 in (4.4 cm) above the back edge, and Loop 1 about 1.25 in (3.2 cm). Each loop has 6 more sc than chains, which is enough to cover the chain without making it ripple.
Tail (Cream)
The tail is made of 5 covered loops centered on the tail corner. The middle loop is the longest.
Join cream with a sl st in L28.
- Tail Loop 1 (in L28): Ch 12, sl st in L28. Ch 1, work 18 sc into the loop, sl st in L28. Sl st in L29.
- Tail Loop 2 (in L29): Ch 14, sl st in L29. Ch 1, work 20 sc into the loop, sl st in L29. Sl st in L30.
- Tail Loop 3 (in L30): Ch 16, sl st in L30. Ch 1, work 22 sc into the loop, sl st in L30. Sl st in B1.
- Tail Loop 4 (in B1): Ch 14, sl st in B1. Ch 1, work 20 sc into the loop, sl st in B1. Sl st in B2.
- Tail Loop 5 (in B2): Ch 12, sl st in B2. Ch 1, work 18 sc into the loop, sl st in B2.
Fasten off. The tail uses 18 + 20 + 22 + 20 + 18 = 98 sc.
Checkpoint: The tail loops measure 1 in (2.5 cm) to 1.25 in (3.2 cm) long, and the bird is about 5 in (12.7 cm) wide overall.
Hanging Loop (Cream)
Join cream with a sl st in the 14th sc of Wing Loop 4, which is the tip of the tallest loop.
Ch 30, sl st in the same st. Ch 1, work 36 sc into the loop, sl st in the same st. Fasten off, leaving an 8 in (20.3 cm) tail. Weave this tail back through the base of the hanger to strengthen it.
The hanger measures about 2.75 in (7.0 cm).
Eye
Sew the black bead to the head between Head Rows 2 and 3, 2 stitches in from the front edge. Use beige thread and pass through the bead twice. For a child-safe ornament, work a French knot in black floss in the same place instead.
Final Blocking
- Weave in all ends along stitches of matching color, and trim to 0.4 in (1.0 cm).
- Spray the ornament until it is evenly damp, or dip it in diluted fabric stiffener and press out the excess.
- Lay it RS up on the blocking mat and pin the body to 4 in (10.2 cm) × 2.2 in (5.6 cm).
- Shape each wing loop into a teardrop and fan the wing so the loops just touch. Pin the tips so Loop 4 stands upright.
- Fan the tail loops outward and downward and pin each tip.
- Pin the hanger straight up from the wing.
- Let the piece dry completely, which takes 12–24 hours, before you unpin it.
- Optional: with a short cream strand, tack neighboring wing loops together at their widest point so the fan keeps its shape.
Final Quality-Control Checklist
- The body measures 4 in (10.2 cm) × 2.2 in (5.6 cm) and lies flat.
- The edging has 54 sc plus the beak, and the beak points forward cleanly.
- There are 4 wing loops (22, 24, 26 and 28 sc) and they get longer toward the head.
- There are 5 tail loops (18, 20, 22, 20 and 18 sc) and the middle one is longest.
- No chain shows through any loop’s covering of sc.
- The overall size is about 5 in (12.7 cm) × 4 in (10.2 cm), plus a 2.75 in (7.0 cm) hanger.
- The eye is secure and all ends are hidden.
Troubleshooting
- The body cups: Your increases are too tight. Go up a hook size or loosen your tension on the inc stitches.
- The body ruffles: You may have added extra stitches. Recount each row against its stated total.
- The loops twist: You twisted the chain before closing it. Keep the chain flat when you sl st it into the base stitch.
- Chain shows through a loop: Push the sc closer together, or add 1–2 sc to that loop.
- A loop is wavy: It has too many sc. Remove 1–2 so it sits smooth.
- The wing flops over: Use stiffener when blocking, or tack the loops together.
- The beak looks blunt: Work the beak chains firmly and pull the sl st snug.
Care
Hand wash in cool water with mild soap, roll the ornament in a towel, and reshape it flat to dry. Store it flat in tissue paper so the loops keep their shape.
Final Notes
Each measurement leads to the next. The 22-stitch gauge gives a 3.6 in (9.1 cm) body after Row 6 and 1.8 in (4.6 cm) of height after the head. The 54-stitch edging brings the body to 4 in (10.2 cm) × 2.2 in (5.6 cm). The wing and tail loops then extend the bird to about 5 in (12.7 cm) × 4 in (10.2 cm), with a 2.75 in (7.0 cm) hanger on top. If you check each measurement as you go, every dove comes out matching.
Happy crocheting!