

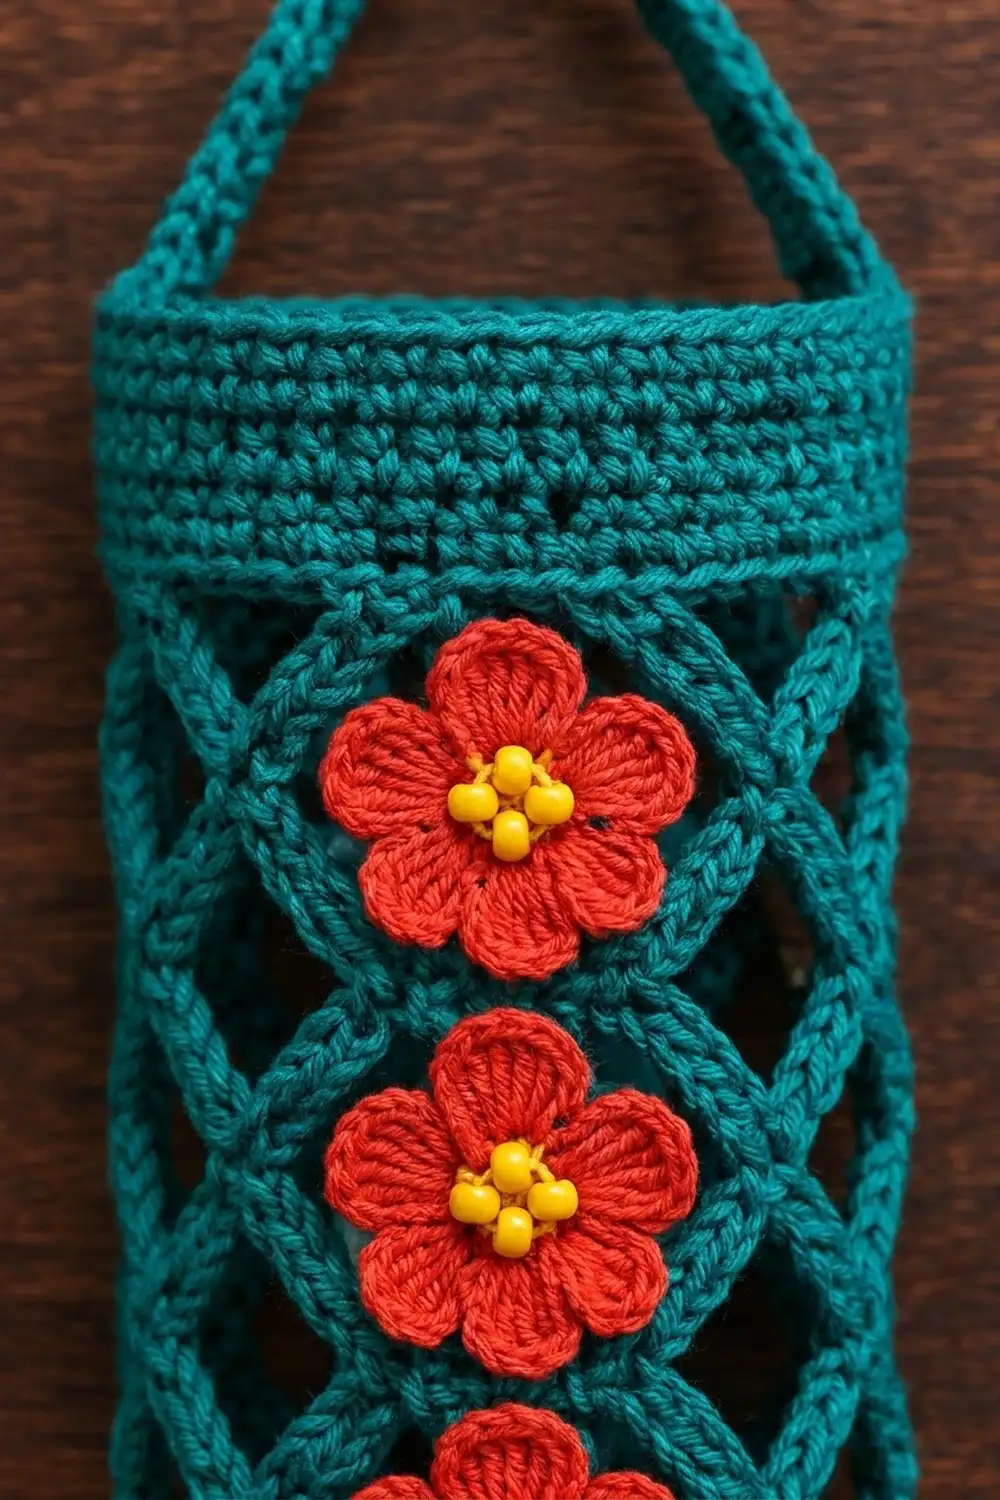
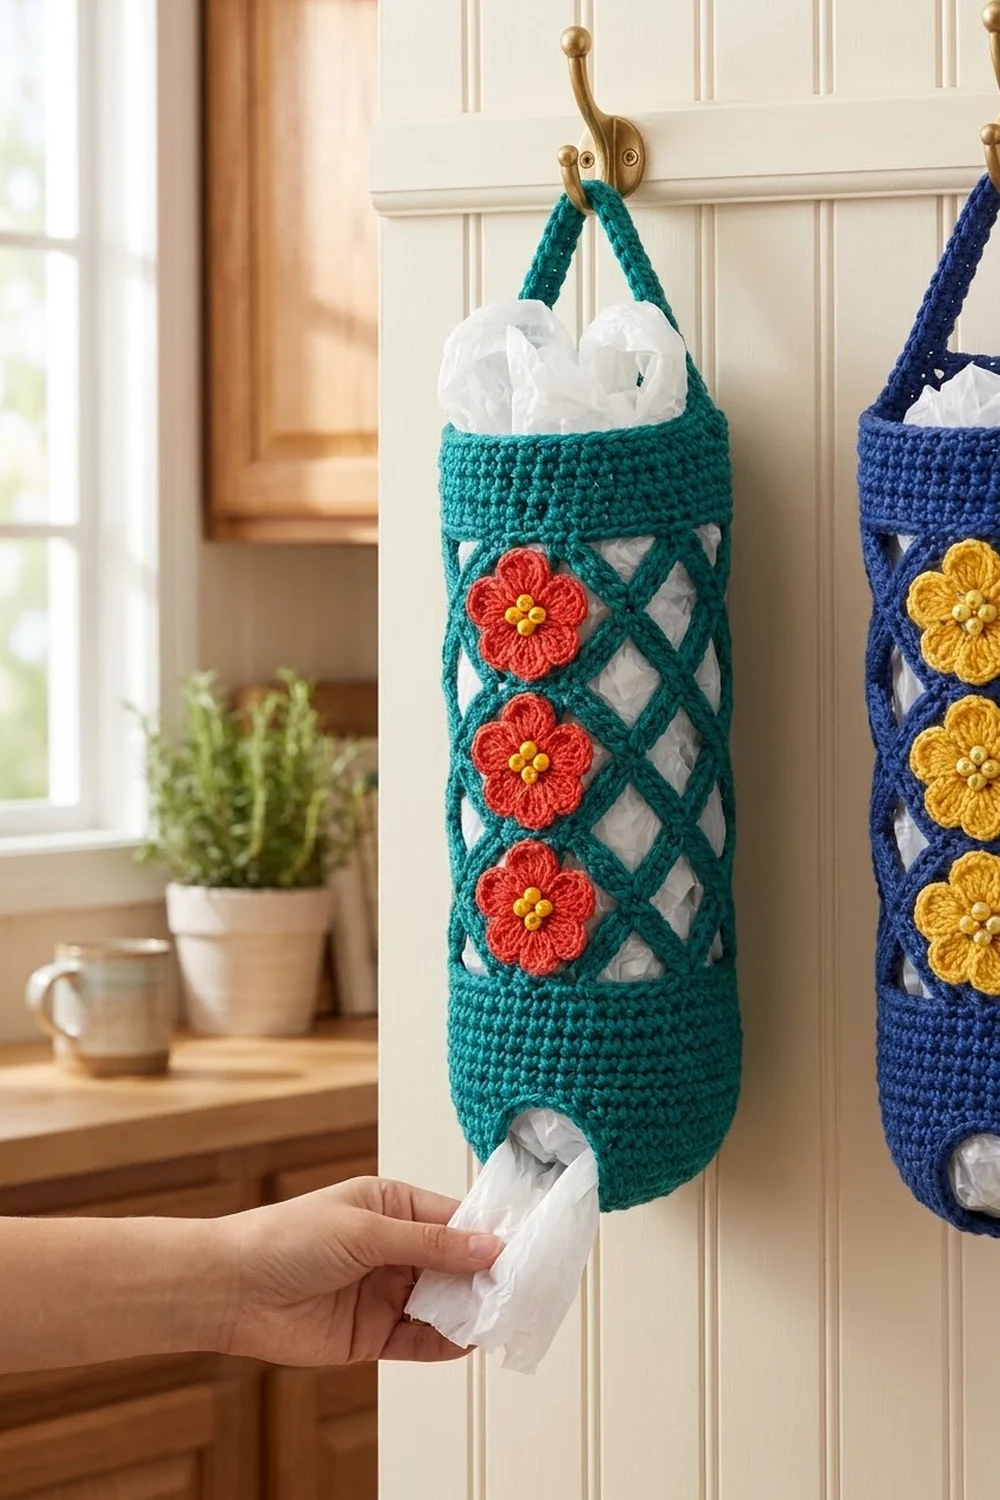
The Poppy Lattice Plastic Bag Holder keeps grocery bags tidy without hiding the color. A teal tube with an open diamond lattice holds the bags. You stuff bags in through the top and pull them out one at a time through a round hole in the base. Three bright red flowers with yellow centers run down the front.
The palette is teal, poppy red and sunny yellow. The style is cheerful and practical, a little vintage-kitchen. It looks just as good in navy with yellow flowers if you want a cooler version.
This pattern uses US crochet terms. Laid flat, the finished holder is 6 in (15.2 cm) wide and 14.5 in (36.8 cm) tall without the handle. The strap adds about 5 in (12.7 cm) of hanging loop.
Construction is simple. You start at the dispensing hole and work the base outward in joined rounds, then go straight up: a solid lower band, a chain-loop lattice, and a solid upper band. A two-round rim finishes the top. Then you make a strap and three flowers and sew them on.
Finished Size and Construction
- Finished size (flat): 6 in (15.2 cm) wide x 14.5 in (36.8 cm) tall
- Height with handle loop: about 19.5 in (49.5 cm)
- Skill level: Easy / advanced beginner
- Terminology: US crochet terms
- Yarn weight: Worsted (#4) cotton or cotton blend
- Hook: 5.0 mm (US H-8)
- Number of pieces: 1 body, 1 handle, 3 flowers
- Layout: single tube; flowers stacked vertically on the center front
- Body circumference: 48 sts = 12 in (30.5 cm)
- Size before border: 6 in x 14 in (15.2 cm x 35.6 cm)
- Border depth: 0.5 in (1.3 cm) at the top rim
Materials
Use a smooth cotton or cotton blend. Cotton holds its shape when the holder is full of bags, and it washes well. Acrylic works too, but the lattice will stretch more.
- Teal (main color): 100 g / about 170 m
- Red (petals): 15 g / about 25 m
- Yellow (flower centers): 5 g / about 8 m
These quantities include a margin of roughly 25% for gauge swatching and differences in tension.
Tools:
– 5.0 mm (US H-8) crochet hook
– Tapestry needle
– 4 stitch markers
– Scissors
– Measuring tape
– Rust-proof pins and a blocking surface
Abbreviations (US Terms)
- ch – chain
- sl st – slip stitch
- sc – single crochet
- hdc – half double crochet
- dc – double crochet
- BLO – back loop only
- MR – magic ring
- st(s) – stitch(es)
- rnd(s) – round(s)
- sk – skip
Special stitch – reverse sc (crab stitch): Working from left to right (right-handers), insert the hook into the next stitch to the right, yarn over, pull up a loop, yarn over, and pull through both loops. It makes a corded, rope-like edge.
Round method: Unless stated otherwise, every round of the body is joined with a sl st to the first sc, followed by ch 1. The ch 1 never counts as a stitch.
Gauge and Checkpoints
Single crochet gauge: 16 sc x 18 rnds = 4 in (10.2 cm) in joined rounds.
Mesh gauge: 4 mesh rounds = 3 in (7.6 cm), measured with the piece hanging and relaxed.
Test one piece first: Work the base (Rnds 1–5) as your swatch. It uses the same stitch and tension as the body and becomes part of the holder if it measures right.
Checkpoints:
1. After Rnd 5: the base lies flat and is about 3.8 in (9.7 cm) across. The center hole is about 1.9 in (4.8 cm) across.
2. After Rnd 14: the tube measures 6 in (15.2 cm) across when flattened.
3. After Rnd 26: the lattice section is 9 in (22.9 cm) tall when hanging.
4. After Rnd 35: the flattened body is 14 in (35.6 cm) tall from the base fold to the top edge.
If your piece is too big: go down a half size to 4.5 mm (US 7). If too small: go up to 5.5 mm (US I-9). If only the lattice height is off, add or remove one mesh round. Each mesh round changes the height by about 0.75 in (1.9 cm).
Body
Base
With teal, ch 24 and join with a sl st to the first ch to form a ring. Don’t twist the chain. This ring becomes the dispensing hole.
Rnd 1: Ch 1, sc in each ch around, join. (24 sc)
Rnd 2: Ch 1, sc in next 3 sts, 2 sc in next st; repeat from * 6 times total, join. (30 sc)
Rnd 3: Ch 1, sc in next 4 sts, 2 sc in next st; repeat 6 times, join. (36 sc)
Rnd 4: Ch 1, sc in next 5 sts, 2 sc in next st; repeat 6 times, join. (42 sc)
Rnd 5: Ch 1, sc in next 6 sts, 2 sc in next st; repeat 6 times, join. (48 sc)
Check checkpoint 1 now. The base should be a flat ring, not cupped or ruffled.
Lower Band
Rnd 6: Ch 1, sc in BLO of each st around, join. (48 sc) The unused front loops make a crisp fold line, so the base turns up into a cup.
Rnds 7–14: Ch 1, sc in each st around, join. (48 sc)
The lower band (Rnds 6–14) is 9 rounds, or 2 in (5.1 cm). Place a marker at st 1 and st 25. These mark the side folds and will guide the handle and flower placement later.
Lattice
Rnd 15 (mesh setup): Ch 1, sc in first st, ch 9, sk 5 sts, sc in next st; repeat from * 6 more times, ch 9, sk last 5 sts, join with a sl st to the first sc. (8 sc and 8 ch-9 loops)
Check the math: each repeat uses 1 sc + 5 skipped sts = 6 sts, and 8 repeats x 6 = 48 sts.
Rnd 16: Sl st in each of next 4 ch to reach the center of the first loop. Ch 1, sc around the same ch-9 loop. Ch 9, sc around the next ch-9 loop; repeat from * 6 more times, ch 9, join with a sl st to the first sc. (8 sc and 8 ch-9 loops)
Rnds 17–26: Repeat Rnd 16. (8 sc and 8 ch-9 loops in every round)
That gives 12 mesh rounds in total (Rnds 15–26). Each sc pinches the center of a loop from the round below, and the result is the diamond lattice. Hang the piece from your fingers and check checkpoint 3: 9 in (22.9 cm) of lattice.
Upper Band
Rnd 27 (conversion round): Ch 1, sc in the same sc as the join, 5 sc around the next ch-9 loop. Sc in next sc, 5 sc around the next ch-9 loop; repeat from * 6 more times, join. Count: 8 sc worked 1 per existing sc + 40 sc worked into the 8 loops = 48 sc.
Rnds 28–35: Ch 1, sc in each st around, join. (48 sc)
The upper band (Rnds 27–35) is 9 rounds, or 2 in (5.1 cm). Check checkpoint 4. Don’t fasten off. Continue with the border.
Handle
With teal, ch 49.
Row 1: Sc in 2nd ch from hook and in each ch across, turn. (48 sc)
Rows 2–3: Ch 1, sc in each st across, turn. (48 sc)
Fasten off and leave a 12 in (30.5 cm) tail. The strap is 12 in (30.5 cm) long and about 0.7 in (1.8 cm) wide. Weave the starting tail into the strap. Keep the long tail for sewing.
Flowers (Make 3)
Rnd 1: With yellow, make an MR, ch 1, work 10 sc in the ring, pull the ring closed, join. (10 sc) Fasten off yellow.
Rnd 2: Join red in any st. Ch 1, 2 sc in BLO of each st around, join. (20 sc) The unworked yellow front loops stay on the surface as a ring of small raised dots around the center.
Rnd 3 (petals): Sl st in next st, (hdc, 2 dc) in next st, (2 dc, hdc) in next st, sl st in next st; repeat from * 5 times total, join with a sl st to the first sl st. (5 petals; 8 sts per petal, 40 sts total)
Each petal uses 4 sts of Rnd 2, and 5 x 4 = 20 sts. Fasten off and leave an 18 in (45.7 cm) red tail. Each flower is about 2.5 in (6.4 cm) across, with a yellow center of about 0.9 in (2.3 cm).
Border
The border is worked on the body only: two rounds at the top rim and one round around the dispensing hole.
Border gauge: same as the body, 4 sc per inch (1.6 sc per cm). Flattened, the 48-st tube has 24 sts on the front and 24 sts on the back. These counts already include the side-fold stitches at markers 1 and 25.
Top Rim
Rnd 36: Ch 1, sc in BLO of each st around, join. (48 sc: 24 front, 24 back)
Rnd 37: Ch 1, reverse sc in each st around, join. (48 reverse sc: 24 front, 24 back) Fasten off and weave in.
Opening Edge
Turn the holder upside down. Join teal in any free loop of the foundation chain at the dispensing hole.
Opening Rnd: Ch 1, reverse sc in each of the 24 foundation-chain loops, join. (24 reverse sc: 12 front, 12 back) Fasten off and weave in.
Why the math works: Every border round is worked 1 stitch per existing stitch, with no increases, so the counts stay at 48 and 24. Reverse sc is slightly firmer than sc, which keeps the rim and the hole from flaring under the weight of the bags. The rim adds 0.5 in (1.3 cm), so the 14 in (35.6 cm) body finishes at 14.5 in (36.8 cm).
Assembly
Handle: Place one strap end inside the tube at the marker at st 1, with the end 1 in (2.5 cm) below the top rim. Whipstitch it to the inside of the upper band through the strap’s full width. Attach the other end the same way at st 25. Check that the strap isn’t twisted. Sew each end twice for strength.
Flowers: Flatten the body with markers 1 and 25 at the side edges. The center front falls between the 2nd and 3rd lattice loops, where the sc points join the diamonds.
Measure up from the bottom of the lattice and center the flowers at 1.5 in (3.8 cm), 4.5 in (11.4 cm) and 7.5 in (19.1 cm). Those heights line up with mesh Rnds 16, 20 and 24. Flowers 2.5 in (6.4 cm) across leave gaps of 0.5 in (1.3 cm) between them and 0.25 in (0.6 cm) at the top and bottom of the lattice.
Using the red tails, sew each flower to the lattice bars behind it. Stitch through the base of every petal and around the yellow center. Sew through the front layer only so the tube stays open. Remove the markers.
Final Blocking
- Wet the holder fully in cool water and gently squeeze it out. Don’t wring it.
- Roll it in a towel to remove excess water.
- Insert a rolled towel or a 2 L bottle wrapped in a towel so the tube holds its round shape.
- Lay it flat and ease the lattice into even diamonds, so that the flattened width measures 6 in (15.2 cm).
- Pin the top rim and base fold so the flattened height is 14.5 in (36.8 cm).
- Press the flower petals flat with your fingertips and pin each petal tip.
- Pin the strap straight at 12 in (30.5 cm).
- Let it dry completely, at least 24 hours, before you remove the pins.
Final Quality-Control Checklist
- Base is flat with 48 sts and has a round hole about 1.9 in (4.8 cm) across
- Lower band, upper band and rim each have 48 sts
- Lattice has 12 rounds with 8 loops per round and no twisted loops
- Flattened size is 6 in x 14.5 in (15.2 cm x 36.8 cm)
- Strap ends sit at opposite side folds, 1 in (2.5 cm) below the rim
- Three flowers are centered vertically and evenly spaced
- Each flower has 5 even petals and a visible ring of yellow dots
- All ends are woven in securely, especially at the strap
Troubleshooting
Base cups or ruffles: A cupped base means your tension is too tight on the increases. Check that you have exactly 6 increases per round. A ruffled base usually means extra stitches, so recount against the round totals.
Lattice slants into a spiral: You probably worked the sc next to the loop center instead of around it. Always sl st over 4 chains first, then sc around the center of the loop.
Lattice is too short: Add one mesh round after Rnd 26, which adds about 0.75 in (1.9 cm). Keep the flower spacing centered on the new height.
Bags fall out of the bottom: The hole is too loose. Work the opening reverse sc more firmly, or work sc2tog 4 times evenly spaced in a round of sc before the reverse sc.
Rim flares: Go down one hook size for Rnds 36–37 only.
Flowers curl: Pin them and steam-block before sewing. Make sure Rnd 3 has exactly 40 sts.
Care
Hand wash in cool water with mild soap, reshape, and dry flat over a rolled towel. Don’t tumble dry, because heat can shrink cotton and distort the lattice.
Final Notes
Each measurement depends on the one before it, so the checkpoints build on each other:
- Gauge of 16 sc = 4 in (10.2 cm) gives a 48-st body of 12 in (30.5 cm) around, or 6 in (15.2 cm) flat.
- The base adds about 1 in (2.5 cm) when flattened. The lower band adds 2 in (5.1 cm), the 12-round lattice 9 in (22.9 cm), and the upper band 2 in (5.1 cm), for 14 in (35.6 cm) before the border.
- The two-round rim adds 0.5 in (1.3 cm), finishing the body at 14.5 in (36.8 cm).
- The 12 in (30.5 cm) strap and three 2.5 in (6.4 cm) flowers complete the holder.
For a second holder, swap in navy with yellow flowers and red centers, or match your kitchen colors.
Happy crocheting!