

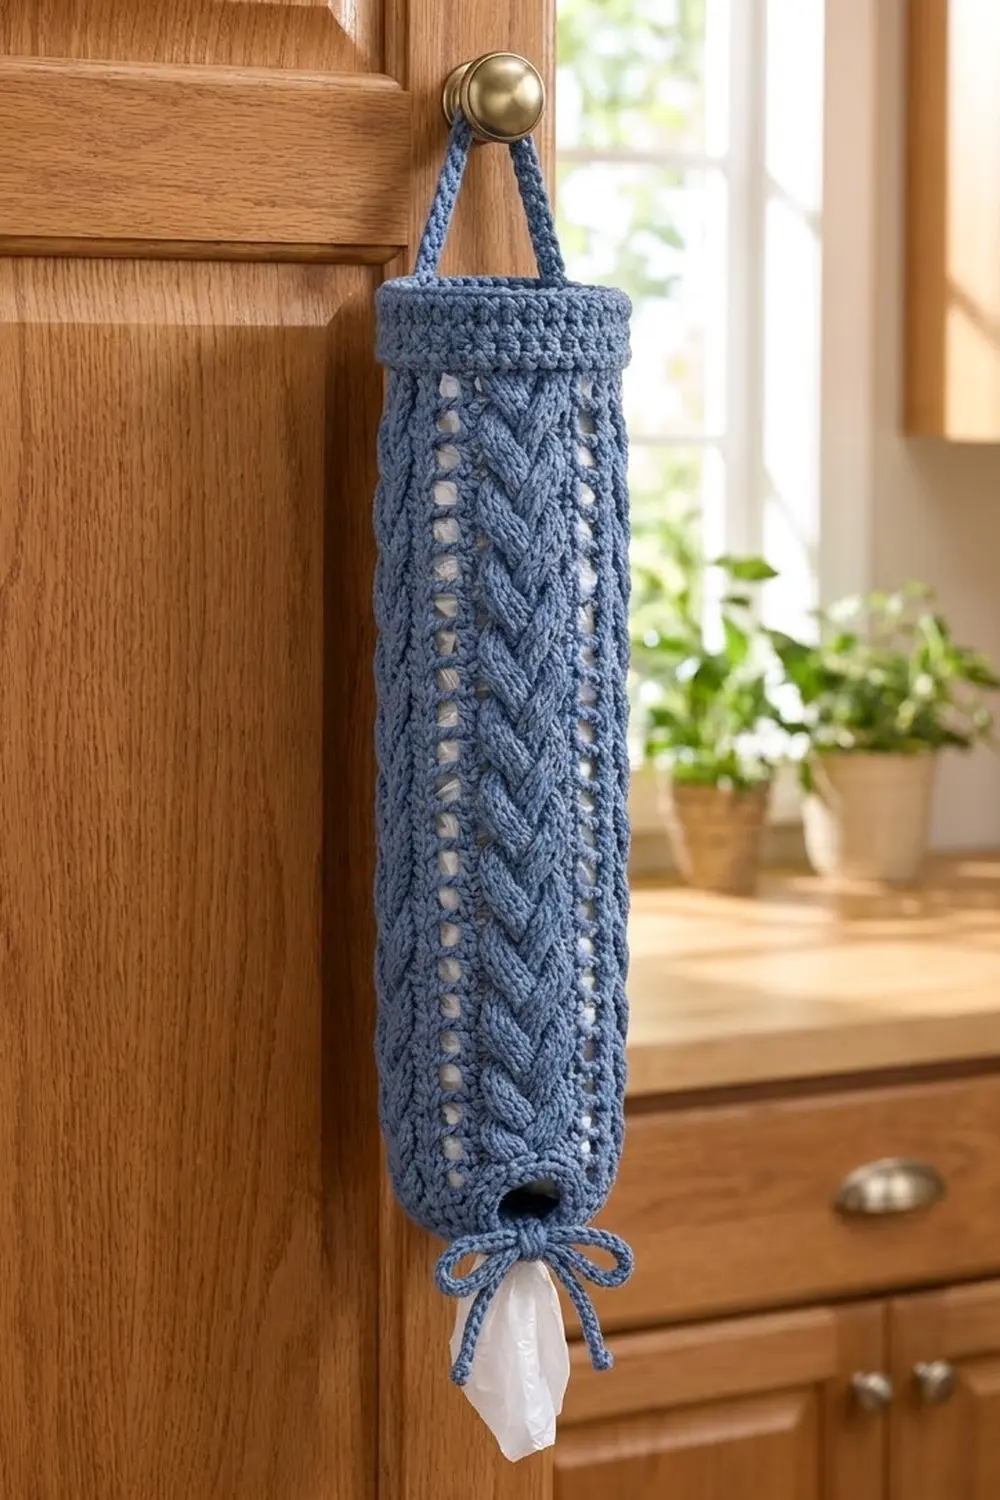
This cabled bag holder turns a pile of loose plastic shopping bags into a neat, good-looking kitchen accessory. Bags go in through the wide top, and you pull them out one at a time from the small gathered hole at the bottom.
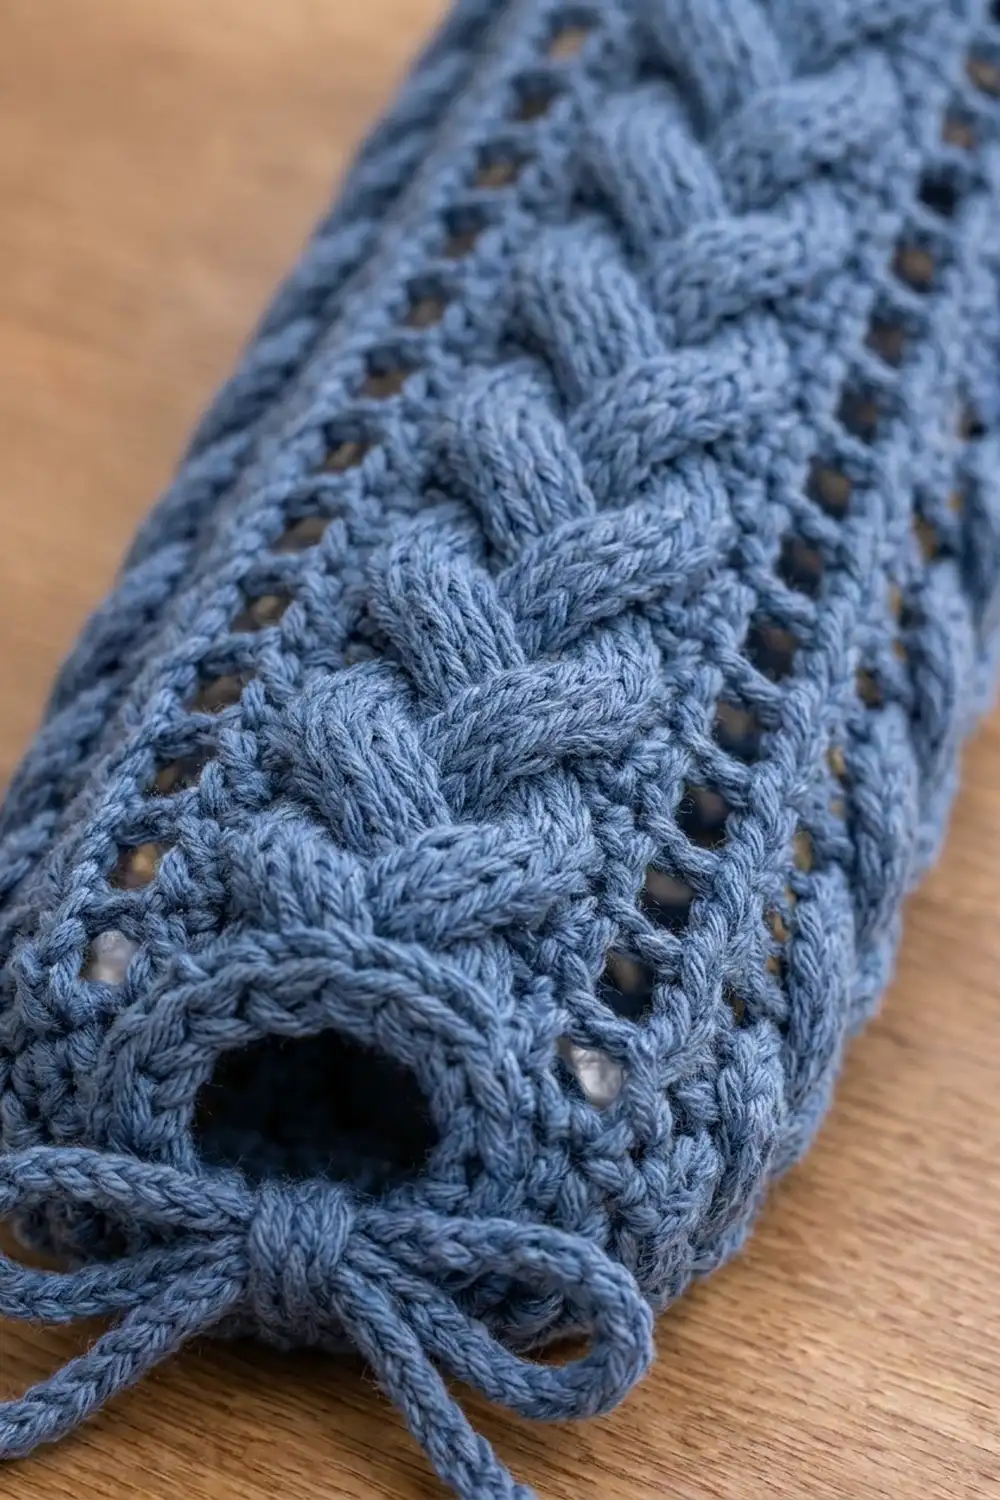
The design pairs four raised braided cables with open eyelet ladders. The tube looks rich and textured, but you can still see when it needs a refill. The sample is worked in a soft denim blue. A cream version looks just as good if you want a lighter, farmhouse style.
The pattern is written in US crochet terms. The finished holder measures about 13 in (33.0 cm) around, 6.5 in (16.5 cm) wide when flat, and 16.5 in (41.9 cm) tall, not counting the hanging strap.
Construction is simple. You work one seamless tube from the bottom up in joined rounds and add a solid top band. Then you crochet the strap straight off the top edge and finish with a slip-stitch cord threaded through a round of eyelets at the bottom.
Finished Size and Construction
- Finished size: 13 in (33.0 cm) around, 6.5 in (16.5 cm) wide when flat, 16.5 in (41.9 cm) tall
- Skill level: Intermediate (post-stitch cables)
- Terminology: US crochet terms
- Yarn weight: Worsted (weight 4)
- Hook: 5.0 mm (H-8)
- Number of pieces: 1 tube with built-in strap, plus 1 drawstring cord
- Layout: 4 identical 12-stitch vertical sections around the tube
- Section width: 3.25 in (8.3 cm) per 12-stitch section
- Size before top band: 13 in (33.0 cm) around, 15 in (38.1 cm) tall
- Top band depth: 1.5 in (3.8 cm)
- Strap: 1 in (2.5 cm) wide, 9 in (22.9 cm) long before attaching
Materials
Choose a smooth worsted cotton or cotton-blend yarn. Cotton gives crisp cables and holds the tube shape well, which matters for a holder that gets filled and emptied every day. Avoid fuzzy or very splitty yarns. Post stitches are much easier with a firm, rounded yarn.
Yarn:
– Denim Blue: 200 g / about 340 m (372 yd)
– Optional cream version: the same amount in Cream instead of Denim Blue
Medium and light solid colors show the braids best. Heathered or tweedy yarns work too. Avoid dark or variegated yarns, because they hide the cable crossings.
These amounts include a margin of about 15 percent for your gauge swatch and small tension differences. Cables use more yarn than plain stitches, so don’t cut it close.
Tools:
– 5.0 mm (H-8) crochet hook
– 4 locking stitch markers
– Tapestry needle
– Scissors
– Measuring tape
– Rust-proof pins and a spray bottle for blocking
– A rolled towel or tube about 4 in (10.2 cm) across (a large drink bottle works) for blocking
Abbreviations (US Terms)
- ch – chain
- sl st – slip stitch
- sc – single crochet
- dc – double crochet
- sk – skip
- st(s) – stitch(es)
- sp – space
- BPdc – back post double crochet
- FPtr – front post treble crochet
- rnd(s) – round(s)
Special stitches:
- Cross A (over 6 sts): Sk next 2 sts, FPtr around each of next 2 sts. Working in front of the sts just made, FPtr around each of the 2 skipped sts. FPtr around each of next 2 sts. (6 sts)
- Cross B (over 6 sts): FPtr around each of next 2 sts. Sk next 2 sts, FPtr around each of next 2 sts. Working behind the sts just made, FPtr around each of the 2 skipped sts. (6 sts)
Alternating Cross A and Cross B every round moves the left and right strands over the center strand in turn. This creates the three-strand braid.
Pattern notes:
– Ch 3 at the start of a round counts as 1 dc. Ch 2 at the start of a cable round and ch 1 at the start of an sc round do not count as sts.
– Join every round with sl st to the first st. Do not turn.
– Ch-1 sps count as sts in all totals.
– In Rnd 4, place a marker at the start of each 12-st section, and move the markers up as you go.
Gauge and Checkpoints
Work the first 8 rounds of the tube and use them as your swatch. Measure flat, without stretching.
- Base gauge: 12 dc = 3.25 in (8.3 cm); 5 dc rnds = 2 in (5.1 cm)
- Cable-pattern gauge: one 12-st section = 3.25 in (8.3 cm) wide; 5 pattern rnds = 2 in (5.1 cm)
- Top band gauge: 16 sc and 16 sc rnds = 4 in (10.2 cm)
Checkpoints:
– After Rnd 3: flat width 6.5 in (16.5 cm), height 1 in (2.5 cm)
– After Rnd 8: height 3 in (7.6 cm)
– After Rnd 18: height 7 in (17.8 cm)
– After Rnd 38: height 15 in (38.1 cm), flat width still 6.5 in (16.5 cm)
– After Rnd 44: height 16.5 in (41.9 cm)
If your tube is too big, go down to a 4.5 mm hook. If it is too small, go up to a 5.5 mm hook. A difference of 0.5 in (1.3 cm) or less in flat width is fine for a bag holder. Larger differences change how much yarn you need and how the cables look.
The Tube
Bottom Section
Foundation: Ch 48 and join with sl st to the first ch to form a ring. Be careful not to twist the chain.
Rnd 1: Ch 1, sc in each ch around, join. (48 sc)
Rnd 2 (drawstring eyelets): Ch 4 (counts as dc + ch 1), sk next st, dc in next st, ch 1, sk next st; repeat from * around, join to 3rd ch of beginning ch-4. (24 dc + 24 ch-1 sps = 48 sts)
Rnd 3: Ch 3, dc in each ch-1 sp and each dc around, join. (48 dc)
Checkpoint: the bottom section is 1 in (2.5 cm) tall and 6.5 in (16.5 cm) wide when flat.
Cable Body
Rnd 4 (setup): Ch 2 (does not count as a st), BPdc around next st, dc in next 6 sts, BPdc around next st, dc in next st, ch 1, sk next st, dc in next st, ch 1, sk next st; repeat from * 3 more times, join to first BPdc. (4 sections of 12 sts = 48 sts: 8 BPdc, 32 dc, 8 ch-1 sps)
Each 12-st section now reads: BPdc, 6 dc for the cable base, BPdc, then the ladder (dc, ch-1 sp, dc, ch-1 sp).
Rnd 5 (Cross A round): Ch 2 (does not count), BPdc around next BPdc, Cross A over next 6 sts, BPdc around next BPdc, dc in next dc, ch 1, sk ch-1 sp, dc in next dc, ch 1, sk ch-1 sp; repeat from * 3 more times, join. (48 sts: 8 BPdc, 24 FPtr, 8 dc, 8 ch-1 sps)
Rnd 6 (Cross B round): Ch 2 (does not count), BPdc around next BPdc, Cross B over next 6 FPtr, BPdc around next BPdc, dc in next dc, ch 1, sk ch-1 sp, dc in next dc, ch 1, sk ch-1 sp; repeat from * 3 more times, join. (48 sts)
Rnds 7–38: Repeat Rnds 5 and 6, in that order, 16 more times, ending with a Cross B round. (48 sts in every round)
You now have 35 body rounds (Rnds 4–38). The ladders stack into vertical columns of small rectangular eyelets, each separated by a single dc post. Each braid sits between two sunken BPdc lines.
Cable tips: Always insert the hook around the post of the matching FPtr from the round below, never into the top of the stitch. Before each FPtr, pull up the first loop a little taller so the stitch reaches the current round without pulling the fabric. When you skip 2 stitches for a cross, keep them folded out of the way with a finger, so you don’t catch them by mistake.
Checkpoint: total height 15 in (38.1 cm); flat width 6.5 in (16.5 cm). Count 4 braids and 4 ladders around.
Top Band and Bottom Edge (Border)
The top band is the border of this piece. It is worked in plain sc at a gauge of 16 sc and 16 rnds = 4 in (10.2 cm).
Rnd 39 (conversion round): Ch 1, sc in each st around, working 1 sc in each BPdc, FPtr, dc, and ch-1 sp, join. (48 sc = 48 sts worked 1 per existing st + 0 extra)
This gives 12 sc per section: 1 over each BPdc, 6 over the braid, and 4 over the ladder.
Rnds 40–44: Ch 1, sc in each st around, join. (48 sc)
The band is 6 sc rounds deep: 6 ÷ 4 rnds per in = 1.5 in (3.8 cm).
Why the math works: The cables pull the fabric in, so 48 sts in the cable pattern measure 13 in (33.0 cm) around. At band gauge, 48 sc measure 48 ÷ 4 = 12 in (30.5 cm). That 1 in (2.5 cm) difference is on purpose. The slightly snug band stands up firmly and keeps the opening round without ruffling. Because the count stays at exactly 48, each 12-st section feeds exactly 12 band sts, and nothing is added or lost where sections meet.
Do not fasten off after Rnd 44.
Bottom edge: Rnd 1 already gives a clean sc edge of 48 sts, 12 per section. You don’t need an extra bottom round, because the drawstring does the shaping.
Hanging Strap
The strap is worked in rows straight off the top band.
Row 1: Ch 1, sc in first 4 sts of Rnd 44, turn. (4 sc)
Rows 2–36: Ch 1, sc in each st across, turn. (4 sc)
At 4 rows per in, 36 rows = 9 in (22.9 cm). Fasten off, leaving a 12 in (30.5 cm) tail.
Flatten the tube so the strap sits at one fold. Starting from the first strap st, count 24 sts around the band to find the opposite side. Use the tail to sew the end of the strap over sts 25–28 of Rnd 44. This forms an arched handle that rises about 4 in (10.2 cm) above the top edge.
Sew through both loops of each band stitch, then go over the seam a second time. A full holder puts steady weight on this join, so a double pass keeps it from stretching.
Drawstring Cord
Ch 90. Sl st in the back bump of the 2nd ch from the hook and in each ch across. (89 sl sts)
Fasten off and weave in both ends. The cord measures about 24 in (61.0 cm).
Weave the cord in and out through the 24 ch-1 sps of Rnd 2, starting and ending at the center front, below one of the braids. Pull until the bottom opening is about 2 in (5.1 cm) across. Tie a bow and knot each cord end.
Final Blocking
- Weave in all ends on the inside, following the post stitches so they stay hidden.
- Untie the drawstring so the bottom lies open.
- Slide the tube over a rolled towel or bottle about 4 in (10.2 cm) across.
- Mist the whole piece with water until damp but not soaked.
- Gently straighten the braids so they run straight up and down, and open each ladder eyelet with a fingertip.
- Check the measurements: 13 in (33.0 cm) around the cable body and 16.5 in (41.9 cm) tall.
- Lay the strap flat and pin it to 1 in (2.5 cm) wide.
- Let it dry completely, then retie the drawstring to a 2 in (5.1 cm) opening.
Final Quality-Control Checklist
- 48 sts in every round, from Rnd 1 to Rnd 44
- 4 braids and 4 ladder columns, all running straight up
- Cross A and Cross B alternate every round, with no cross repeated twice in a row
- Every braid sits between two BPdc lines
- Top band is 6 sc rounds, 1.5 in (3.8 cm) deep
- Strap ends sit on opposite sides of the top and are sewn on securely
- Drawstring passes through all 24 eyelets of Rnd 2
- Finished height is 16.5 in (41.9 cm) and flat width is 6.5 in (16.5 cm)
Troubleshooting
The braids look twisted instead of braided. You worked the same cross twice in a row. Rip back to the last correct round and alternate Cross A and Cross B.
The fabric puckers behind the cables. Your FPtr sts are too short. Pull up the first loop a little taller before finishing each FPtr.
The ladder columns drift sideways. Make sure each dc goes into a dc, not into a ch-1 sp, and that each ch 1 skips only the ch-1 sp below it.
The tube is spiraling. Make sure each join lands in the first st of the round, not in the beginning chain. Keep moving your markers up.
The stitch count is off. Count the ch-1 sps as sts. Check that the first BPdc of each round goes around the first BPdc of the round below.
The top band flares. Your sc are looser than the cable body. Work the band with a 4.5 mm hook.
The bottom hole is too large. Pull the drawstring tighter, or add a second knot above the bow.
Bags won’t pull out smoothly. Loosen the drawstring a little, to about 2.5 in (6.4 cm), and stuff bags in loosely rather than packing them down.
Care
Hand wash in cool water with mild soap, press out the water in a towel, and dry it over a bottle or rolled towel to keep the tube shape. Cotton versions can be machine washed on a gentle cycle in a mesh laundry bag.
Final Notes
The whole holder follows one measurement chain: 12 sts per section x 4 sections = 48 sts in every round. At 3.25 in (8.3 cm) per section, the body is 13 in (33.0 cm) around and 6.5 in (16.5 cm) wide when flat. The bottom section adds 1 in (2.5 cm), the 35 cable rounds add 14 in (35.6 cm), and the 6-round band adds 1.5 in (3.8 cm), for a total of 16.5 in (41.9 cm). A 9 in (22.9 cm) strap forms the handle, and a 24 in (61.0 cm) cord closes the bottom to a 2 in (5.1 cm) dispensing hole.
Check your gauge on the first 8 rounds and keep the cross rounds in order. The result is a sturdy, good-looking bag holder you can finish in an afternoon or two.
Happy crocheting!