

The Sage Bloom Hanging Basket is a small oval wall basket. Lace flower motifs run all the way around its sides. Two crochet straps loop over wooden rings, so it hangs flat against the wall and keeps spare toilet paper rolls, washcloths or small towels within reach.
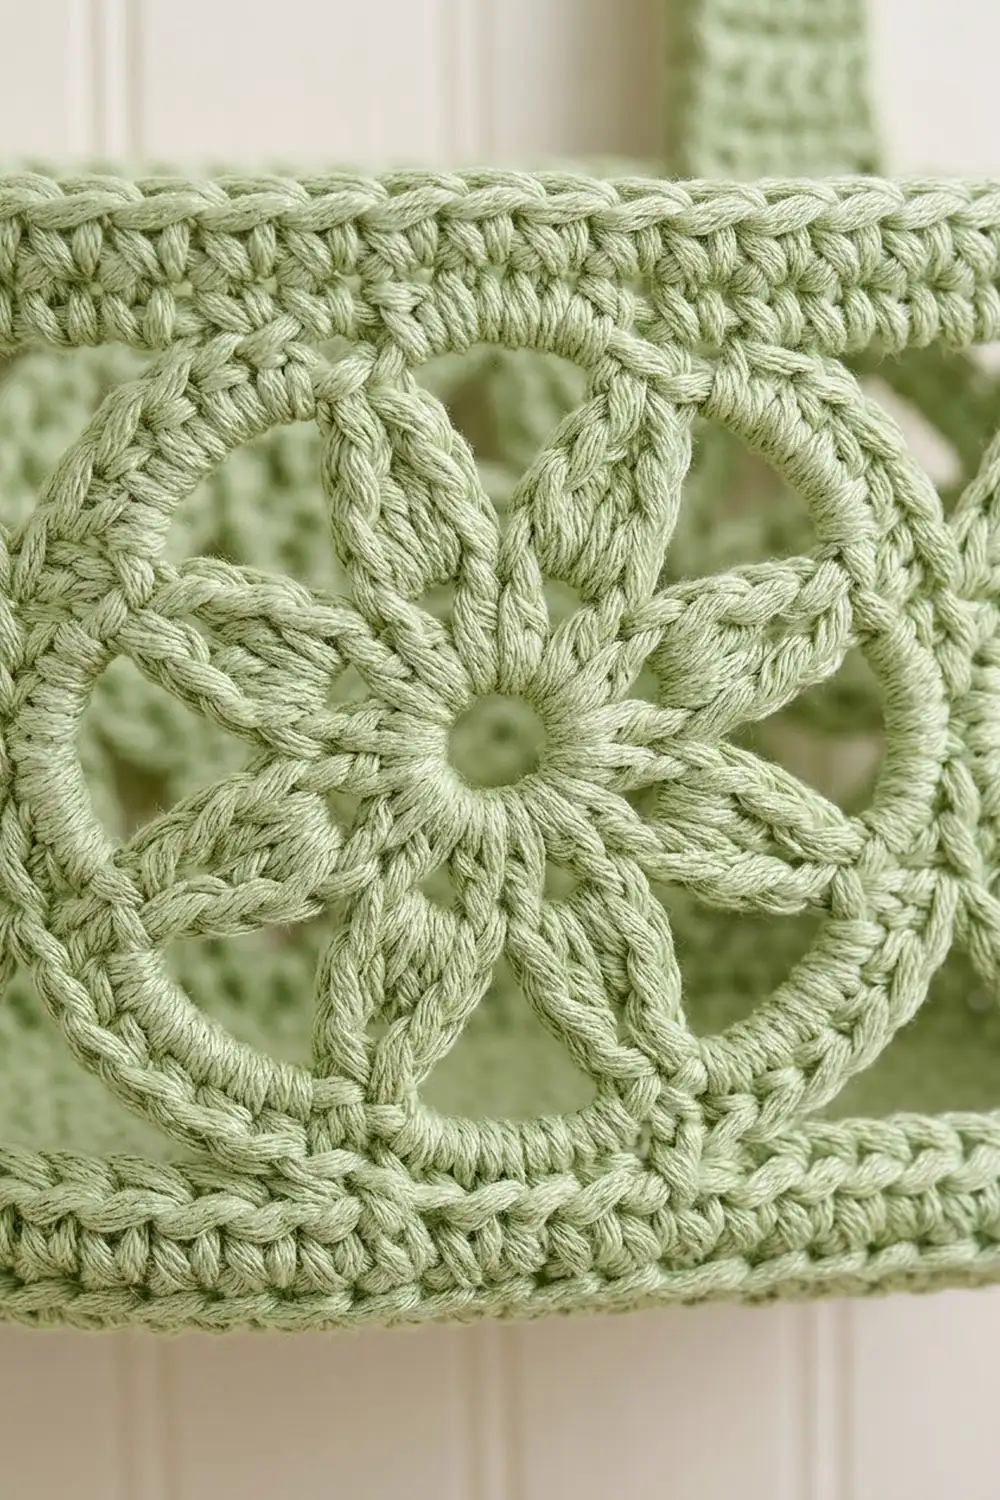
The sample is made in one soft sage green worsted cotton. The base and top band are solid and firm. The flower band between them is open and lacy. Each flower has eight clustered petals inside a round double-crochet frame, and eight motifs go all the way around.
This pattern uses US crochet terms. The finished basket measures 10.25 in (26.0 cm) long, 4 in (10.2 cm) deep and 5 in (12.7 cm) tall.
How it’s built: you crochet the oval base in joined rounds and turn up a short wall. Next you make eight motifs and sew them into a ring. Then you work a top band and a bottom band along the edges of the motif ring and sew the ring onto the wall. Last, you make two straps and attach them to the rings and the basket.
Finished Size and Construction
- Finished size: 10.25 in (26.0 cm) long × 4 in (10.2 cm) deep × 5 in (12.7 cm) tall
- Skill level: Intermediate
- Terminology: US
- Yarn weight: Worsted (#4) cotton
- Hook: 4.0 mm (G-6)
- Number of pieces: 11 crocheted pieces (1 base, 8 motifs, 2 straps), plus 2 wooden rings
- Layout: one ring of 8 motifs: 2 on the front, 2 on each end, 2 on the back
- Piece size: each motif is 3.25 in (8.3 cm) across; each strap is 1.25 in × 8.9 in (3.2 cm × 22.6 cm)
- Size before border: the motif ring measures 26 in (66.0 cm) around and 3.25 in (8.3 cm) tall
- Border depth: top band about 1 in (2.5 cm); base wall plus bottom band about 0.75 in (1.9 cm)
Materials
Use a smooth, firm cotton or cotton blend. Cotton holds the basket’s shape, shows the stitches clearly and stands up to a humid bathroom. Avoid fuzzy or very stretchy yarns, because the straps would sag.
- Sage green worsted cotton: 200 g, about 340 m (372 yd), based on 170 m per 100 g
The sample used about 165 g. The quantity above includes a margin for your gauge swatch and tension differences.
Tools and hardware:
- 4.0 mm (G-6) crochet hook
- Tapestry needle
- 4 locking stitch markers
- Scissors and a measuring tape
- 2 unfinished wooden rings, 2.75 in (7.0 cm) outer diameter
- 2 wood screws, plus wall anchors if your wall needs them
- A small drill bit for pilot holes
- Spray bottle and rustproof pins for blocking
Abbreviations (US Terms)
- ch – chain
- sl st – slip stitch
- sc – single crochet
- hdc – half double crochet
- dc – double crochet
- tr – treble crochet
- BLO – back loop only
- MR – magic ring
- sk – skip
- st(s) – stitch(es)
- sp – space
- rnd(s) – round(s)
- RS – right side
- rev sc – reverse single crochet (crab stitch): sc worked from left to right (left-handers: right to left)
Special stitches:
- tr3cl (treble cluster): Work all three treble crochets into the same stitch. Yarn over twice, insert hook, pull up a loop, (yarn over, pull through 2 loops) twice. Repeat from * to * 2 more times in the same stitch. Yarn over and pull through all 4 loops on the hook.
- Beg cl (beginning cluster): Ch 4, then work the tr3cl steps only twice in the same stitch, and yarn over and pull through all 3 loops on the hook.
- tr3tog (treble three together): Work the same partial treble as in the tr3cl, but into each of the next 3 stitches instead of one. Yarn over and pull through all 4 loops on the hook. This counts as 1 stitch and uses up 3.
Gauge and Checkpoints
Gauge: 16 sc × 18 rnds = 4 in (10.2 cm).
Make one motif before you start the base. It’s the quickest test of your tension.
- Motif Rnd 2: about 2 in (5.1 cm) across, measured from petal tip to petal tip
- Motif Rnd 4: 3.25 in (8.3 cm) across
- Base Rnd 9: 10.25 in × 4 in (26.0 cm × 10.2 cm)
- Wall Rnd 12: 26 in (66.0 cm) around
- Motif ring: 26 in (66.0 cm) around, the same as the wall
If your motif is bigger than 3.25 in (8.3 cm), go down half a hook size. If it is smaller, go up half a size. Even 0.25 in (0.6 cm) per motif matters: across 8 motifs it adds up to 2 in (5.1 cm) around, and the ring would no longer fit the wall.
Base
Work the base in joined rounds. Do not turn. The ch 1 at the start of a round does not count as a stitch.
Ch 28.
Rnd 1: 3 sc in 2nd ch from hook, sc in next 25 ch, 3 sc in last ch. Rotate the chain and work along the free loops of the other side: sc in next 25 ch. Sl st to first sc. (56 sts: two ends of 3 sts each, two straight sides of 25 sts each)
Rnd 2: Ch 1, 2 sc in each of next 3 sts, sc in next 25, 2 sc in each of next 3 sts, sc in next 25. Sl st to first sc. (62 sts)
Rnd 3: Ch 1, (sc in next st, 2 sc in next st) 3 times, sc in next 25; repeat from * once more. Sl st to first sc. (68 sts)
Rnds 4–9: Continue the same way. Each round, work one more plain sc before each increase in the end groups. The straight sides stay at 25 sts.
- Rnd 4: (sc in next 2, 2 sc in next) 3 times at each end. (74 sts)
- Rnd 5: (sc in next 3, 2 sc in next) at each end. (80 sts)
- Rnd 6: (sc in next 4, 2 sc in next) at each end. (86 sts)
- Rnd 7: (sc in next 5, 2 sc in next) at each end. (92 sts)
- Rnd 8: (sc in next 6, 2 sc in next) at each end. (98 sts)
- Rnd 9: (sc in next 7, 2 sc in next) at each end. (104 sts)
After Rnd 9, each end group has 27 sts and each straight side has 25 sts: 27 + 25 + 27 + 25 = 104.
Checkpoint: The base should lie flat and measure 10.25 in × 4 in (26.0 cm × 10.2 cm).
Wall
Rnd 10: Ch 1, sc in BLO of each st around. Sl st to first sc. (104 sts) The unworked front loops make a crisp fold line, so the wall turns up.
Rnds 11–12: Ch 1, sc in each st around. Sl st to first sc. (104 sts)
Fasten off and leave a 40 in (101.6 cm) tail for sewing.
Counting the first st of Rnd 12 as st 1, sts 1–27 are one end, 28–52 the front, 53–79 the other end and 80–104 the back. Place markers in sts 28 and 80.
Flower Motif (make 8)
Rnd 1: MR, ch 1, 8 sc in ring. Sl st to first sc and pull the ring closed. (8 sts)
Rnd 2: Beg cl in same st, ch 3. Tr3cl in next sc, ch 3; repeat from * 6 more times. Sl st to top of Beg cl. (8 clusters, 8 ch-3 sps) These clusters are the petals, and the ch-3 spaces are the open gaps between them.
Rnd 3: Ch 1. Sc in top of next cluster, 3 sc in next ch-3 sp; repeat from * around. Sl st to first sc. (32 sts)
Rnd 4: Ch 3 (counts as dc), dc in next 2 sts, 2 dc in next st. Dc in next 3 sts, 2 dc in next st; repeat from * 6 more times. Sl st to top of ch-3. (40 sts)
Fasten off and leave a 12 in (30.5 cm) tail on every second motif for sewing.
Checkpoint: The motif is 3.25 in (8.3 cm) across.
Mark the joining points: Count the ch-3 as st 1. Sts 9–11 are the right seam and sts 29–31 are the left seam. That leaves two arcs of 17 sts each: sts 12–28, and sts 32–40 plus 1–8.
Make All Pieces
All pieces are sage green:
- 1 base (with wall)
- 8 flower motifs
- 2 straps (see Straps below)
Motif layout around the basket, in order:
Front long side:   [A] [B]
Right end:         [C] [D]
Back long side:    [E] [F]
Left end:          [G] [H]
(H joins back to A to close the ring)
Joining the Motifs
- Place two motifs RS together. Line up the right seam sts (9–11) of the first motif with the left seam sts (31–29) of the second.
- Whipstitch through both loops of all 3 matching pairs of stitches. That’s 3 sts to 3 sts, so nothing is added and nothing is skipped.
- Join A to B, B to C, and so on through H.
- Check that no motif is flipped, then join H to A to close the ring. That makes 8 seams in total.
Pull each stitch snug, but not so tight that the motif puckers. The seams should sit flat and run straight up and down. Every motif should end up with one 17-st arc at the top and one at the bottom.
Checkpoint: Measure the ring along its middle. It should be 26 in (66.0 cm) around, which is 8 × 3.25 in (8.3 cm).
Border: Top and Bottom Bands
The bands follow the same 4 sc per inch (2.5 cm) gauge as the base. Each band changes the curved 17-st arcs into a straight edge of 13 sts per motif. Eight motifs × 13 sts = 104 sts, which exactly matches the wall.
Top Band
Rnd 1 (conversion): With RS facing, join yarn in the first st of any top arc.
Tr3tog over next 3 sts, dc in next st, hdc in next st, sc in next 7 sts, hdc in next st, dc in next st, tr3tog over next 3 sts. Skip the seam and go to the first st of the next motif’s top arc. Repeat from * around. Sl st to first st.
Per motif, 11 sts are worked one into each stitch, plus 2 tr3tog that each use up 3 sts. That turns 17 sts into 11 + 2 = 13. (8 × 13 = 104 sts)
The tall tr3tog stitches fill the dip where two circles meet. The short sc stitches sit across the top of each circle, so the edge comes out straight.
Rnds 2–3: Ch 1, sc in each st around. Sl st to first sc. (104 sts)
Rnd 4: Ch 1, rev sc in each st around. Sl st to first st. (104 sts) This round makes the corded rim.
Fasten off and weave in the ends.
Bottom Band
Rnd 1: Work exactly like Top Band Rnd 1, but into the bottom arcs. (104 sts)
Fasten off.
Attach the Motif Ring to the Wall
- Line up the bottom band with wall Rnd 12. Bottom band st 1 is the first st of motif A, and it meets wall st 28. The seam between A and B then sits at the center of the front.
- Use the wall tail to whipstitch each band st to its matching wall st through both loops. That’s 104 sts to 104 sts.
Checkpoint: The basket stands 5 in (12.7 cm) tall, with no gathers and no loose sections.
Straps (make 2)
Row 1: Ch 6, sc in 2nd ch from hook and in each ch across. (5 sts)
Rows 2–40: Ch 1, turn, sc in each st across. (5 sts)
Fasten off and leave a 16 in (40.6 cm) tail.
Checkpoint: Each strap is 1.25 in × 8.9 in (3.2 cm × 22.6 cm).
Attaching the Straps
- Slide a wooden ring onto one end of a strap. Fold the top 7 rows down over the ring to the back of the strap and whipstitch the edges down.
- Lay the other end of the strap over the outside of the back top band, with 4 rows overlapping the band. Center one strap over wall sts 80–84 and the other over sts 100–104. That puts their centers 5 in (12.7 cm) apart.
- Sew around the overlapping square, then stitch a large X through it, as in the sample.
- About 6.4 in (16.3 cm) of each strap hangs between its ring and the basket.
Final Blocking
- Spray the basket until it is damp, not soaked.
- Stuff it firmly with a towel or a 10 × 4 in (25.4 × 10.2 cm) box so the sides stand straight.
- Press each flower flat and pin the petals open so the gaps between them are even.
- Pin the top band level, then pin the straps flat and straight.
- Let it dry completely, for at least 24 hours.
- Pre-drill pilot holes through the top edge of each ring. Screw the rings to the wall 5 in (12.7 cm) apart, center to center, using anchors if needed.
Final Quality-Control Checklist
- [ ] The base is 10.25 × 4 in (26.0 × 10.2 cm) and lies flat.
- [ ] The wall has 104 sts and measures 26 in (66.0 cm) around.
- [ ] All 8 motifs are 3.25 in (8.3 cm) across, with 40 sts in Rnd 4.
- [ ] All 8 seams are 3 sts long and none are twisted.
- [ ] Both bands have 104 sts.
- [ ] Two motifs are centered on the front and two on the back.
- [ ] The straps match in length and are 5 in (12.7 cm) apart.
- [ ] All ends are woven in securely.
Troubleshooting
- The base ruffles: You may have too many increases, or your row gauge is too short. Recount the round, then try a tighter tension.
- The base cups upward: Your increases are tight. Go up half a hook size for the end groups only.
- The motifs are wavy: Rnd 3 is too loose. Work it firmly, or block harder.
- The motif ring is longer than the wall: Your motifs are oversized. Remake them with a smaller hook.
- There are gaps at the band seams: Make sure each tr3tog starts right next to the seam.
- The straps stretch: Use a smaller hook for the straps, or line them with cotton ribbon.
Care
Hand wash in cool water, press out the water with a towel, and dry the basket flat over a box to keep its shape. Remove the wooden rings before washing.

Final Notes
The measurements all build on each other. If your gauge is 16 sc to 4 in (10.2 cm), the base comes out at 10.25 × 4 in (26.0 × 10.2 cm) and the wall at 104 sts, or 26 in (66.0 cm) around. Eight motifs of 3.25 in (8.3 cm) also make 26 in (66.0 cm), and 8 × 13 band sts make the same 104 sts. Check each measurement as you go, and the whole basket will fit together.
Happy crocheting!