

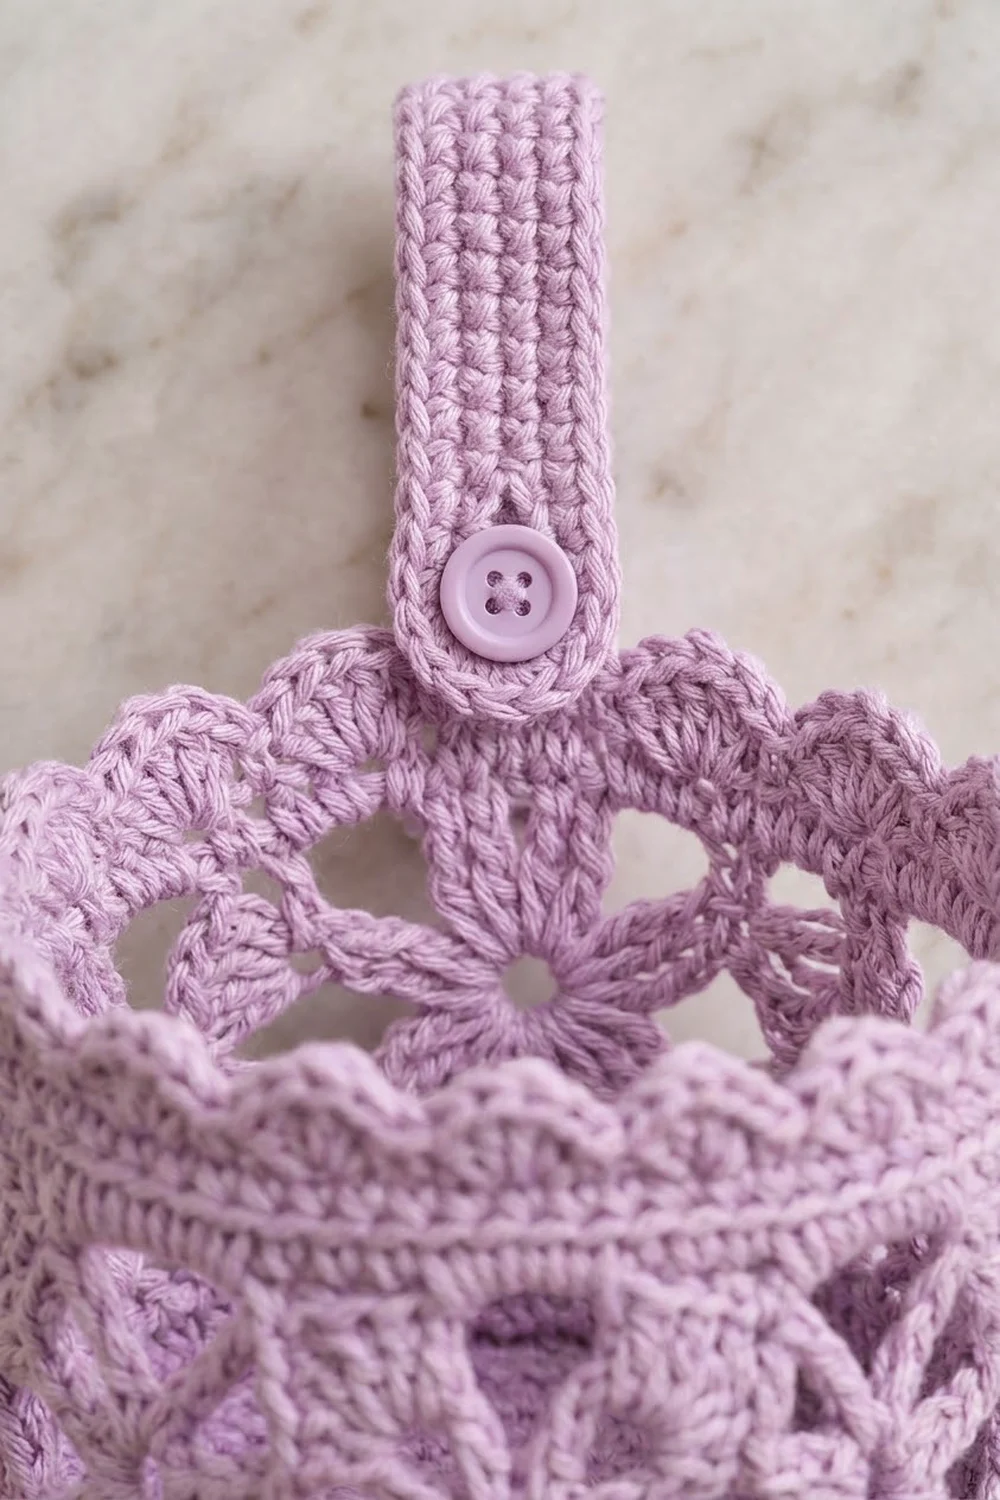
This is a practical bathroom organizer that also looks nice: three round lace baskets in soft lilac, joined in a row and hung from a wooden rod with buttoned tabs. Each basket holds one standard toilet roll. You can also use them for washcloths, small toiletries or hair accessories.
The look is cottage-style and calm. Each wall has two bands of three-petal flower fans framed by chain loops, with solid single crochet rounds that keep the basket firm. A row of small shell scallops finishes the top rim. Everything is worked in one color, so the texture does all the decorative work.
This pattern uses US crochet terms. Each basket measures 5.75 in (14.6 cm) across and 4.25 in (10.8 cm) tall. The joined row of three is about 17.25 in (43.8 cm) wide.
Each basket is worked in one piece from the bottom up: a flat circle base, a ridge round that turns the wall upward, then the lace bands, the solid rounds and the scalloped rim. You make three baskets and three tabs, seam the baskets together where they touch, then sew on the tabs and buttons.
Finished Size and Construction
- Finished size (one basket): 5.75 in (14.6 cm) diameter × 4.25 in (10.8 cm) tall
- Finished size (joined row): 17.25 in (43.8 cm) wide × 5.75 in (14.6 cm) deep × 4.25 in (10.8 cm) tall
- Skill level: Intermediate
- Terminology: US
- Yarn weight: Worsted (#4), cotton or cotton blend
- Hook: 4.0 mm (US G-6)
- Number of pieces: 6 (3 baskets, 3 tabs)
- Layout: 3 baskets in one horizontal row
- Wall circumference: 72 sts = 18 in (45.7 cm)
- Wall height before border: 3.75 in (9.5 cm)
- Border depth (shell rim): 0.5 in (1.3 cm)
- Tab size: 1.5 in (3.8 cm) wide × 7 in (17.8 cm) long
Materials
Pick a smooth worsted-weight cotton or cotton blend. Cotton holds its shape, shows the lace clearly and copes with a humid bathroom. Avoid fuzzy or very stretchy acrylic, which can let the baskets sag.
- Lilac: 150 g, about 255 m (based on a typical 50 g / 85 m worsted cotton)
- Each basket uses about 38 g, each tab about 5 g, and the rest goes to seaming.
These quantities include a margin of roughly 20%, so you won’t run short if your tension is slightly loose.
Tools and notions:
– 4.0 mm (US G-6) crochet hook
– Yarn needle
– 4 locking stitch markers
– 3 lilac buttons, 5/8 in (1.6 cm)
– Sewing thread and needle for the buttons
– Wooden dowel rod, 1 in (2.5 cm) diameter × 22 in (55.9 cm) long, with 2 wall brackets, screws and anchors
– Tape measure and rustproof pins
Abbreviations (US Terms)
- ch – chain
- sl st – slip stitch
- sc – single crochet
- dc – double crochet
- sc2tog – single crochet 2 together
- BLO – back loop only
- MR – magic ring
- sk – skip
- sp – space
- st(s) – stitch(es)
- rep – repeat
Special stitch – 3-dc cluster (cl): In the space you are working into, [yarn over, insert hook, yarn over and pull up a loop, yarn over and pull through 2 loops] 3 times (4 loops on hook), then yarn over and pull through all 4 loops.
Gauge and Checkpoints
Gauge: 16 sc and 18 rounds = 4 in (10.2 cm) in sc, worked firmly.
Make one complete basket before starting the others. The basket is a working gauge swatch, and its measurements tell you whether the rest of the set will fit together and hold a roll.
Checkpoints:
– After Rnd 6 (36 sts): base measures about 3 in (7.6 cm) across.
– After Rnd 12 (72 sts): base measures 5.75 in (14.6 cm) across.
– After Rnd 15: wall is about 0.75 in (1.9 cm) tall.
– After Rnd 19: wall is about 2.25 in (5.7 cm) tall.
– After Rnd 23: wall is about 3.5 in (8.9 cm) tall.
– After Rnd 24: wall is 3.75 in (9.5 cm) tall.
If your base is too big: go down a hook size (3.75 mm). A base that is too wide makes the wall loose and floppy.
If your base is too small: go up a hook size (4.5 mm). The basket has to clear a roll about 4.5 in (11.4 cm) across.
Don’t add or remove rounds to fix size. The lace repeats depend on exactly 72 stitches.
Basket (Make 3)
Base
Work in joined rounds. Join each round with a sl st to the first sc, and start each round with ch 1, which does not count as a stitch.
Rnd 1: In MR, work 6 sc. Join. (6 sts)
Rnd 2: 2 sc in each st around. Join. (12 sts)
Rnd 3: Sc in next st, 2 sc in next st; rep from * 6 times. Join. (18 sts)
Rnd 4: Sc in next 2 sts, 2 sc in next st; rep from * 6 times. Join. (24 sts)
Rnd 5: Sc in next st, 2 sc in next st, sc in next 3 sts, 2 sc in next st; rep from * 4 times, sc in next 2 sts. Join. (30 sts)
Rnd 6: Sc in next 4 sts, 2 sc in next st; rep from * 6 times. Join. (36 sts)
Rnd 7: Sc in next 2 sts, 2 sc in next st, sc in next 5 sts, 2 sc in next st; rep from * 4 times, sc in next 3 sts. Join. (42 sts)
Rnd 8: Sc in next 6 sts, 2 sc in next st; rep from * 6 times. Join. (48 sts)
Rnd 9: Sc in next 3 sts, 2 sc in next st, sc in next 7 sts, 2 sc in next st; rep from * 4 times, sc in next 4 sts. Join. (54 sts)
Rnd 10: Sc in next 8 sts, 2 sc in next st; rep from * 6 times. Join. (60 sts)
Rnd 11: Sc in next 4 sts, 2 sc in next st, sc in next 9 sts, 2 sc in next st; rep from * 4 times, sc in next 5 sts. Join. (66 sts)
Rnd 12: Sc in next 10 sts, 2 sc in next st; rep from * 6 times. Join. (72 sts)
Staggering the increases on alternate rounds keeps the base round rather than hexagonal. Check that the base is 5.75 in (14.6 cm) across and lies flat.
Wall – Solid Bottom Band
Rnd 13 (turning ridge): Ch 1, sc in BLO of each st around. Join. (72 sts)
This leaves the front loops as a visible ridge and turns the wall straight up.
Rnds 14–15: Ch 1, sc in each st around. Join. (72 sts)
Wall – Lace Band 1
Rnd 16 (lattice): Ch 1, sc in first st, ch 5, sk 3 sts, sc in next st; rep from * 17 times, but on the last repeat skip the final sc and join with a sl st to the first sc instead. (18 sc, 18 ch-5 loops)
Each repeat uses 4 stitches, and 18 × 4 = 72.
Rnd 17 (petal fans): Sl st in each of next 3 ch to reach the center of loop 1. Ch 1, sc in loop 1. Ch 3, in next loop work (cl, ch 3, cl, ch 3, cl), ch 3, sc in next loop; rep from * 8 times total, ending with sc in loop 17. Then ch 3, work (cl, ch 3, cl, ch 3, cl) in loop 18, ch 3, and join to the first sc. (9 fans of 3 clusters each = 27 cl, 9 sc)
The fans sit in the even-numbered loops and the sc in the odd-numbered loops, which gives 9 flowers around the basket.
Rnd 18 (frame): Ch 1, sc in same st as join. Ch 4, sc in top of center cluster of next fan, ch 4, sc in next sc; rep from * around, omitting the last sc, and join to the first sc. (18 sc, 18 ch-4 loops)
Rnd 19 (conversion round): Ch 1, sc in next sc, 3 sc in next ch-4 loop; rep from * 18 times. Join.
Count: 18 sc worked 1-per-sc + 54 sc worked into loops = 72 sts.
Wall – Lace Band 2
Rnds 20–23: Repeat Rnds 16–19. The fans stack directly above the first band. (72 sts at end of Rnd 23)
Wall – Top Solid Round
Rnd 24: Ch 1, sc in each st around. Join. (72 sts)
Leave the yarn attached if you want to add the border now, or fasten off and add it after joining. The steps below assume you add it after joining.
Mark the basket: The join seam is the back center (st 1). Count around and place markers at st 19 (one side), st 37 (front center) and st 55 (other side). The two side markers are where neighboring baskets will touch.
Hanging Tab (Make 3)
Work in rows. Ch 1 at the start of each row does not count as a stitch.
Foundation: Ch 7.
Row 1: Sc in 2nd ch from hook and in each ch across. Turn. (6 sts)
Rows 2–28: Ch 1, sc in each st across. Turn. (6 sts)
Row 29 (buttonhole): Ch 1, sc in next 2 sts, ch 2, sk 2 sts, sc in next 2 sts. Turn. (4 sc, 1 ch-2 sp)
Row 30: Ch 1, sc in next 2 sts, 2 sc in ch-2 sp, sc in next 2 sts. Turn. (6 sts)
Row 31: Ch 1, sc2tog, sc in next 2 sts, sc2tog. Turn. (4 sts)
Row 32: Ch 1, sc2tog twice. (2 sts)
Fasten off and weave in ends.
The tab measures 1.5 in (3.8 cm) wide and 7 in (17.8 cm) long, with a rounded buttonhole end.
Make All Pieces
- Baskets: 3 in lilac, all worked through Rnd 24
- Tabs: 3 in lilac
Layout (front view):
[Basket A] [Basket B] [Basket C]
   tab        tab        tab
Arrange the baskets with the back-center seams facing the wall and the front-center markers facing you.
Joining
Method: Whipstitch with a yarn needle and lilac yarn, working only through the solid rounds.
Stitch-to-stitch logic: Basket A’s right-side marker meets Basket B’s left-side marker, and Basket B’s right-side marker meets Basket C’s left-side marker. At each seam, line up 2 stitches from each basket: the marked stitch and the one next to it toward the back. Whipstitch those 2 matched pairs together on Rnds 13, 14, 15, 19, 23 and 24. That is 6 solid rounds per seam, 12 stitch pairs in all.
Skip the lattice and fan rounds, then add one tacking stitch through the side chain loops of Rnds 16 and 20 so the lace doesn’t gap.
Tension: Pull each stitch just snug. If you pull too tight, the walls flatten and the circles become ovals. If you leave them loose, the baskets swing apart when loaded.
Size checkpoint: The joined row should measure 17.25 in (43.8 cm) wide (3 × 5.75 in). Each basket should still stand round.
Border (Shell Rim)
Border gauge: One shell repeat covers 4 sts, which is 1 in (2.5 cm) of rim, and stands 0.5 in (1.3 cm) tall.
Work the border on each basket separately, starting at the back-center seam.
Rnd 25: Join yarn in st 1. Ch 1, sc in st 1, sk 1 st, 5 dc in next st, sk 1 st, sc in next st; rep from * around, ending the last repeat with sk 1 st, then sl st to the first sc instead of working a sc. (18 shells, 18 sc per basket)
Counts:
– Per basket: 72 sts ÷ 4 sts per repeat = 18 shells
– Joined row of 3 baskets: 3 × 18 = 54 shells in total
– No extra stitches are added at the seams, because each basket’s rim is a closed 72-stitch circle.
Why the math works: Every wall round after the base holds exactly 72 sts. The lattice repeat is 4 sts (18 loops), each fan pairs 2 loops (9 flowers), and the shell repeat is 4 sts (18 shells). Because 72 divides evenly by 4 and by 8, every repeat closes exactly at the back seam.
Fasten off and weave in all ends on the inside of the wall.
Attach the tabs: On each basket, place the foundation end of a tab inside the back wall at back center, with Rows 1–4 (about 1 in / 2.5 cm) overlapping Rnds 21–24. Sew it down securely around all edges. Sew a button to the outer face of the tab at Row 9, centered. That puts the button about 1 in (2.5 cm) above the top of Rnd 24.
Final Blocking
- Fill each basket with a toilet roll, or a rolled towel of about the same size, so the walls stand straight.
- Spray the whole piece lightly with water until damp but not soaked.
- Pull each shell scallop upward with your fingers and spread the 5 dc into an even fan.
- Open each petal fan so the 3 clusters spread evenly, and center the ch-4 frame above them.
- Pin the tabs flat on a towel, pinning the rounded end into shape.
- Leave everything to dry completely, at least 12 hours, before hanging.
Final Quality-Control Checklist
- Each base is 5.75 in (14.6 cm) across and lies flat.
- Each wall has 72 sts on Rnd 24 and stands 3.75 in (9.5 cm) tall before the border.
- Every basket has 9 fans in each lace band, stacked vertically.
- Each rim has 18 shells, and every shell has exactly 5 dc.
- The joined row measures 17.25 in (43.8 cm) wide.
- The seams sit at the side points, not shifted toward the front.
- The tabs are sewn firmly inside the back walls, and the buttons are tight.
- Each buttonhole fits over its button snugly but without strain.
- All yarn ends are woven in on the inside.
Troubleshooting
The base ruffles: Your tension is loose or the increases are uneven. Go down a hook size, and check the stitch count at the end of every round.
The base cups upward before Rnd 13: Your stitches are too tight. Go up a hook size for the base only.
The wall flares outward: Rnd 13 wasn’t worked in BLO, or the lattice chains are too long. Check the ridge, and chain more firmly in Rnd 16.
The fan count is wrong: The Rnd 16 lattice must have exactly 18 loops. Count the loops before you start Rnd 17.
The baskets lean forward when loaded: Move the tab overlap lower (Rnds 19–24), or shorten the loop by moving the button up to Row 11.
The buttonhole is too tight: Work ch 3 instead of ch 2 on Row 29, and work 3 sc into the space on Row 30, then sc2tog at the center to keep 6 sts.
Care
Hand wash in cool water, press out excess water in a towel, then reshape and dry flat with a roll inside each basket. Dust the lace occasionally with a soft brush.

Final Notes
The measurement chain is short and reliable. A gauge of 16 sc = 4 in (10.2 cm) gives a 72-stitch base that is 5.75 in (14.6 cm) across. Those 72 stitches build a wall 3.75 in (9.5 cm) tall, and the 18-shell rim brings it to 4.25 in (10.8 cm). Three baskets joined side by side make a row 17.25 in (43.8 cm) wide, and each one hangs from a 7 in (17.8 cm) buttoned tab on a 1 in (2.5 cm) rod. Check the base before you start each wall, and the rest will line up.
Happy crocheting!