

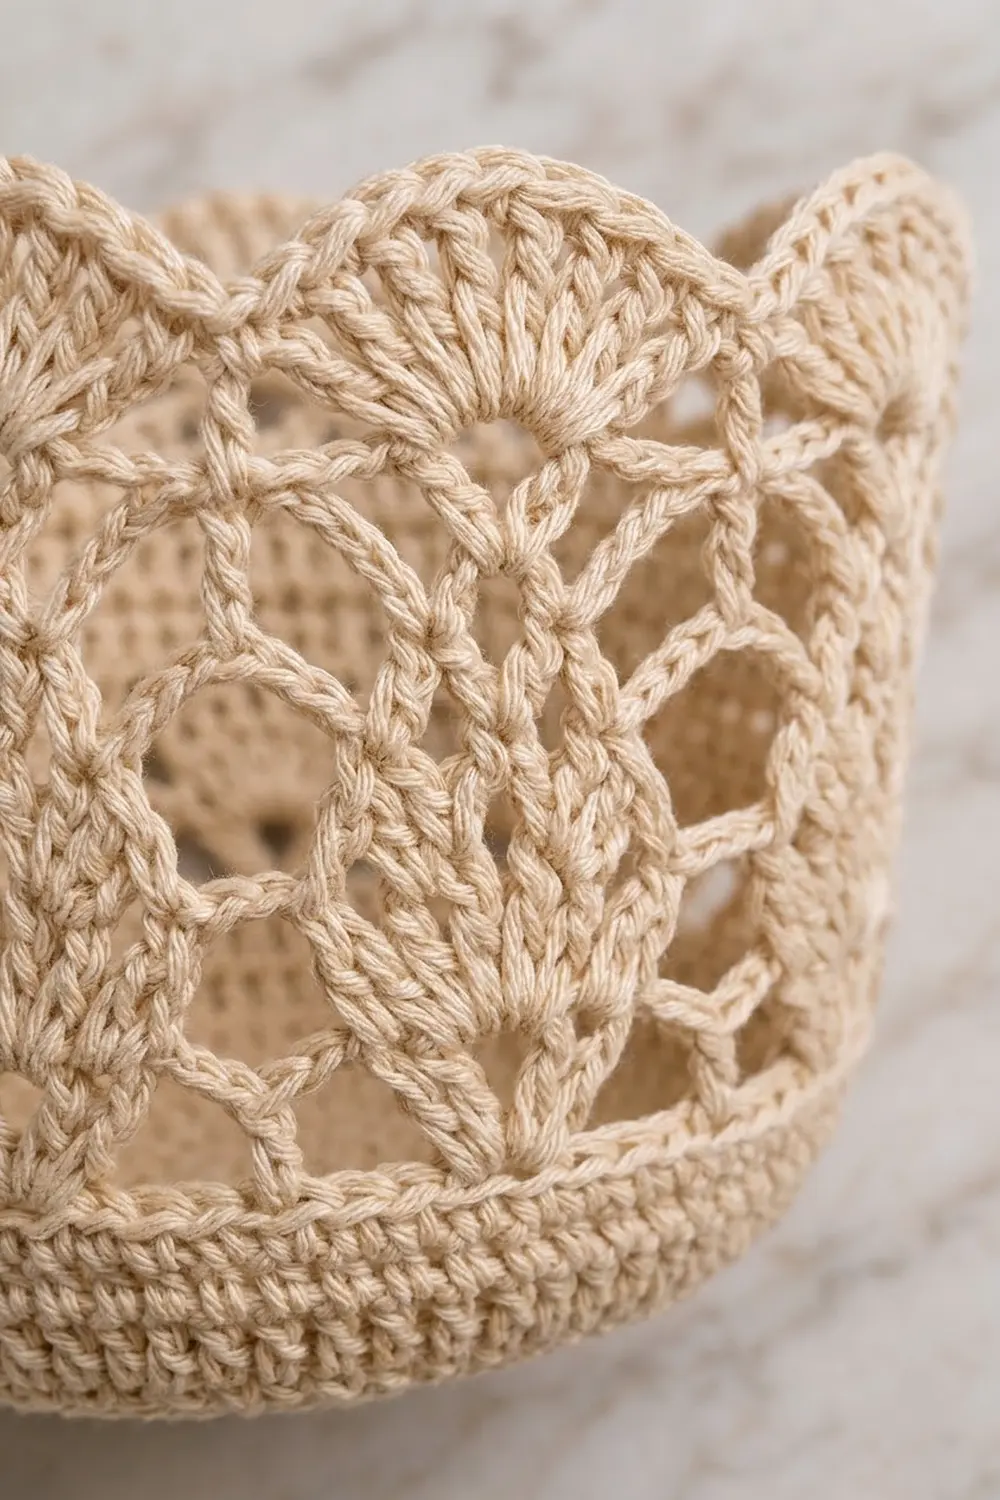
The Pearl Pineapple Hanging Wall Basket is a small, lacy D-shaped basket. It hangs flat against the wall from a lacy triangular panel and a wooden ring. Three pineapple motifs run across the front with open shells between them, and the rim ends in rounded scallops.
The sample uses a single color, a soft natural ivory cotton, so the lace shows up clearly against a wall. Cotton also gives the basket enough body to stand on its own. It’s a good size for a spare toilet roll or small bathroom items.
This pattern uses US crochet terms. The finished basket is 8 in (20.3 cm) wide at the base, 4 in (10.2 cm) deep and 5 in (12.7 cm) tall. The rim flares to about 9 in (22.9 cm). Measured from the basket bottom to the top of the ring, the whole piece is about 11.5 in (29.2 cm) tall.
First you make a half-circle base in rows. Then you work the walls up from its edge in joined rounds. Last, you make a triangle panel that narrows into a strap. The panel is sewn to the back wall and the strap wraps around the ring.
Finished Size and Construction
- Finished size: basket 8 in (20.3 cm) wide x 4 in (10.2 cm) deep x 5 in (12.7 cm) tall; hanging height about 11.5 in (29.2 cm)
- Skill level: Intermediate
- Terminology: US terms
- Yarn weight: worsted (#4) cotton
- Hook: 4.0 mm (G-6)
- Number of pieces: 2 crocheted pieces (basket and triangle panel) + 1 wooden ring
- Layout: the triangle stands upright behind the basket’s flat back wall, with the ring at the top
- Piece sizes: basket as above; triangle 8 in (20.3 cm) wide x 7 in (17.8 cm) tall, plus a strap 1.5 in (3.8 cm) wide
- Size before border: triangle 8 in (20.3 cm) x 7 in (17.8 cm), with loose, loopy sides
- Border depth: 0.25 in (0.6 cm) along each slanted side
Materials
Choose a smooth worsted-weight cotton. It holds the basket’s shape and copes well with a damp bathroom.
- Natural ivory (only color): 125 g, about 213 m
- Basket: about 85 g
- Triangle panel, strap and border: about 30 g
These quantities include a margin of about 10%.
Tools:
- 4.0 mm (G-6) crochet hook
- Wooden ring, 2.5 in (6.4 cm) outer diameter
- Tapestry needle
- 4 locking stitch markers
- Scissors
- Rust-proof pins and a blocking mat
- A bowl about 4 in (10.2 cm) deep
- Optional: fabric stiffener or spray starch
Abbreviations (US Terms)
- ch – chain
- sl st – slip stitch
- sc – single crochet
- dc – double crochet
- blo – back loop only
- rsc – reverse single crochet (crab stitch)
- sk – skip
- sp(s) – space(s)
- st(s) – stitch(es)
- rep – repeat
- RS / WS – right side / wrong side
Special stitches:
- Shell (S): (2 dc, ch 2, 2 dc) in the same st or sp.
- Double shell: (2 dc, ch 2, 2 dc, ch 2, 2 dc) in the same sp.
- Fan: 7 dc in the same st.
Gauge and Checkpoints
- Single crochet: 16 sts x 18 rounds = 4 in (10.2 cm)
- Double crochet: 14 sts x 8 rows = 4 in (10.2 cm)
Make the base first and use it as your gauge swatch. Measure it flat, without stretching.
- After base Row 4: straight edge 4 in (10.2 cm), depth 2 in (5.1 cm)
- After base Row 8: straight edge 8 in (20.3 cm), depth 4 in (10.2 cm)
- After wall Rnd 4: solid wall 0.9 in (2.3 cm) tall
- After wall Rnd 12: basket 5 in (12.7 cm) tall
- Triangle after Row 2: 8 in (20.3 cm) wide
- Triangle after Row 12: 7 in (17.8 cm) tall
If the base is too big, go down 0.5 mm in hook size. If it’s too small, go up 0.5 mm. Use the same hook for both pieces so the triangle matches the back wall.
Basket Base
The base is a half circle worked in rows, starting from the middle of the straight edge.
Row 1: Make a magic ring. Ch 2 (does not count as a st), work 6 dc in the ring and pull it closed. Turn. (6 dc)
Row 2: Ch 2, 2 dc in each st across. Turn. (12 dc)
Row 3: Ch 2, (dc in next st, 2 dc in next st) 6 times. Turn. (18 dc)
Row 4: Ch 2, (dc in next 2 sts, 2 dc in next st) 6 times. Turn. (24 dc)
Row 5: Ch 2, (dc in next 3 sts, 2 dc in next st) 6 times. Turn. (30 dc)
Row 6: Ch 2, (dc in next 4 sts, 2 dc in next st) 6 times. Turn. (36 dc)
Row 7: Ch 2, (dc in next 5 sts, 2 dc in next st) 6 times. Turn. (42 dc)
Row 8: Ch 2, (dc in next 6 sts, 2 dc in next st) 6 times. Do not turn. (48 dc)
Each row adds 6 sts, so Row n has 6 x n dc. The base is now 8 in (20.3 cm) across and 4 in (10.2 cm) deep.
Basket Walls
Work in joined rounds without turning. The side facing you is the outside of the basket.
Rnd 1: Ch 1. Rotate the base so you can work along the straight edge. Work 2 sc in each of the 16 row-ends (32 sc), then 1 sc in each of the 48 dc along the curve. Join with a sl st to the first sc. (80 sc)
Place markers in sc 1 and sc 32. Sts 1–32 form the flat back wall and sts 33–80 form the curved front.
Rnd 2: Ch 1, sc blo in each st around. Join. (80 sc)
Working this round in the back loops creates a crisp fold where the base meets the wall.
Rnds 3–4: Ch 1, sc in each st around. Join. (80 sc)
Check: the solid wall should be 0.9 in (2.3 cm) tall. Move the markers up to Rnd 4, because you’ll need them for joining.
The lace uses a 16-st repeat, and 80 / 16 = 5 repeats. Two repeats sit on the back wall and three on the curve.
Rnd 5: Sl st in each of the next 8 sts, so you are now in st 9. Ch 3 (counts as dc), then work 6 dc in the same st as the last sl st. Ch 3, sk 3, sc in next st, ch 3, sk 3, S in next st, ch 3, sk 3, sc in next st, ch 3, sk 3*, fan in next st. Rep from * 3 more times, then from * to ** once. Join to the top of the ch-3. (5 fans and 5 shells: 55 dc, 10 sc, 20 ch-3 sps)
The fans sit at the center of each front section, and shells sit at both back corners.
Rnd 6: Ch 4 (counts as dc + ch 1), (dc in next dc, ch 1) 5 times, dc in next dc. Ch 4, sk to the next shell, S in its ch-2 sp, ch 4*, dc in first dc of next fan, (ch 1, dc in next dc) 6 times. Rep from * 3 more times, then from * to ** once. Join to the 3rd ch of the beginning ch-4. (55 dc, 30 ch-1 sps, 10 ch-4 sps)
Rnd 7: Sl st in first ch-1 sp, ch 1, sc in same sp. (Ch 3, sc in next ch-1 sp) 5 times, ch 3, double shell in ch-2 sp of next S, ch 3*, sc in first ch-1 sp of next pineapple. Rep from * 3 more times, then from * to ** once. Join to first sc. (30 sc, 30 dc, 25 pineapple loops)
Rnd 8: Sl st in first ch-3 loop, ch 1, sc in same loop. (Ch 3, sc in next loop) 4 times, ch 3, S in first ch-2 sp of double shell, ch 2, S in next ch-2 sp, ch 3*, sc in first loop of next pineapple. Rep from * 3 more times, then from * to ** once. Join. (25 sc, 40 dc, 20 pineapple loops)
Rnd 9: Sl st in first ch-3 loop, ch 1, sc in same loop. (Ch 3, sc in next loop) 3 times, ch 3, S in next S sp, ch 3, sc in next ch-2 sp, ch 3, S in next S sp, ch 3*, sc in first loop of next pineapple. Rep as in Rnd 8. Join. (25 sc, 40 dc, 15 pineapple loops)
Rnd 10: Sl st in first ch-3 loop, ch 1, sc in same loop. (Ch 3, sc in next loop) 2 times, ch 3, S in next S sp, ch 2, sc in next ch-3 sp, ch 3, sc in next ch-3 sp, ch 2, S in next S sp, ch 3*, sc in first loop of next pineapple. Rep as in Rnd 8. Join. (25 sc, 40 dc, 10 pineapple loops)
Rnd 11: Sl st in first ch-3 loop, ch 1, sc in same loop. Ch 3, sc in next loop, ch 3, S in next S sp, ch 3, sc in center ch-3 sp, ch 3, S in next S sp, ch 3*, sc in first loop of next pineapple. Rep as in Rnd 8. Join. (15 sc, 40 dc, 5 tip loops)
Rnd 12 (scalloped rim): Sl st in next tip loop. Ch 3 (counts as dc), then work 8 dc in the same loop. Sc in next ch-3 sp, 7 dc in next S sp, sc in next ch-3 sp, 5 dc in center sc, sc in next ch-3 sp, 7 dc in next S sp, sc in next ch-3 sp*, 9 dc in next tip loop. Rep from * 3 more times, then from * to ** once. Join to the top of the ch-3 and fasten off. (140 dc, 20 sc, 20 scallops)
Each repeat has 9 + 7 + 5 + 7 = 28 dc and 4 sc. Check: the basket should be 5 in (12.7 cm) tall.
Triangle Back Panel
The panel is worked in rows from the bottom edge up. Its 32 bottom sts match the 32 back-wall sts.
Row 1 (RS): Ch 33. Sc in the 2nd ch from the hook and in each ch across. Turn. (32 sc)
Row 2: Ch 1, sc in each st across. Turn. (32 sc)
Check: the panel should be 8 in (20.3 cm) wide.
Row 3: Ch 1, sc in first sc, (ch 5, sk 2, sc in next sc) 10 times, sc in last sc. Turn. (12 sc, 10 ch-5 loops)
Row 4: Sl st in first 2 sc and in each of next 2 ch. Ch 1, sc in same loop, (ch 5, sc in next loop) 9 times. Turn. (10 sc, 9 loops)
Rows 5–12: Sl st in each of next 3 ch, ch 1, sc in same loop, (ch 5, sc in next loop) across. Turn. Each row has 1 loop fewer than the last: Row 5 has 8 loops, Row 6 has 7, Row 7 has 6, Row 8 has 5, Row 9 has 4, Row 10 has 3, Row 11 has 2 and Row 12 has 1.
Check: the triangle should be 7 in (17.8 cm) tall.
Row 13 (strap): Sl st in each of next 2 ch, ch 1, 6 sc in the single loop. Turn. (6 sc)
Rows 14–29: Ch 1, sc in each st across. Turn. (6 sc)
The strap has 17 rows and measures 3.75 in (9.5 cm) long by 1.5 in (3.8 cm) wide. Fasten off and leave a 12 in (30.5 cm) tail.
Make All Pieces
- Basket: 1, about 85 g natural ivory
- Triangle panel with strap and border: 1, about 30 g natural ivory
- Wooden ring: 1
Front view layout:
          ( ring )
           |strap|
          /       \
         /  panel  \
  [====== basket ======]
Border
Add the border to the triangle before joining. It firms up the loopy sides so they stay straight.
Border gauge: 4 sc per 1 in (2.5 cm), which matches the main sc gauge.
Border Row 1: With the RS facing, join yarn at the bottom right corner. Work 1 sc in each of the 2 sc row-ends (Rows 1–2), then 3 sc around each of the 10 net row-ends (Rows 3–12). Stop at the base of the strap. (32 sc)
Border Row 2: Ch 1 and do not turn. Rsc in each sc back down to the corner, then fasten off. (32 rsc)
Repeat both rows on the left side, joining at the bottom left corner and working up. (32 sc, then 32 rsc)
Why the math works: each slanted side rises 7 in (17.8 cm) over a horizontal distance of 4 in (10.2 cm), so the side is about 8 in (20.3 cm) long. At 4 sc per inch, 8 in needs 32 sc, and 2 + (10 x 3) = 32. Each side then matches the 32-st bottom edge, so the panel lies flat.
Joining
Turn the basket so the back wall faces you. Place the triangle WS-down against the outside of the back wall, with its Row 1 lined up with wall Rnd 4 between your markers.
Method: whipstitch with a tapestry needle and a 24 in (61.0 cm) length of yarn.
Stitch-to-stitch logic: sew each of the triangle’s 32 foundation loops to one of the 32 back-wall sts of Rnd 4. Pass the needle under both strands of each Rnd 4 st, just below the base of Rnd 5. Sew 32 to 32, with no extra or skipped sts.
Tension: pull each stitch until it is just snug. If you pull too tightly the back wall puckers, and if the stitches are too loose the panel tips forward.
Tack each side of the triangle to the back corner shells of Rnd 12 with 3–4 small stitches. Then tack the center of the back rim to the panel.
Strap: pass the strap through the ring from front to back and fold 1.5 in (3.8 cm) to the WS. Whipstitch the 6 sts of Row 29 to the 6 sts of Row 13, one to one.
Size checkpoint: the panel peak should sit about 7.9 in (20.1 cm) above the basket bottom, and the total hanging height should be about 11.5 in (29.2 cm).
Final Blocking
- Weave in all ends along the solid rounds or rows.
- Soak the joined piece in cool water for 10 minutes.
- Roll it in a towel to press out the water. Don’t wring it.
- Slip the basket over a bowl about 4 in (10.2 cm) deep.
- Pin each rim scallop open.
- Pin the triangle sides straight and the strap flat.
- Optional: spray with starch or brush on diluted stiffener.
- Let it dry for at least 24 hours.
Final Quality-Control Checklist
- The base’s straight edge measures 8 in (20.3 cm)
- Wall Rnds 1–4 have 80 sc each
- There are 5 pineapples: 3 on the front and 2 on the back
- The rim has 20 scallops, with the 9-dc scallops over the pineapple tips
- The triangle has 32 bottom sts and 32 border sts per side
- The panel is sewn 32 to 32 and the ring turns freely
Troubleshooting
- Base ruffles: your dc gauge is loose. Go down a hook size.
- Base cups: you missed increases. Each row should have 6 x the row number in sts.
- Pineapples off-center: Rnd 5 must start in st 9.
- Rim flops: use starch, or work Rnd 12 with a hook 0.5 mm smaller.
- Wavy triangle sides: rework the border with exactly 3 sc per net row-end.
Care
Hand wash in cool water with mild soap, then dry the basket over a bowl. Reshape the scallops and starch again if needed.

Final Notes
Each measurement sets up the next one. The 8 in (20.3 cm) base gives 80 wall sts, which hold five 16-st pineapple repeats. The 32 back-wall sts match the triangle’s 32-st bottom edge, and each 32-st border side matches the panel’s 8 in (20.3 cm) slant. If you check every stage, the pieces will fit together without forcing.
Happy crocheting!