

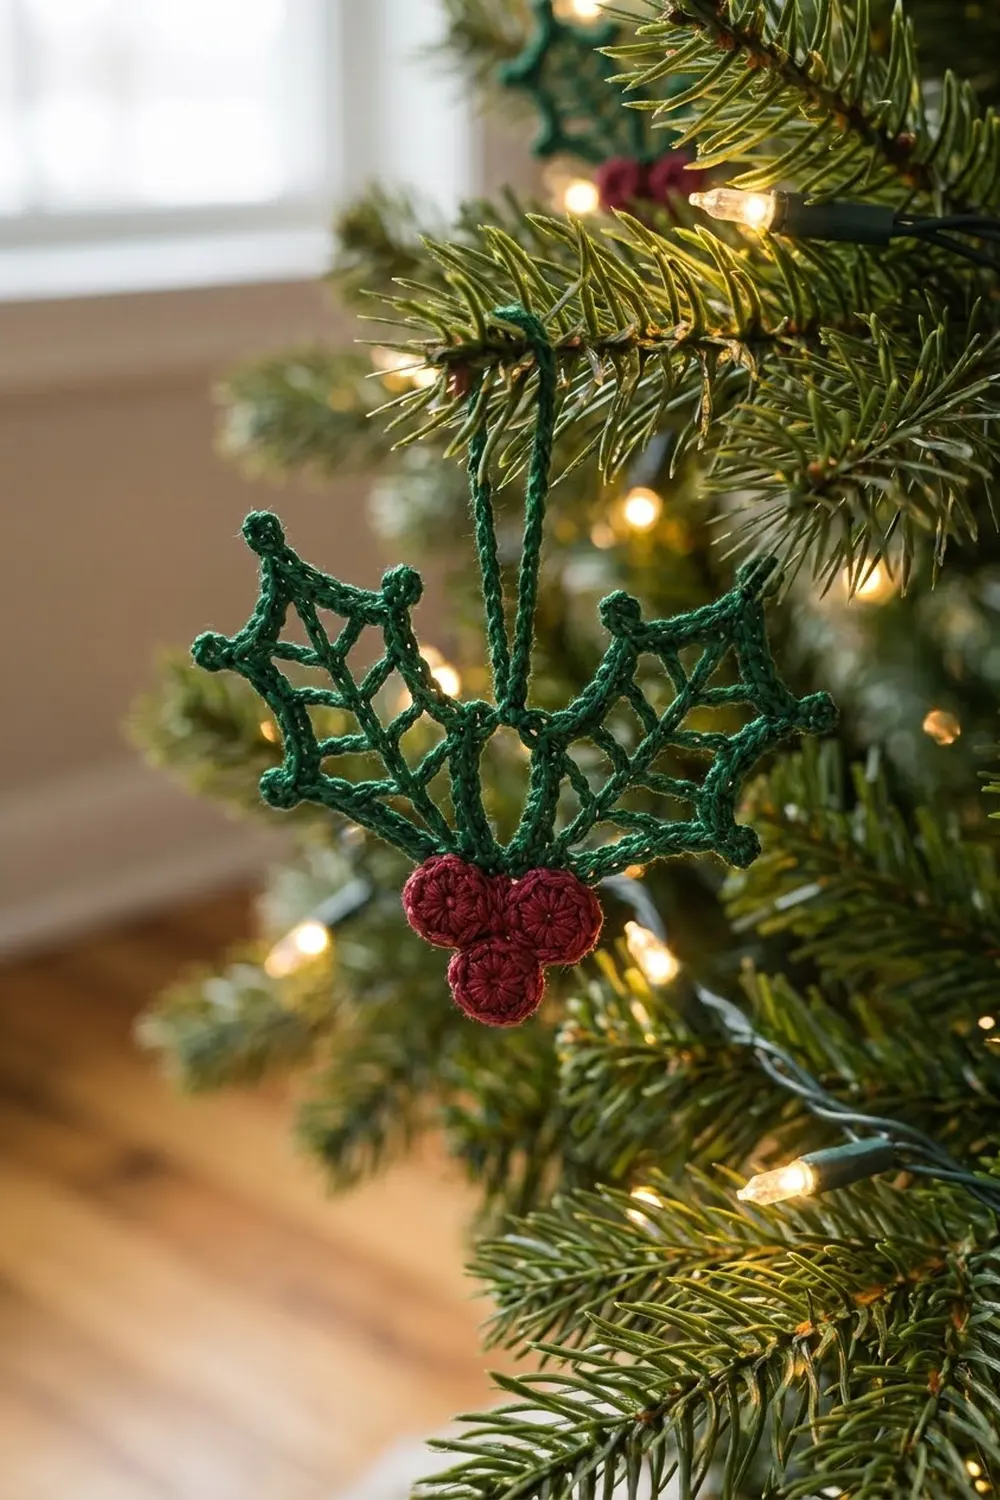
This little holly ornament is crocheted in thread. It has two lacy leaves, three plump berries and a slim hanging loop. Each leaf is open inside, with a center vein, slender side veins and a crisp outline that ends in seven picot points. When it’s blocked, it looks like a cut-paper snowflake made as a holly sprig.
The colors are deep forest green for the leaves and loop, and cranberry red for the berries. The style is light, clean and traditional, so it suits a tree, a gift wrap topper or a wreath.
This pattern uses US crochet terms. The finished ornament measures about 4 in (10.2 cm) wide x 3 in (7.6 cm) tall without the loop. The loop adds about 2 in (5.1 cm).
Here’s how it goes together. Each leaf starts as a single-crochet midrib. A round of slip-stitch spokes forms the veins, and a chain round links the spoke tips into the outline. A single-crochet border round with picots finishes the edge. The berries are tiny domed circles. Everything is sewn together at the base of the V.
Finished Size and Construction
- Finished size: 4 in (10.2 cm) wide x 3 in (7.6 cm) tall, plus a 2 in (5.1 cm) loop
- Skill level: Intermediate (thread work and slip-stitch veins)
- Terminology: US
- Yarn weight: Size 3 crochet thread (about Lace/0 weight)
- Hook: 2.25 mm (B-1)
- Number of pieces: 6 (2 leaves, 3 berries, 1 loop)
- Layout: Leaves in a V, berry triangle over the V, loop rising from the center
- Leaf size: 2.25 in (5.7 cm) long x 1.5 in (3.8 cm) wide
- Leaf size before border: 2 in (5.1 cm) long x 1.25 in (3.2 cm) wide
- Border depth: about 0.125 in (0.3 cm), plus picots
- Berry size: 0.6 in (1.5 cm) across
Materials
Pick a smooth, tightly twisted mercerized cotton thread. Cotton holds the open veins crisply after blocking, and mercerized thread has a gentle sheen that looks right on holly.
- Forest green, size 3 thread: 6 g / 25 m (27 yd)
- Cranberry red, size 3 thread: 2 g / 8 m (9 yd)
The quantities include a comfortable margin for gauge swatches and sewing tails.
Tools:
- 2.25 mm (B-1) crochet hook
- Tapestry needle with a small eye
- Scissors
- Rustproof pins and a foam blocking mat
- Spray bottle, or fabric stiffener (optional)
Abbreviations (US Terms)
- ch – chain
- sl st – slip stitch
- sc – single crochet
- BLO – back loop only
- sp – space
- st(s) – stitch(es)
- rnd – round
Special stitches:
- Picot: ch 3, sl st in 3rd ch from hook.
- Spoke (ch X): ch X, sl st in 2nd ch from hook and in each remaining ch back to the midrib. The skipped ch at the end is the spoke tip.
Gauge and Checkpoints
Gauge: 10 sc = 1 in (2.5 cm), and 12 ch = 1 in (2.5 cm).
Make one leaf completely before anything else. It is your gauge swatch.
Checkpoints:
- After Row 1: the 15-sc midrib measures 1.5 in (3.8 cm).
- After Rnd 3: the leaf measures 2 in (5.1 cm) long x 1.25 in (3.2 cm) wide when lightly stretched.
- After Rnd 4: the leaf measures 2.25 in (5.7 cm) x 1.5 in (3.8 cm) after pinning.
- Berry: 0.6 in (1.5 cm) across.
If your leaf is too big, switch to a 2.0 mm hook, or tighten your slip stitches. If it’s too small, switch to a 2.5 mm hook. Keep the slip stitches relaxed, because tight slip stitches pull the veins short and cup the leaf.
Leaf (make 2)
Use forest green. Leave a 6 in (15.2 cm) starting tail for sewing.
Row 1 (midrib): Ch 16. Sc in 2nd ch from hook and in each ch across. (15 sc)
The end where you finish is the base. The far end is the tip. Do not turn.
Rnd 2 (veins): Ch 1. Rotate the piece so you can work into the free loops on the underside of the foundation chain, moving from the base toward the tip.
- Side A: sl st in the first 3 loops. Make a spoke with ch 6 (spoke 1, 5 sl st). Sl st in the next 4 loops. Make a spoke with ch 7 (spoke 2, 6 sl st). Sl st in the next 4 loops. Make a spoke with ch 6 (spoke 3, 5 sl st). Sl st in the next 4 loops.
- Tip: make a spoke with ch 5 (tip spoke, 4 sl st).
- Side B: working along the tops of the Row 1 sc, sl st in the first 4 sc. Make spoke 3 with ch 6. Sl st in the next 4 sc. Make spoke 2 with ch 7. Sl st in the next 4 sc. Make spoke 1 with ch 6. Sl st in the last 3 sc.
Sl st in the first sl st of the round to join.
Count check: each side uses 3 + 4 + 4 + 4 = 15 sts, which matches the 15-st midrib. The round has 7 spokes: 3 per side plus the tip spoke. The longer middle spokes make the widest part of the leaf.
Rnd 3 (outline): Ch 1. Sc in the base st (the joining st). Then:
- Ch 6, sc in the tip of spoke 1, side A.
- Ch 6, sc in the tip of spoke 2.
- Ch 6, sc in the tip of spoke 3.
- Ch 5, sc in the tip of the tip spoke.
- Ch 5, sc in the tip of spoke 3, side B.
- Ch 6, sc in the tip of spoke 2.
- Ch 6, sc in the tip of spoke 1.
- Ch 6, sl st in the first sc to join.
Count check: 8 sc (the base and 7 tips), 6 ch-6 sps and 2 ch-5 sps. That’s 36 + 10 = 46 ch, plus 8 sc, for 54 sts around.
As you go, angle each spoke slightly toward the tip. That gives the veins their swept-forward holly look.
Border (Rnd 4, each leaf)
Border gauge: 1 sc per ch, at 10 sc = 1 in (2.5 cm).
Rnd 4: Ch 1. Then work as follows:
- Base: sc in the base sc.
- Side A: 6 sc in the ch-6 sp. In the spoke 1 sc, work sc and a picot. 6 sc in the next ch-6 sp. In the spoke 2 sc, work sc and a picot. 6 sc in the next ch-6 sp. In the spoke 3 sc, work sc and a picot. 5 sc in the ch-5 sp.
- Tip: in the tip sc, work sc and a picot.
- Side B: 5 sc in the ch-5 sp. In the spoke 3 sc, work sc and a picot. 6 sc in the next ch-6 sp. In the spoke 2 sc, work sc and a picot. 6 sc in the next ch-6 sp. In the spoke 1 sc, work sc and a picot. 6 sc in the last ch-6 sp.
Sl st in the first sc to join. Fasten off and leave an 8 in (20.3 cm) tail.
Counts per section:
- Side A, including the base sc: 1 + 6 + 1 + 6 + 1 + 6 + 1 + 5 = 27 sc
- Tip: 1 sc
- Side B: 5 + 1 + 6 + 1 + 6 + 1 + 6 = 26 sc
- Total: 27 + 1 + 26 = 54 sc and 7 picots
Why the math works: Rnd 3 has exactly 54 sts (46 ch + 8 sc). Rnd 4 places 1 sc per chain and 1 sc per sc, so the border has 54 sc as well. At 10 sc per inch, that’s 5.4 in (13.7 cm) of edge. That matches the outline of a 2.25 in x 1.5 in (5.7 cm x 3.8 cm) leaf, so it lies flat without ruffling.
Because the border adds nothing extra across the chain spaces, the scallops between points can pull inward during blocking. That gives the leaf its curved-in holly edges. The picots sit only at the 7 spoke tips, and the base stays plain so the two leaves can join smoothly.
Berry (make 3)
Use cranberry red.
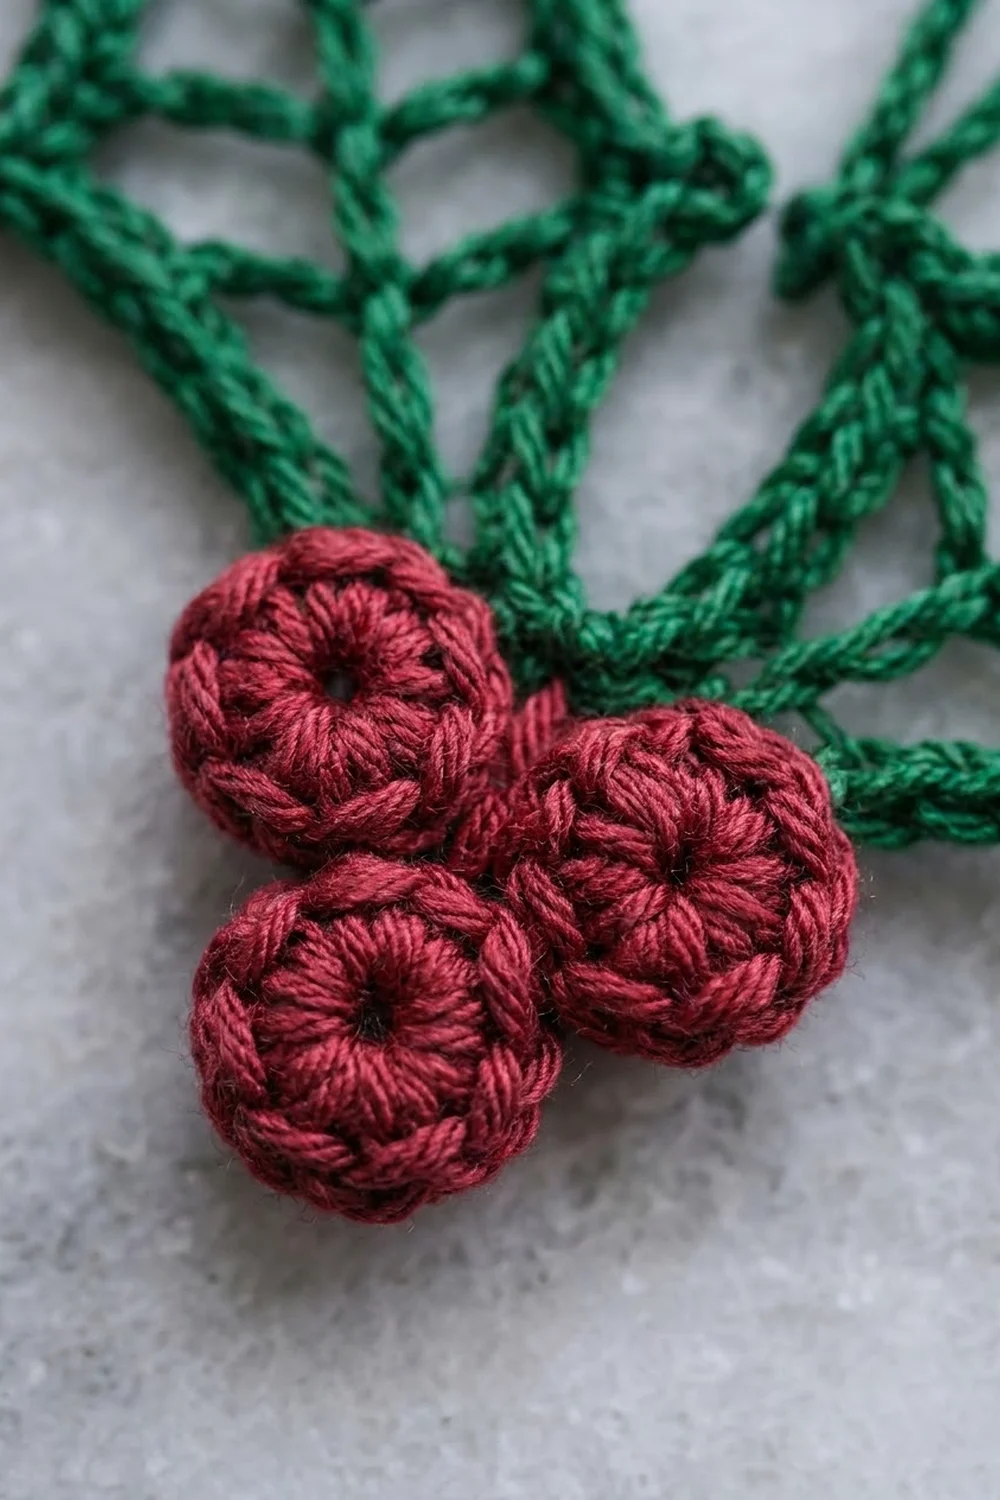
Rnd 1: Make a magic ring, ch 1, and work 8 sc in the ring. Pull the ring nearly closed, leaving a tiny center hole. Sl st to the first sc. (8 sc)
Rnd 2: Ch 1, 2 sc in each st around. Sl st to the first sc. (16 sc)
Rnd 3: Ch 1, sc BLO in each st around. Sl st to the first sc. (16 sc)
Fasten off and leave an 8 in (20.3 cm) tail.
Working Rnd 3 in the back loops rolls the edge under, which domes the berry and gives it the rounded rim in the photo. Tuck the starting tail behind the dome for a little extra puff. Each berry should measure 0.6 in (1.5 cm) across.
Make All Pieces
- Forest green: 2 leaves and 1 hanging loop (the loop is worked in place after joining)
- Cranberry red: 3 berries
Layout, front view:
        (loop)
          ||
 LEAF 1   ||   LEAF 2
     \    ||    /
      \   ||   /
       \  ||  /
        \ || /
         \||/
        (B)(B)
          (B)
Joining
Method: whip stitch with the green tails.
Leaves:
- Lay both leaves right side up in a V, about 100 degrees apart, with the bases overlapping by 0.25 in (0.6 cm).
- Line up the base sc of Leaf 1 with the base sc of Leaf 2. Then line up the next 2 border sts on each inner edge. That’s 3 sts on each leaf.
- Whip stitch them together one stitch to one stitch, so 3 sts are joined to 3 sts. Don’t skip or double any stitch, or the V will twist.
- Keep your tension snug but not tight. The join should feel firm without puckering the picots on either side.
Hanging loop:
- Join green with a sl st at the center of the V join.
- Ch 50, then sl st into the same st.
- Sl st in each ch around the loop (50 sl st) to make a firmer cord.
- Fasten off and weave in the end.
The loop should stand about 2 in (5.1 cm) above the join, which clears the leaf tips by about 0.5 in (1.3 cm).
Berries:
- Using the red tails, sew the three berries into a triangle: two on top, one centered below. Use 2 to 3 stitches at each point where they touch.
- Center the cluster over the V join so the top two berries cover the seam.
- Stitch the back of each berry rim to the leaf bases.
Size checkpoint: the assembled ornament should measure 4 in (10.2 cm) wide x 3 in (7.6 cm) tall without the loop.
Final Blocking
- Weave in all remaining tails along the borders. Don’t weave them through the open veins.
- Spritz the ornament evenly until it’s damp. If you like a stiffer finish, dip it in fabric stiffener instead.
- Lay it face up on a blocking mat.
- Pin each picot outward first, angling the points slightly toward the leaf tip.
- Pin the tip of each leaf so the leaf measures 2.25 in (5.7 cm) long.
- Leave the scallops between points unpinned so they curve inward naturally.
- Smooth each spoke straight with a fingertip.
- Shape the berries into domes with your fingertips.
- Let everything dry completely before you unpin it.
Final Quality-Control Checklist
- Each leaf has 7 picot points: 1 tip and 3 per side.
- Each border has 54 sc in total: 27 on side A, 1 at the tip and 26 on side B.
- Each leaf has 7 straight spokes running from the midrib to the points.
- Each leaf measures 2.25 in x 1.5 in (5.7 cm x 3.8 cm).
- Each berry has 16 sc in its last round and measures 0.6 in (1.5 cm) across.
- The V join is 3 sts to 3 sts, flat, with no twist.
- The berries cover the join completely.
- The loop is centered and firm, about 2 in (5.1 cm) tall.
- The ornament measures 4 in x 3 in (10.2 cm x 7.6 cm).
Troubleshooting
- The leaf cups or curls: your slip stitches are too tight. Redo Rnd 2 more loosely, or go up a hook size for that round only.
- The edges ruffle: you’ve added extra sc in the chain spaces. Count 6 or 5 sc per space exactly.
- The points look blunt: pin the picots harder during blocking. Also check that each picot sits right after its tip sc.
- The spokes look crooked: re-wet the leaf and straighten each spoke before re-pinning.
- The berries lie flat: make sure Rnd 3 is worked in the back loops only, and tuck the tail inside.
- The ornament tilts when hung: the loop is off-center. Move it to the exact middle of the V join.
Care
Hand wash in cool water with mild soap, press out the water in a towel, and re-pin to dry. Store flat or hang it away from direct sunlight so the red doesn’t fade.
Final Notes
The whole ornament follows one measurement chain:
- 10 sc per inch makes a 1.5 in (3.8 cm) midrib.
- Seven spokes and a 54-st outline turn that midrib into a 2 in (5.1 cm) leaf.
- A 1-to-1 border brings each leaf to 2.25 in (5.7 cm).
- Two leaves in a V, three 0.6 in (1.5 cm) berries and a 50-ch loop give you a 4 in x 3 in (10.2 cm x 7.6 cm) ornament.
Check each stage as you go and the finished piece will come out right.
Happy crocheting!