

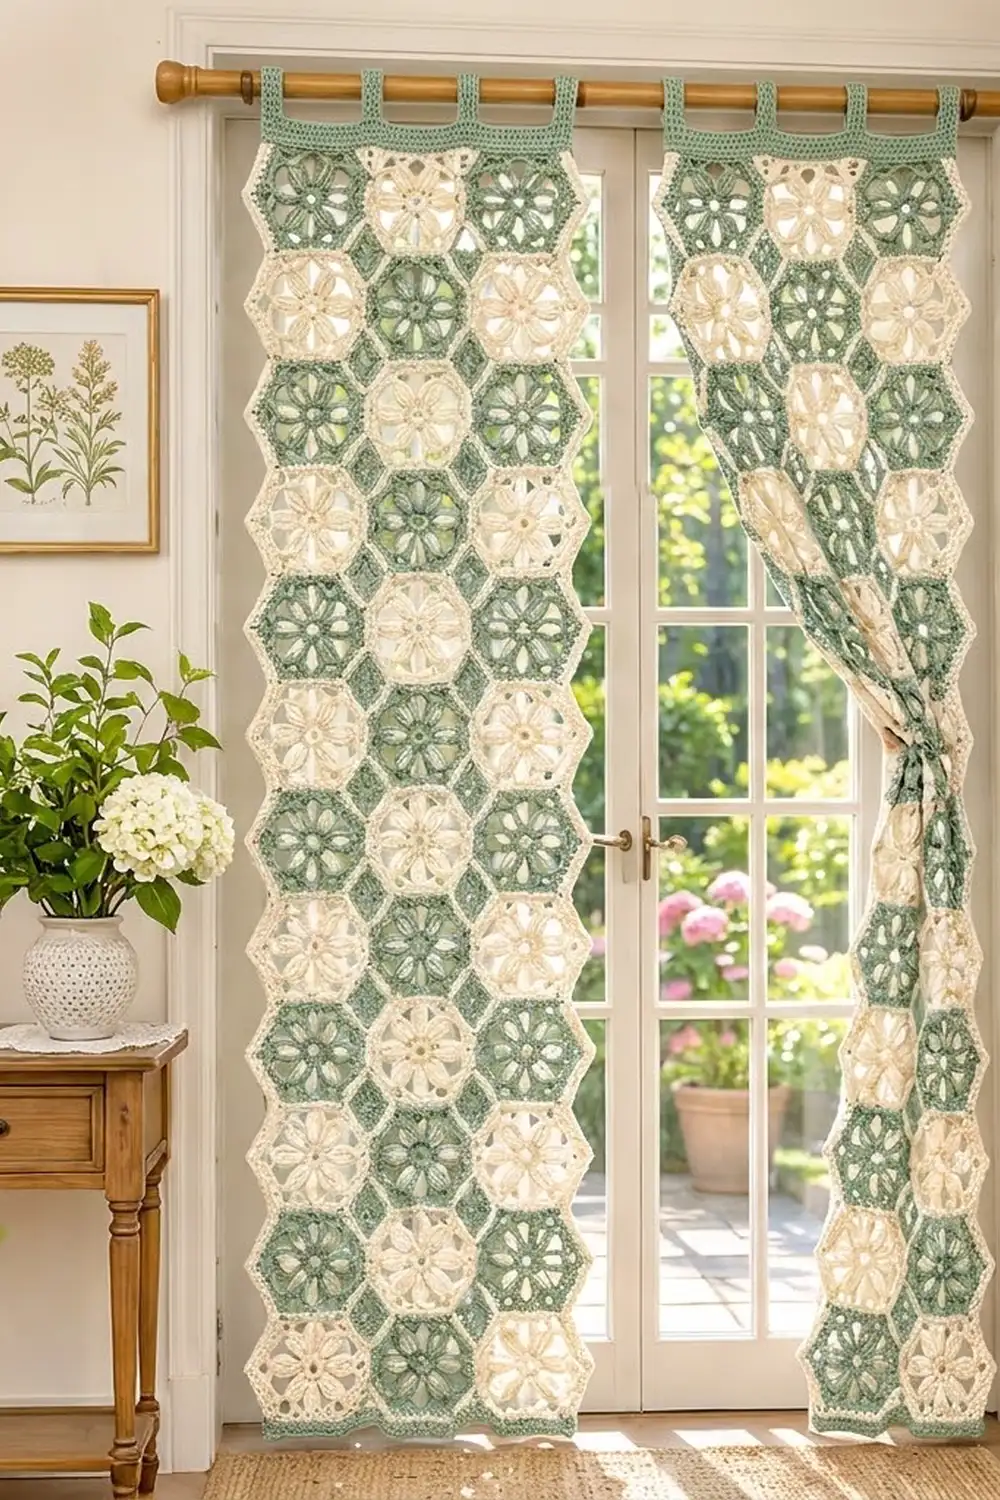
These curtain panels are made from honeycomb hexagons. Each hexagon has a six-petal puff flower inside an airy lattice frame, and the frame is finished with a crisp single crochet edge. The motifs are joined into two staggered columns, so each panel has a tidy honeycomb texture and soft zigzag edges along the sides and bottom.
The palette is sage green and warm cream. The colors alternate down each column and checker diagonally across the panel. A solid sage band with three tabs runs across the top and slides straight onto a curtain rod.
This pattern uses US crochet terms. Each finished panel measures about 14 in (35.6 cm) wide at its widest point and 67.1 in (170.4 cm) long from the top of the band to the lowest point, not counting the tabs. The pattern makes two panels.
You crochet full hexagons in the round and one half hexagon in rows. Then you slip-stitch the pieces into two columns, join the columns along their zigzag seam, and work the top band and tabs directly onto the joined motifs.
Finished Size and Construction
- Finished size (per panel): 14 in (35.6 cm) wide × 67.1 in (170.4 cm) long, plus tabs
- Skill level: Intermediate
- Terminology: US
- Yarn weight: Worsted (#4), cotton or cotton blend
- Hook: 5 mm (H-8)
- Number of pieces: 18 hexagons + 1 half hexagon per panel; 36 hexagons + 2 half hexagons in total
- Layout: 2 staggered columns of 9 hexagons each; the half hexagon sits on top of the right column
- Hexagon size: 8 in (20.3 cm) point to point, 6.9 in (17.5 cm) flat to flat, 4 in (10.2 cm) per side
- Size before border: 14 in (35.6 cm) × 65.6 in (166.6 cm)
- Border depth: top band 1.5 in (3.8 cm); the tabs add a loop of about 1.5 in (3.8 cm)
Materials
Choose a smooth worsted-weight cotton or cotton blend. Cotton keeps the puffs well defined and holds up to sunlight and washing. Avoid fuzzy yarns, because they blur the lattice windows.
- Sage green: about 380 g / 700 m (18 hexagons, 2 half hexagons, both top bands and tabs, and all joining)
- Cream: about 250 g / 460 m (18 hexagons)
The quantities include a margin of about 15% for gauge differences and a test hexagon.
Tools:
– 5 mm (H-8) crochet hook
– Tapestry needle
– Stitch markers
– Scissors
– Rust-proof pins and a blocking surface
– Measuring tape
– Spray bottle
Abbreviations (US Terms)
- ch: chain
- sl st: slip stitch
- sc: single crochet
- dc: double crochet
- tr: treble crochet
- sk: skip
- sp: space
- st(s): stitch(es)
- MR: magic ring
- RS / WS: right side / wrong side
Puff stitch: (Yo, insert hook in st, yo and pull up a loop to the height of a dc) 3 times, yo and pull through all 7 loops on hook, then ch 1 to lock.
Beginning puff: Ch 2, (yo, insert hook in same st, pull up a loop) twice, yo and pull through all 5 loops, ch 1 to lock.
Gauge and Checkpoints
Gauge: 16 sc × 18 rows = 4 in (10.2 cm). One finished hexagon measures 8 in (20.3 cm) point to point.
Make one test hexagon first and check it at each stage:
- After Round 1: 1.75 in (4.4 cm) across
- After Round 2: 3.5 in (8.9 cm) across, measured from petal tip to petal tip
- After Round 3: 7.25 in (18.4 cm) point to point
- After Round 4: 8 in (20.3 cm) point to point, 6.9 in (17.5 cm) flat to flat, 4 in (10.2 cm) per side
If your hexagon is larger than 8 in (20.3 cm), change to a hook 0.5 mm smaller. If it is smaller than 7.75 in (19.7 cm), change to a hook 0.5 mm larger. Being off by 0.25 in (0.6 cm) per motif adds up to more than 2.25 in (5.7 cm) over the nine hexagons in a column, so check this carefully.
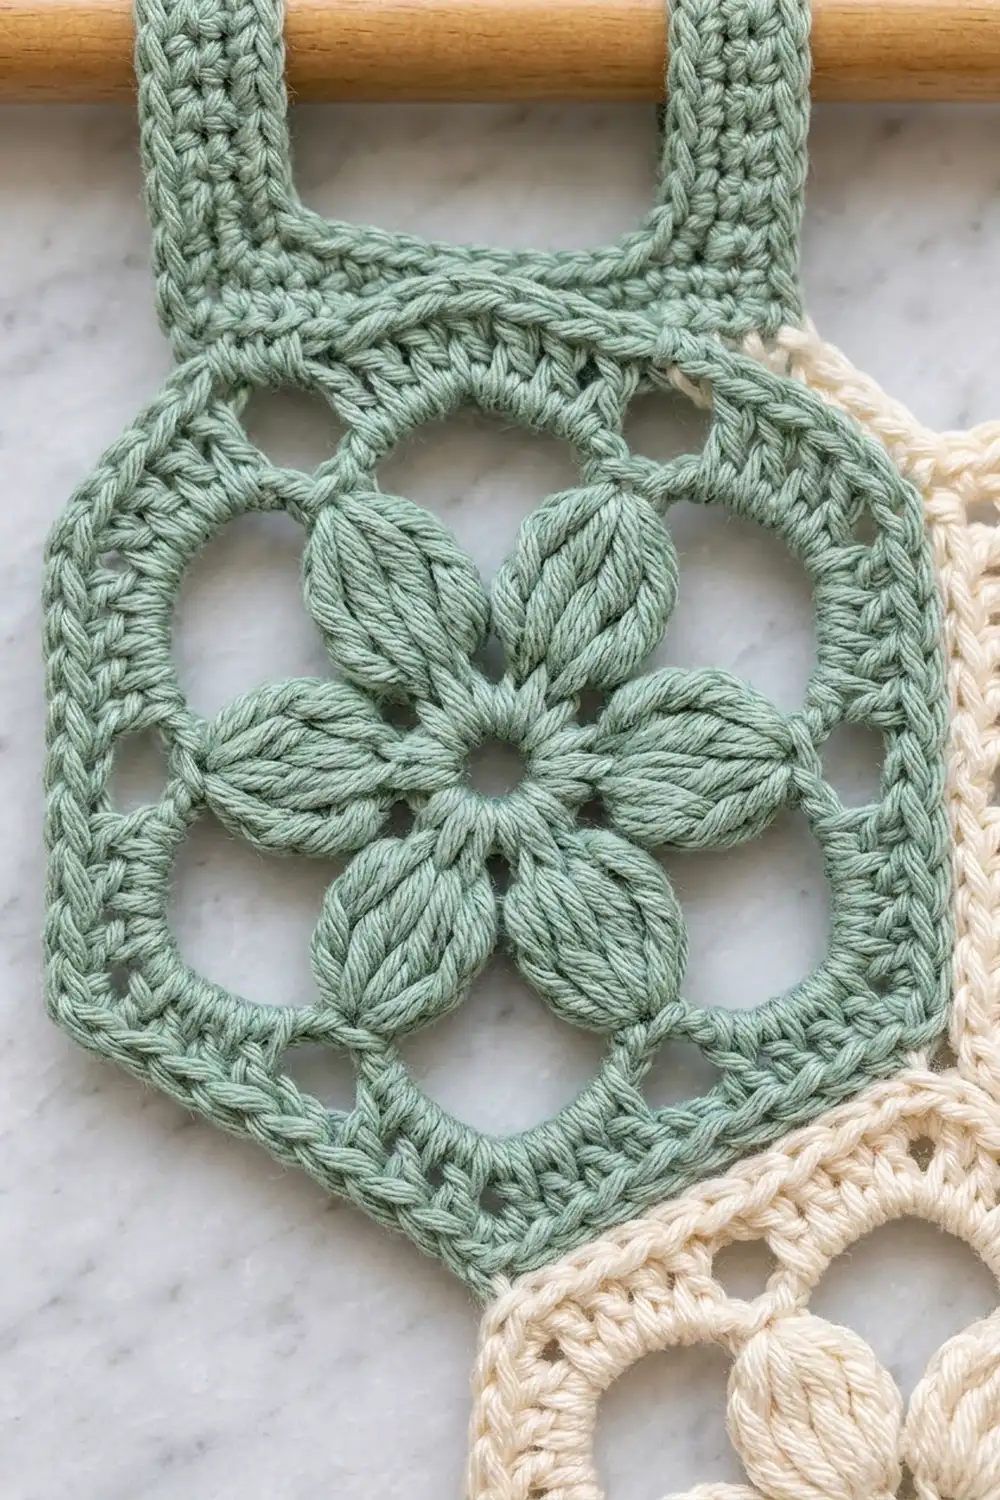
Hexagon Motif (Make 36)
Work in joined rounds with the RS facing you throughout.
Round 1: MR, ch 3 (counts as dc), 11 dc in ring. Join with sl st to top of ch-3. Pull the ring closed, but leave a small open center. (12 dc)
Round 2: Beginning puff in same st as join, ch 3, sk next dc, puff in next dc, ch 3, sk next dc; repeat from * 4 more times. Join with sl st to top of beginning puff. (6 puffs, 6 ch-3 sps)
The petals point toward the middle of each future side.
Round 3: Sl st into first ch-3 sp. Ch 4 (counts as tr), ch 3, tr in same sp to make the first corner. Ch 4, sc in top of next puff, ch 4, (tr, ch 3, tr) in next ch-3 sp; repeat from * 4 more times. Ch 4, sc in top of next puff, ch 4. Join with sl st to top of beginning ch-4. (12 tr, 6 sc, 6 corner ch-3 sps, 12 ch-4 sps)
The two ch-4 arches above each petal form the open hexagonal window.
Round 4: Sl st into next corner ch-3 sp. Ch 1, (2 sc, ch 2, 2 sc) in same sp. Sc in next tr, 4 sc in next ch-4 sp, sc in next sc, 4 sc in next ch-4 sp, sc in next tr, (2 sc, ch 2, 2 sc) in next corner sp; repeat from * 4 more times. Sc in next tr, 4 sc in ch-4 sp, sc in sc, 4 sc in ch-4 sp, sc in next tr. Join with sl st to first sc. Fasten off and weave in the ends.
Count: 15 sc per side between corner ch-2 sps (2 + 1 + 4 + 1 + 4 + 1 + 2). That gives 90 sc and 6 ch-2 corners in total.
Per-side count for joining and the band: 17 stitches. This is the 15 sc plus 1 stitch worked into each of the side’s 2 corner ch-2 sps.
Half Hexagon (Make 2, Sage)
This piece fills the notch at the top of the right column so the band can run straight. Work in rows and turn at the end of each row.
Row 1: MR, ch 3 (counts as dc), 6 dc in ring. Turn. (7 dc)
Row 2: Ch 3 (counts as dc), ch 1, puff in next dc, (ch 3, sk next dc, puff in next dc) twice, ch 1, dc in top of turning ch. Turn. (3 puffs, 2 ch-3 sps, 2 ch-1 sps, 2 dc)
Row 3: Ch 4 (counts as tr), tr in same st. Sk the ch-1 sp. Ch 4, sc in next puff, ch 4, (tr, ch 3, tr) in next ch-3 sp; repeat from * once more. Ch 4, sc in next puff, ch 4, sk the ch-1 sp, 2 tr in top of turning ch. Turn. (8 tr, 3 sc, 2 corner ch-3 sps, 6 ch-4 sps)
Row 4: Ch 1, 2 sc in first tr, sc in next tr, 4 sc in ch-4 sp, sc in sc, 4 sc in ch-4 sp, sc in next tr, (2 sc, ch 2, 2 sc) in corner sp. Sc in next tr, 4 sc in ch-4 sp, sc in sc, 4 sc in ch-4 sp, sc in next tr, (2 sc, ch 2, 2 sc) in corner sp. Sc in next tr, 4 sc in ch-4 sp, sc in sc, 4 sc in ch-4 sp, sc in next tr, 2 sc in top of turning ch. Fasten off. (45 sc: 15 on each of the 3 sides, plus 2 ch-2 corners)
Checkpoint: The straight edge measures 8 in (20.3 cm). Each of the 3 short sides measures 4 in (10.2 cm), the same as a full hexagon side.
Make All Pieces
For each panel, make 9 sage hexagons, 9 cream hexagons, and 1 sage half hexagon. For both panels, that is 18 sage hexagons, 18 cream hexagons, and 2 sage half hexagons.
The layout for one panel is shown below. Column B sits half a hexagon lower than Column A. G = sage and C = cream.
[ ====== SAGE BAND + 3 TABS ====== ]
  A1 G   |  B0 half G
         |  B1 C
  A2 C   |
         |  B2 G
  A3 G   |
         |  B3 C
  A4 C   |
         |  B4 G
  A5 G   |
         |  B5 C
  A6 C   |
         |  B6 G
  A7 G   |
         |  B7 C
  A8 C   |
         |  B8 G
  A9 G   |
         |  B9 C
Joining
Join with sage, using a flat slip-stitch seam. Hold the two pieces side by side with the RS up and work through the back loops only of the matching Round 4 stitches. This leaves a neat raised line on the front.
Stitch-to-stitch logic: Each seam is 17 sl sts. Work 1 sl st through both corner ch-2 sps, then 15 sl sts matching sc to sc, then 1 sl st through the next pair of corner sps. The sides match exactly, so no stitches are skipped or added.
- Column A: Join A1 through A9 flat side to flat side. That is 8 seams of 17 sl sts.
- Column B: Join the short side of B0 to the top of B1, then join B1 through B9. That is 9 seams of 17 sl sts.
- Zigzag seam: Lay Column B against Column A, half a motif lower. Starting at the top, join A1 to B0’s slanted side. Continue down the zigzag: A1 to B1, A2 to B1, A2 to B2, and so on to A9 to B9. That is 18 seam segments. Next to each other, two segments share a corner sl st, so the count is 18 × 16 + 1 = 289 sl sts.
Tension: Keep the slip stitches as loose as the sc beneath them. If a seam puckers, go up one hook size for joining only.
Checkpoint: The joined panel measures 14 in (35.6 cm) wide at the side points and 65.6 in (166.6 cm) long from the top of A1 to the bottom point of B9. Column B’s lower edge sits 3.5 in (8.9 cm) below Column A’s lower edge.
Border: Top Band and Tabs
Border gauge: 16 sc × 18 rows = 4 in (10.2 cm), the same as the motif edge.
The top edge is made of two parts: A1’s flat top side and B0’s 8 in (20.3 cm) straight edge. Together they form one straight line.
Row 1 (RS): Join sage at the right end of B0’s straight edge. Work 32 sc evenly across the straight edge of B0, working into the row ends in this order: Row 4: 2 sc, Row 3: 6 sc, Row 2: 4 sc, Row 1: 4 sc, then Row 1: 4 sc, Row 2: 4 sc, Row 3: 6 sc, Row 4: 2 sc. Next, work 1 sc in A1’s top-right corner sp (where A1 meets B0), 15 sc across A1’s top side, and 1 sc in A1’s top-left corner sp. Turn. (32 + 17 = 49 sc)
Why the math works: A1 gives its full per-side count of 17, including both of its corner stitches. B0’s straight edge is two side lengths, worked at 16 sc per side length, for 32 sc. The shared point at the seam is already covered by A1’s corner stitch, so no seam stitch is added. At 4 sc per inch, 49 sc measures 12.25 in (31.1 cm), which matches the straight top edge.
Rows 2–7: Ch 1, sc in each st across. Turn. (49 sc per row) After Row 7, the band is 1.5 in (3.8 cm) deep. Do not fasten off.
Tab positions: tab 1 on sts 1–7, gap on sts 8–21, tab 2 on sts 22–28, gap on sts 29–42, tab 3 on sts 43–49 (7 + 14 + 7 + 14 + 7 = 49).
- Tab 1, Rows 1–14: Ch 1, sc in each of the first 7 sts. Turn. (7 sc) Fasten off, leaving a 12 in (30.5 cm) tail.
- Tabs 2 and 3: Join sage in st 22 for tab 2 and in st 43 for tab 3, and work them the same way.
Each tab measures 1.75 in (4.4 cm) wide × 3.1 in (7.9 cm) long, and each gap measures 3.5 in (8.9 cm). Fold each tab to the WS and whipstitch its last row to the back of band Row 1. This makes a loop of about 1.5 in (3.8 cm), which fits a rod up to 1.25 in (3.2 cm) across.
Repeat all steps for the second panel.
Final Blocking
- Weave in all ends before blocking.
- Soak each panel in cool water for 15 minutes, then gently press out the water. Do not wring it.
- Roll the panel in a towel to remove the excess moisture.
- Lay it flat and pin the band straight at 12.25 in (31.1 cm).
- Pin every hexagon point so each side measures 4 in (10.2 cm), and keep the columns straight.
- Check the length: 67.1 in (170.4 cm) from the top of the band to the lowest point.
- Pinch each puff petal into shape and open each lattice window with a fingertip.
- Let the panel dry completely before you unpin it.
Final Quality-Control Checklist
- Every hexagon has 15 sc per side and sharp ch-2 corners
- 9 hexagons per column, with colors alternating as shown in the grid
- The sage half hexagon sits on top of the right column
- All seams are 17 sl sts and lie flat with no puckers
- The band is 49 sc wide and 7 rows deep
- There are 3 tabs of 7 sc each, evenly spaced and securely sewn
- Both panels match in length to within 0.5 in (1.3 cm)
Troubleshooting
- Puffs look flat: Pull each loop up to full dc height before closing the puff.
- Hexagon cups: The Round 3 chains are too tight. Loosen them, or work the ch-4s with a larger hook.
- Hexagon ruffles: The chains are too loose. Try ch 3 instead of ch 4, then check the side measurement again.
- Seams pucker: Join with a hook one size larger.
- Band waves: Recheck Row 1. It must be exactly 49 sc.
- Panel too long: Leave off the last hexagon in each column. Each hexagon you remove shortens the panel by 6.9 in (17.5 cm).
Care
Machine wash cool on a gentle cycle in a mesh bag, then reshape and dry flat. Do not tumble dry, because the panels can lose length.
Final Notes
Here is the measurement chain from start to finish. A gauge of 16 sc per 4 in gives a hexagon side of 4 in (10.2 cm). That makes each hexagon 8 in (20.3 cm) point to point. Two staggered columns of 9 hexagons make a panel 14 in × 65.6 in (35.6 cm × 166.6 cm), and the 49-stitch band brings the length to 67.1 in (170.4 cm). If your gauge is right at the start, the rest of the panel will measure correctly too.
Happy crocheting!