

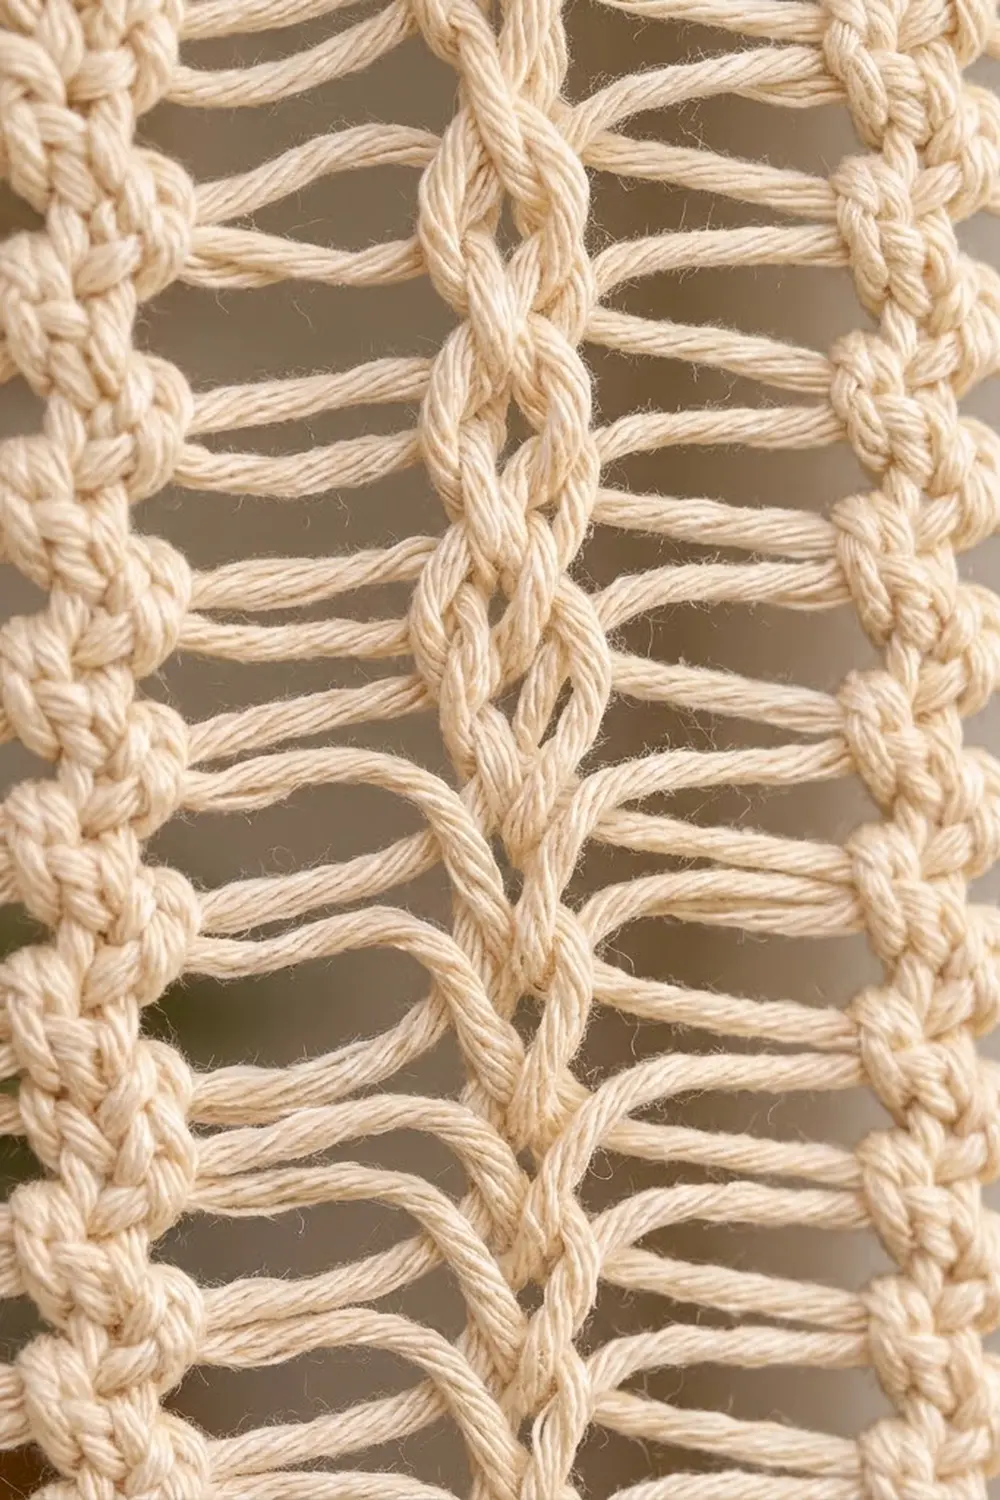
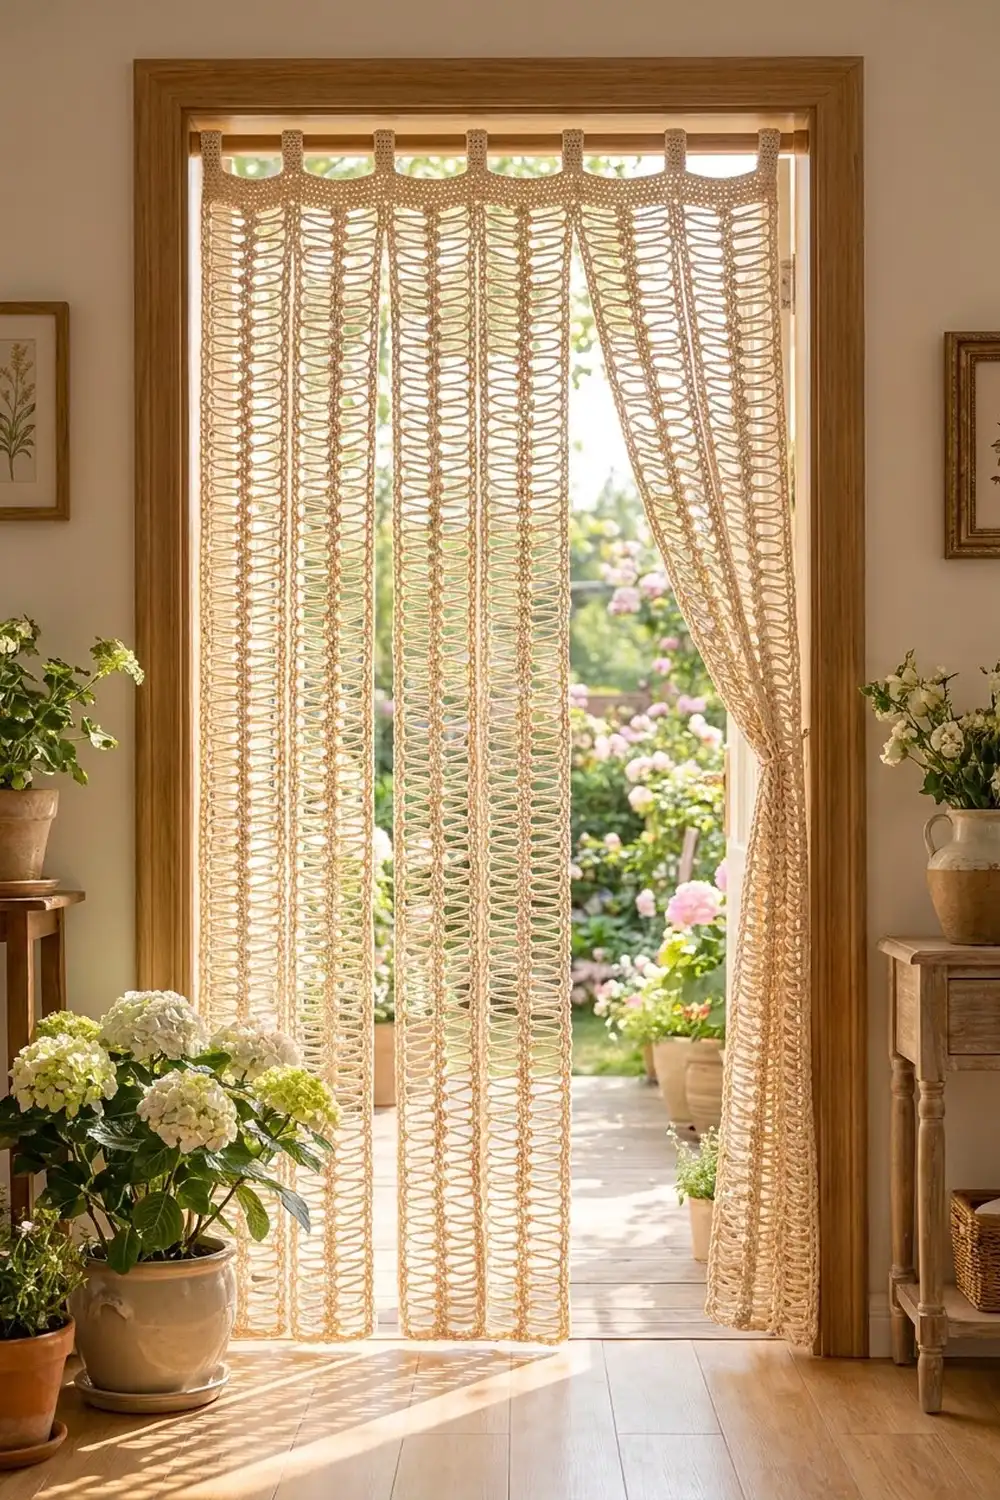
This airy door curtain is made from long hairpin lace strips. Each strip has a knotted center spine with open loops on both sides. Six strips are braided together loop through loop, so the curtain gets tall, rope-like seams between its spines. It lets light and air through while still softening the doorway.
The design uses one color, a warm ivory. It suits cottage, boho, and coastal rooms, and it looks just as good gathered to one side as it does hanging straight.
The pattern uses US crochet terms. The finished curtain is 36.5 in (92.7 cm) wide and 74.5 in (189.2 cm) long from the bottom edge to the top of the header. The tabs add another 3 in (7.6 cm) of hanging loop above the header.
Here is how it comes together. You make six hairpin lace strips on a loom set to 6 in (15.2 cm). Then you braid the strips together with your hook, using no extra yarn. Next, you add a short chain “bridge” across each strip end so the top and bottom have stitches to work into. Last, you work one round of border, an 8-row header, and six tabs.
Finished Size and Construction
- Finished size: 36.5 in × 74.5 in (92.7 cm × 189.2 cm), plus 3 in (7.6 cm) tab loops
- Skill level: Intermediate (basic hairpin lace experience helps)
- Terminology: US crochet terms
- Yarn weight: Worsted (#4), cotton or cotton blend
- Hook: 5.0 mm (H-8)
- Number of pieces: 6 hairpin lace strips (header and tabs are worked onto the joined panel)
- Layout: 6 strips side by side, 1 row high
- Strip size: 6 in × 72 in (15.2 cm × 182.9 cm), 288 loops per side
- Size before border: 36 in × 72 in (91.4 cm × 182.9 cm)
- Border depth: 1 sc round, 0.25 in (0.6 cm) per edge, plus an 8-row header of 2 in (5.1 cm) at the top
Materials
Pick a smooth worsted cotton or cotton blend. Cotton holds the loops open and hangs straight. Fuzzy or very stretchy yarns blur the loops and can make the curtain grow in length.
- Ivory (main and only color): 600 g, about 1,140 yd (1,042 m), for example six 100 g skeins of 190 yd (174 m) each
- Strips: about 128 yd (117.0 m) each, 768 yd (702.3 m) total
- Bridges, border, header, tabs: about 110 yd (100.6 m)
Tools:
– 5.0 mm (H-8) crochet hook
– Adjustable hairpin lace loom set to 6 in (15.2 cm)
– Locking stitch markers (at least 12)
– Scrap yarn in a contrasting color, for holding loops
– Tapestry needle
– Measuring tape
– Rust-proof pins and a blocking surface (or a clothes rack for hang-drying)
These quantities include a margin of about 25% for swatching, a slightly looser gauge, and lengthening the curtain.
Abbreviations (US Terms)
- ch – chain
- sc – single crochet
- sl st – slip stitch
- sp – space
- st(s) – stitch(es)
- RS / WS – right side / wrong side
Special stitch: hairpin spine sc. With the hook in the loop at the center of the loom, turn the loom a half turn to the left (right prong over to the left). The yarn wraps around the new right prong. Insert the hook into the front strand of the loop on the left prong, yarn over, and pull up a loop (2 loops on hook). Yarn over and pull through both loops. This adds 1 loop to one side of the strip and 1 sc to the spine.
Twisted sc (tw-sc). Insert the hook into a hairpin loop from front to back, then twist the loop one half turn clockwise before you finish a regular sc. Twisting keeps the loop from opening up.
Gauge and Checkpoints
Hairpin gauge: 4 loops per side = 1 in (2.5 cm) along the spine. A relaxed strip measures 6 in (15.2 cm) from loop tip to loop tip.
Sc gauge: 16 sc and 16 rows = 4 in (10.2 cm).
Make a test strip first: 24 loops per side. It should measure 6 in (15.2 cm) long and 6 in (15.2 cm) wide after you lay it flat and pat it into shape. Also work a 16-st sc swatch of 16 rows.
Checkpoints for each strip:
– 48 loops per side = 12 in (30.5 cm)
– 96 loops per side = 24 in (61.0 cm)
– 144 loops per side = 36 in (91.4 cm)
– 288 loops per side = 72 in (182.9 cm)
If the test strip is too long (fewer than 4 loops per inch), tighten the spine sc or go down to a 4.5 mm hook. If it is too short (more than 4 loops per inch), loosen the spine sc or go up to a 5.5 mm hook. Hairpin loop width comes from the loom, so check that the loom is set to exactly 6 in (15.2 cm).
If your sc gauge is off, change hook size for the border and header only. The 24-sc-per-strip math needs 4 sc per inch.
Hairpin Lace Strip (Make 6)
Setup:
1. Make a slip knot. Slip it onto the left prong and slide the knot to the center of the loom.
2. Wrap the yarn from front to back around the right prong. Hold the working yarn behind the loom.
3. Insert the hook into the slip-knot loop, yarn over, and pull through. Ch 1 to lock it. This is the center of the spine.
Main pattern:
4. Work 1 hairpin spine sc. You now have 1 loop on each prong.
5. Repeat step 4 until each side has 288 loops. That takes 575 more turns after the first, or 576 turns total, because each turn adds a loop to alternating sides.
Stitch counts:
– After 48 loops per side: 96 spine sc, 12 in (30.5 cm)
– After 144 loops per side: 288 spine sc, 36 in (91.4 cm)
– After 288 loops per side: 576 spine sc, 72 in (182.9 cm)
Managing length: When the prongs fill up, take out the bottom bar and slide the loops off, leaving the last 4 loops on each prong. Run a strand of scrap yarn through each side’s removed loops, keeping them in order and untwisted. Put the bar back and keep going.
Finishing the strip: Cut the yarn, leaving a 6 in (15.2 cm) tail, and pull it through the last spine sc. Slide the last loops off and thread them onto the scrap yarn.
Mark the start of each strip with a stitch marker. Strips must all point the same way when you join them.
Check: 288 loops on each side, a straight spine with no twists, and a length of 72 in (182.9 cm) when relaxed.
Make All Pieces
You need 6 strips, all in ivory. Lay them out in this order:
[Strip 1] [Strip 2] [Strip 3] [Strip 4] [Strip 5] [Strip 6]
  6 in      6 in      6 in      6 in      6 in      6 in
That is 6 strips × 6 in (15.2 cm) = 36 in (91.4 cm) total. Each strip is 72 in (182.9 cm) long.
Joining
Method: Braided loop-through-loop join. It uses no yarn. The seam is the chain-like braid you see between the spines.
Stitch-to-stitch logic: Join loop 1 to loop 1, loop 2 to loop 2, and so on up to loop 288. Each loop is used exactly once. Nothing is skipped and nothing is added.
- Lay Strip 1 and Strip 2 side by side, both with their start markers at the bottom. Keep all loops untwisted, or twist all of them the same way.
- Insert the hook into loop 1 on Strip 1’s right side.
- Insert the hook into loop 1 on Strip 2’s left side, then pull Strip 2’s loop through Strip 1’s loop. One loop stays on the hook.
- Insert the hook into loop 2 of Strip 1 and pull it through the loop on the hook.
- Insert the hook into loop 2 of Strip 2 and pull it through the loop on the hook.
- Keep alternating until loop 288 of each strip has been used.
- Lock the last loop with a 6 in (15.2 cm) scrap of ivory yarn. Tie it to the strip end and leave the ends to weave in later.
- Join Strip 3 to Strip 2 the same way, and continue until all 6 strips are joined.
Tension advice: Pull each loop until it lies snug against the one before it, but don’t tug. If you pull too hard, the seam shortens and the panel puckers. If you leave it loose, the curtain sags at the seams. Every 48 loops, check that the seam is as long as the strips next to it.
Size checkpoint: The joined panel measures 36 in × 72 in (91.4 cm × 182.9 cm). It has 288 loops along each outer side edge, on Strip 1’s left side and Strip 6’s right side.
Bridges and Border
Bridges: These close each strip end so the top and bottom edges have stitches. Work them on both ends of each strip. For the top end of each strip:
- Join yarn with a sl st at the tip of the first loop on the left.
- Ch 11.
- Sc around the top spine sc.
- Ch 11.
- Sl st into the tip of the last loop on the right. Fasten off.
Work the bottom ends the same way. You get 12 bridges in total, 6 at the top and 6 at the bottom. Each bridge has 2 ch-11 sps and 1 sc.
Border gauge: 4 sc = 1 in (2.5 cm).
Border Round (RS): Join yarn at the top right corner.
- Top edge: On each strip, work 1 sc in each of the 11 ch, 2 sc in the bridge sc, and 1 sc in each of the next 11 ch. That is 11 + 2 + 11 = 24 sc per strip, and 6 × 24 = 144 sc. Ch 1 for the corner.
- Left side: Work 1 tw-sc in each of the 288 edge loops of Strip 1: 288 sc. Ch 1 for the corner.
- Bottom edge: Work 24 sc per strip the same way as the top: 144 sc. Ch 1 for the corner.
- Right side: Work 1 tw-sc in each of the 288 edge loops of Strip 6: 288 sc. Ch 1 for the corner, then sl st to the first sc.
Total: 864 sc plus 4 corner ch-1 sps. The corner ch-1 sps are not counted as stitches, so no corner is counted twice.
Why the math works: 24 sc ÷ 4 per inch = 6 in (15.2 cm), the width of one strip. Six strips × 24 = 144 sc = 36 in (91.4 cm). On the sides, 288 loops × 1 sc = 288 sc ÷ 4 = 72 in (182.9 cm), the length of one strip. The edges lie flat with no ruffling or cupping.
Bordered size: 36.5 in × 72.5 in (92.7 cm × 184.2 cm).
Header (Rows 1–8): Work these rows over the 144 top sts only.
– Row 1 (WS): Join at the top-left corner ch-1 sp. Ch 1 (does not count as a st), then sc in each of the 144 sts. Turn. 144 sc.
– Rows 2–8: Ch 1, sc in each st, turn. 144 sc in every row. Don’t fasten off.
The header plus the border round is 9 rows = 2.25 in (5.7 cm). The curtain body now measures 36.5 in × 74.5 in (92.7 cm × 189.2 cm).
Tabs (make 6): Center one tab over each strip. In each strip’s 24-st section, the tab sits on sts 9–16. That means 8 sts are skipped, 8 sts are tabbed, and 8 sts are skipped.
- Row 1: Join at st 9 of the section, ch 1, sc in each of the next 8 sts. Turn. 8 sc.
- Rows 2–24: Ch 1, sc in each of the 8 sts, turn. 8 sc per row.
Each tab is 2 in × 6 in (5.1 cm × 15.2 cm). Fold it to the WS and sew the last row along Row 4 of the header. This makes a 3 in (7.6 cm) loop that fits rods up to 1.75 in (4.4 cm) across. Tab centers are 6 in (15.2 cm) apart.
Final Blocking
- Weave in all ends along the spines or the sc rows, never through the open loops.
- Soak the curtain in cool water with a little wool wash for 15 minutes. Press the water out gently. Don’t wring it.
- Roll it in towels to take out extra water.
- Lay it flat. Pin the side edges straight to 36.5 in (92.7 cm) across and 74.5 in (189.2 cm) from the bottom to the header top.
- Straighten each spine and fan the loops out evenly.
- Leave it until about half dry, then hang it on the rod to finish drying. Its own weight evens out the length.
Final Quality-Control Checklist
- 6 strips, each with 288 loops per side and 576 spine sc
- 5 braided seams with every loop used once and no twists out of order
- Border: 144 sc on the top and bottom edges, 288 sc on each side, 4 corner ch-1 sps
- 8 header rows of 144 sc each
- 6 tabs, each 8 sc wide and 24 rows long, folded to the same depth
- Size: 36.5 in × 74.5 in (92.7 cm × 189.2 cm) plus 3 in (7.6 cm) tab loops
- No loose ends hanging in the loop areas
Troubleshooting
- The spine curves: You turned the loom in mixed directions. Always turn it the same way.
- One strip is longer than the others: Count the loops. Rip back or add loops to reach 288 per side.
- The seam puckers: You pulled the braid too tight. Undo that section and rework it with gentler tension.
- The side edge ruffles: Your sc is too loose. Go down one hook size for the border.
- The header flares: Check for 144 sc. If the count is right, use a smaller hook for the header.
- The tabs sit crooked: Recount so each tab starts at st 9 of its 24-st section.
- The loops fall off the loom: Thread scrap yarn through them sooner and keep only 4 loops on each prong.
Care
Hand wash or machine wash cold on a gentle cycle inside a mesh laundry bag. Reshape while damp and hang to dry on the rod.
Final Notes
The measurement chain goes like this:
– Each strip has 4 loops per inch, so 288 loops = 72 in (182.9 cm) long and 6 in (15.2 cm) wide.
– Six strips make 36 in (91.4 cm).
– Each strip end has 24 sc, so 144 sc = 36 in (91.4 cm).
– The border brings the panel to 36.5 in × 72.5 in (92.7 cm × 184.2 cm).
– The header brings it to 74.5 in (189.2 cm), and the tabs add a 3 in (7.6 cm) loop.
To make the curtain longer, add loops in multiples of 4 per side. Each extra 4 loops adds 1 in (2.5 cm), and the side borders grow by the same count.
Happy crocheting!