
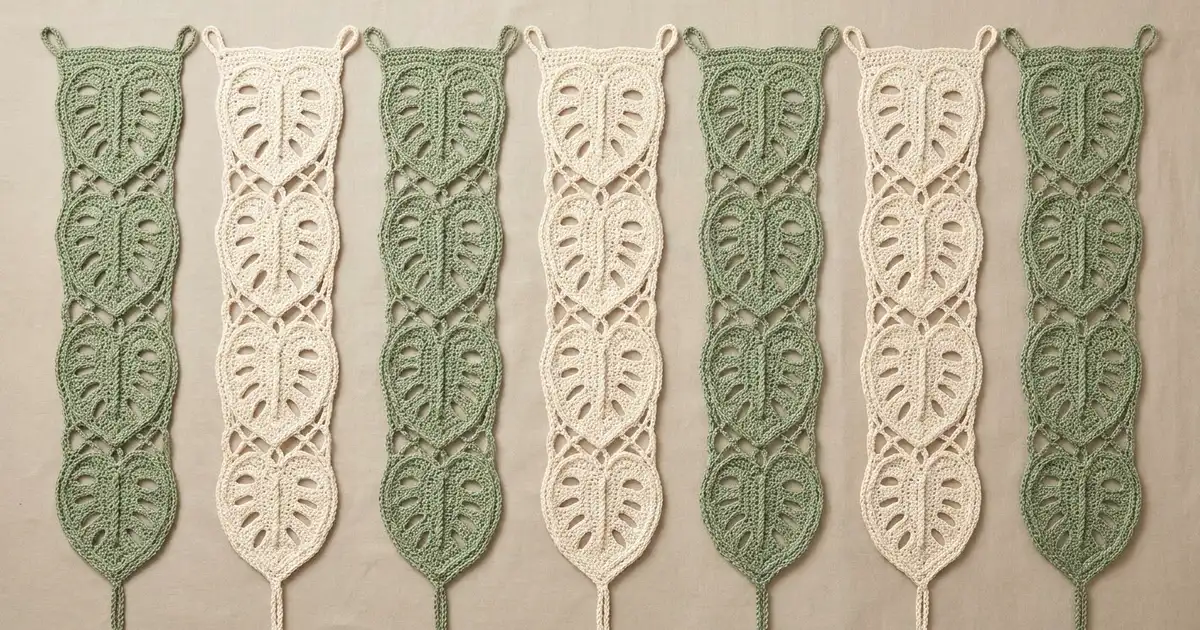
The Monstera Trail Curtain is a doorway curtain built from crocheted leaves. Seven long strips hang side by side from a wooden rod. Each strip holds eight heart-shaped monstera leaves, linked top to bottom by a light chain lattice.
The strips alternate sage green and cream: four green and three cream. Each leaf has two rounded top lobes with a center notch, a pointed tip, a raised center vein, and three small oval fenestrations on each side of the vein. A single crochet frame outlines every leaf and carries the lattice between leaves.
This pattern uses US crochet terms. Each strip measures 5 in (12.7 cm) wide and 68 in (172.7 cm) long, from the top of the hanging loop to the bottom point. With seven strips spaced about 1 in (2.5 cm) apart, the curtain is about 41 in (104.1 cm) wide.
You crochet 56 separate leaves in three rounds each. A spine pass joins the leaves of each strip down the center and makes the hanging loop. A frame round then edges each leaf and builds the lattice on both sides of the strip.
Finished Size and Construction
- Finished strip size: 5 in x 68 in (12.7 cm x 172.7 cm)
- Finished curtain: 7 strips, about 41 in (104.1 cm) wide when hung 1 in (2.5 cm) apart
- Skill level: Intermediate
- Terminology: US
- Yarn weight: #5 bulky cotton or cotton cord
- Hook: 6.0 mm (US J-10)
- Number of pieces: 56 leaves, assembled into 7 strips of 8 leaves
- Layout: 7 strips across, 8 leaves down each strip
- Leaf size before frame: 4.5 in x 5.75 in (11.4 cm x 14.6 cm)
- Leaf size after frame: 5 in x 6 in (12.7 cm x 15.2 cm)
- Frame (border) depth: 0.25 in (0.6 cm) on each long edge
Materials
Choose a smooth, firm bulky cotton or 3 mm cotton cord with about 100 m per 100 g (109 yd per 3.5 oz). Cotton keeps the leaves crisp and helps the strips hang straight. Avoid fuzzy yarns, because they hide the fenestrations.
- Sage green: 750 g, about 750 m (820 yd), for 4 strips
- Cream: 560 g, about 560 m (612 yd), for 3 strips
One strip uses about 165 m (180 yd). These quantities include a margin of roughly 15% for gauge differences and swatching.
Tools:
– 6.0 mm (US J-10) crochet hook
– Tapestry needle
– Stitch markers (at least 4)
– Scissors and tape measure
– Blocking mats and rust-proof pins
– Spray bottle
– Wooden curtain rod, at least 44 in (111.8 cm) long, with end caps
Abbreviations (US Terms)
- ch – chain
- sl st – slip stitch
- sc – single crochet
- hdc – half double crochet
- dc – double crochet
- sk – skip
- sp – space
- st(s) – stitch(es)
- RS – right side
Special stitch – surface slip stitch (surface sl st): Hold the working yarn behind the piece. Insert the hook from front to back through the fabric, pull up a loop, and draw it through the loop on the hook. Repeat along a line to make a raised chain on the RS.
Gauge and Checkpoints
Gauge: 12 dc and 7 rows = 4 in (10.2 cm). Chain gauge: 10 ch = 3 in (7.6 cm).
Make one complete leaf before anything else. It is your real gauge swatch. At each checkpoint, measure it flat without stretching:
- After Rnd 1: 1.75 in x 4.5 in (4.4 cm x 11.4 cm)
- After Rnd 2: 3.25 in x 5.25 in (8.3 cm x 13.3 cm)
- After Rnd 3: 4.5 in x 5.75 in (11.4 cm x 14.6 cm)
- After the frame: 5 in x 6 in (12.7 cm x 15.2 cm)
If your leaf is too big, go down a hook size. If it is too small, go up a size. If only the length is off, the problem is your chains: adjust the tension of the foundation chain, not the hook. A leaf that is 0.25 in (0.6 cm) too long adds 2 in (5.1 cm) to every strip.
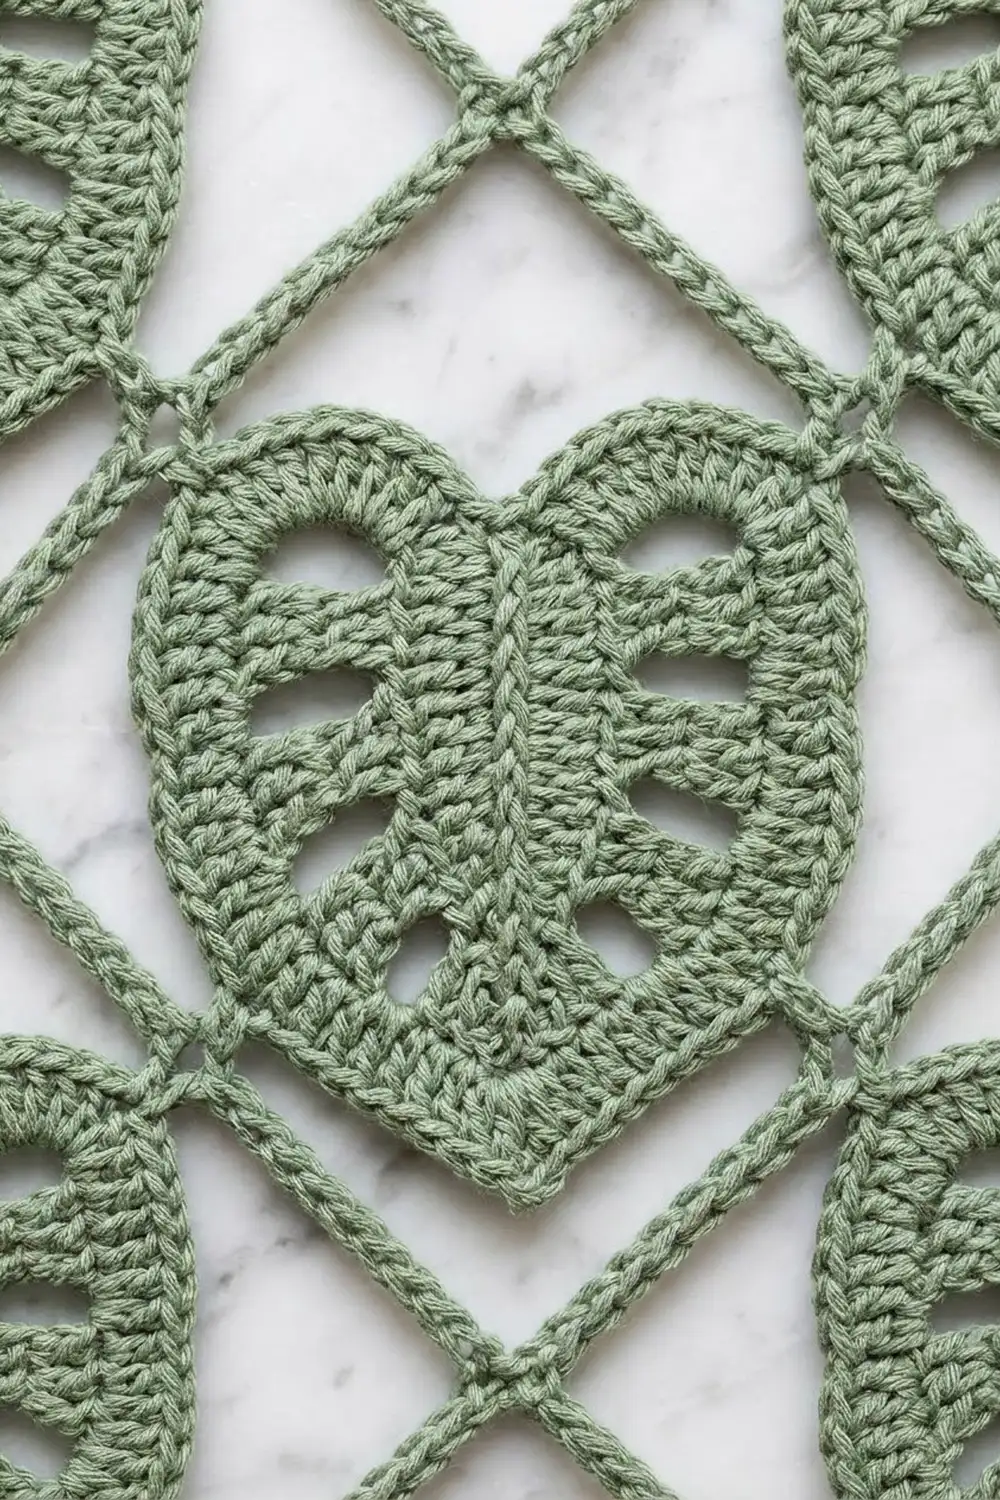
Leaf (Make 56)
Each leaf is worked in joined rounds around a foundation chain, which becomes the midrib. Do not turn between rounds; keep the RS facing you throughout.
Foundation: Ch 13.
Rnd 1: Sc in 2nd ch from hook, hdc in next ch, dc in next 9 ch, 6 dc in last ch. Rotate and work along the other side of the foundation chain: dc in next 9 ch, hdc in next ch, sc in next ch, ch 2, sl st in first sc. (28 sts + ch-2 tip sp)
The sc end is the leaf tip and the 6-dc end is the top. Before Rnd 2, number the Rnd 1 sts 1 to 28, starting with the first sc.
Rnd 2: Ch 1, 2 sc in st 1 (same st as join), hdc in st 2, dc in st 3, [ch 2, sk next st, dc in next 2 sts] twice, ch 2, sk st 10, dc in st 11.
Top: 2 dc in st 12, 3 dc in st 13, hdc in st 14, hdc in st 15, 3 dc in st 16, 2 dc in st 17.
Second side: dc in st 18, ch 2, sk st 19, [dc in next 2 sts, ch 2, sk next st] twice, dc in st 26, hdc in st 27, 2 sc in st 28, ch 2, sl st in first sc. (30 sts + 6 ch-2 sps + ch-2 tip)
Each side now has 9 sts and 3 ch-2 sps, and the top has 12 sts. The two hdc make the dip that becomes the notch. The ch-2 sps over the skipped sts become the fenestrations.
Rnd 3: Ch 1, sc in same st as join, sc in next sc, hdc in next hdc, dc in next dc, 3 dc in next ch-2 sp, dc in next 2 dc, 3 dc in next ch-2 sp, dc in next 2 dc, 3 dc in next ch-2 sp, dc in next dc. (18 sts on first side)
First lobe: 2 dc in each of next 5 dc. (10 dc)
Notch: sc in each of next 2 hdc. (2 sc)
Second lobe: 2 dc in each of next 5 dc. (10 dc)
Second side: dc in next dc, 3 dc in next ch-2 sp, dc in next 2 dc, 3 dc in next ch-2 sp, dc in next 2 dc, 3 dc in next ch-2 sp, dc in next dc, hdc in next hdc, sc in next 2 sc. (18 sts)
Ch 3, sl st in first sc. Fasten off and weave in ends. (58 sts: 18 + 22 + 18, plus ch-3 tip)
The ch-3 bridges the tip and keeps it pointed. The ch-2 sps from Rnd 2 stay open under the 3-dc groups, giving three oval fenestrations on each side.
Reference points for assembly:
– Lobe stitches: On each lobe, count the 10 dc from the outer edge in toward the notch. Dc 1 sits next to the side and dc 10 sits next to the notch.
– Side stitches: On each side, count the 18 sts from the tip upward. St 1 is the sc next to the ch-3 tip, and st 18 is the dc next to the lobe.
– Point A is lobe dc 5 (the lobe peak).
– Point B is side st 6 (the center dc of the lowest 3-dc group).
Make All Pieces
- Sage green: 32 leaves (4 strips x 8)
- Cream: 24 leaves (3 strips x 8)
- Total: 56 leaves
Steam the leaves flat before assembly, then sort them into stacks of 8 per strip.
Curtain layout (G = green, C = cream; each letter is one leaf):
Strip:   1  2  3  4  5  6  7
Leaf 1:  G  C  G  C  G  C  G
Leaf 2:  G  C  G  C  G  C  G
Leaf 3:  G  C  G  C  G  C  G
Leaf 4:  G  C  G  C  G  C  G
Leaf 5:  G  C  G  C  G  C  G
Leaf 6:  G  C  G  C  G  C  G
Leaf 7:  G  C  G  C  G  C  G
Leaf 8:  G  C  G  C  G  C  G
Each strip is a single color. The strips are not joined to each other; each one hangs on its own from the rod.
Joining: The Spine Pass
The spine joins the 8 leaves of one strip down the center and adds the raised vein. Work it in the strip’s color. Lay the leaves in a column, RS up, with the tips pointing down.
Hanging loop: Ch 14, sl st in first ch to form a ring. (13-ch loop)
Top stem: Ch 6. Sc in the gap between the 2 notch sc of Leaf 1.
Vein: Work 12 surface sl st down the center line of Leaf 1, following the foundation chain to the tip. Sc in the ch-3 tip sp. (1 sc + 12 surface sl st + 1 sc per leaf)
Link: Ch 10. Sc in the notch gap of Leaf 2. Mark the 5th ch of this link with a stitch marker.
Repeat Vein and Link down the strip until you have finished Leaf 8’s vein and worked the sc in its tip sp. (7 links of 10 ch)
Bottom stem: Ch 5. Fasten off.
Tension advice: Work the link chains at the same tension as your gauge chain, so that 10 chains measure 3 in (7.6 cm). Tight links pull the leaves together and pucker the lattice. Loose links let the strip stretch when hung. Keep the surface sl st loose enough that each leaf lies flat.
Size checkpoint: Lay the strip flat. From the top of the hanging loop to the end of the bottom stem, it should measure about 68 in (172.7 cm). The gap between one leaf’s tip and the next leaf’s lobe tops should be 2.25 in (5.7 cm).
Border: The Frame Round
The frame is one continuous round. It edges each leaf with sc and builds the lattice on both sides of the strip.
Border gauge: The sc edging adds 0.25 in (0.6 cm) to each side, bringing each leaf from 4.5 in (11.4 cm) to 5 in (12.7 cm) wide. The lattice chains use the same chain gauge: 10 ch = 3 in (7.6 cm).
With RS facing, join yarn with a sl st at the base of the hanging loop, in the ch where the ring was closed.
Down the left edge:
1. Ch 6, sc in Point A (lobe dc 5) of Leaf 1, sc in next 4 lobe dc (dc 4 to dc 1), sc in next 13 side sts (st 18 down to st 6, ending at Point B). (18 sc)
2. Ch 10, sc in the marked 5th ch of the link below, ch 5, sc in Point A of the next leaf, sc in next 17 sts to Point B. (18 sc)
3. Repeat step 2 for Leaves 3 to 8.
Bottom: Ch 5, sc in the last ch of the bottom stem, ch 5.
Up the right edge:
1. Sc in Point B of Leaf 8, sc in next 12 side sts (st 7 up to st 18), sc in lobe dc 1 to dc 5, ending at Point A. (18 sc)
2. Ch 5, sc in the same marked link ch you used on the left edge, ch 10, sc in Point B of the leaf above, sc in next 17 sts to Point A. (18 sc)
3. Repeat step 2 up to Leaf 1.
Top: Ch 6, sl st at the base of the hanging loop. Fasten off and weave in ends.
Frame counts per strip:
– Leaf sc on each edge: 8 leaves x 18 sc = 144 sc
– Chains on each edge: 6 + (7 x 15) + 5 = 116 ch
– Lattice sc: 7 per edge, both edges sharing the same link ch, plus 1 sc at the bottom stem
– Total frame sc: 144 + 144 + 14 + 1 = 303
Why the math works: In Rnd 3, each leaf has 18 sts per side and 10 dc per lobe. Each frame edge uses exactly 5 lobe sts plus 13 side sts per leaf, which is 18, so 8 leaves give 144 sc per edge. No stitches are added at the links, because the lattice sc sit on the spine chain, never on the leaves. The 10-ch rail runs diagonally from Point B to the link, and the 5-ch rail climbs to the next lobe peak. Together they form the diamond openings between leaves.
Final Blocking
- Lay the strip on blocking mats, RS up.
- Mist it with water until damp, not soaked.
- Pin the hanging loop and the bottom point so the strip measures 68 in (172.7 cm).
- Pin each leaf at its lobe peaks and tip so it measures 5 in (12.7 cm) wide.
- Open each fenestration with a pin tip so the ovals are clear.
- Pin each lattice diamond so it is square to the center line.
- Let the strip dry completely, for at least 24 hours.
- Unpin and hang the strips on the rod in G-C-G-C-G-C-G order, about 1 in (2.5 cm) apart.
Final Quality-Control Checklist
- Every leaf has 58 sts in Rnd 3 and 18 sc on each frame edge.
- Each leaf measures 5 in x 6 in (12.7 cm x 15.2 cm).
- All 7 links measure 3 in (7.6 cm) and none are twisted.
- Both frame edges have 144 sc and 116 ch.
- Each strip measures 68 in (172.7 cm) and hangs straight.
- All ends are woven in at least 2 in (5.1 cm) and trimmed.
- Strips alternate green and cream, starting and ending with green.
Troubleshooting
Leaves cup in the center: The Rnd 1 chain was too tight. Chain it again more loosely, or use a hook one size larger for the foundation chain only.
Lobes ruffle: Your dc are too short. Work the Rnd 3 lobes with looser yarn overs.
Notch disappears: Check that you worked hdc, not dc, into sts 14 and 15 in Rnd 2.
Fenestrations close up: You worked into the skipped st instead of the ch-2 sp. Work the 3 dc under the chain.
Strip twists when hung: Not all the leaves were RS up. Check that each leaf faces front before the spine pass.
Strips have different lengths: Your link tension varies. Measure each link; 10 ch should measure 3 in (7.6 cm).
Lattice sags: The frame chains are looser than the spine. Rework that section with tighter chains.
Care
Hand wash in cool water with mild soap, roll in a towel to press out the water, and dry flat. Block again if the strips lengthen over time.

Final Notes
The measurement chain is short and reliable. A leaf of 4.5 in x 5.75 in (11.4 cm x 14.6 cm) after Rnd 3 becomes 5 in x 6 in (12.7 cm x 15.2 cm) with the frame. Eight leaves with 3 in (7.6 cm) links make one 68 in (172.7 cm) strip. Seven strips hung 1 in (2.5 cm) apart give a curtain about 41 in (104.1 cm) wide. Check one leaf, then one strip, and the rest will follow.
Happy crocheting!