
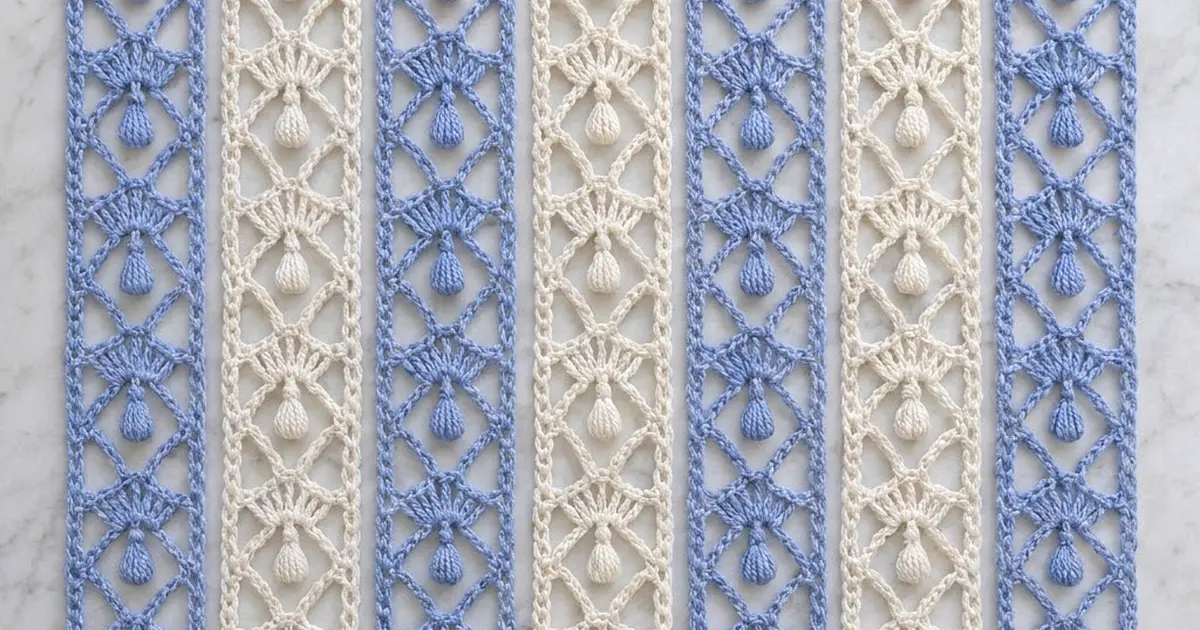
This doorway curtain is made of seven narrow lace strips in soft cornflower blue and creamy white. Each strip is a column of openwork cells. A small fan of double crochets fills the top of every cell, and a plump teardrop puff hangs just below it, a bit like a tiny tassel. Chain arches cross between the cells, so the strips look light and airy and let the breeze through.
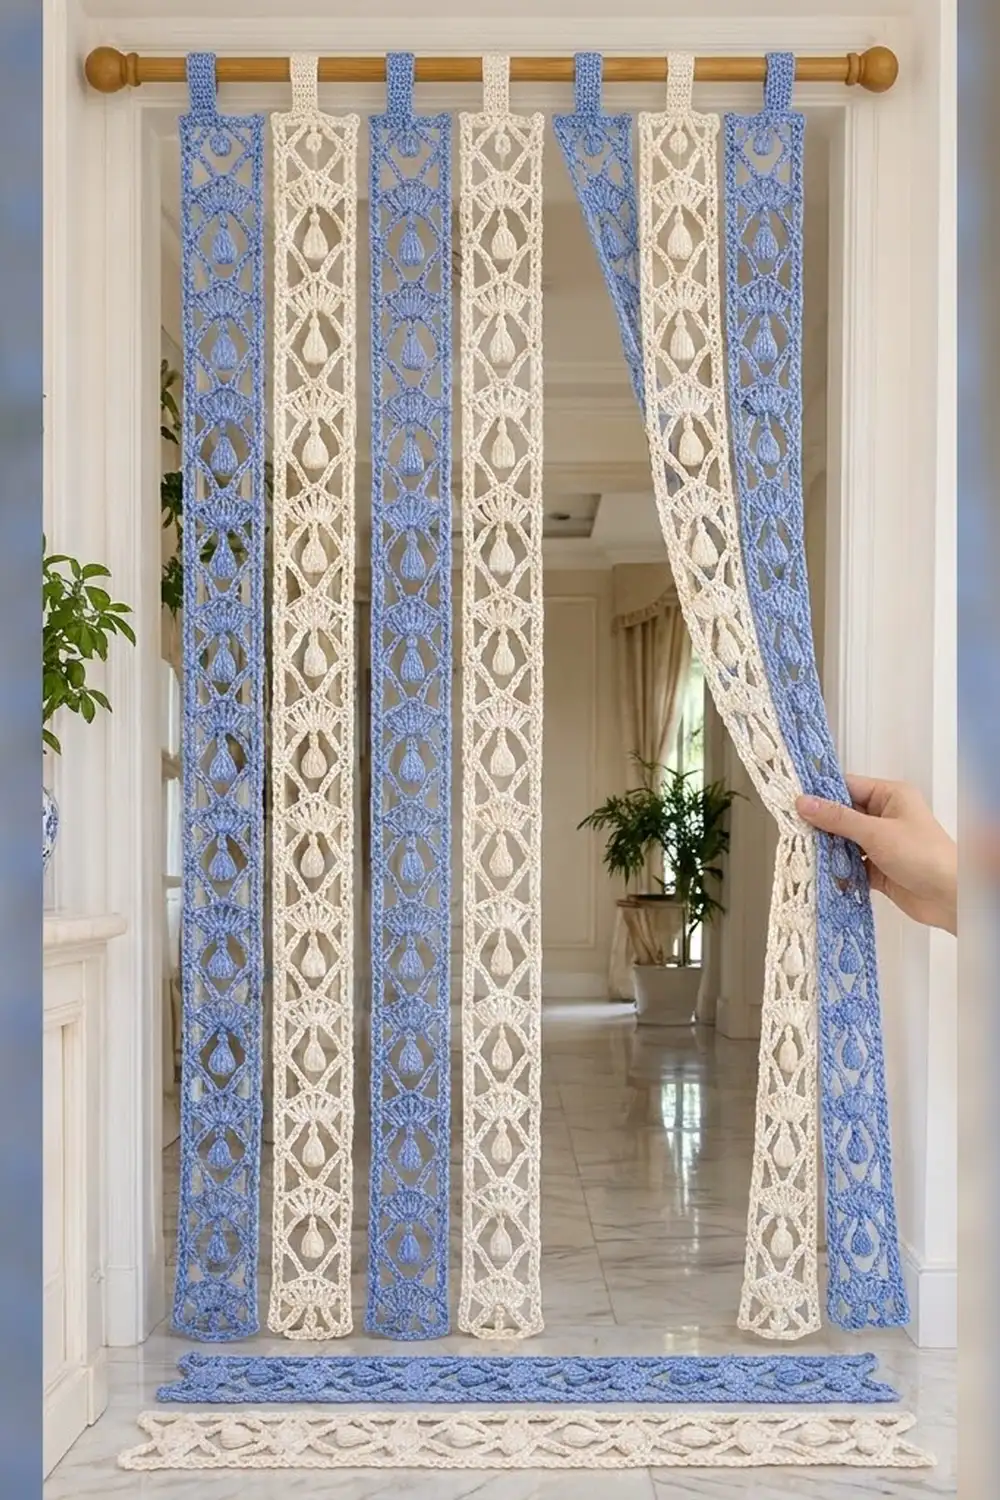
The strips alternate blue, cream, blue, cream, blue, cream, blue. Each one has its own hanging tab that loops over a wooden rod. The strips are never sewn to each other, so you can walk through the curtain and part it by hand.
This pattern uses US crochet terms. Each bordered strip measures 3.5 in (8.9 cm) wide by 77 in (195.6 cm) long, not counting the tab. Hung with 1.5 in (3.8 cm) gaps, the seven strips cover 33.5 in (85.1 cm), which suits a standard interior doorway.
Each strip is worked in rows from the bottom up over 13 stitches. A 3-row motif repeats 38 times. After that you add a top bar of single crochet, then one round of single crochet border, and last a folded hanging tab.
Finished Size and Construction
- Finished strip size: 3.5 in (8.9 cm) wide x 77 in (195.6 cm) long, plus tab
- Finished curtain width: 33.5 in (85.1 cm) with 1.5 in (3.8 cm) gaps
- Skill level: Intermediate
- Terminology: US
- Yarn weight: Worsted (#4), cotton or cotton blend
- Hook: 5.5 mm (US I-9)
- Number of pieces: 7 separate strips (4 blue, 3 cream)
- Layout: 7 strips side by side on one rod, not joined to each other
- Strip size before border: 3 in (7.6 cm) x 76.5 in (194.3 cm)
- Border depth: 0.25 in (0.6 cm) on every side
Materials
Pick a smooth worsted cotton with good stitch definition. Cotton hangs straight and doesn’t fuzz, and the fans and puffs stay crisp. The amounts below assume about 170 m per 100 g.
- Color A, cornflower blue: 450 g (765 m), enough for 4 strips
- Color B, cream: 350 g (595 m), enough for 3 strips
Each strip uses about 90 g (153 m). The totals above already include a safety margin of roughly 10–15%.
Tools:
- 5.5 mm (US I-9) crochet hook
- Tapestry needle
- Scissors
- Stitch markers
- Tape measure
- Rust-proof pins and a long blocking surface (towels on the floor work)
- Spray bottle
- Wooden curtain rod, up to 1.25 in (3.2 cm) in diameter
Abbreviations (US Terms)
- ch – chain
- sl st – slip stitch
- sc – single crochet
- dc – double crochet
- sp – space
- st(s) – stitch(es)
- RS / WS – right side / wrong side
- TP – teardrop puff (see below)
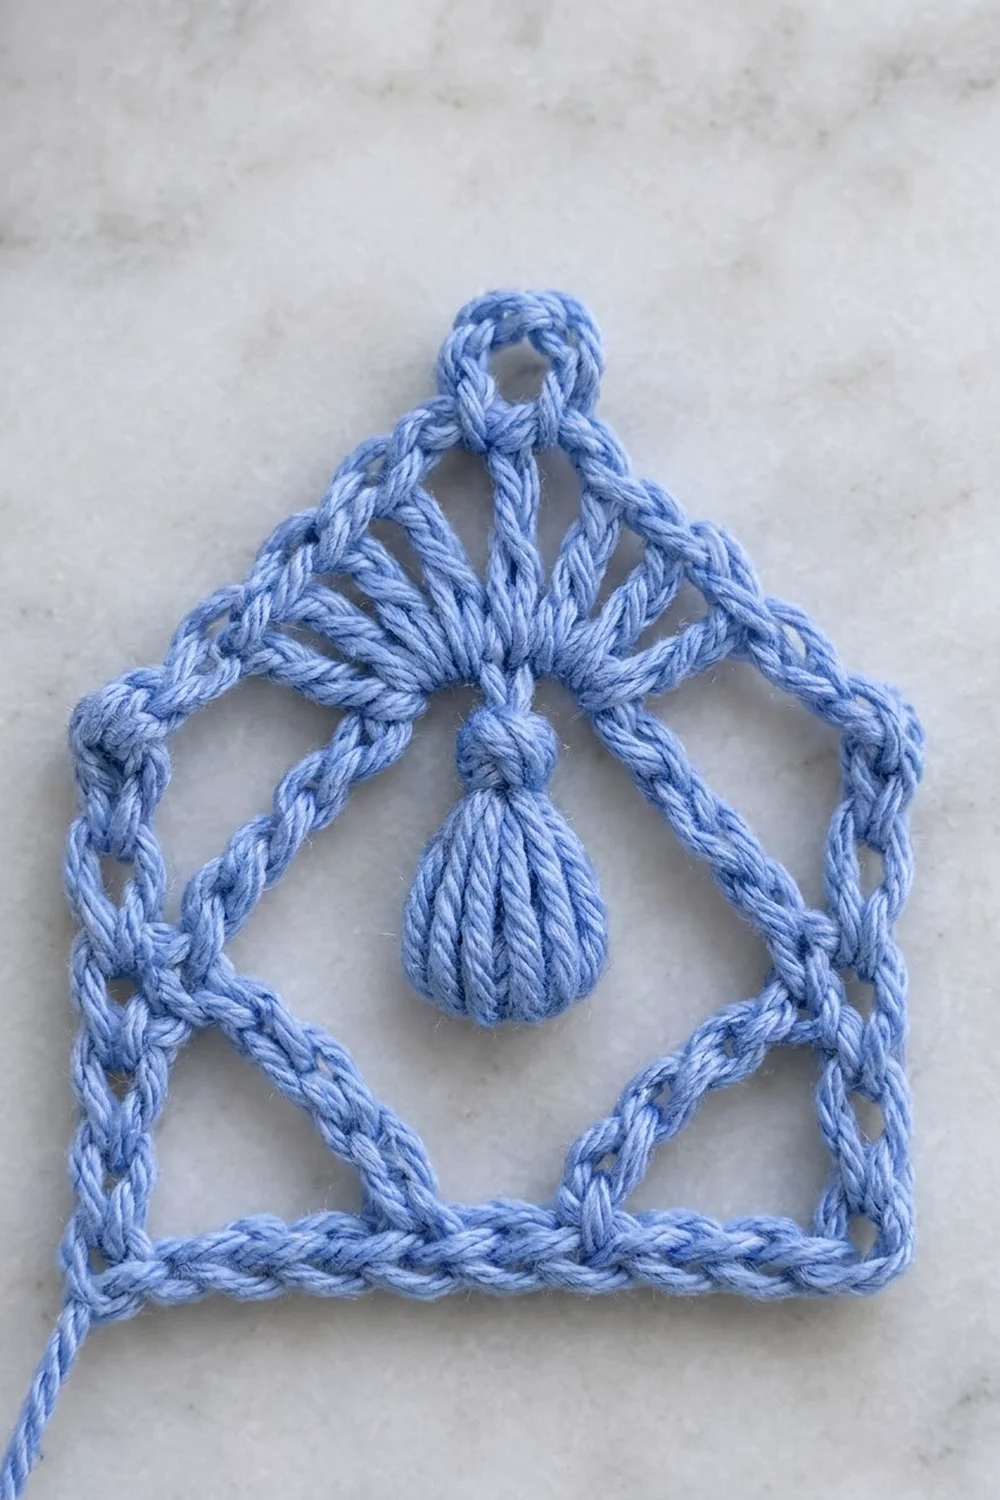
Teardrop Puff (TP): (Yo, insert hook in indicated st, yo, pull up a loop to 0.75 in / 1.9 cm tall) 5 times: 11 loops on hook. Yo and draw through all 11 loops, then ch 1 tightly to close. The ch-1 is the “knot” at the top of the teardrop, and you work the fan into it on the next row. The TP counts as 1 st.
Gauge and Checkpoints
Gauge: 13 sts = 3 in (7.6 cm) wide. One 3-row motif = 2 in (5.1 cm) tall. Measure gently, without stretching.
Make a test piece first. Ch 14 and work the Foundation Row, then 3 motifs (9 rows). Don’t add the top bar. The test piece should measure:
- Width: 3 in (7.6 cm)
- Height of the 3 motifs (not counting the foundation): 6 in (15.2 cm)
Checkpoints while you work the real strip:
- After 5 motifs: 10 in (25.4 cm) of pattern
- After 10 motifs: 20 in (50.8 cm)
- After 19 motifs (halfway): 38 in (96.5 cm)
- After 38 motifs plus the top bar: 76.5 in (194.3 cm) overall
If the strip is too wide or too tall, go down one hook size, to 5.0 mm (US H-8). If it is too narrow or too short, go up one size, to 6.0 mm (US J-10). If only the length is off, check your TP loop height first. Pulling those loops to an even 0.75 in (1.9 cm) controls most of the row height.
Strip Pattern
Make 7 strips: 4 in Color A and 3 in Color B. Every strip is worked the same way.
Foundation: Ch 14.
Foundation Row (RS): Sc in 2nd ch from hook and in each ch across. (13 sc)
Motif Rows (repeat 38 times)
Row 1 (cell base / crossing row): Ch 3 (counts as dc now and throughout), turn. Dc in next st, ch 4, skip next 4 sts, sc in next st (the center st), ch 4, skip next 4 sts, dc in last 2 sts. (2 dc + 4 ch + 1 sc + 4 ch + 2 dc = 13 sts)
On the first repeat you work into the 13 sc of the Foundation Row. On every later repeat you work into Row 3. In that case the “4 sts” skipped on each side are the ch-1 sp plus 3 fan dc, and the center sc goes into the 4th (middle) fan dc. Either way the count is 13.
Row 2 (teardrop row): Ch 3, turn. Dc in next dc, ch 4, skip ch-4 sp, TP in center sc, ch 4, skip ch-4 sp, dc in next dc, dc in top of turning ch. (2 dc + 4 ch + 1 TP + 4 ch + 2 dc = 13 sts)
The TP hangs with its round bulb at the bottom and its closing knot at the top.
Row 3 (fan row): Ch 3, turn. Dc in next dc, ch 1, skip ch-4 sp, 7 dc in the closing ch-1 of the TP, ch 1, skip ch-4 sp, dc in next dc, dc in top of turning ch. (2 dc + 1 ch + 7 dc + 1 ch + 2 dc = 13 sts)
The 7 dc spread upward from the knot into a fan. In the next Row 1, the center sc pulls the middle of the fan into the chain arches. That makes the crossing point between this cell and the next one.
Repeat Rows 1–3 until you have 38 motifs (114 rows). End after a Row 3.
Top Bar Row: Ch 1, turn. Sc in first 2 dc, sc in ch-1 sp, sc in each of the 7 fan dc, sc in ch-1 sp, sc in next dc, sc in top of turning ch. (2 + 1 + 7 + 1 + 2 = 13 sc) Fasten off and weave in the ends.
Size before border: 3 in (7.6 cm) wide x 76.5 in (194.3 cm) long. That is 0.25 in (0.6 cm) of foundation, 76 in (193.0 cm) of motifs (38 x 2 in / 5.1 cm), and 0.25 in (0.6 cm) of top bar.
Make All Pieces
- Color A (blue): 4 strips
- Color B (cream): 3 strips
Finish all seven strips before you start any borders, then lay them out in hanging order, left to right:
| A | B | A | B | A | B | A |
 1   2   3   4   5   6   7
The blue strips sit at both outer edges and in the middle, which keeps the curtain balanced. All the strips should be within 0.5 in (1.3 cm) of each other in length. If one is shorter, block it a little more firmly before you add its border.
Joining: Hanging the Strips
These strips are not seamed to each other. Each one hangs on its own from its own tab, so people can walk through the curtain. All the “joining” happens at the tab. You make the tab after the border (next section), fold it to the WS, and stitch it down.
Stitch-to-stitch logic: The tab is 7 sts wide. When you fold it, line up the 7 sts of the tab’s last row with the 7 sts directly behind the tab’s base on the WS of the Top Bar Row (sts 4–10). Whipstitch them one-to-one. Don’t skip stitches and don’t double up, or the tab will lean to one side.
Tension: Keep the whipstitch snug but not tight. Pulled too hard, it puckers the top bar and the fan below it.
Hanging: Slide the tabs onto the rod in the 1-to-7 order above. Space them so each gap is 1.5 in (3.8 cm), measured edge to edge at the top bar.
Size checkpoint: 7 strips x 3.5 in (8.9 cm) = 24.5 in (62.2 cm). Six gaps x 1.5 in (3.8 cm) = 9 in (22.9 cm). Total = 33.5 in (85.1 cm). For a wider doorway, widen the gaps evenly.
Border and Hanging Tab
Border gauge: 9 sc = 2 in (5.1 cm), which is 4.5 sc per inch along the row ends. One dc row is about 0.67 in (1.7 cm) tall, so work 3 sc into each dc row end. Work 1 sc into each sc row end. Across the top and bottom, work 1 sc per stitch.
Round 1 (RS): With RS facing, join yarn in the first st of the Top Bar Row. Ch 1, sc in each st across the top. (Top: 13 sc) Ch 1 for the corner. Rotate and work down the long side: 1 sc in the end of the Top Bar Row, 3 sc in each of the 114 dc row ends, 1 sc in the end of the Foundation Row. (Side: 1 + 342 + 1 = 344 sc) Ch 1 for the corner. Rotate and work across the free loops of the foundation chain, 1 sc in each. (Bottom: 13 sc) Ch 1 for the corner. Work up the second long side the same way as the first. (Side: 344 sc) Ch 1 for the corner, then sl st to the first sc. Fasten off.
Round 1 total: 13 + 344 + 13 + 344 = 714 sc, plus 4 corner ch-1 sps.
The corners are ch-1 spaces, not stitches. So each per-side count above is complete as written, and nothing is counted twice at the corners.
Why the math works: 344 sc at 4.5 sc per inch = 76.4 in (194.1 cm). That matches the 76.5 in (194.3 cm) body length, so the border lies flat without ruffling or pulling in. Across the ends, 13 sc at 1 sc per st keeps the original 3 in (7.6 cm) width. The border adds 0.25 in (0.6 cm) on each side, which gives 3.5 in x 77 in (8.9 cm x 195.6 cm).
Hanging Tab
With RS facing, join yarn in the 4th sc of the top edge.
Row 1: Ch 1, sc in same st and in next 6 sc. (7 sc)
Rows 2–18: Ch 1, turn, sc in each sc across. (7 sc)
At 4 sc rows per inch, the tab is 4.5 in (11.4 cm) long and about 1.5 in (3.8 cm) wide. Fold it to the WS and whipstitch Row 18 to the back of the Top Bar Row, sts 4–10, as described in the Joining section. The finished loop stands about 2.25 in (5.7 cm) tall. Its 4.5 in (11.4 cm) inside circumference fits a rod up to 1.25 in (3.2 cm) across.
Final Blocking
- Weave in every end along a dc column or through the sc border. Never weave across an open chain arch.
- Lay the strip flat on towels, RS up.
- Pin both long edges straight, 3.5 in (8.9 cm) apart, with a pin every 6 in (15.2 cm).
- Ease the length to 77 in (195.6 cm). Don’t stretch it past that, because the strip will lengthen a bit more once it hangs.
- Open each fan into an even half-circle with your fingertips. Pin the outer fan dc if needed.
- Plump each teardrop puff so the bulb sits centered below its fan.
- Spray until damp but not soaked, and let it dry completely before you unpin.
- Let the strip hang for 24 hours before you set the final spacing on the rod, so the cotton can settle.
Final Quality-Control Checklist
- Every strip has exactly 38 motifs and 13 sts across.
- All TPs are the same size, with the knot on top.
- Every fan has 7 dc.
- Border sides have 344 sc each, top and bottom have 13 sc each, and the corners are ch-1.
- Each tab has 7 sc x 18 rows and is stitched to sts 4–10.
- Strips measure 3.5 in (8.9 cm) x 77 in (195.6 cm), within 0.5 in (1.3 cm) of each other.
- Order is A, B, A, B, A, B, A, with even 1.5 in (3.8 cm) gaps.
Troubleshooting
The strip twists or slants. Make sure you work the last dc into the top of the turning ch on every row. If you miss it, the strip gets narrower on one side.
The teardrops look flat or uneven. Pull all 5 loops up to the same height before you close the puff, and close it with a firm ch 1.
The fan cups or ruffles. The ch-1 spaces on either side may be too loose. Try a tighter ch 1, or replace it with a sl st into the ch-4 sp.
The border waves. Your row ends are shorter than the gauge. Work 2 sc instead of 3 into every third dc row end.
The border pulls in. Your row ends are taller than the gauge. Add 1 extra sc in every 10th dc row end, and add the same number on both sides.
One strip hangs longer than the others. Wet it again and block it shorter.
Care
Hand wash in cool water with mild detergent, then press the water out gently in a towel. Dry flat or hanging, and reshape the fans while damp.
Final Notes
The whole curtain rests on one simple chain of measurements. 13 sts = 3 in (7.6 cm), and each 3-row motif = 2 in (5.1 cm). So 38 motifs = 76 in (193.0 cm), and the strip measures 76.5 in (194.3 cm) with its foundation and top bar. The border adds 0.25 in (0.6 cm) all around, for 3.5 in x 77 in (8.9 cm x 195.6 cm). Seven strips with six 1.5 in (3.8 cm) gaps cover 33.5 in (85.1 cm). Check your gauge on the test piece and again at each motif checkpoint, and every strip will hang straight and match its neighbors.
Happy crocheting!