
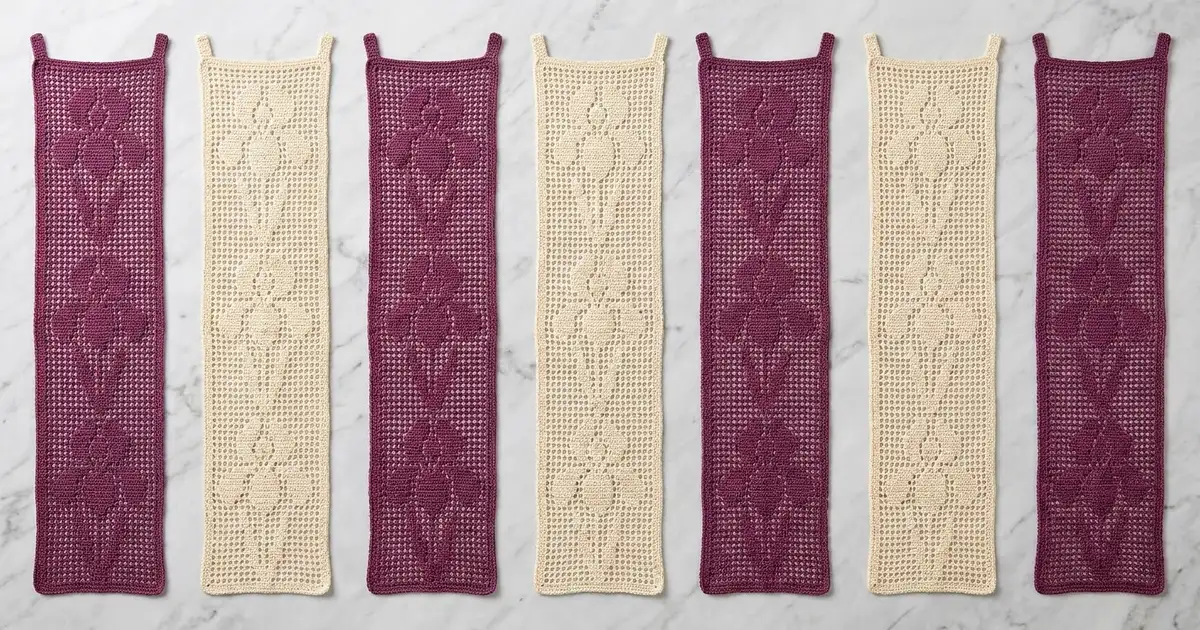
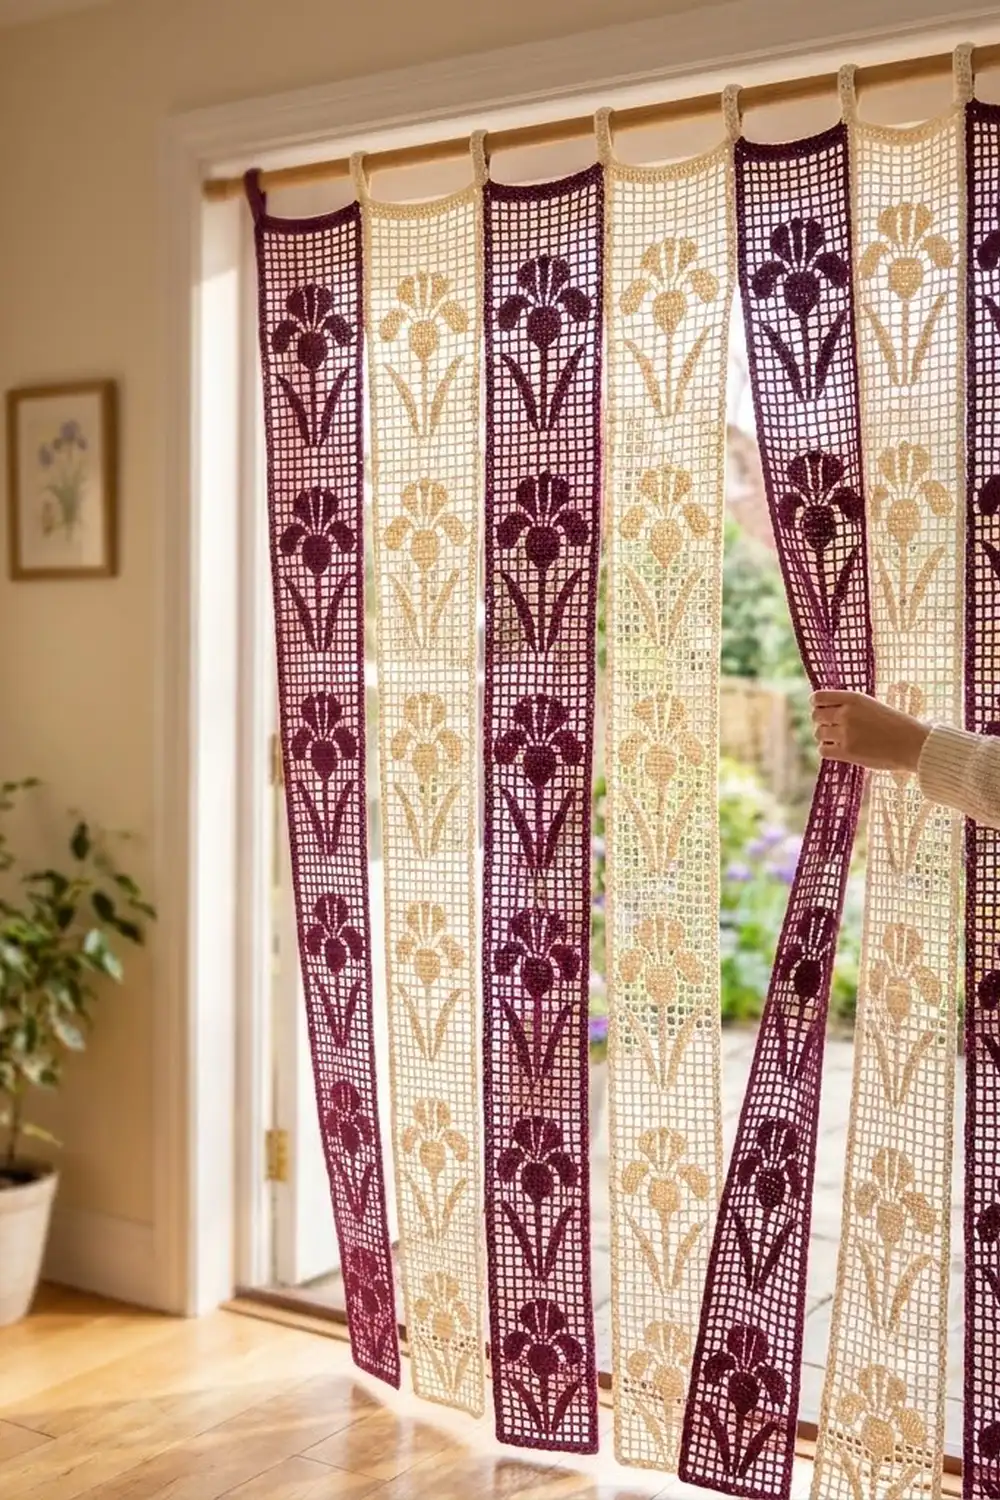
This door curtain is made of seven slim filet-crochet strips. Each strip carries a column of stylized irises, and the strips hang side by side from a rod. The irises are solid blocks set into an airy mesh, so light still comes through the doorway while the motifs stay easy to read from across the room.
The sample alternates deep plum and soft cream, starting and ending with plum. The look is vintage cottage with a clean graphic edge. Each strip has a crisp single-crochet outline and two small hanging loops at the top corners.
This pattern uses US crochet terms. Each finished strip measures 5.9 in (15.0 cm) wide by 68.8 in (174.8 cm) long, plus loops about 1.5 in (3.8 cm) tall. The full seven-strip curtain is 41.3 in (104.9 cm) wide when the strips hang edge to edge.
Construction is simple. You work each strip from the bottom up in filet mesh, 11 blocks wide, following a 28-row iris repeat six times. Then you add one round of single crochet as a border and two chain-and-single-crochet loops. The strips are never sewn together. Each one hangs on its own, so people can walk through the doorway.
Finished Size and Construction
- Finished strip size: 5.9 in × 68.8 in (15.0 cm × 174.8 cm)
- Hanging length including loops: about 70.3 in (178.6 cm)
- Skill level: Intermediate (filet reading, long-strip tension)
- Terminology: US
- Yarn weight: Sport (2), mercerized or matte cotton
- Hook: 3.5 mm (E/4)
- Number of pieces: 7 separate strips (4 plum, 3 cream)
- Layout: 7 strips side by side, alternating colors, not joined
- Strip size before border: 5.5 in × 68.4 in (14.0 cm × 173.7 cm)
- Border depth: 1 round of sc, about 0.2 in (0.5 cm) on every side
Materials
Choose a smooth cotton or cotton blend in sport weight, about 3.1 m per gram (roughly 155 m per 50 g). Cotton keeps the mesh square and holds its shape when it hangs. Avoid fuzzy or very stretchy yarns, because long strips will grow under their own weight.
- Plum (Color A): 800 g / about 2,480 m (4 strips)
- Cream (Color B): 600 g / about 1,860 m (3 strips)
One strip uses about 180 g / 560 m. These quantities include a margin of roughly 10% for gauge swatches and differences between dye lots.
Tools:
– 3.5 mm (E/4) crochet hook
– Tapestry needle
– Stitch markers (at least 6)
– Rustproof pins and a long blocking surface (foam mats or a carpeted floor with a towel)
– Measuring tape
– Curtain rod about 1 in (2.5 cm) in diameter, at least 42 in (106.7 cm) long
Abbreviations (US Terms)
- ch – chain
- sl st – slip stitch
- sc – single crochet
- dc – double crochet
- sp – space
- st(s) – stitch(es)
- rep – repeat
Special stitches:
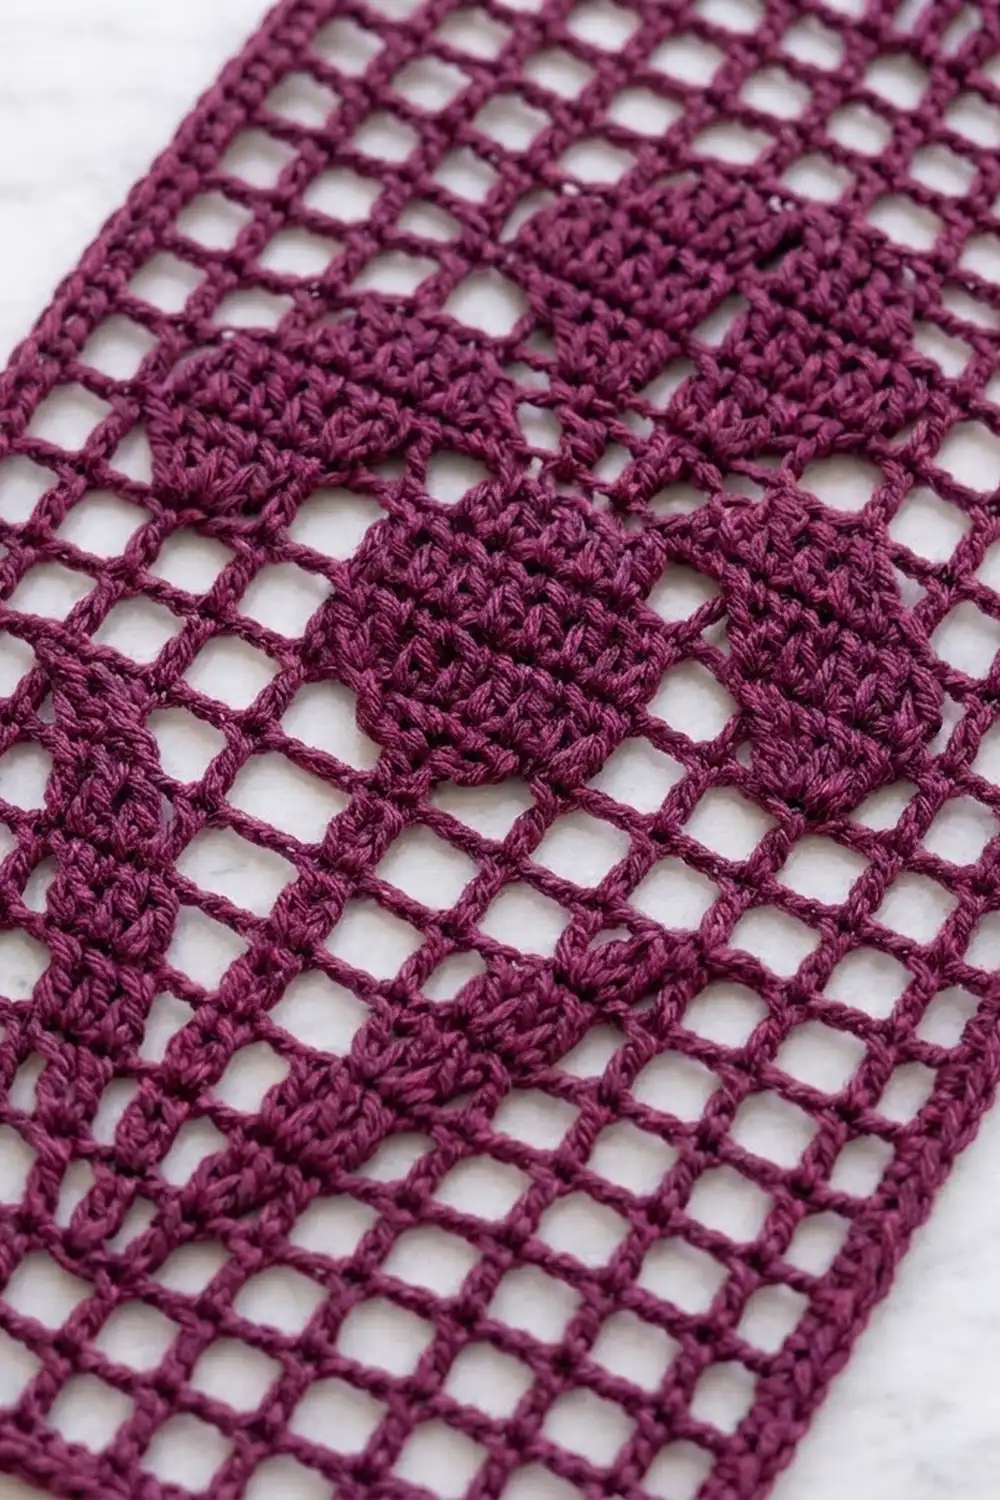
– Open block (O): ch 2, skip the next 2 sts (or the ch-2 sp), dc in the next dc.
– Solid block (S): dc in each of the next 2 sts, or work 2 dc in the ch-2 sp, then dc in the next dc.
– Beginning open block: ch 5 (counts as dc + ch 2), skip the first 2 sts or ch-2 sp, dc in the next dc.
– Ending open block: ch 2, skip 2, dc in the 3rd ch of the turning ch-5.
Every row has 12 dc posts and 11 blocks, which makes 34 sts per row. The first and last blocks (columns 1 and 11) are always open.
Gauge and Checkpoints
Gauge: 10 blocks × 10 rows = 5 in wide × 4 in tall (12.7 cm × 10.2 cm) in filet mesh. One block is 0.5 in (1.3 cm) wide, and one row is 0.4 in (1.0 cm) tall.
Make a test swatch first. Chain 38 and work Rows 1–10 of the strip in all open blocks. Block the swatch and measure it. It should be 5.5 in (14.0 cm) wide and 4 in (10.2 cm) tall.
Checkpoints on the first strip:
– After Row 30 (end of Repeat 1): 12 in (30.5 cm) tall
– After Row 86 (end of Repeat 3): 34.4 in (87.4 cm) tall
– After Row 171 (final row): 68.4 in (173.7 cm) tall, 5.5 in (14.0 cm) wide
Measure the strip lying flat and relaxed, never hanging.
If the strip is too big: go down to a 3.25 mm hook, or shorten the ch-2 spaces by keeping the chains snug.
If the strip is too small: go up to a 3.75 mm hook. If only the height is short, pull up a little taller on each dc.
Strip Pattern
Make 1 strip in your chosen color. You don’t change colors within a strip.
Foundation
Ch 38.
Row 1: Dc in the 8th ch from the hook (counts as dc, ch 2 and the first open block). Ch 2, skip 2 ch, dc in the next ch. Rep from * 9 more times. Turn. (11 open blocks; 12 dc; 34 sts)*
Row 2: Beginning open block. Work 9 open blocks, then the ending open block. Turn. (11 open blocks; 34 sts)
Iris Repeat (28 rows)
Work the following 28 rows six times: Rows 3–30, 31–58, 59–86, 87–114, 115–142 and 143–170. Place a marker at the start of each repeat.
Every row begins with a beginning open block (column 1) and ends with an ending open block (column 11). The list below gives the solid blocks for each row. Every column not listed is open. The design is symmetrical, so it reads the same whether you are working a right-side or a wrong-side row.
Background
– R1–R2: all open
Leaves and stem
– R3: S at columns 5, 6, 7 (leaf base)
– R4: S at columns 4, 5, 6, 7, 8
– R5: S at columns 4, 6, 8
– R6–R8: S at columns 3, 6, 9
– R9–R11: S at columns 2, 6, 10 (leaf tips)
– R12–R15: S at column 6 (stem)
Flower
– R16: S at columns 5, 6, 7
– R17: S at columns 4, 5, 6, 7, 8
– R18: S at columns 3, 4, 6, 8, 9
– R19: S at columns 2, 3, 4, 6, 8, 9, 10 (falls at their widest)
– R20: S at columns 2, 3, 6, 9, 10
– R21: S at columns 2, 5, 6, 7, 10 (fall tips drop; standard begins)
– R22: S at columns 4, 5, 6, 7, 8
– R23–R24: S at columns 4, 5, 7, 8 (open column 6 splits the standard)
– R25: S at columns 5, 7
Background
– R26–R28: all open
Every row still has 34 sts and 12 dc posts. A solid block doesn’t change the stitch count. It only fills the 2 sts between dc posts.
Solid-block counts per row: R3 = 3, R4 = 5, R5 = 3, R6–R11 = 3, R12–R15 = 1, R16 = 3, R17 = 5, R18 = 5, R19 = 7, R20 = 5, R21 = 5, R22 = 5, R23–R24 = 4, R25 = 2.
Top Margin
Row 171: Beginning open block, 9 open blocks, ending open block. (11 open blocks; 34 sts) Don’t fasten off. Go straight on to the border.
That gives 4 open rows at the bottom (Rows 1–2 plus R1–R2 of Repeat 1) and 4 open rows at the top (R26–R28 of Repeat 6 plus Row 171), so the column of irises is centered.
Make All Pieces
- Plum (Color A): 4 strips
- Cream (Color B): 3 strips
- Total: 7 strips
Layout (left to right, as seen from the room):
| A | B | A | B | A | B | A |
| P | C | P | C | P | C | P |
Measure every strip against your first one at the checkpoints. Strips that hang side by side show even a 1 in (2.5 cm) difference in length.
Joining (Hanging Layout, No Seams)
These strips are intentionally not joined. Each one hangs from its own two loops so the curtain parts easily when someone walks through.
- Method: Thread each strip’s two loops onto the rod in layout order.
- Stitch logic: The loops sit on the top border at matching stitch positions on every strip (see the Hanging Loops section), so all seven tops line up exactly.
- Tension advice: Work all the loops at the same tension. A loop that is too tight drags its strip higher than its neighbors.
- Size checkpoint: With the strips hanging edge to edge, the curtain measures 7 × 5.9 in = 41.3 in (104.9 cm) wide. That covers a standard 36 in (91.4 cm) doorway with a small overlap onto the frame.
Border
Border gauge: sc worked 2 per row end along the long sides (5 sc per 1 in / 2.5 cm), and 1 sc per stitch along the top and bottom (34 sc over 5.5 in / 14.0 cm).
Round 1
Ch 1. Work 3 sc in the last dc of Row 171 (top corner).
- Top edge: 1 sc in each of the next 32 sts. Count each ch-2 sp as 2 sts (2 sc in the sp). Work 3 sc in the last st (the corner).
- First long side: Work 2 sc around the post or turning ch at each row end, from Row 171 down to Row 1. That is 171 × 2 = 342 sc.
- Bottom corner: 3 sc in the first foundation ch.
- Bottom edge: 1 sc in each of the 32 foundation chs between the corners (2 sc in each ch-2 sp area). Work 3 sc in the last corner ch.
- Second long side: 2 sc in each row end, Row 1 up to Row 171: 342 sc.
- Sl st to the first sc. Don’t fasten off if you are adding loops now.
Per-side counts. Each count runs from corner center sc to corner center sc and includes both of them:
– Top and bottom: 1 corner + 1 + 32 + 1 + 1 corner = 36 sc each
– Long sides: 1 corner + 1 + 342 + 1 + 1 corner = 346 sc each
– Round total: 2 × 36 + 2 × 346 − 4 shared corners = 760 sc
Why the math works: Each 3-sc corner group gives 1 sc to each side it touches plus the shared center. So 4 corners × 3 = 12 sc, the top and bottom add 32 + 32 = 64 sc, and the long sides add 342 + 342 = 684 sc. That totals 760. On the long sides, 2 sc per 0.4 in (1.0 cm) row matches a natural sc gauge, so the edges won’t ruffle or pull in. The border adds 0.2 in (0.5 cm) on all four sides: 5.5 + 0.4 = 5.9 in (15.0 cm) wide and 68.4 + 0.4 = 68.8 in (174.8 cm) long.
Hanging Loops
Number the top-edge sc from 1 to 36, starting with the right corner center sc as st 1.
Right loop: Join with a sl st in st 2. Ch 20, about 4 in (10.2 cm). Sl st in st 6. Turn, and work 26 sc into the ch-20 loop. Sl st in st 2 and fasten off.
Left loop: Join with a sl st in st 31. Ch 20, sl st in st 35, then turn and work 26 sc into the loop. Sl st in st 31 and fasten off.
The loops sit at mirror-image positions (2 and 35, 6 and 31). Each forms an arch about 1.5 in (3.8 cm) tall, which slips easily over a 1 in (2.5 cm) rod.
Weave in all ends inside solid blocks wherever you can, where they won’t show.
Final Blocking
- Soak the strip in cool water with a little wool or cotton wash for 15 minutes.
- Press out the water. Roll the strip in a towel, but don’t wring it.
- Lay it flat on the mats in a straight line. If your surface is too short, lay it out in an S-curve.
- Pin the two long edges every 4 in (10.2 cm) so the strip is 5.9 in (15.0 cm) wide along its whole length.
- Pin the length to 68.8 in (174.8 cm), checking at each repeat marker. Each repeat should be 11.2 in (28.4 cm).
- Square up the open blocks with your fingertips, nudging the ch-2 spaces into even windows.
- Pin each loop into an even arch.
- Let the strip dry completely, usually 24 hours. Then hang it.
Final Quality-Control Checklist
- [ ] Every strip has 171 rows and six iris repeats
- [ ] Columns 1 and 11 are open on every row
- [ ] Every row has 12 dc posts (34 sts)
- [ ] The split standard (open column 6) shows on R23–R24 of every repeat
- [ ] The border round totals 760 sc with 3-sc corners
- [ ] The loops sit at sts 2–6 and 31–35 on every strip
- [ ] Every strip blocks to 5.9 in × 68.8 in (15.0 cm × 174.8 cm)
- [ ] There are 4 plum and 3 cream strips, hung in the order A–B–A–B–A–B–A
Troubleshooting
The mesh slants to one side: You may be skipping the turning ch-5 by mistake. Always work the last dc of each row into the 3rd ch of the turning ch.
The iris looks lopsided: Count from column 1 on every row. Because the design is symmetrical, a misplaced solid block is always an off-by-one count.
The long edges wave: You worked too many sc per row end. Stick to exactly 2.
The long edges pull in: Your sc are too tight. Loosen them, or use a hook one size larger for the border only.
The strips hang at different lengths: Compare row counts first, then gauge. Re-block the longest strip and pin it slightly shorter. Cotton accepts a small adjustment.
The solid blocks pucker: Work the filler dc into the ch-2 sp, not into the individual chains, and keep your tension even.
Care
Hand wash in cool water, press out the water, and dry flat, re-pinning if needed. Don’t tumble dry, because the long strips will stretch and tangle.
Final Notes
The measurement chain is simple. Each block is 0.5 in (1.3 cm) wide and each row is 0.4 in (1.0 cm) tall, so 11 blocks are 5.5 in (14.0 cm) wide and 171 rows are 68.4 in (173.7 cm) tall. The single sc border adds 0.2 in (0.5 cm) on each side, for a finished strip of 5.9 in × 68.8 in (15.0 cm × 174.8 cm). Seven strips hang to a curtain 41.3 in (104.9 cm) wide. Check your gauge first, measure at every checkpoint, and every iris will line up across the doorway.
Happy crocheting!